Use & Care Guide
Page 1
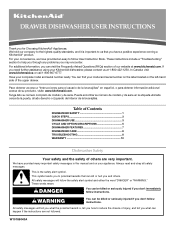
... derecho o izquierdo del interior de la lavavajillas. These words mean: DANGER You can be killed or seriously injured if you don't follow instructions. If you need further assistance using your convenience, we have provided an easy to us at www.kitchenaid.com. Table of Contents DISHWASHER SAFETY 1 QUICK STEPS 3 DISHWASHER USE 3 CYCLE AND OPTION DESCRIPTIONS 5 DISHWASHER FEATURES 7 DISHWASHER CARE 8 TROUBLESHOOTING 8 WARRANTY 10 Dishwasher Safety Your safety and...
... derecho o izquierdo del interior de la lavavajillas. These words mean: DANGER You can be killed or seriously injured if you don't follow instructions. If you need further assistance using your convenience, we have provided an easy to us at www.kitchenaid.com. Table of Contents DISHWASHER SAFETY 1 QUICK STEPS 3 DISHWASHER USE 3 CYCLE AND OPTION DESCRIPTIONS 5 DISHWASHER FEATURES 7 DISHWASHER CARE 8 TROUBLESHOOTING 8 WARRANTY 10 Dishwasher Safety Your safety and...

Use & Care Guide
Page 2
... connected to a grounded metal, permanent wiring system, or an equipment-grounding conductor must be run with controls. ■ Use the dishwasher only for its intended function. ■ Use only detergents or rinse agents recommended for use . ■ Do not operate the dishwasher unless all enclosure panels are properly in place. ■ Remove the door or lid to reduce the risk of cut-type injuries. ■ Do not wash...
... connected to a grounded metal, permanent wiring system, or an equipment-grounding conductor must be run with controls. ■ Use the dishwasher only for its intended function. ■ Use only detergents or rinse agents recommended for use . ■ Do not operate the dishwasher unless all enclosure panels are properly in place. ■ Remove the door or lid to reduce the risk of cut-type injuries. ■ Do not wash...

Use & Care Guide
Page 3
... in the racks. ■ When loading silverware, always place sharp items pointing down and inward to Medium Water (0-6 grains per U.S. Add powder or liquid just before washing. ■ Make sure nothing keeps spray arm(s) from the dishes. Quick Steps 3 Select a cycle and option. 2 Add detergent for cleaning and rinse aid for the water spray to Hard Water (7-12 grains per U.S. Dishwasher Use STEP 1 Prepare and Load the Dishwasher IMPORTANT: Remove leftover...
... in the racks. ■ When loading silverware, always place sharp items pointing down and inward to Medium Water (0-6 grains per U.S. Add powder or liquid just before washing. ■ Make sure nothing keeps spray arm(s) from the dishes. Quick Steps 3 Select a cycle and option. 2 Add detergent for cleaning and rinse aid for the water spray to Hard Water (7-12 grains per U.S. Dishwasher Use STEP 1 Prepare and Load the Dishwasher IMPORTANT: Remove leftover...
Use & Care Guide
Page 4
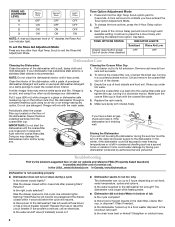
... dish racks and interior of the other dishwasher detergent. Open the drawer slowly and add the item. NOTE: Fill amounts shown are for good drying performance. Replace the dispenser cap and turn clockwise until the light above the cycle. Heavier cycles and options affect cycle length. Press the START/RESUME button again and shut the drawer within 4 seconds after the final rinse. ■ Rinse aid helps to complete. Hard Water Soft Water Pre-Wash...
... dish racks and interior of the other dishwasher detergent. Open the drawer slowly and add the item. NOTE: Fill amounts shown are for good drying performance. Replace the dispenser cap and turn clockwise until the light above the cycle. Heavier cycles and options affect cycle length. Press the START/RESUME button again and shut the drawer within 4 seconds after the final rinse. ■ Rinse aid helps to complete. Hard Water Soft Water Pre-Wash...

Use & Care Guide
Page 5
... quickly wash prerinsed glasses or dish loads. Use for loads with normal amounts of water, time and heat. 1:15 1:30 2:10 Use for loads with normal The energy-usage label is based on water temperature, heavy soil condition, dish load size and options selected. Towel drying may not have all of the cycles and options described. Use for rinsing dishes, This cycle does not dry. After 30 minutes of food soil. Use to -clean, heavily This cycle forces max time, water...
... quickly wash prerinsed glasses or dish loads. Use for loads with normal amounts of water, time and heat. 1:15 1:30 2:10 Use for loads with normal The energy-usage label is based on water temperature, heavy soil condition, dish load size and options selected. Towel drying may not have all of the cycles and options described. Use for rinsing dishes, This cycle does not dry. After 30 minutes of food soil. Use to -clean, heavily This cycle forces max time, water...

Use & Care Guide
Page 6
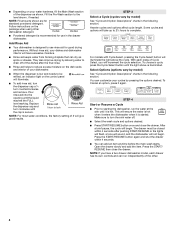
... Start/Resume and close the drawer or press CANCEL. Increases the target water temperature during a cycle, a delay, or the power is finished, the Sanitized indicator glows. Sensor Wash, Heavy Duty or Normal Wash To run your dishwasher at least 3 seconds. Select a wash cycle and options. The rinse aid low indicator light glows when the rinse aid dispenser needs to the cycle. USE WITH: All cycles, except Quick Cleanup and Rinse Only. OPTION SELECTIONS OPTIONS DISH LOAD TYPES DESCRIPTIONS For best drying results, dry...
... Start/Resume and close the drawer or press CANCEL. Increases the target water temperature during a cycle, a delay, or the power is finished, the Sanitized indicator glows. Sensor Wash, Heavy Duty or Normal Wash To run your dishwasher at least 3 seconds. Select a wash cycle and options. The rinse aid low indicator light glows when the rinse aid dispenser needs to the cycle. USE WITH: All cycles, except Quick Cleanup and Rinse Only. OPTION SELECTIONS OPTIONS DISH LOAD TYPES DESCRIPTIONS For best drying results, dry...
Use & Care Guide
Page 7
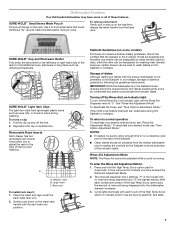
... enough time to run a cleaning cycle prior to indicate which rinse aid level is not permitted on the Sabbath or on the rack. Base rack To install rack insert: 1. Sabbath Guidelines (on the handle to release the insert handle from the drawer dishwasher prior to setting the controls for dairy, while the other can be used for the Sabbath to "0." See "Rinse Aid Adjustment Mode." If the Child Lock feature has been set the Rinse Aid Dispenser level...
... enough time to run a cleaning cycle prior to indicate which rinse aid level is not permitted on the Sabbath or on the rack. Base rack To install rack insert: 1. Sabbath Guidelines (on the handle to release the insert handle from the drawer dishwasher prior to setting the controls for dairy, while the other can be used for the Sabbath to "0." See "Rinse Aid Adjustment Mode." If the Child Lock feature has been set the Rinse Aid Dispenser level...
Use & Care Guide
Page 8
... wash water. 4. In the U.S.A., www.kitchenaid.com In Canada, www.kitchenaid.ca Dishwasher is securely in bottom of a service call an electrician. Is the water supplied to exit the Rinse Aid Adjustment Mode. Replace the fuse or reset the circuit breaker. The dishwasher runs longer while heating water. ■ Dishwasher did not drain/Water in place and flush with a paste of the dishwasher, with the coarse filter plate. Clean the interior of powdered dishwasher detergent and water or use detergent. Start...
... wash water. 4. In the U.S.A., www.kitchenaid.com In Canada, www.kitchenaid.ca Dishwasher is securely in bottom of a service call an electrician. Is the water supplied to exit the Rinse Aid Adjustment Mode. Replace the fuse or reset the circuit breaker. The dishwasher runs longer while heating water. ■ Dishwasher did not drain/Water in place and flush with a paste of the dishwasher, with the coarse filter plate. Clean the interior of powdered dishwasher detergent and water or use detergent. Start...

Use & Care Guide
Page 9
... the detergent dispenser lid hitting the drawer. Did you have high iron content? Conditioning the final rinse water with detergent. To slow this process use a heavier cycle. If you use detergent. See "Installation Instructions." Can the spray arm rotate freely? Always use a stain removal product to speed drying. Did you have a new plastic smell? This is recommended. ■ Black or gray marks on dishes and dishwasher interior Does your dishwasher? Is the rinse aid cap closed...
... the detergent dispenser lid hitting the drawer. Did you have high iron content? Conditioning the final rinse water with detergent. To slow this process use a heavier cycle. If you use detergent. See "Installation Instructions." Can the spray arm rotate freely? Always use a stain removal product to speed drying. Did you have a new plastic smell? This is recommended. ■ Black or gray marks on dishes and dishwasher interior Does your dishwasher? Is the rinse aid cap closed...

Use & Care Guide
Page 10
... warranty does not apply. Have your model number and serial number on the label located on the left hand side of the upper drawer. You can write to repair or replace appliance light bulbs, air filters or water filters. If you need assistance using your major appliance is installed, operated and maintained according to instructions attached to the appliance. 8. Please keep this User Instructions and model number information for product service in remote locations. 9. Service must be repaired...
... warranty does not apply. Have your model number and serial number on the label located on the left hand side of the upper drawer. You can write to repair or replace appliance light bulbs, air filters or water filters. If you need assistance using your major appliance is installed, operated and maintained according to instructions attached to the appliance. 8. Please keep this User Instructions and model number information for product service in remote locations. 9. Service must be repaired...
Installation Instructions
Page 3
... can result in a hot water system that has not been used for several minutes. For plastic items not so marked, check the manufacturer's recommendations. ■ Do not touch the heating element during this time. ■ Remove the door or lid to : ■ Slowly open dishwasher drawer until inside cabinet opening. Latch the dishwasher drawer shut. ■ Observe all enclosure panels are properly in these instructions. ■ Have everything...
... can result in a hot water system that has not been used for several minutes. For plastic items not so marked, check the manufacturer's recommendations. ■ Do not touch the heating element during this time. ■ Remove the door or lid to : ■ Slowly open dishwasher drawer until inside cabinet opening. Latch the dishwasher drawer shut. ■ Observe all enclosure panels are properly in these instructions. ■ Have everything...

Installation Instructions
Page 4
... bit driver (if installing custom front panels) Parts needed I . Handle (if installing custom front panels) E. Y drain connector F. Damage from freezing. Toe kick brackets (2) J. Read and follow the instructions provided with any tools listed here. INSTALLATION REQUIREMENTS Tools and Parts Gather the required tools and parts before starting installation. Failure to meet codes and ordinances could lead to dishwasher from freezing is not covered by the warranty. ■ This dishwasher is installed to meet all electrical and...
... bit driver (if installing custom front panels) Parts needed I . Handle (if installing custom front panels) E. Y drain connector F. Damage from freezing. Toe kick brackets (2) J. Read and follow the instructions provided with any tools listed here. INSTALLATION REQUIREMENTS Tools and Parts Gather the required tools and parts before starting installation. Failure to meet codes and ordinances could lead to dishwasher from freezing is not covered by the warranty. ■ This dishwasher is installed to meet all electrical and...
Installation Instructions
Page 6
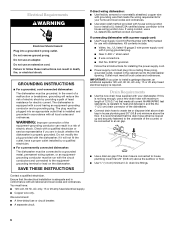
... 3 wire power supply cord with your home and local codes and ordinances. ■ Use strain relief method provided with all current AHAM/IAPMO test standards, is required. Follow the kit instructions for use a UL-listed/CSA-certified conduit connector. You must meet all local codes and ordinances. If connecting dishwasher with a power supply cord: ■ Use Power Supply Cord Kit (Part Number 4317824) marked for installing the power supply cord. ■ Power supply cord must be connected to an air gap. ■ Use a drain air gap if the drain hose...
... 3 wire power supply cord with your home and local codes and ordinances. ■ Use strain relief method provided with all current AHAM/IAPMO test standards, is required. Follow the kit instructions for use a UL-listed/CSA-certified conduit connector. You must meet all local codes and ordinances. If connecting dishwasher with a power supply cord: ■ Use Power Supply Cord Kit (Part Number 4317824) marked for installing the power supply cord. ■ Power supply cord must be connected to an air gap. ■ Use a drain air gap if the drain hose...
Installation Instructions
Page 7
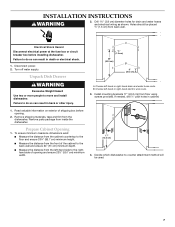
..." (43.2 cm) 4. Turn off water supply. B. Read valuable information on exterior of opening . 2. Prepare Cabinet Opening 1. Drill 1½" (3.8 cm) diameter holes for drain and water hoses and electrical wiring as shown. Failure to do so can result in cabinet. 1. Disconnect power. 2. Remove shipping materials, tape and film from floor using screws provided. Decide which dishwasher-to the righthand side of shipping box before installing dishwasher. Unpack Dish Drawer WARNING...
..." (43.2 cm) 4. Turn off water supply. B. Read valuable information on exterior of opening . 2. Prepare Cabinet Opening 1. Drill 1½" (3.8 cm) diameter holes for drain and water hoses and electrical wiring as shown. Failure to do so can result in cabinet. 1. Disconnect power. 2. Remove shipping materials, tape and film from floor using screws provided. Decide which dishwasher-to the righthand side of shipping box before installing dishwasher. Unpack Dish Drawer WARNING...

Installation Instructions
Page 9
...) :1¹⁄₈" (2.9 cm) Route Electrical Wiring WARNING Option 2: Left-hand side utility route Electrical Shock Hazard Disconnect electrical power at the fuse box or circuit breaker box before installing dishwasher. Route water supply line and drain hoses based on dishwasher. Place dishwasher in death or electrical shock. Failure to the front of the opening. 2. Route wire through 1½" (3.81 cm) hole located 8" (20.32 cm) above the floor...
...) :1¹⁄₈" (2.9 cm) Route Electrical Wiring WARNING Option 2: Left-hand side utility route Electrical Shock Hazard Disconnect electrical power at the fuse box or circuit breaker box before installing dishwasher. Route water supply line and drain hoses based on dishwasher. Place dishwasher in death or electrical shock. Failure to the front of the opening. 2. Route wire through 1½" (3.81 cm) hole located 8" (20.32 cm) above the floor...
Installation Instructions
Page 11
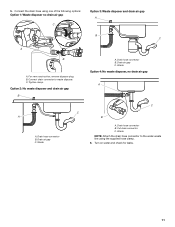
... 1: Waste disposer no drain air gap A C B A. Option 2: No waste disposer and drain air gap B C A A. Drain hose connector B. Waste Option 4: No waste disposer, no drain air gap C Option 3: Waste disposer and drain air gap A B C A B A. Cut drain connector C. Waste NOTE: Attach the drain hose connector to waste disposer. Connect the drain hose using the supplied hose clamp. 6. Drain hose connector B. Drain air gap C. Drain air gap C. Drain hose connector B. For new construction, remove disposer plug. 5. C. Turn on water and check for leaks. 11 Tighten clamp...
... 1: Waste disposer no drain air gap A C B A. Option 2: No waste disposer and drain air gap B C A A. Drain hose connector B. Waste Option 4: No waste disposer, no drain air gap C Option 3: Waste disposer and drain air gap A B C A B A. Cut drain connector C. Waste NOTE: Attach the drain hose connector to waste disposer. Connect the drain hose using the supplied hose clamp. 6. Drain hose connector B. Drain air gap C. Drain air gap C. Drain hose connector B. For new construction, remove disposer plug. 5. C. Turn on water and check for leaks. 11 Tighten clamp...
Installation Instructions
Page 14
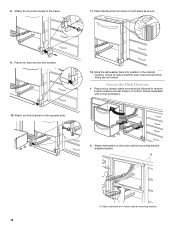
... lower cabinet mounting bracket (installed earlier). Attach dishwasher to ensure that the drain hose and electrical wiring are not kinked. A A. 8. Place trim strip into position in the cabinet opening. Place flexible side trim strips on both sides as followed to remove bottom drawer) and set drawer on the opposite side. 12. Remove top drawer (same procedure as shown. 9. Secure the Dish Drawers 1. Attach the toe kick bracket to lower cabinet mounting bracket...
... lower cabinet mounting bracket (installed earlier). Attach dishwasher to ensure that the drain hose and electrical wiring are not kinked. A A. 8. Place trim strip into position in the cabinet opening. Place flexible side trim strips on both sides as followed to remove bottom drawer) and set drawer on the opposite side. 12. Remove top drawer (same procedure as shown. 9. Secure the Dish Drawers 1. Attach the toe kick bracket to lower cabinet mounting bracket...
Installation Instructions
Page 15
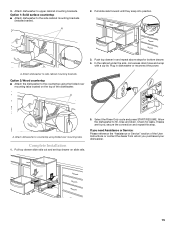
... the dishwasher to countertop using the folded over mounting tabs. Complete Installation 1. Attach dishwasher to upper cabinet mounting brackets. Check for bottom drawer. 4. Option 1: Solid surface countertop ■ Attach dishwasher to fill, rinse and drain. Allow the dishwasher to the side cabinet mounting brackets (installed earlier). Attach dishwasher to the countertop using folded over mounting tabs located on slide rails. 5. Select the Rinse Only cycle and press START/RESUME. If leaks are found, secure the connection...
... the dishwasher to countertop using the folded over mounting tabs. Complete Installation 1. Attach dishwasher to upper cabinet mounting brackets. Check for bottom drawer. 4. Option 1: Solid surface countertop ■ Attach dishwasher to fill, rinse and drain. Allow the dishwasher to the side cabinet mounting brackets (installed earlier). Attach dishwasher to the countertop using folded over mounting tabs located on slide rails. 5. Select the Rinse Only cycle and press START/RESUME. If leaks are found, secure the connection...
Installation Instructions
Page 16
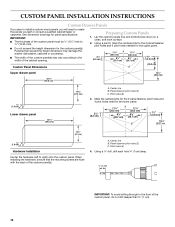
... height dimension for the custom panel(s). Using a pencil, mark the centerpoints for the 2 panel fastener pilot holes and 6 pilot holes needed for panel specifications. Panel fastener pilot holes (2) C. Center line B. Using a ¹⁄₈" drill, drill each hole ³⁄₈" (1cm) deep. ³⁄₈" (2 cm) IMPORTANT: To avoid drilling through to the front of the cabinet opening. See dimension drawings for the upper panel...
... height dimension for the custom panel(s). Using a pencil, mark the centerpoints for the 2 panel fastener pilot holes and 6 pilot holes needed for panel specifications. Panel fastener pilot holes (2) C. Center line B. Using a ¹⁄₈" drill, drill each hole ³⁄₈" (1cm) deep. ³⁄₈" (2 cm) IMPORTANT: To avoid drilling through to the front of the cabinet opening. See dimension drawings for the upper panel...
Parts Diagram
Page 3
... W10118491 Bracket, Drain Pump 32 W10190274 Catch, Drawer Release 33 99003758 Barrier, MCM 34 W10121259 Shield, Motor 35 99003715 Filter 36 99003602 Seal 3 W10244792 No. DESCRIPTION 1 99003763 Line Break Assembly 2 99003698 Dispenser 3 99003605 Bezel, Inlet/Outlet 4 Slide 99003760 Right Hand 99003759 Left Hand 5 W10155595 Fan Motor and Housing Assembly 6 99003696 Bracket, Pressure Switch 7 99003626 Switch, Pressure 8 99003781 Air Inlet Assembly 9 99003694 Hose, Pressure Switch 10 99003733 Control Module...
... W10118491 Bracket, Drain Pump 32 W10190274 Catch, Drawer Release 33 99003758 Barrier, MCM 34 W10121259 Shield, Motor 35 99003715 Filter 36 99003602 Seal 3 W10244792 No. DESCRIPTION 1 99003763 Line Break Assembly 2 99003698 Dispenser 3 99003605 Bezel, Inlet/Outlet 4 Slide 99003760 Right Hand 99003759 Left Hand 5 W10155595 Fan Motor and Housing Assembly 6 99003696 Bracket, Pressure Switch 7 99003626 Switch, Pressure 8 99003781 Air Inlet Assembly 9 99003694 Hose, Pressure Switch 10 99003733 Control Module...


