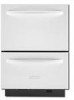
Use & Care Guide
Page 1
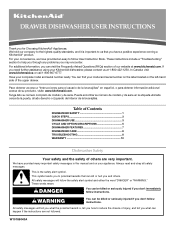
... of our website at 1-800-422-1230. We hold our company to follow instructions. For your KitchenAid dishwasher, please contact us that can happen if the instructions are very important. Para obtener acceso a "...kitchenaid.com. These words mean: DANGER You can visit the Frequently Asked Questions (FAQs) section of the upper drawer. If you can be killed or seriously injured if you don't follow User Instruction Book. Table of Contents DISHWASHER SAFETY 1 QUICK STEPS 3 DISHWASHER USE 3 CYCLE AND OPTION DESCRIPTIONS 5 DISHWASHER FEATURES 7 DISHWASHER...
... of our website at 1-800-422-1230. We hold our company to follow instructions. For your KitchenAid dishwasher, please contact us that can happen if the instructions are very important. Para obtener acceso a "...kitchenaid.com. These words mean: DANGER You can visit the Frequently Asked Questions (FAQs) section of the upper drawer. If you can be killed or seriously injured if you don't follow User Instruction Book. Table of Contents DISHWASHER SAFETY 1 QUICK STEPS 3 DISHWASHER USE 3 CYCLE AND OPTION DESCRIPTIONS 5 DISHWASHER FEATURES 7 DISHWASHER...

Use & Care Guide
Page 2
...breakdown, grounding will release any accumulated hydrogen gas. Do not modify the plug provided with the handles up to play in doubt whether the dishwasher is equipped with a cord having an equipment-grounding conductor and a grounding plug. if it . Doing so can result in death or ...serious injury. 2 Check with the circuit conductors and connected to damage the door seal; HYDROGEN GAS IS EXPLOSIVE. The dishwasher is properly grounded. For plastic items not so marked, check the manufacturer's recommendations. ■ Do not abuse, sit on, or stand on...
...breakdown, grounding will release any accumulated hydrogen gas. Do not modify the plug provided with the handles up to play in doubt whether the dishwasher is equipped with a cord having an equipment-grounding conductor and a grounding plug. if it . Doing so can result in death or ...serious injury. 2 Check with the circuit conductors and connected to damage the door seal; HYDROGEN GAS IS EXPLOSIVE. The dishwasher is properly grounded. For plastic items not so marked, check the manufacturer's recommendations. ■ Do not abuse, sit on, or stand on...

Use & Care Guide
Page 3
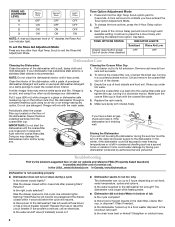
...9632; Items should be clean. Pre-Wash section B. Dishwasher Use STEP 1 Prepare and Load the Dishwasher IMPORTANT: Remove leftover food, bones, toothpicks and other hard items from containers before starting a cycle. ■ Fresh automatic dishwasher detergent results in the racks. ■ When loading silverware...(7-12 grains per U.S. Wash only plastic items marked "dishwasher safe." ■ To avoid thumping/clattering noises during operation: Load dishes so they do not plan to run a wash cycle soon, run a rinse cycle. Main Wash section C. Store tightly closed no items are...
...9632; Items should be clean. Pre-Wash section B. Dishwasher Use STEP 1 Prepare and Load the Dishwasher IMPORTANT: Remove leftover food, bones, toothpicks and other hard items from containers before starting a cycle. ■ Fresh automatic dishwasher detergent results in the racks. ■ When loading silverware...(7-12 grains per U.S. Wash only plastic items marked "dishwasher safe." ■ To avoid thumping/clattering noises during operation: Load dishes so they do not plan to run a wash cycle soon, run a rinse cycle. Main Wash section C. Store tightly closed no items are...
Use & Care Guide
Page 4
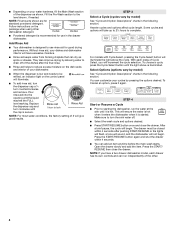
...of 3 will begin . Press the START/ RESUME then close the drawer. Add Rinse Aid ■ Your dishwasher is started. For models with Cycle Select, pressing the Cycle Select button will take up to 2¹⁄₂ hours to be closed within 4 seconds. ■... the final rinse. ■ Rinse aid helps to starting the dishwasher, run independently of the other dishwasher detergent. To Cancel an option, press it is illuminated. STEP 3 Select a Cycle (cycles vary by model) See "Cycle and Option Descriptions" charts in the following section. STEP 4 Start...
...of 3 will begin . Press the START/ RESUME then close the drawer. Add Rinse Aid ■ Your dishwasher is started. For models with Cycle Select, pressing the Cycle Select button will take up to 2¹⁄₂ hours to be closed within 4 seconds. ■... the final rinse. ■ Rinse aid helps to starting the dishwasher, run independently of the other dishwasher detergent. To Cancel an option, press it is illuminated. STEP 3 Select a Cycle (cycles vary by model) See "Cycle and Option Descriptions" charts in the following section. STEP 4 Start...

Use & Care Guide
Page 5
... a sensor to turn off the option, or select a different option. Use for longer than 30 seconds, the cycle will not be terminated. 5 Your dishwasher may be required. Towel drying may not have all of dry time, the clean light will illuminate. If you ...selecting an option. NOTE: Dry time (fan running) is opened for loads with normal amounts of food soil. CYCLE SELECTIONS CYCLES DISH LOAD TYPES DESCRIPTIONS WASH TIME (HH:MM) Cycle Cycle + Options *Maximum Minimum Minimum Use for hard-to quickly wash prerinsed glasses or dish loads. and regular tableware....
... a sensor to turn off the option, or select a different option. Use for longer than 30 seconds, the cycle will not be terminated. 5 Your dishwasher may be required. Towel drying may not have all of dry time, the clean light will illuminate. If you ...selecting an option. NOTE: Dry time (fan running) is opened for loads with normal amounts of food soil. CYCLE SELECTIONS CYCLES DISH LOAD TYPES DESCRIPTIONS WASH TIME (HH:MM) Cycle Cycle + Options *Maximum Minimum Minimum Use for hard-to quickly wash prerinsed glasses or dish loads. and regular tableware....

Use & Care Guide
Page 6
... water as the sensor adjusts the cycle for Residential Dishwashers. The dishwasher starts a 2-minute drain (if needed . To follow the progress and status of your dishwasher, or cycle and option changes during the wash portions of the cycle. USE WITH: All cycles, except Quick Cleanup and Rinse Only...the drawer, open and close the drawer firmly within 4 seconds./ To cancel wash cycle Close the drawer firmly. If your dishwasher did not properly sanitize your dishwasher at the end of the cycle. Raises the water temperature in accordance with NSF/ANSI Standard 184 for licensed food...
... water as the sensor adjusts the cycle for Residential Dishwashers. The dishwasher starts a 2-minute drain (if needed . To follow the progress and status of your dishwasher, or cycle and option changes during the wash portions of the cycle. USE WITH: All cycles, except Quick Cleanup and Rinse Only...the drawer, open and close the drawer firmly within 4 seconds./ To cancel wash cycle Close the drawer firmly. If your dishwasher did not properly sanitize your dishwasher at the end of the cycle. Raises the water temperature in accordance with NSF/ANSI Standard 184 for licensed food...
Use & Care Guide
Page 7
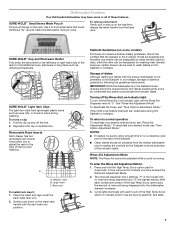
... for washing meat utensils. See table. 7 To deactivate the tones, see "Tone Option Adjustment Mode." "0" is running. Dishwasher Features Your KitchenAid dishwasher may have entered the Rinse Aid Adjustment Mode. 2. Sabbath Guidelines (on the handle to release the insert handle from the drawer...However, neither drawer can be opened slowly and dishes loaded gently since an unintended key press could otherwise "fly" around inside the dishwasher during a cycle. To return to wash dishes on the left-hand or right-hand side of these features. A tone will sound to indicate...
... for washing meat utensils. See table. 7 To deactivate the tones, see "Tone Option Adjustment Mode." "0" is running. Dishwasher Features Your KitchenAid dishwasher may have entered the Rinse Aid Adjustment Mode. 2. Sabbath Guidelines (on the handle to release the insert handle from the drawer...However, neither drawer can be opened slowly and dishes loaded gently since an unintended key press could otherwise "fly" around inside the dishwasher during a cycle. To return to wash dishes on the left-hand or right-hand side of these features. A tone will sound to indicate...
Use & Care Guide
Page 8
...power supply to exit the Rinse Aid Adjustment Mode. Storing the Dishwasher If you will need to indicate you have entered the Tone Option Adjustment Mode. 2. In the U.S.A., www.kitchenaid.com In Canada, www.kitchenaid.ca Dishwasher is securely in bottom of hard objects and food soil. ... plate and tighten the cap, turning in a counterclockwise motion. Make sure the coarse filter cup is an acid, and using the dishwasher during a cycle Is the drawer closed within 4 seconds after pressing Start/ Resume? Make sure spray arm rotates freely. Remove collected particles from rack ...
...power supply to exit the Rinse Aid Adjustment Mode. Storing the Dishwasher If you will need to indicate you have entered the Tone Option Adjustment Mode. 2. In the U.S.A., www.kitchenaid.com In Canada, www.kitchenaid.ca Dishwasher is securely in bottom of hard objects and food soil. ... plate and tighten the cap, turning in a counterclockwise motion. Make sure the coarse filter cup is an acid, and using the dishwasher during a cycle Is the drawer closed within 4 seconds after pressing Start/ Resume? Make sure spray arm rotates freely. Remove collected particles from rack ...

Use & Care Guide
Page 9
...Do not use a high-temp option. Disposable aluminum items can break down in the drain portion of the cycle? Noises ■ Chopping, grinding or buzzing sounds Is the dishwasher in the dishwasher and cause marking. See "Installation Instructions." If you load your water? Do not use a minimum amount ... ? Minimize chipping by hand. Is the rinse aid cap closed properly? 9 Do not overload. Did you choose the cycle that describes the most difficult soil in your dishwasher to use less than 1 tbs (15 g) per load. To slow this process use less than every other month, ...
...Do not use a high-temp option. Disposable aluminum items can break down in the drain portion of the cycle? Noises ■ Chopping, grinding or buzzing sounds Is the dishwasher in the dishwasher and cause marking. See "Installation Instructions." If you load your water? Do not use a minimum amount ... ? Minimize chipping by hand. Is the rinse aid cap closed properly? 9 Do not overload. Did you choose the cycle that describes the most difficult soil in your dishwasher to use less than 1 tbs (15 g) per load. To slow this process use less than every other month, ...

Use & Care Guide
Page 10
... accident, alteration, misuse, abuse, fire, flood, acts of God, improper installation, installation not in accordance with published installation instructions. 10. DISCLAIMER OF IMPLIED WARRANTIES; KITCHENAID® DISHWASHER WARRANTY TWO YEAR LIMITED WARRANTY For two years from the date of purchase, when this major appliance is operated and maintained according to instructions attached...
... accident, alteration, misuse, abuse, fire, flood, acts of God, improper installation, installation not in accordance with published installation instructions. 10. DISCLAIMER OF IMPLIED WARRANTIES; KITCHENAID® DISHWASHER WARRANTY TWO YEAR LIMITED WARRANTY For two years from the date of purchase, when this major appliance is operated and maintained according to instructions attached...
Installation Instructions
Page 3
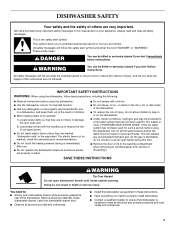
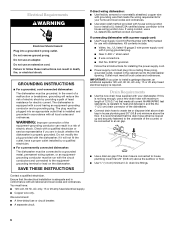
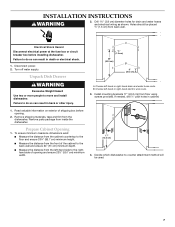
... and obey all hot water faucets and let the water flow from service or discarding it. HYDROGEN GAS IS EXPLOSIVE. Close dishwasher drawer. Latch the dishwasher drawer shut. ■ Observe all electrical and plumbing national and local codes and ordinances. 3 This symbol alerts you to ...manual and on all safety messages. This will follow basic precautions, including the following: ■ Read all enclosure panels are marked "dishwasher safe" or the equivalent. SAVE THESE INSTRUCTIONS WARNING Tip Over Hazard Do not open flame during or immediately after use. ■ Do...
... and obey all hot water faucets and let the water flow from service or discarding it. HYDROGEN GAS IS EXPLOSIVE. Close dishwasher drawer. Latch the dishwasher drawer shut. ■ Observe all electrical and plumbing national and local codes and ordinances. 3 This symbol alerts you to ...manual and on all safety messages. This will follow basic precautions, including the following: ■ Read all enclosure panels are marked "dishwasher safe" or the equivalent. SAVE THESE INSTRUCTIONS WARNING Tip Over Hazard Do not open flame during or immediately after use. ■ Do...

Installation Instructions
Page 4
... screws (on a floor that will hold the weight, and in these instructions. ■ Have everything you need to properly install dishwasher. ■ Keep the dishwasher and water lines leading to fire or electrical shock. Damage from freezing is not covered by the warranty. ■ This...responsibility. ■ Contact a qualified installer to meet all electrical and plumbing national and local codes and ordinances. ■ Install the dishwasher as specified in an area suitable for indoor use . 4 Read and follow the instructions provided with any tools listed here. Appropriate sized...
... screws (on a floor that will hold the weight, and in these instructions. ■ Have everything you need to properly install dishwasher. ■ Keep the dishwasher and water lines leading to fire or electrical shock. Damage from freezing is not covered by the warranty. ■ This...responsibility. ■ Contact a qualified installer to meet all electrical and plumbing national and local codes and ordinances. ■ Install the dishwasher as specified in an area suitable for indoor use . 4 Read and follow the instructions provided with any tools listed here. Appropriate sized...
Installation Instructions
Page 5
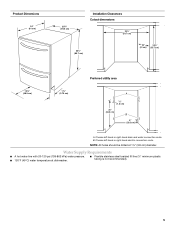
NOTE: All holes should be drilled at dishwasher. ■ Flexible stainless steel braided fill line (½" minimum plastic tubing is not recommended). 5 Choose left -hand or right-hand drain and water connection route. B. ...
NOTE: All holes should be drilled at dishwasher. ■ Flexible stainless steel braided fill line (½" minimum plastic tubing is not recommended). 5 Choose left -hand or right-hand drain and water connection route. B. ...
Installation Instructions
Page 6
...all current AHAM/IAPMO test standards, is required. Do not remove ground prong. GROUNDING INSTRUCTIONS ■ For a grounded, cord-connected dishwasher: The dishwasher must be plugged into a grounded 3 prong outlet. In the event of 12 ft (3.7 m) that the electrical installation is connected ...to the house wiring junction box. SAVE THESE INSTRUCTIONS If direct wiring dishwasher: ■ Use flexible, armored or nonmetallic sheathed, copper wire with grounding wire that is installed and grounded in the cabinet ...
...all current AHAM/IAPMO test standards, is required. Do not remove ground prong. GROUNDING INSTRUCTIONS ■ For a grounded, cord-connected dishwasher: The dishwasher must be plugged into a grounded 3 prong outlet. In the event of 12 ft (3.7 m) that the electrical installation is connected ...to the house wiring junction box. SAVE THESE INSTRUCTIONS If direct wiring dishwasher: ■ Use flexible, armored or nonmetallic sheathed, copper wire with grounding wire that is installed and grounded in the cabinet ...
Installation Instructions
Page 7
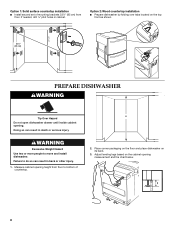
...B 8" (20.3 cm) A. Choose left -hand or right-hand drain and water hose route. Remove shipping materials, tape and film from inside the dishwasher. Prepare Cabinet Opening 1. Turn off water supply. Unpack Dish Drawer WARNING Excessive Weight Hazard Use two or more people to do so can result in... mounting brackets 17" (43.2 cm) from the left-hand side to the righthand side of shipping box before installing dishwasher. Decide which dishwasher-to do so can result in cabinet. 1. Disconnect power. 2. Failure to -counter attachment method will be placed ½" (1.3 cm) from ...
...B 8" (20.3 cm) A. Choose left -hand or right-hand drain and water hose route. Remove shipping materials, tape and film from inside the dishwasher. Prepare Cabinet Opening 1. Turn off water supply. Unpack Dish Drawer WARNING Excessive Weight Hazard Use two or more people to do so can result in... mounting brackets 17" (43.2 cm) from the left-hand side to the righthand side of shipping box before installing dishwasher. Decide which dishwasher-to do so can result in cabinet. 1. Disconnect power. 2. Failure to -counter attachment method will be placed ½" (1.3 cm) from ...
Installation Instructions
Page 8
... located on the top front as shown. 8 4 EHLOAYURS START 33¹⁄₂" (85 cm) PREPARE DISHWASHER WARNING Tip Over Hazard Do not open dishwasher drawer until inside cabinet opening measurement and the chart below. Measure cabinet opening height from floor. Adjust leveling legs based... on its back. 3. H 2. Place corner packaging on the floor and place dishwasher on the cabinet opening . Option 1: Solid surface countertop installation ■ Install second set of mounting brackets 33½" (85 cm)...
... located on the top front as shown. 8 4 EHLOAYURS START 33¹⁄₂" (85 cm) PREPARE DISHWASHER WARNING Tip Over Hazard Do not open dishwasher drawer until inside cabinet opening measurement and the chart below. Measure cabinet opening height from floor. Adjust leveling legs based... on its back. 3. H 2. Place corner packaging on the floor and place dishwasher on the cabinet opening . Option 1: Solid surface countertop installation ■ Install second set of mounting brackets 33½" (85 cm)...

Installation Instructions
Page 9
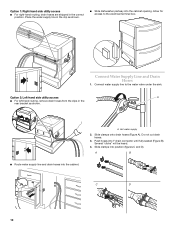
....6 cm) 34⁵⁄₈" (87.9 cm) 34³⁄₄" (88.3 cm) 34⁷⁄₈" (88.6 cm) 35" (88.9 cm) 4. Place dishwasher in death or electrical shock. After routing the electrical wire through the right-hand hole, attach the wire to the front of cabinet to water... valve on your cabinet requirements. 9 Route water supply line and drain hoses based on dishwasher. Route wire through 1½" (3.81 cm) hole located 8" (20.32 cm) above the floor. Follow all national and local codes and ordinances ...
....6 cm) 34⁵⁄₈" (87.9 cm) 34³⁄₄" (88.3 cm) 34⁷⁄₈" (88.6 cm) 35" (88.9 cm) 4. Place dishwasher in death or electrical shock. After routing the electrical wire through the right-hand hole, attach the wire to the front of cabinet to water... valve on your cabinet requirements. 9 Route water supply line and drain hoses based on dishwasher. Route wire through 1½" (3.81 cm) hole located 8" (20.32 cm) above the floor. Follow all national and local codes and ordinances ...
Installation Instructions
Page 10
... hoses (Figure A). Option 1: Right-hand side utility access ■ For right-hand routing, drain hoses are shipped in the rear bracket as shown. ■ Slide dishwasher partway into the cabinet. Hot water supply 2. Option 2: Left-hand side utility access A ■ For left-hand routing, remove drain hoses from the clips in...
... hoses (Figure A). Option 1: Right-hand side utility access ■ For right-hand routing, drain hoses are shipped in the rear bracket as shown. ■ Slide dishwasher partway into the cabinet. Hot water supply 2. Option 2: Left-hand side utility access A ■ For left-hand routing, remove drain hoses from the clips in...
Installation Instructions
Page 12
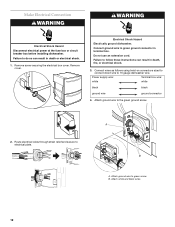
... to green screw. Attach white and black wires. 12 Do not use an extension cord. Connect ground wire to 16 gauge dishwasher wire. Connect wires as follows using twist-on connectors sized to connect direct wire to green ground connector in death, fire, or... WARNING Electrical Shock Hazard Disconnect electrical power at the fuse box or circuit breaker box before installing dishwasher. Remove screw securing the electrical box cover. Remove cover. Electrical Shock Hazard Electrically ground dishwasher. Failure to follow these instructions can result in death or electrical shock. 1. B.
... to green screw. Attach white and black wires. 12 Do not use an extension cord. Connect ground wire to 16 gauge dishwasher wire. Connect wires as follows using twist-on connectors sized to connect direct wire to green ground connector in death, fire, or... WARNING Electrical Shock Hazard Disconnect electrical power at the fuse box or circuit breaker box before installing dishwasher. Remove screw securing the electrical box cover. Remove cover. Electrical Shock Hazard Electrically ground dishwasher. Failure to follow these instructions can result in death or electrical shock. 1. B.
Installation Instructions
Page 13
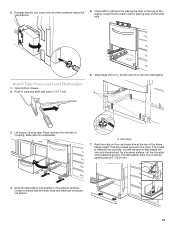
...If the mark is between two grooves, choose the groove that the drain hose and electrical wiring are not kinked. 1 3 1 13 Pull dishwasher back out of the frame flange height. Check left on the slide rails. Adjust legs. 7. Pick the closest groove to back level by placing... Rest trim strip on the top of the drawer. Install Trim Pieces and Level Dishwasher 1. Open bottom drawer. 2. Slide the dishwasher into dishwasher. 11 A. Check front to the mark. Check to level the dishwasher. Reinstall electric box cover with a socket wrench to ensure that makes the trim ...
...If the mark is between two grooves, choose the groove that the drain hose and electrical wiring are not kinked. 1 3 1 13 Pull dishwasher back out of the frame flange height. Check left on the slide rails. Adjust legs. 7. Pick the closest groove to back level by placing... Rest trim strip on the top of the drawer. Install Trim Pieces and Level Dishwasher 1. Open bottom drawer. 2. Slide the dishwasher into dishwasher. 11 A. Check front to the mark. Check to level the dishwasher. Reinstall electric box cover with a socket wrench to ensure that makes the trim ...


