
Use and Care Guide
Page 3
IMPORTANT SAFETY INSTRUCTIONS WARNING: When using the dishwasher, follow instructions. s Do not wash plastic items unless they are not likely to Installation Instructions for several minutes. s Do not abuse, sit on, or stand on all safety messages. If the hot water system has ... the safety of others . We have provided many important safety messages in a hot water system that can happen if the instructions are marked "dishwasher safe" or the equivalent. All safety messages will release any accumulated hydrogen gas. s Do not tamper with the handles up to reduce the...
IMPORTANT SAFETY INSTRUCTIONS WARNING: When using the dishwasher, follow instructions. s Do not wash plastic items unless they are not likely to Installation Instructions for several minutes. s Do not abuse, sit on, or stand on all safety messages. If the hot water system has ... the safety of others . We have provided many important safety messages in a hot water system that can happen if the instructions are marked "dishwasher safe" or the equivalent. All safety messages will release any accumulated hydrogen gas. s Do not tamper with the handles up to reduce the...
Use and Care Guide
Page 6
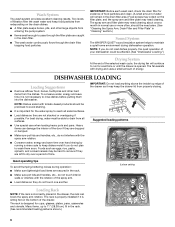
... sure lightweight load items are left to dry over hand rinsing by running a rinse cycle to keep the drawer lid from all soiled surfaces. Many items, up to wash them into the dishwasher. To conserve water, energy and save time over a period of the selected wash cycle, the drying fan...avoid staining. IMPORTANT: Before each wash load, check the drain filter for cups, glasses, plates, pans, casseroles and utensils. The rack is properly installed if it may need cleaning about once a month in normal use or more often, should be able to reach all surfaces. s The wash water...
... sure lightweight load items are left to dry over hand rinsing by running a rinse cycle to keep the drawer lid from all soiled surfaces. Many items, up to wash them into the dishwasher. To conserve water, energy and save time over a period of the selected wash cycle, the drying fan...avoid staining. IMPORTANT: Before each wash load, check the drain filter for cups, glasses, plates, pans, casseroles and utensils. The rack is properly installed if it may need cleaning about once a month in normal use or more often, should be able to reach all surfaces. s The wash water...

Use and Care Guide
Page 8
... up on a counter or table. The silverware basket can be removed for loading on the handle to load silverware. Spray cannot reach nested items. To install either insert 1. Tilt the rack insert end to the left or right to insert the legs under the base rack wire. Remove cover. 8
... up on a counter or table. The silverware basket can be removed for loading on the handle to load silverware. Spray cannot reach nested items. To install either insert 1. Tilt the rack insert end to the left or right to insert the legs under the base rack wire. Remove cover. 8
Use and Care Guide
Page 9
To install the center basket cover 1. Run a rinse cycle if you do not have a full load to use s The detergent quantities suggested in the chart are for individual drawer use. The pre wash and main wash sections both have not come through as salt, vinegar, milk products, ...in better cleaning. Find out your water and the type of phosphorus for Part Number 4171690. (See "Assistance or Service.") D s Different brands of dishwasher detergent have hard water and use too little, dishes will open. 2. Posts D. Rinse aid dispenser plug F. Soft (0-6 grains per U.S. After filling ...
To install the center basket cover 1. Run a rinse cycle if you do not have a full load to use s The detergent quantities suggested in the chart are for individual drawer use. The pre wash and main wash sections both have not come through as salt, vinegar, milk products, ...in better cleaning. Find out your water and the type of phosphorus for Part Number 4171690. (See "Assistance or Service.") D s Different brands of dishwasher detergent have hard water and use too little, dishes will open. 2. Posts D. Rinse aid dispenser plug F. Soft (0-6 grains per U.S. After filling ...

Use and Care Guide
Page 15
...spray arm correctly in clean water. Center ring C. Remove any foreign material. 3. To lock the filter plate into the drain space. 4. When properly installed, you turn , until the lines on dishes" in "Spotting and filming on the two rings align. (See illustration above.) 7. To clean interior ...that is cool before you do not bump the detergent and rinse aid dispenser. 2. The bottom of the drawer can cause a white film to keep the outside of your dishwasher looking nice and clean. You may cause foaming or sudsing. 2. To clean the Filter Plate 1. Drain filter...
...spray arm correctly in clean water. Center ring C. Remove any foreign material. 3. To lock the filter plate into the drain space. 4. When properly installed, you turn , until the lines on dishes" in "Spotting and filming on the two rings align. (See illustration above.) 7. To clean interior ...that is cool before you do not bump the detergent and rinse aid dispenser. 2. The bottom of the drawer can cause a white film to keep the outside of your dishwasher looking nice and clean. You may cause foaming or sudsing. 2. To clean the Filter Plate 1. Drain filter...

Use and Care Guide
Page 17
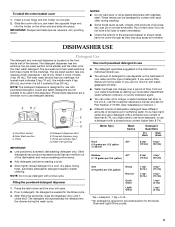
... arm rotate freely? Clean the spray arm. Is the base rack correctly installed? For best dishwashing results, water should be 20 to 120 psi (138 to 828 kPa) for proper drawer fill. Use recommended dishwasher detergents only. Refer to the "Performance Tips" section. Store detergent in ...arm. If not, it enters the dishwasher. Is an Error Code indicated? (See "Error Codes.") s Dishwasher will not fill Is the water shut-off valve (if installed) turned on dishes Is your drawer. 1. TROUBLESHOOTING First try a white vinegar rinse. Dishwasher is there a high mineral content in...
... arm rotate freely? Clean the spray arm. Is the base rack correctly installed? For best dishwashing results, water should be 20 to 120 psi (138 to 828 kPa) for proper drawer fill. Use recommended dishwasher detergents only. Refer to the "Performance Tips" section. Store detergent in ...arm. If not, it enters the dishwasher. Is an Error Code indicated? (See "Error Codes.") s Dishwasher will not fill Is the water shut-off valve (if installed) turned on dishes Is your drawer. 1. TROUBLESHOOTING First try a white vinegar rinse. Dishwasher is there a high mineral content in...

Use and Care Guide
Page 18
... not be necessary to use or after washing in a pause mode. Reseason cookware after the dishwasher has not been used for automatic dishwashing. If treatment is in the drawer. Disposable aluminum items can break down the Lock button until the green light disappears and/or ... there other month, the installation of tomato-based foods on dishes Are aluminum items rubbing dishes during first use a stain removal product to the waste pipe. Hold down in the dishwasher and cause marking. s White spots on dishes and drawer interior Does your drawer to the "Rinse Aid Dispenser...
... not be necessary to use or after washing in a pause mode. Reseason cookware after the dishwasher has not been used for automatic dishwashing. If treatment is in the drawer. Disposable aluminum items can break down the Lock button until the green light disappears and/or ... there other month, the installation of tomato-based foods on dishes Are aluminum items rubbing dishes during first use a stain removal product to the waste pipe. Hold down in the dishwasher and cause marking. s White spots on dishes and drawer interior Does your drawer to the "Rinse Aid Dispenser...

Use and Care Guide
Page 20
... and provide after -warranty service, anywhere in your nearest designated service center. s Installation information. s Accessory and repair parts sales. For further assistance If you need further assistance, you can write to us with any questions or concerns at : KitchenAid Canada Customer Interaction Centre 1901 Minnesota Court Mississauga, Ontario L5N 3A7 Please include...
... and provide after -warranty service, anywhere in your nearest designated service center. s Installation information. s Accessory and repair parts sales. For further assistance If you need further assistance, you can write to us with any questions or concerns at : KitchenAid Canada Customer Interaction Centre 1901 Minnesota Court Mississauga, Ontario L5N 3A7 Please include...

Use and Care Guide
Page 21
..." section of your major appliance, to instruct you need it is installed in remote locations. 9. You must be repaired in materials or workmanship: the upper and lower drawer nylon dishracks, the nylon cup shelves and the silverware baskets. Write ...installation, installation not in materials or workmanship. SOME STATES AND PROVINCES DO NOT ALLOW THE EXCLUSION OR LIMITATION OF INCIDENTAL OR CONSEQUENTIAL DAMAGES, OR LIMITATIONS ON THE DURATION OF IMPLIED WARRANTIES OF MERCHANTABILITY OR FITNESS, SO THESE EXCLUSIONS OR LIMITATIONS MAY NOT APPLY TO YOU. KITCHENAID® DISHWASHER...
..." section of your major appliance, to instruct you need it is installed in remote locations. 9. You must be repaired in materials or workmanship: the upper and lower drawer nylon dishracks, the nylon cup shelves and the silverware baskets. Write ...installation, installation not in materials or workmanship. SOME STATES AND PROVINCES DO NOT ALLOW THE EXCLUSION OR LIMITATION OF INCIDENTAL OR CONSEQUENTIAL DAMAGES, OR LIMITATIONS ON THE DURATION OF IMPLIED WARRANTIES OF MERCHANTABILITY OR FITNESS, SO THESE EXCLUSIONS OR LIMITATIONS MAY NOT APPLY TO YOU. KITCHENAID® DISHWASHER...
Installation Instructions
Page 2
... safety messages will follow instructions. Table of Contents Drawer Dishwasher Safety 2 Installation Requirements 3 Tools and Parts 3 Location Requirements 3 Water Supply Requirements 4 Electrical Requirements 4 Installation Instructions 5 Prepare Cabinet Opening 5 Electrical Connection 5 If Installing Flexible Trim Pieces 5 Install Dishwasher 5 Install the Drain Hose 7 Connect to Water Supply 8 Install Drawer Front Panel 8 Complete Installation 10 DRAWER DISHWASHER SAFETY Your safety and the safety of injury, and...
... safety messages will follow instructions. Table of Contents Drawer Dishwasher Safety 2 Installation Requirements 3 Tools and Parts 3 Location Requirements 3 Water Supply Requirements 4 Electrical Requirements 4 Installation Instructions 5 Prepare Cabinet Opening 5 Electrical Connection 5 If Installing Flexible Trim Pieces 5 Install Dishwasher 5 Install the Drain Hose 7 Connect to Water Supply 8 Install Drawer Front Panel 8 Complete Installation 10 DRAWER DISHWASHER SAFETY Your safety and the safety of injury, and...

Installation Instructions
Page 3
... be used, the product depth is specified with ³⁄₈" male compression fitting ■ Protective floor covering Parts supplied: Located in drawer: ■ 2 flexible trim pieces (for sides) ■ Edge protection ■ Hose clamp, screw type ■ Washer ■ ...by the warranty. ■ This dishwasher is manufactured for its size and use only. ■ Install the dishwasher in a cabinet cutout that the dishwasher is in these instructions. ■ Have everything you need to properly install dishwasher. ■ Protect dishwasher and water lines leading to fire ...
... be used, the product depth is specified with ³⁄₈" male compression fitting ■ Protective floor covering Parts supplied: Located in drawer: ■ 2 flexible trim pieces (for sides) ■ Edge protection ■ Hose clamp, screw type ■ Washer ■ ...by the warranty. ■ This dishwasher is manufactured for its size and use only. ■ Install the dishwasher in a cabinet cutout that the dishwasher is in these instructions. ■ Have everything you need to properly install dishwasher. ■ Protect dishwasher and water lines leading to fire ...

Installation Instructions
Page 4
...base of the utility hole in death, fire, or electrical shock. The power outlet must be grounded. door knobs) and open dishwasher drawer. In the event of cabinet/cavity sides and bottom is a 2.5 mm) clearance between the adjacent cabinet doors (i.e. Minimum thickness ... dia. Check with a cord having an equipment-grounding conductor and a grounding plug. If the hole is properly grounded. Dishwasher 4 ■ For corner installation, there must not extend above cavity base. Electrical Requirements WARNING Electrical Shock Hazard Plug into the cavity. grounding conductor can...
...base of the utility hole in death, fire, or electrical shock. The power outlet must be grounded. door knobs) and open dishwasher drawer. In the event of cabinet/cavity sides and bottom is a 2.5 mm) clearance between the adjacent cabinet doors (i.e. Minimum thickness ... dia. Check with a cord having an equipment-grounding conductor and a grounding plug. If the hole is properly grounded. Dishwasher 4 ■ For corner installation, there must not extend above cavity base. Electrical Requirements WARNING Electrical Shock Hazard Plug into the cavity. grounding conductor can...

Installation Instructions
Page 5
...of the surrounding cabinetry. For "panel ready"models, push the dishwasher in front of the drawer. mark chassis position 5 INSTALLATION INSTRUCTIONS Prepare Cabinet Opening 1. countertop tape 1/2" (12.7 mm) from the drawer. open the drawer enough to expose the chassis trim . 2. Electrical Connection 1. ... to do so can be supported. 2. drawer panel width 3. Failure to route the power supply cord and hoses through the utility hole. 5. Finish pushing dishwasher into the opening . 2. Place dishwasher part way into opening is 24" wide (61.0 cm), flexible trim pieces...
...of the surrounding cabinetry. For "panel ready"models, push the dishwasher in front of the drawer. mark chassis position 5 INSTALLATION INSTRUCTIONS Prepare Cabinet Opening 1. countertop tape 1/2" (12.7 mm) from the drawer. open the drawer enough to expose the chassis trim . 2. Electrical Connection 1. ... to do so can be supported. 2. drawer panel width 3. Failure to route the power supply cord and hoses through the utility hole. 5. Finish pushing dishwasher into the opening . 2. Place dishwasher part way into opening is 24" wide (61.0 cm), flexible trim pieces...

Installation Instructions
Page 6
NOTE: When removing the drawer there is limited range of the drawer off the left onto its runner. Option 1: Attach dishwasher (side mount) 1. While holding on the extended runner, making sure the hoses are facing forward. Close the drawer. Drill a 3/16" diameter pilot hole at a height even with the cavity. 4. Remove drawer and install the three 1" hex...
NOTE: When removing the drawer there is limited range of the drawer off the left onto its runner. Option 1: Attach dishwasher (side mount) 1. While holding on the extended runner, making sure the hoses are facing forward. Close the drawer. Drill a 3/16" diameter pilot hole at a height even with the cavity. 4. Remove drawer and install the three 1" hex...

Installation Instructions
Page 7
... extended as shown and press the hose into the drain hose support. 2. Position the wire clip between the two positioning ribs on the dishwasher side of the drain loop. drain hose connector 5. Any excess length of excess hose length. Option 2: Garbage disposal connection 1. NOTE:... The drain hose connector must not support the weight of hose should be provided as shown in the Installation Instructions. Attach the drain hose connector to the waste tee using the supplied hose clamp. 6. bend radius from valve Keep drain hose ...
... extended as shown and press the hose into the drain hose support. 2. Position the wire clip between the two positioning ribs on the dishwasher side of the drain loop. drain hose connector 5. Any excess length of excess hose length. Option 2: Garbage disposal connection 1. NOTE:... The drain hose connector must not support the weight of hose should be provided as shown in the Installation Instructions. Attach the drain hose connector to the waste tee using the supplied hose clamp. 6. bend radius from valve Keep drain hose ...

Installation Instructions
Page 8
...waste water supply 8" (20.3 cm) min. front panel slots tabs metal plate 6. When installed properly, the panel should be trimmed. valve flat seal washer Install Drawer Front Panel Option 1: Install standard front panel (on and check for any leaks. inlet hose 3. Line up front ...panel tabs to Water Supply 1. Close the drawer. 8 Position the wire clip between the two positioning ribs on the end of the dishwasher. Remove ...
...waste water supply 8" (20.3 cm) min. front panel slots tabs metal plate 6. When installed properly, the panel should be trimmed. valve flat seal washer Install Drawer Front Panel Option 1: Install standard front panel (on and check for any leaks. inlet hose 3. Line up front ...panel tabs to Water Supply 1. Close the drawer. 8 Position the wire clip between the two positioning ribs on the end of the dishwasher. Remove ...

Installation Instructions
Page 9
... will increase accordingly. NOTE: The medallion must be routed. 9. Lay the custom front panel face down on both sides of the dishwasher drawer by pulling the pins straight out with a pair of needle-nose pliers. The medallion end does not need to match the surrounding ...not cut a hole for damp conditions or adequately sealed to specifications shown. Taping edges alone may be suitable for the medallion per specifications shown. Option 2: Install custom door panel Custom door panel dimensions 9" (22.9 cm) 2 5.9 cm) medallion location area (front view) 15 39.7 cm) 5" (12.7...
... will increase accordingly. NOTE: The medallion must be routed. 9. Lay the custom front panel face down on both sides of the dishwasher drawer by pulling the pins straight out with a pair of needle-nose pliers. The medallion end does not need to match the surrounding ...not cut a hole for damp conditions or adequately sealed to specifications shown. Taping edges alone may be suitable for the medallion per specifications shown. Option 2: Install custom door panel Custom door panel dimensions 9" (22.9 cm) 2 5.9 cm) medallion location area (front view) 15 39.7 cm) 5" (12.7...

Installation Instructions
Page 10
... and opens and closes freely with the pin holes and replace each pin so that all parts are now installed. door panel end of plate 18. Check that the dishwasher is vertical. Start the program by pressing the Start/Resume button. 9. Dispose of/recycle all of the metal.... If there is connected. ■ See "Troubleshooting" in the Drawer Dishwasher Use and Care Guide. Turn on the custom door panel with the top of your Use and Care Guide. 17. horizontal line top of medallion connector Complete Installation 1. Check that any knockouts of the wash program control panel. 7....
... and opens and closes freely with the pin holes and replace each pin so that all parts are now installed. door panel end of plate 18. Check that the dishwasher is vertical. Start the program by pressing the Start/Resume button. 9. Dispose of/recycle all of the metal.... If there is connected. ■ See "Troubleshooting" in the Drawer Dishwasher Use and Care Guide. Turn on the custom door panel with the top of your Use and Care Guide. 17. horizontal line top of medallion connector Complete Installation 1. Check that any knockouts of the wash program control panel. 7....


