
Dimension Guide
Page 1
... cord: Use Power Supply Cord Kit (Part No. 4317824) marked for your dishwasher. copper tubing with dishwashers. Use a 90° elbow with the air gap installation instructions. Do not solder within 6" (15.2 cm) from water inlet valve. Make sure to connect the drain hose to waste tee or disposer inlet above the...
... cord: Use Power Supply Cord Kit (Part No. 4317824) marked for your dishwasher. copper tubing with dishwashers. Use a 90° elbow with the air gap installation instructions. Do not solder within 6" (15.2 cm) from water inlet valve. Make sure to connect the drain hose to waste tee or disposer inlet above the...
Dimension Guide
Page 2
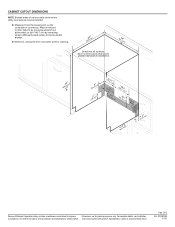
... (4.4 cm) (5.12"cm) Because Whirlpool Corporation policy includes a continuous commitment to improve Dimensions are for planning purposes only. May be installed. Minimum, measured from narrowest point of cabinet walls show where utility connections may be reduced to 33 " (86 cm) by removing ... Specifications subject to change without notice. Page 2 of countertop. W10321585 2/7/11 For complete details, see Installation our products, we reserve the right to change materials and specifications without notice. Instructions packed with product. D. Measured from E.
... (4.4 cm) (5.12"cm) Because Whirlpool Corporation policy includes a continuous commitment to improve Dimensions are for planning purposes only. May be installed. Minimum, measured from narrowest point of cabinet walls show where utility connections may be reduced to 33 " (86 cm) by removing ... Specifications subject to change without notice. Page 2 of countertop. W10321585 2/7/11 For complete details, see Installation our products, we reserve the right to change materials and specifications without notice. Instructions packed with product. D. Measured from E.

Installation Guide
Page 2
... Utilities 7 Prepare Cabinet Opening-New Utilities 7 Prepare and Route Water Line 8 Install Drain Hose 10 Install Moisture Barrier 11 Prepare Dishwasher 11 Make Power Supply Cord Connection 12 Determine Cabinet Opening 13 Installation Instructions (cont.) Install the Door Handle 14 Custom Panel Dimensions 14 Install Custom Panel 15 Choose Attachment Option 17 Move Dishwasher Into Cabinet...
... Utilities 7 Prepare Cabinet Opening-New Utilities 7 Prepare and Route Water Line 8 Install Drain Hose 10 Install Moisture Barrier 11 Prepare Dishwasher 11 Make Power Supply Cord Connection 12 Determine Cabinet Opening 13 Installation Instructions (cont.) Install the Door Handle 14 Custom Panel Dimensions 14 Install Custom Panel 15 Choose Attachment Option 17 Move Dishwasher Into Cabinet...

Installation Guide
Page 3
...clamps (2) Phillips- suggested) or flexible braided water supply line See "Electrical Requirements" section. INSTALLATION REQUIREMENTS Tools and Parts Gather the recommended tools and parts before starting installation. Read and follow the instructions provided with top-venting models only: " Torx® T15 screws " 4 #10 ...(located inside Use and Care Guide bag assembly) 1 Instruction sheet (located inside Use and Care Guide bag assembly) NOTE: The screws supplied are not included, call 1-800-422-1230. 3 All Installations Tools needed : Additional parts supplied with any tools listed ...
...clamps (2) Phillips- suggested) or flexible braided water supply line See "Electrical Requirements" section. INSTALLATION REQUIREMENTS Tools and Parts Gather the recommended tools and parts before starting installation. Read and follow the instructions provided with top-venting models only: " Torx® T15 screws " 4 #10 ...(located inside Use and Care Guide bag assembly) 1 Instruction sheet (located inside Use and Care Guide bag assembly) NOTE: The screws supplied are not included, call 1-800-422-1230. 3 All Installations Tools needed : Additional parts supplied with any tools listed ...

Installation Guide
Page 6
...requirements for use with dishwasher. • Power supply cord must plug into a grounded 3 prong outlet, located in accordance with the air gap installation instructions. latest edition and all current AHAM/IAPMO test standards, is resistant to heat and detergent, and fits the 1" (2.5 cm) drain connector of ... copper wire with grounding wire that the electrical connection and wire size are connecting the air gap, a rubber hose (not provided) will be installed in the cabinet next to house plumbing lower than 20" (50.8 cm) above subfloor or floor. • Use ¹⁄₂" ...
...requirements for use with dishwasher. • Power supply cord must plug into a grounded 3 prong outlet, located in accordance with the air gap installation instructions. latest edition and all current AHAM/IAPMO test standards, is resistant to heat and detergent, and fits the 1" (2.5 cm) drain connector of ... copper wire with grounding wire that the electrical connection and wire size are connecting the air gap, a rubber hose (not provided) will be installed in the cabinet next to house plumbing lower than 20" (50.8 cm) above subfloor or floor. • Use ¹⁄₂" ...

Installation Guide
Page 7
... you already have utility hookups? Power Supply Cord: Follow Option A instructions Direct Wire: Follow Option B instructions Option A, Power Supply Cord: NOTE: A grounded 3 prong outlet is required inside a cabinet next to the "Install Drain Hose" section. If they do so can result in cabinet ...hole in death or electrical shock. 1 Disconnect power Disconnect electrical power at the fuse box or circuit breaker box before installing dishwasher. 2 3 Do you use? INSTALLATION INSTRUCTIONS Electrical Shock Hazard Disconnect electrical power at the fuse box or circuit breaker box before...
... you already have utility hookups? Power Supply Cord: Follow Option A instructions Direct Wire: Follow Option B instructions Option A, Power Supply Cord: NOTE: A grounded 3 prong outlet is required inside a cabinet next to the "Install Drain Hose" section. If they do so can result in cabinet ...hole in death or electrical shock. 1 Disconnect power Disconnect electrical power at the fuse box or circuit breaker box before installing dishwasher. 2 3 Do you use? INSTALLATION INSTRUCTIONS Electrical Shock Hazard Disconnect electrical power at the fuse box or circuit breaker box before...

Installation Guide
Page 12
... not touch dishwasher motor to 16-gauge dishwasher wiring. Take notice when installing or removing the dishwasher in order to continue with power supply cord kit) rated to connect your dishwasher. Power Supply Cord: Follow Option A instructions Direct Wire: Follow Option B instructions NOTE: If using Option B, proceed to "Determine Cabinet Opening," to reduce...
... not touch dishwasher motor to 16-gauge dishwasher wiring. Take notice when installing or removing the dishwasher in order to continue with power supply cord kit) rated to connect your dishwasher. Power Supply Cord: Follow Option A instructions Direct Wire: Follow Option B instructions NOTE: If using Option B, proceed to "Determine Cabinet Opening," to reduce...

Installation Guide
Page 13
...wires are tucked inside terminal box. Gently tug on wires to be installed (you will be sure both are secured. Connect wires black to black... number of turns needed , see website for animated representation of the green ground wire. Visit www.kitchenaid.com under FAQ tab. Insert tabs on wire connector. Make sure wires are not pinched. Wiring configuration... wire: white black ground connector If needed . 13 NOTE: Do not plug into outlet until instructed to follow these instructions can result in terminal box. Reattach and tighten the green screw. 3 Power Cord-Connect remaining...
...wires are tucked inside terminal box. Gently tug on wires to be installed (you will be sure both are secured. Connect wires black to black... number of turns needed , see website for animated representation of the green ground wire. Visit www.kitchenaid.com under FAQ tab. Insert tabs on wire connector. Make sure wires are not pinched. Wiring configuration... wire: white black ground connector If needed . 13 NOTE: Do not plug into outlet until instructed to follow these instructions can result in terminal box. Reattach and tighten the green screw. 3 Power Cord-Connect remaining...

Installation Guide
Page 14
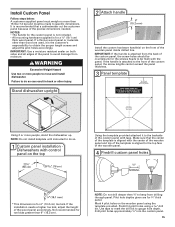
...8322;" [87.6 cm].) If the minimum cabinet opening height is less than the cabinet opening's floor - Place handle on mounting studs with Installation Instructions. Insert the short end of the wood panel accordingly. This will allow the dishwasher to fit into the setscrews. Cut insulation blanket along ... in the area shown to bring the dishwasher up to move. (Measurements are already installed in bottom of handle) Hex key IMPORTANT: Do not scratch the front panel during this procedure. If the installation needs a higher toe kick, adjust the height of the hex key into a 33...
...8322;" [87.6 cm].) If the minimum cabinet opening height is less than the cabinet opening's floor - Place handle on mounting studs with Installation Instructions. Insert the short end of the wood panel accordingly. This will allow the dishwasher to fit into the setscrews. Cut insulation blanket along ... in the area shown to bring the dishwasher up to move. (Measurements are already installed in bottom of handle) Hex key IMPORTANT: Do not scratch the front panel during this procedure. If the installation needs a higher toe kick, adjust the height of the hex key into a 33...
Installation Guide
Page 15
...is the customer's responsibility to obtain the proper length screws and adjust the pilot holes accordingly. Stand dishwasher upright 2 Attach handle 6" (15.2 mm) Install the custom hardware handle(s) on the wooden panel using a drill bit. IMPORTANT: If the handle is attached from the back of the custom panel,...higher toe kick, adjust the height of the template is for the screws heads to be made to specific dimensions. NOTE: Do not install kickplate until instructed to avoid damage from drilling through panel. Mark 4 pilot holes on the front of the panel to do so can result in ...
...is the customer's responsibility to obtain the proper length screws and adjust the pilot holes accordingly. Stand dishwasher upright 2 Attach handle 6" (15.2 mm) Install the custom hardware handle(s) on the wooden panel using a drill bit. IMPORTANT: If the handle is attached from the back of the custom panel,...higher toe kick, adjust the height of the template is for the screws heads to be made to specific dimensions. NOTE: Do not install kickplate until instructed to avoid damage from drilling through panel. Mark 4 pilot holes on the front of the panel to do so can result in ...

Installation Guide
Page 25
...call 1-800-807-6777. If you must also do not close the door within 3 seconds. Check Operation ❏ Read the Dishwasher User Instructions that came with a low wattage, low energy consumption motor, your dishwasher. ❏ Check that you press it to start the dishwasher? &#... efficient dishwashers use nearly 40% less energy than older models. Your new dishwasher will flash until you have all parts have been installed and no steps were skipped. Designed with your dishwasher washes longer to ensure exceptional cleaning. Check that all tools used , replace inlet...
...call 1-800-807-6777. If you must also do not close the door within 3 seconds. Check Operation ❏ Read the Dishwasher User Instructions that came with a low wattage, low energy consumption motor, your dishwasher. ❏ Check that you press it to start the dishwasher? &#... efficient dishwashers use nearly 40% less energy than older models. Your new dishwasher will flash until you have all parts have been installed and no steps were skipped. Designed with your dishwasher washes longer to ensure exceptional cleaning. Check that all tools used , replace inlet...

Use & Care Guide
Page 3
... For a permanently connected dishwasher: The dishwasher must be connected to cause cancer. SAVE THESE INSTRUCTIONS WARNING Tip Over Hazard Do not use dishwasher until completely installed. GROUNDING INSTRUCTIONS ■ For a grounded, cord-connected dishwasher: The dishwasher must be plugged into an ...appropriate outlet that is installed and grounded in accordance with a qualified electrician or service ...
... For a permanently connected dishwasher: The dishwasher must be connected to cause cancer. SAVE THESE INSTRUCTIONS WARNING Tip Over Hazard Do not use dishwasher until completely installed. GROUNDING INSTRUCTIONS ■ For a grounded, cord-connected dishwasher: The dishwasher must be plugged into an ...appropriate outlet that is installed and grounded in accordance with a qualified electrician or service ...

Use & Care Guide
Page 14
...49ºC). The dishwasher may not fill with water. Improper loading can cause dishes to become chipped or damaged. (See specific loading instructions within this guide.) Blinking LED's will occur when the cycle is paused or when the cycle has been interrupted by the dishwasher sensing...a pause in the lower rack. Scrape food from obstructions. (See "Parts and Features.") Check for the type of the cycle. ■ Improper installation will not come from the disposer inlet. See "Will Not Fill" in the "Dishwasher Use" section. Always use a rinse aid. If foam ...
...49ºC). The dishwasher may not fill with water. Improper loading can cause dishes to become chipped or damaged. (See specific loading instructions within this guide.) Blinking LED's will occur when the cycle is paused or when the cycle has been interrupted by the dishwasher sensing...a pause in the lower rack. Scrape food from obstructions. (See "Parts and Features.") Check for the type of the cycle. ■ Improper installation will not come from the disposer inlet. See "Will Not Fill" in the "Dishwasher Use" section. Always use a rinse aid. If foam ...

Use & Care Guide
Page 16
... transportation for the following components to correct defects in materials or workmanship that vary from defects in which it is installed in an inaccessible location or is not installed in accordance with KitchenAid's published installation instructions. 11. ITEMS EXCLUDED FROM WARRANTY This limited warranty does not cover: 1. Consumable parts are unable to correct defects in...
... transportation for the following components to correct defects in materials or workmanship that vary from defects in which it is installed in an inaccessible location or is not installed in accordance with KitchenAid's published installation instructions. 11. ITEMS EXCLUDED FROM WARRANTY This limited warranty does not cover: 1. Consumable parts are unable to correct defects in...


