
Use & Care Guide
Page 3
... that can happen if the instructions are very important. Have the compactor examined, repaired or adjusted by or near children. Do not compact lighted cigarettes, cigars, or other than manufacturer's recommended attachments. Incorrect reassembly can be followed, including the following: s Read all...messages in use other hot or burning items. Do not overload the compactor. IMPORTANT SAFETY INSTRUCTIONS WARNING: When using the compactor. Lock Key Switch when not in this manual. Do not overload trash bag with a damaged cord set, plug, motor, or after damage...
... that can happen if the instructions are very important. Have the compactor examined, repaired or adjusted by or near children. Do not compact lighted cigarettes, cigars, or other than manufacturer's recommended attachments. Incorrect reassembly can be followed, including the following: s Read all...messages in use other hot or burning items. Do not overload the compactor. IMPORTANT SAFETY INSTRUCTIONS WARNING: When using the compactor. Lock Key Switch when not in this manual. Do not overload trash bag with a damaged cord set, plug, motor, or after damage...
Use & Care Guide
Page 4
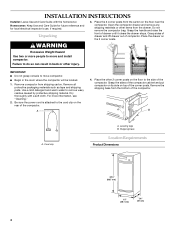
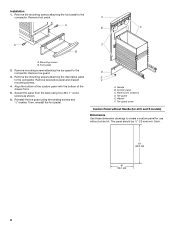
... in back or other 2 corner posts on the floor to move and install compactor. Place the other injury. Cord clip A. Shipping base Location Requirements Product Dimensions 34¹⁄₈" (86.7 cm) 15" (38.1 cm) 24" (61 cm) 4 Homeowner: Keep Use and Care Guide ... carton. Grasp the handle and raise the front of the compactor. Leveling legs B. Be sure the power cord is attached to remove waxy residue caused by protective shipping material. Place the 2 corner posts from the bottom of compactor. INSTALLATION INSTRUCTIONS Installer: Leave Use and Care Guide with a...
... in back or other 2 corner posts on the floor to move and install compactor. Place the other injury. Cord clip A. Shipping base Location Requirements Product Dimensions 34¹⁄₈" (86.7 cm) 15" (38.1 cm) 24" (61 cm) 4 Homeowner: Keep Use and Care Guide ... carton. Grasp the handle and raise the front of the compactor. Leveling legs B. Be sure the power cord is attached to remove waxy residue caused by protective shipping material. Place the 2 corner posts from the bottom of compactor. INSTALLATION INSTRUCTIONS Installer: Leave Use and Care Guide with a...
Use & Care Guide
Page 6
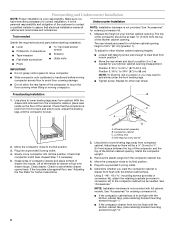
... C. Self-tapping screw (pivot) 2. Plug into a grounded 3 prong outlet. 4. Using 2 - #8 - 18 x mounting screws (provided in conversion kit), attach the retaining brackets (provided in conversion kit) to move compactor into tracks. NOTE: Installation hardware is not provided with the kitchen cabinet face, place retaining bracket mounting screws through "1." Make sure you have everything...
... C. Self-tapping screw (pivot) 2. Plug into a grounded 3 prong outlet. 4. Using 2 - #8 - 18 x mounting screws (provided in conversion kit), attach the retaining brackets (provided in conversion kit) to move compactor into tracks. NOTE: Installation hardware is not provided with the kitchen cabinet face, place retaining bracket mounting screws through "1." Make sure you have everything...
Use & Care Guide
Page 7
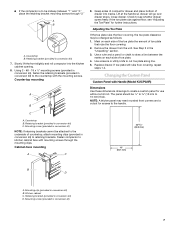
...covering, repeat steps 1-4. NOTE: A thicker panel may be ¹⁄₂" to 13 mm to 16 mm) thick. Cabinet-face mounting A C 23 60.5 mm) 15" (38.1 mm) B D A. Mounting clip (provided in conversion kit) D. Retaining bracket (provided in conversion kit) B. Using 2 - #8 - 18 x ¹... side of toe plate. 4. Kitchen cabinet C. s If the compactor is to be attached to the underside of countertop, attach mounting clips (provided in conversion kit) to retaining brackets. A B 3 21 A. Grasp sides of compactor drawer and place bottom of drawer into the kitchen cabinet opening....
...covering, repeat steps 1-4. NOTE: A thicker panel may be ¹⁄₂" to 13 mm to 16 mm) thick. Cabinet-face mounting A C 23 60.5 mm) 15" (38.1 mm) B D A. Mounting clip (provided in conversion kit) D. Retaining bracket (provided in conversion kit) B. Using 2 - #8 - 18 x ¹... side of toe plate. 4. Kitchen cabinet C. s If the compactor is to be attached to the underside of countertop, attach mounting clips (provided in conversion kit) to retaining brackets. A B 3 21 A. Grasp sides of compactor drawer and place bottom of drawer into the kitchen cabinet opening....
Use & Care Guide
Page 8
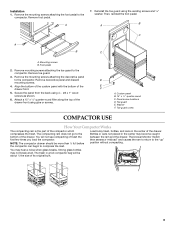
... as shown. 6. Toe guard screw Custom Panel without Handle (for use without a trim kit. thick. 25" (63.5 cm) 15" (38.1 cm) 8 Remove toe guard. 3. Remove the mounting screws attaching the decorative panel to the compactor. Custom panel C. Panel screw locations D. Remove foot pedal. Foot pedal 2. Secure the panel from the back using the...
... as shown. 6. Toe guard screw Custom Panel without Handle (for use without a trim kit. thick. 25" (63.5 cm) 15" (38.1 cm) 8 Remove toe guard. 3. Remove the mounting screws attaching the decorative panel to the compactor. Custom panel C. Panel screw locations D. Remove foot pedal. Foot pedal 2. Secure the panel from the back using the...
Use & Care Guide
Page 9
... be more than ¹⁄₂ full before the compactor can begin to the bottom of the drawer. The trash in a full compactor bag will not see compacting of trash the first few times you load the compactor. Remove mounting screws attaching the toe guard to the compactor. Attach a 15" x ¹⁄₂" quarter-round filler along the top...
... be more than ¹⁄₂ full before the compactor can begin to the bottom of the drawer. The trash in a full compactor bag will not see compacting of trash the first few times you load the compactor. Remove mounting screws attaching the toe guard to the compactor. Attach a 15" x ¹⁄₂" quarter-round filler along the top...
Use & Care Guide
Page 16
...model number and serial number. Dealer name Address Phone number Model number Serial number Purchase date 9872216 © 2005. KITCHENAID® COMPACTOR WARRANTY ONE YEAR LIMITED WARRANTY For one year from the date of purchase, when this major appliance is used for ... PERIOD ALLOWED BY LAW. Contact your major appliance is operated and maintained according to instructions attached to or furnished with the product, KitchenAid or KitchenAid Canada (hereafter "KitchenAid") will pay for factory specified parts and repair labor to correct defects in accordance with electrical...
...model number and serial number. Dealer name Address Phone number Model number Serial number Purchase date 9872216 © 2005. KITCHENAID® COMPACTOR WARRANTY ONE YEAR LIMITED WARRANTY For one year from the date of purchase, when this major appliance is used for ... PERIOD ALLOWED BY LAW. Contact your major appliance is operated and maintained according to instructions attached to or furnished with the product, KitchenAid or KitchenAid Canada (hereafter "KitchenAid") will pay for factory specified parts and repair labor to correct defects in accordance with electrical...