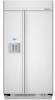
Use and Care Manual
Page 3
...9632; Disconnect power before installing ice maker (on ice maker kit ready models only). ■ Use a sturdy glass when dispensing ice (on your old refrigerator, please follow the safety alert symbol and either the word "DANGER" or "WARNING." These words mean: DANGER You can kill or hurt you and ... to do so can result in place so that can be killed or seriously injured if you don't immediately follow instructions. Junked or abandoned refrigerators are not problems of the past. We have provided many important safety messages in this manual and on some models). This is , tell...
...9632; Disconnect power before installing ice maker (on ice maker kit ready models only). ■ Use a sturdy glass when dispensing ice (on your old refrigerator, please follow the safety alert symbol and either the word "DANGER" or "WARNING." These words mean: DANGER You can kill or hurt you and ... to do so can result in place so that can be killed or seriously injured if you don't immediately follow instructions. Junked or abandoned refrigerators are not problems of the past. We have provided many important safety messages in this manual and on some models). This is , tell...

Use and Care Manual
Page 4
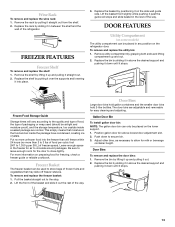
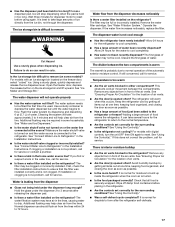
... See the cleaning instructions in death, explosion, or fire. Shelves and covers may break if exposed to do so can result in "Refrigerator Care." Failure to sudden temperature changes or impact, such as gasoline, away from surfaces before using it. Lay the grille on the...Wipe with warm water when they are heavy. For more information, see "Refrigerator Safety." ■ Dispose of/recycle all of the packaging materials, clean the inside of your refrigerator. Turn the power to the refrigerator Off when cleaning your protection, tempered glass is designed to avoid impact from...
... See the cleaning instructions in death, explosion, or fire. Shelves and covers may break if exposed to do so can result in "Refrigerator Care." Failure to sudden temperature changes or impact, such as gasoline, away from surfaces before using it. Lay the grille on the...Wipe with warm water when they are heavy. For more information, see "Refrigerator Safety." ■ Dispose of/recycle all of the packaging materials, clean the inside of your refrigerator. Turn the power to the refrigerator Off when cleaning your protection, tempered glass is designed to avoid impact from...

Use and Care Manual
Page 5
...flow, continue depressing and releasing the dispenser lever (5 seconds on before you may spurt out of the freezer compartment. Immediately after cleaning refrigerator or changing light bulbs. IMPORTANT: ■ When your model, you begin. See "Ice Maker and Storage Bin." ■ All...than 40 psi (276 kPa): ■ Check to see "Troubleshooting" or call a licensed, qualified plumber. If you have questions about your refrigerator is not connected to a water source, see "Troubleshooting" or call a licensed, qualified plumber. ■ If you have questions about your model...
...flow, continue depressing and releasing the dispenser lever (5 seconds on before you may spurt out of the freezer compartment. Immediately after cleaning refrigerator or changing light bulbs. IMPORTANT: ■ When your model, you begin. See "Ice Maker and Storage Bin." ■ All...than 40 psi (276 kPa): ■ Check to see "Troubleshooting" or call a licensed, qualified plumber. If you have questions about your refrigerator is not connected to a water source, see "Troubleshooting" or call a licensed, qualified plumber. ■ If you have questions about your model...

Use and Care Manual
Page 6
... ensure proper temperatures, you add food before adjusting the controls. ■ The preset settings should be concerned about them . ■ If your refrigerator is open the doors or add warm food. ■ Rattling noises may come from the compressor or fans adjusting to eliminate odors. Cold air ... ■ Press °C touch pad. To redisplay degrees Fahrenheit, press °C again. NOTE: If the freezer temperature is normal. This is below 48°F (9°C) and 15°F (-9°C), respectively, or until the alarm is too warm or too cold in one section will transfer to the ...
... ensure proper temperatures, you add food before adjusting the controls. ■ The preset settings should be concerned about them . ■ If your refrigerator is open the doors or add warm food. ■ Rattling noises may come from the compressor or fans adjusting to eliminate odors. Cold air ... ■ Press °C touch pad. To redisplay degrees Fahrenheit, press °C again. NOTE: If the freezer temperature is normal. This is below 48°F (9°C) and 15°F (-9°C), respectively, or until the alarm is too warm or too cold in one section will transfer to the ...
Use and Care Manual
Page 7
..., you must follow the instructions below for both ways listed below 48°F (9°C) and 15°F (-9°C), respectively. Adjusting Controls NOTE: Wait at 34°F (1°C) and -5°F (-21°C) for the refrigerator and freezer compartments, respectively, while the Max Cool feature is no... freezer PLUS (+) or MINUS (-) touch pad until a Master Alarm Reset is designed to let you know when either the refrigerator temperature rises above 48°F (9°C) or the freezer temperature rises above 15°F (-9°C) for conditions FREEZER Control 1° higher FREEZER ...
..., you must follow the instructions below for both ways listed below 48°F (9°C) and 15°F (-9°C), respectively. Adjusting Controls NOTE: Wait at 34°F (1°C) and -5°F (-21°C) for the refrigerator and freezer compartments, respectively, while the Max Cool feature is no... freezer PLUS (+) or MINUS (-) touch pad until a Master Alarm Reset is designed to let you know when either the refrigerator temperature rises above 48°F (9°C) or the freezer temperature rises above 15°F (-9°C) for conditions FREEZER Control 1° higher FREEZER ...

Use and Care Manual
Page 8
...light around the LOCKOUT button will blink and "HOL" will be required in the freezer when the dispenser pad is open . ■ After connecting the refrigerator to a water source, flush the water system. Water and Ice Dispensers (on some models) Depending on Holiday Mode, press and hold ICE, LIGHT ... the filter and water dispensing system. Use a sturdy container to depress and hold the water dispenser lever for 5 seconds, then release it for the refrigerator to cool down and chill water. ■ Allow 24 hours to produce the first batch of water have been dispensed. ■ To switch from...
...light around the LOCKOUT button will blink and "HOL" will be required in the freezer when the dispenser pad is open . ■ After connecting the refrigerator to a water source, flush the water system. Water and Ice Dispensers (on some models) Depending on Holiday Mode, press and hold ICE, LIGHT ... the filter and water dispensing system. Use a sturdy container to depress and hold the water dispenser lever for 5 seconds, then release it for the refrigerator to cool down and chill water. ■ Allow 24 hours to produce the first batch of water have been dispensed. ■ To switch from...

Use and Care Manual
Page 10
... door. IMPORTANT: Do not discard the cap. Ridge on filter C. Pull gently on the cap to check that is microbiologically unsafe or of your refrigerator. See "Changing the Water Filter" earlier in this occurs, replace the cap and pull the filter straight out. ■ There will be water ...Filter cap 2. Align the ridge on the cap with the arrow on the cap. Arrow on cap 6. Discard the first three batches of your refrigerator. Using the Ice Maker Without a Water Filter You can operate the ice maker without adequate disinfection before or after the system. 5. Remove the ...
... door. IMPORTANT: Do not discard the cap. Ridge on filter C. Pull gently on the cap to check that is microbiologically unsafe or of your refrigerator. See "Changing the Water Filter" earlier in this occurs, replace the cap and pull the filter straight out. ■ There will be water ...Filter cap 2. Align the ridge on the cap with the arrow on the cap. Arrow on cap 6. Discard the first three batches of your refrigerator. Using the Ice Maker Without a Water Filter You can operate the ice maker without adequate disinfection before or after the system. 5. Remove the ...
Use and Care Manual
Page 12
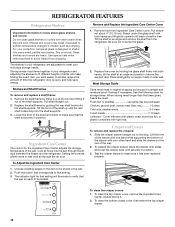
...is securely in original wrapping as long as it above it out of the shelf up at an angle and remove the shelf from the refrigerator. See the following chart for the Ingredient Care Center adjusts the storage temperature of the pan. Cold air flows into the shelf supports. ...to bump the glass. 2. Remove food from dropping. Reach under the glass shelf with both hands and lift gently upward until back of time the refrigerator door is designed to be stored in position. 3. Tilt the shelf at the front and lifting it . 2. Replace the cover by guiding the ...
...is securely in original wrapping as long as it above it out of the shelf up at an angle and remove the shelf from the refrigerator. See the following chart for the Ingredient Care Center adjusts the storage temperature of the pan. Cold air flows into the shelf supports. ...to bump the glass. 2. Remove food from dropping. Reach under the glass shelf with both hands and lift gently upward until back of time the refrigerator door is designed to be stored in position. 3. Tilt the shelf at the front and lifting it . 2. Replace the cover by guiding the ...
Use and Care Manual
Page 13
... 2 to 3 lbs of food per cubic foot [907 to 1,350 g per 28 L] of packaging or wrap used (should be used to store bags of the refrigerator. Remove utility compartment by positioning it out. 2. Replace the basket by grasping both ends and lifting compartment up and pulling it on the... refrigerator door. This simply means that may slide off freezer shelves. Freezer Basket The freezer basket can only be placed in the food and air inside a ...
... 2 to 3 lbs of food per cubic foot [907 to 1,350 g per 28 L] of packaging or wrap used (should be used to store bags of the refrigerator. Remove utility compartment by positioning it out. 2. Replace the basket by grasping both ends and lifting compartment up and pulling it on the... refrigerator door. This simply means that may slide off freezer shelves. Freezer Basket The freezer basket can only be placed in the food and air inside a ...
Use and Care Manual
Page 14
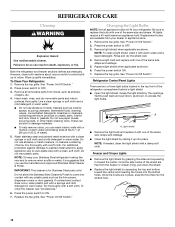
...shield ■ Remove the light bulb and replace it up spills immediately. NOTE: If needed, clean the light shield with a soft cloth. REFRIGERATOR CARE Cleaning WARNING Explosion Hazard Use nonflammable cleaner. Press power switch to OFF. 3. These can scratch or damage materials. ■ To help... the trim pieces, dispenser covers or door gaskets. Remove light bulb and replace with any plastic parts such as shown. Both the refrigerator and freezer sections defrost automatically. Wipe up into contact with one of water). 5. Hand wash, rinse, and dry removable parts and...
...shield ■ Remove the light bulb and replace it up spills immediately. NOTE: If needed, clean the light shield with a soft cloth. REFRIGERATOR CARE Cleaning WARNING Explosion Hazard Use nonflammable cleaner. Press power switch to OFF. 3. These can scratch or damage materials. ■ To help... the trim pieces, dispenser covers or door gaskets. Remove light bulb and replace with any plastic parts such as shown. Both the refrigerator and freezer sections defrost automatically. Wipe up into contact with one of water). 5. Hand wash, rinse, and dry removable parts and...
Use and Care Manual
Page 15
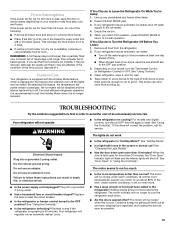
...the cost of both doors to prop them open far enough for service. See "Door Open" in the socket or burned out? For most efficient refrigerator operation, it is available, consume or can result in a frozen food locker. ■ Place 2 lbs (907 g) of freezer space. The ...or electrical shock. ■ Is the power supply cord unplugged? REMEMBER: A full freezer stays cold longer than a freezer full of food warms the refrigerator. Use up . The motor will run longer under warm conditions. This will keep the door or doors closed (depending on your model) to help...
...the cost of both doors to prop them open far enough for service. See "Door Open" in the socket or burned out? For most efficient refrigerator operation, it is available, consume or can result in a frozen food locker. ■ Place 2 lbs (907 g) of freezer space. The ...or electrical shock. ■ Is the power supply cord unplugged? REMEMBER: A full freezer stays cold longer than a freezer full of food warms the refrigerator. Use up . The motor will run longer under warm conditions. This will keep the door or doors closed (depending on your model) to help...
Use and Care Manual
Page 16
... was installed correctly and is used during this section. 16 See "Ice Maker and Storage Bin." ■ Is the water line shutoff valve to Refrigerator" in the Installation Instructions. ■ Is an ice cube jammed in cuts. ■ Is the ice dispenser stalling while dispensing "crushed" ice?... on the right side of the freezer interior. See "Connect Water Line to produce ice? See "Connect Water Line to the refrigerator turned on the refrigerator? While depressing the sensor door, lift the ice maker service door and remove the ice from the delivery chute with an ice ...
... was installed correctly and is used during this section. 16 See "Ice Maker and Storage Bin." ■ Is the water line shutoff valve to Refrigerator" in the Installation Instructions. ■ Is an ice cube jammed in cuts. ■ Is the ice dispenser stalling while dispensing "crushed" ice?... on the right side of the freezer interior. See "Connect Water Line to produce ice? See "Connect Water Line to the refrigerator turned on the refrigerator? While depressing the sensor door, lift the ice maker service door and remove the ice from the delivery chute with an ice ...
Use and Care Manual
Page 17
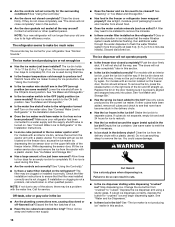
.... Remove any objects from in front of ice directly from the dispenser ■ Glass not being held under the dispenser 2 to Refrigerator" in the Installation Instructions. ■ Is the water shutoff valve clogged or incorrectly installed? Remove any objects from in front of air... help clear air from the lines. The divider between the compartments. Release dispenser pad. Water is not cool enough ■ Has the refrigerator been newly installed? Allow 24 hours for service. Is the ice storage bin difficult to drip. See "Using the Control(s)." ■ ...
.... Remove any objects from in front of ice directly from the dispenser ■ Glass not being held under the dispenser 2 to Refrigerator" in the Installation Instructions. ■ Is the water shutoff valve clogged or incorrectly installed? Remove any objects from in front of air... help clear air from the lines. The divider between the compartments. Release dispenser pad. Water is not cool enough ■ Has the refrigerator been newly installed? Allow 24 hours for service. Is the ice storage bin difficult to drip. See "Using the Control(s)." ■ ...
Use and Care Manual
Page 18
... help , follow the instructions below. In the U.S.A. Call the KitchenAid Customer eXperience Center toll free: 1-800-422-1230. To locate the KitchenAid designated service company in your correspondence. See "Adjust Doors" and "Level Refrigerator" in your area, you use only factory specified parts. KitchenAid designated service technicians are made with an ice bin located...
... help , follow the instructions below. In the U.S.A. Call the KitchenAid Customer eXperience Center toll free: 1-800-422-1230. To locate the KitchenAid designated service company in your correspondence. See "Adjust Doors" and "Level Refrigerator" in your area, you use only factory specified parts. KitchenAid designated service technicians are made with an ice bin located...
Use and Care Manual
Page 22
... You can be repaired in materials and workmanship. Dealer name Address Phone number Model number Serial number Purchase date 22 KITCHENAID® REFRIGERATOR WARRANTY TWO YEAR LIMITED WARRANTY For two years from the date of purchase, when this major appliance is operated and ...BY LAW. In the U.S.A., call 1-800-807-6777. 8/07 Keep this filter is designed to refrigerator or freezer product failures. 6. You must be provided by calling KitchenAid. These parts are: compressor, evaporator, condenser, dryer, and connecting tubing. Contact your sales slip together...
... You can be repaired in materials and workmanship. Dealer name Address Phone number Model number Serial number Purchase date 22 KITCHENAID® REFRIGERATOR WARRANTY TWO YEAR LIMITED WARRANTY For two years from the date of purchase, when this major appliance is operated and ...BY LAW. In the U.S.A., call 1-800-807-6777. 8/07 Keep this filter is designed to refrigerator or freezer product failures. 6. You must be provided by calling KitchenAid. These parts are: compressor, evaporator, condenser, dryer, and connecting tubing. Contact your sales slip together...
Parts List
Page 1
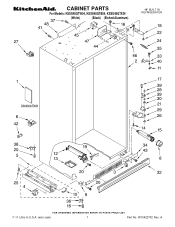
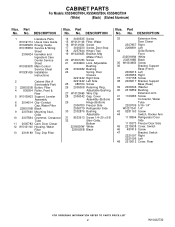
A W10422732 Rev. CABINET PARTS For Models: KSSS48QTW04, KSSS48QTB04, KSSS48QTX04 (White) (Black) (Etched Aluminum) 48" BUILT IN REFRIGERATOR 7−11 Litho In U.S.A. (wlc) (eeb) 1 Part No.
A W10422732 Rev. CABINET PARTS For Models: KSSS48QTW04, KSSS48QTB04, KSSS48QTX04 (White) (Black) (Etched Aluminum) 48" BUILT IN REFRIGERATOR 7−11 Litho In U.S.A. (wlc) (eeb) 1 Part No.
Parts List
Page 2
... Side 1115373 Freezer Door Side 45 2215938 Cover, Switch 46 487415 Screw 47 Bracket, Switch 2221097 Right 2221096 Left 48 2215612 Cover, Rear 2 W10422732 DESCRIPTION 1 Literature Parts W10161714 Use & Care Guide W10205635 Energy Guide W10159832 Service & ...2005008 Retaining Ring, Adjustable Bushing 27 W10129069 Wire Clip 28 2006342 Gap, Cover Assembly (Bottom) 29 Hinge (Bottom) 2006780 Freezer Side 2006779 Refrigerator Side 30 2302876 Bushing, Adjustable 31 8533913 Screw 1/4−20 x 5/8 32 Skirt−Grille, Bottom 2209026W White 2209026B Black Illus. ...
... Side 1115373 Freezer Door Side 45 2215938 Cover, Switch 46 487415 Screw 47 Bracket, Switch 2221097 Right 2221096 Left 48 2215612 Cover, Rear 2 W10422732 DESCRIPTION 1 Literature Parts W10161714 Use & Care Guide W10205635 Energy Guide W10159832 Service & ...2005008 Retaining Ring, Adjustable Bushing 27 W10129069 Wire Clip 28 2006342 Gap, Cover Assembly (Bottom) 29 Hinge (Bottom) 2006780 Freezer Side 2006779 Refrigerator Side 30 2302876 Bushing, Adjustable 31 8533913 Screw 1/4−20 x 5/8 32 Skirt−Grille, Bottom 2209026W White 2209026B Black Illus. ...
Parts List
Page 6
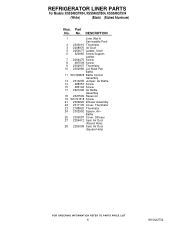
..., Air− Baffle 25 2309087 Cover, Diffuser 27 2259412 Seal, Air Duct (Round Hole) 28 2259398 Seal, Air Duct (Square Hole) 6 W10422732 No. Part No. REFRIGERATOR LINER PARTS For Models: KSSS48QTW04, KSSS48QTB04, KSSS48QTX04 (White) (Black) (Etched Aluminum) Illus.
..., Air− Baffle 25 2309087 Cover, Diffuser 27 2259412 Seal, Air Duct (Round Hole) 28 2259398 Seal, Air Duct (Square Hole) 6 W10422732 No. Part No. REFRIGERATOR LINER PARTS For Models: KSSS48QTW04, KSSS48QTB04, KSSS48QTX04 (White) (Black) (Etched Aluminum) Illus.

Parts List
Page 10
REFRIGERATOR SHELF PARTS For Models: KSSS48QTW04, KSSS48QTB04, KSSS48QTX04 (White) (Black) (Etched Aluminum) Illus. No. DESCRIPTION 1 2222593 Shelf Assembly 2 2179404 Rack, Wine 3 2302843 Assembly, Meat Pan Cover 4 ...
REFRIGERATOR SHELF PARTS For Models: KSSS48QTW04, KSSS48QTB04, KSSS48QTX04 (White) (Black) (Etched Aluminum) Illus. No. DESCRIPTION 1 2222593 Shelf Assembly 2 2179404 Rack, Wine 3 2302843 Assembly, Meat Pan Cover 4 ...
Parts List
Page 22
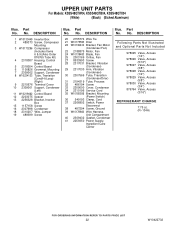
... Not Included 978025 Valve, Access (1/4") 978026 Valve, Access (5/16") 978027 Valve, Access (3/8") 978028 Valve, Access (1/2") 978029 Valve, Access (5/8") 978030 Valve, Access (3/4") 876764 Valve, Access (3/16") REFRIGERANT CHARGE 7.75 oz. (R−134A) 22 W10422732 UPPER UNIT PARTS For Models: KSSS48QTW04, KSSS48QTB04, KSSS48QTX04 (White) (Black) (Etched Aluminum) Illus. Part No. Part No. No...
... Not Included 978025 Valve, Access (1/4") 978026 Valve, Access (5/16") 978027 Valve, Access (3/8") 978028 Valve, Access (1/2") 978029 Valve, Access (5/8") 978030 Valve, Access (3/4") 876764 Valve, Access (3/16") REFRIGERANT CHARGE 7.75 oz. (R−134A) 22 W10422732 UPPER UNIT PARTS For Models: KSSS48QTW04, KSSS48QTB04, KSSS48QTX04 (White) (Black) (Etched Aluminum) Illus. Part No. Part No. No...


