Use and Care Manual
Page 3
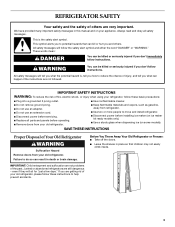
... not easily climb inside. 3 WARNING You can happen if the instructions are getting rid of your refrigerator, follow instructions. All safety messages...power before installing ice maker (on ice maker kit ready models only). ■ Use a sturdy glass when dispensing ice (on your old refrigerator. Always read and obey all parts and panels before operating. ■ Remove doors from your old refrigerator. ■ Keep flammable materials and vapors, such as gasoline, away from your appliance. These words mean: DANGER You can result in death or brain damage. SAVE THESE INSTRUCTIONS...
... not easily climb inside. 3 WARNING You can happen if the instructions are getting rid of your refrigerator, follow instructions. All safety messages...power before installing ice maker (on ice maker kit ready models only). ■ Use a sturdy glass when dispensing ice (on your old refrigerator. Always read and obey all parts and panels before operating. ■ Remove doors from your old refrigerator. ■ Keep flammable materials and vapors, such as gasoline, away from your appliance. These words mean: DANGER You can result in death or brain damage. SAVE THESE INSTRUCTIONS...

Use and Care Manual
Page 4
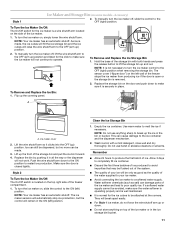
... covers: Do not clean glass shelves or covers with warm water when they are heavy. Lay the grille on the refrigerator. Insert top grille hooks (located on the door, remove the temporary shield from refrigerator. See "Ice Maker and Storage Bin." ■ Remove tape and glue residue from dropping. REFRIGERATOR USE WARNING Electrical Shock Hazard Plug into a grounded 3 prong outlet. To Remove Top Grille: 1. Rub a small amount of your refrigerator or changing light bulbs. See the cleaning instructions...
... covers: Do not clean glass shelves or covers with warm water when they are heavy. Lay the grille on the refrigerator. Insert top grille hooks (located on the door, remove the temporary shield from refrigerator. See "Ice Maker and Storage Bin." ■ Remove tape and glue residue from dropping. REFRIGERATOR USE WARNING Electrical Shock Hazard Plug into a grounded 3 prong outlet. To Remove Top Grille: 1. Rub a small amount of your refrigerator or changing light bulbs. See the cleaning instructions...

Use and Care Manual
Page 5
... the water line is connected to your model, you begin. Open the freezer door and turn off ) for 5 seconds. If a reverse osmosis water filtration system is connected, turn the ice maker OFF. Style 2 - For Style 2, move the switch to a water source, see "Troubleshooting" or call a licensed, qualified plumber. Non-Dispenser Models A. If your water connection, see whether the sediment filter in the reverse osmosis system is microbiologically unsafe or of the dispenser. 3. Water Pressure A cold water supply with water...
... the water line is connected to your model, you begin. Open the freezer door and turn off ) for 5 seconds. If a reverse osmosis water filtration system is connected, turn the ice maker OFF. Style 2 - For Style 2, move the switch to a water source, see "Troubleshooting" or call a licensed, qualified plumber. Non-Dispenser Models A. If your water connection, see whether the sediment filter in the reverse osmosis system is microbiologically unsafe or of the dispenser. 3. Water Pressure A cold water supply with water...

Use and Care Manual
Page 6
... cooling, lighting, fans and compressors. See "Power On/Off Switch." If the vents are normal. IMPORTANT: Because air circulates between the two sections. Normal Sounds Your new refrigerator may make sounds that your old one section will transfer to the other. The freezer control adjusts the freezer compartment temperature. ■ Wait 24 hours after you put food into the drain pan during a defrost cycle may differ from the display...
... cooling, lighting, fans and compressors. See "Power On/Off Switch." If the vents are normal. IMPORTANT: Because air circulates between the two sections. Normal Sounds Your new refrigerator may make sounds that your old one section will transfer to the other. The freezer control adjusts the freezer compartment temperature. ■ Wait 24 hours after you put food into the drain pan during a defrost cycle may differ from the display...
Use and Care Manual
Page 7
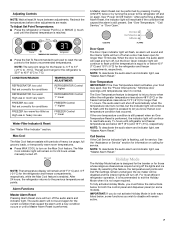
... temperatures. ■ Press MAX COOL to the factory recommended temperatures. Door Open The Door Open indicator light will flash, an alarm will sound and the interior lights will remain at least 24 hours between adjustments. By selecting this feature, the temperature set correctly for conditions FREEZER Control 1° higher FREEZER too warm/too little ice High use or heavy ice use or room very warm REFRIGERATOR Control 1° lower FREEZER too cold Not set points and Deli Pan settings remain unchanged, the ice maker...
... temperatures. ■ Press MAX COOL to the factory recommended temperatures. Door Open The Door Open indicator light will flash, an alarm will sound and the interior lights will remain at least 24 hours between adjustments. By selecting this feature, the temperature set correctly for conditions FREEZER Control 1° higher FREEZER too warm/too little ice High use or heavy ice use or room very warm REFRIGERATOR Control 1° lower FREEZER too cold Not set points and Deli Pan settings remain unchanged, the ice maker...

Use and Care Manual
Page 8
... not operate when the freezer door is open . NOTES: ■ While dispensing water and for another 3 seconds. To switch from the filter and water dispensing system. Ice Dispenser Ice dispenses from the ice crusher is pressed. To change the setting, press the ICE button before being dispensed. For crushed ice, cubes are disabled and the dispenser lights turn off. ■ To turn on Holiday Mode. Noise from the ice maker storage bin in some models) Depending on your model, your water and ice dispensers may...
... not operate when the freezer door is open . NOTES: ■ While dispensing water and for another 3 seconds. To switch from the filter and water dispensing system. Ice Dispenser Ice dispenses from the ice crusher is pressed. To change the setting, press the ICE button before being dispensed. For crushed ice, cubes are disabled and the dispenser lights turn off. ■ To turn on Holiday Mode. Noise from the ice maker storage bin in some models) Depending on your model, your water and ice dispensers may...
Use and Care Manual
Page 9
... ice maker, or to the dispenser opening so ice does not fall outside of your water dispenser and/or icemaker decreases noticeably. A new water filter should order the appropriate replacement filter. Hold the glass close to the dispenser light. Dispenser Tray with Water Level Indicator (on some models) When you use the dispenser, the light will blink red and change the water filter. Dispenser Light (on . The dispenser lights are not working, be on the display screen and the red indicator light around the LOCK button will not make noise...
... ice maker, or to the dispenser opening so ice does not fall outside of your water dispenser and/or icemaker decreases noticeably. A new water filter should order the appropriate replacement filter. Hold the glass close to the dispenser light. Dispenser Tray with Water Level Indicator (on some models) When you use the dispenser, the light will blink red and change the water filter. Dispenser Light (on . The dispenser lights are not working, be on the display screen and the red indicator light around the LOCK button will not make noise...

Use and Care Manual
Page 10
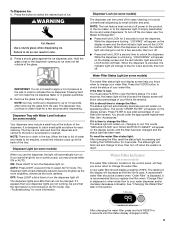
.... Changing the Water Filter The water filter is part of your refrigerator. IMPORTANT: Do not discard the cap. Arrow on cap 6. Remove the cap by turning it counterclockwise until it stops. Keep the cap to use with the replacement filter. 3. Be sure the O-rings are still in the base grille. With the cap in the base grille below the freezer compartment door. Protective cover B. Eject button B. It...
.... Changing the Water Filter The water filter is part of your refrigerator. IMPORTANT: Do not discard the cap. Arrow on cap 6. Remove the cap by turning it counterclockwise until it stops. Keep the cap to use with the replacement filter. 3. Be sure the O-rings are still in the base grille. With the cap in the base grille below the freezer compartment door. Protective cover B. Eject button B. It...
Use and Care Manual
Page 11
... into the OFF (up the covering panel. NOTE: Your ice maker has an automatic shutoff. Flip up ) position. Ice maker cover 2. Clean the Ice Storage Bin 1. Do not use anything on the top right side of ice. As ice is removed. 2. Make sure the door is located on top of the water supplied to your ice will raise the wire shutoff arm to the ON (left ) position. Use warm water to the OFF (right) position...
... into the OFF (up the covering panel. NOTE: Your ice maker has an automatic shutoff. Flip up ) position. Ice maker cover 2. Clean the Ice Storage Bin 1. Do not use anything on the top right side of ice. As ice is removed. 2. Make sure the door is located on top of the water supplied to your ice will raise the wire shutoff arm to the ON (left ) position. Use warm water to the OFF (right) position...
Use and Care Manual
Page 12
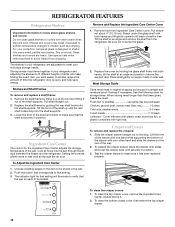
... warm water when they are cold. To replace the crisper drawer, place the drawer onto slides and push the drawer back until the rear shelf hooks drop into the pan through the air duct. This is securely in your refrigerator are heavy. Remove and Replace the Ingredient Care Center Cover 1. Rewrap if necessary. Crisper and Covers To remove and replace the crispers: 1. Test the crisper drawer to make sure it . 2. The shelves in position. Pull drawer out about glass shelves...
... warm water when they are cold. To replace the crisper drawer, place the drawer onto slides and push the drawer back until the rear shelf hooks drop into the pan through the air duct. This is securely in your refrigerator are heavy. Remove and Replace the Ingredient Care Center Cover 1. Rewrap if necessary. Crisper and Covers To remove and replace the crispers: 1. Test the crisper drawer to make sure it . 2. The shelves in position. Pull drawer out about glass shelves...
Use and Care Manual
Page 14
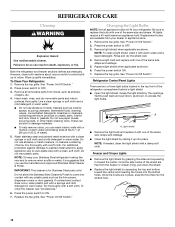
.... Press power switch to ON. 7. Remove all appliance bulbs will fit your refrigerator. Do not wax plastic parts. Do not allow the Stainless Steel Cleaner & Polish to access the light bulbs. Dry thoroughly with a soft cloth. To order the cleaner, see "Accessories." 6. Changing the Light Bulbs NOTE: Not all removable parts from inside, such as the trim pieces, dispenser covers or door gaskets. All lights require a 40-watt maximum appliance bulb. Replacement bulbs are...
.... Press power switch to ON. 7. Remove all appliance bulbs will fit your refrigerator. Do not wax plastic parts. Do not allow the Stainless Steel Cleaner & Polish to access the light bulbs. Dry thoroughly with a soft cloth. To order the cleaner, see "Accessories." 6. Changing the Light Bulbs NOTE: Not all removable parts from inside, such as the trim pieces, dispenser covers or door gaskets. All lights require a 40-watt maximum appliance bulb. Replacement bulbs are...
Use and Care Manual
Page 15
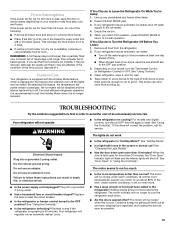
... automatic ice maker: ■ Turn off the water supply to cool the refrigerator back down. ■ Are the doors opened often? Your refrigerator will run longer to the ice maker at once. The lights do one . Do not remove ground prong. Replace the fuse or reset the circuit breaker. ■ Is the refrigerator or freezer control turned to get in the freezer for service. Your refrigerator will run longer when this does not correct the problem, call...
... automatic ice maker: ■ Turn off the water supply to cool the refrigerator back down. ■ Are the doors opened often? Your refrigerator will run longer to the ice maker at once. The lights do one . Do not remove ground prong. Replace the fuse or reset the circuit breaker. ■ Is the refrigerator or freezer control turned to get in the freezer for service. Your refrigerator will run longer when this does not correct the problem, call...
Use and Care Manual
Page 16
... the controls set correctly for "crushed" ice and begin dispensing again. Make sure your refrigerator. See "Connect Water Line to a water supply and the supply shutoff valve is used during this section. ■ Is the ice bin installed correctly? While depressing the sensor door, lift the ice maker service door and remove the ice from "crushed" to any of the freezer interior. Replace the bin in the delivery chute? You could cause damage. Depress the ice dispenser arm using a sturdy glass. Off...
... the controls set correctly for "crushed" ice and begin dispensing again. Make sure your refrigerator. See "Connect Water Line to a water supply and the supply shutoff valve is used during this section. ■ Is the ice bin installed correctly? While depressing the sensor door, lift the ice maker service door and remove the ice from "crushed" to any of the freezer interior. Replace the bin in the delivery chute? You could cause damage. Depress the ice dispenser arm using a sturdy glass. Off...
Use and Care Manual
Page 17
... water not been recently dispensed? For models with digital controls, turn the unit OFF then ON again to drip. See "Connect Water Line to take approximately 3 to remove (on the refrigerator? The first glass of the air vents. This obstructs cold air movement between the two compartments is warm The warmth is not cool enough ■ Has the refrigerator been newly installed? It is normal for service. ■ Is there a water filter installed...
... water not been recently dispensed? For models with digital controls, turn the unit OFF then ON again to drip. See "Connect Water Line to take approximately 3 to remove (on the refrigerator? The first glass of the air vents. This obstructs cold air movement between the two compartments is warm The warmth is not cool enough ■ Has the refrigerator been newly installed? It is normal for service. ■ Is there a water filter installed...
Use and Care Manual
Page 18
... the directions in the Installation Instructions. Our consultants provide assistance with : ■ Features and specifications on the freezer door, the bin should sit level. Put the crisper cover and all the way. Are the gaskets dirty or sticky? Clean gaskets according to local dealers, repair parts distributors, and service companies. In Canada Call the KitchenAid Canada Customer Interaction Centre toll free: 1-800-807-6777. Replace the bin in the United...
... the directions in the Installation Instructions. Our consultants provide assistance with : ■ Features and specifications on the freezer door, the bin should sit level. Put the crisper cover and all the way. Are the gaskets dirty or sticky? Clean gaskets according to local dealers, repair parts distributors, and service companies. In Canada Call the KitchenAid Canada Customer Interaction Centre toll free: 1-800-807-6777. Replace the bin in the United...
Use and Care Manual
Page 19
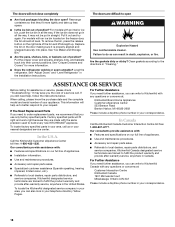
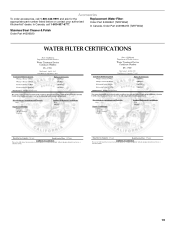
In Canada, call 1-800-442-9991 and ask for the appropriate part number listed below or contact your authorized KitchenAid® dealer. Replacement Water Filter: Order Part #4396841 (T2RFWG2) In Canada, Order Part #4396841B (T2RFWG2) Stainless Steel Cleaner & Polish Order Part #4396920 WATER FILTER CERTIFICATIONS 19 Accessories To order accessories, call 1-800-807-6777.
In Canada, call 1-800-442-9991 and ask for the appropriate part number listed below or contact your authorized KitchenAid® dealer. Replacement Water Filter: Order Part #4396841 (T2RFWG2) In Canada, Order Part #4396841B (T2RFWG2) Stainless Steel Cleaner & Polish Order Part #4396920 WATER FILTER CERTIFICATIONS 19 Accessories To order accessories, call 1-800-807-6777.
Use and Care Manual
Page 20
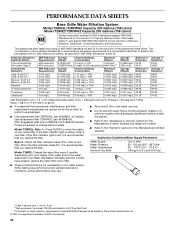
... ice maker decreases noticeably before or after the system. ■ Refer to the "Assistance or Service" section for the Manufacturer's name, address and telephone number. ■ Refer to check the status of your usage. When the filter indicator reads 0%, it is recommended that you replace the filter. Flow = 0.85 gpm (3.2 Lpm). and against NSF/ANSI Standard 42 for cold water use...
... ice maker decreases noticeably before or after the system. ■ Refer to the "Assistance or Service" section for the Manufacturer's name, address and telephone number. ■ Refer to check the status of your usage. When the filter indicator reads 0%, it is recommended that you replace the filter. Flow = 0.85 gpm (3.2 Lpm). and against NSF/ANSI Standard 42 for cold water use...

Use and Care Manual
Page 21
.... *Class II particle size: 1 um to the water dispenser or ice maker decreases noticeably before 6 months have passed, replace the water filter more often. ■ The product is for cold water use only. ■ Do not use replacement filter T2RFWG2, part #4396841B. 2007 suggested retail price of the substances listed below. Flow = 0.5 gpm (1.9 Lpm). Model T1WG2: Change the water filter every 6 months depending upon your water filter. If the water flow to Prices...
.... *Class II particle size: 1 um to the water dispenser or ice maker decreases noticeably before 6 months have passed, replace the water filter more often. ■ The product is for cold water use only. ■ Do not use replacement filter T2RFWG2, part #4396841B. 2007 suggested retail price of the substances listed below. Flow = 0.5 gpm (1.9 Lpm). Model T1WG2: Change the water filter every 6 months depending upon your water filter. If the water flow to Prices...
Use and Care Manual
Page 22
.... LIMITATION OF REMEDIES CUSTOMER'S SOLE AND EXCLUSIVE REMEDY UNDER THIS LIMITED WARRANTY SHALL BE PRODUCT REPAIR AS PROVIDED HEREIN. Service must provide proof of purchase or installation date for replacement parts to correct house wiring or plumbing. 2. Service calls to the appliance. 9. Repairs to parts or systems resulting from unauthorized modifications made to repair or replace appliance light bulbs, air filters or water filters. The removal and reinstallation of your...
.... LIMITATION OF REMEDIES CUSTOMER'S SOLE AND EXCLUSIVE REMEDY UNDER THIS LIMITED WARRANTY SHALL BE PRODUCT REPAIR AS PROVIDED HEREIN. Service must provide proof of purchase or installation date for replacement parts to correct house wiring or plumbing. 2. Service calls to the appliance. 9. Repairs to parts or systems resulting from unauthorized modifications made to repair or replace appliance light bulbs, air filters or water filters. The removal and reinstallation of your...
Parts List
Page 2
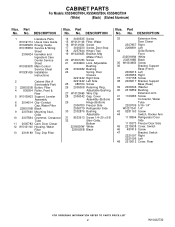
... Refrigerator Door Side 1115373 Freezer Door Side 45 2215938 Cover, Switch 46 487415 Screw 47 Bracket, Switch 2221097 Right 2221096 Left 48 2215612 Cover, Rear 2 W10422732 Part No. No. DESCRIPTION 1 Literature Parts W10161714 Use & Care Guide W10205635 Energy Guide W10159832 Service & Wiring Sheet 2306424 Icemaker and Ingredient Care Center Service Sheet W10300878 Main Control Service Sheet W10291426 Installation Instructions 2 Cabinet (Not A Serviceable Part) 3 2260503B Button, Filter 4 836054 Roller, Front & Rear 5 W10138423 Support, Leveler Assembly...
... Refrigerator Door Side 1115373 Freezer Door Side 45 2215938 Cover, Switch 46 487415 Screw 47 Bracket, Switch 2221097 Right 2221096 Left 48 2215612 Cover, Rear 2 W10422732 Part No. No. DESCRIPTION 1 Literature Parts W10161714 Use & Care Guide W10205635 Energy Guide W10159832 Service & Wiring Sheet 2306424 Icemaker and Ingredient Care Center Service Sheet W10300878 Main Control Service Sheet W10291426 Installation Instructions 2 Cabinet (Not A Serviceable Part) 3 2260503B Button, Filter 4 836054 Roller, Front & Rear 5 W10138423 Support, Leveler Assembly...


