Use and Care Manual
Page 3
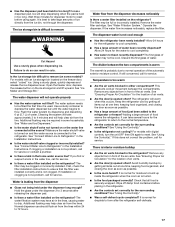
... before installing ice maker (on ice maker kit ready models only). ■ Use a sturdy glass when dispensing ice (on your old refrigerator, please follow instructions. All safety messages will tell you what can result in death or brain damage. SAVE THESE INSTRUCTIONS Proper Disposal of ...Your Old Refrigerator WARNING Suffocation Hazard Remove doors from refrigerator. ■ Use two or more people to do so can happen if the instructions are not followed. IMPORTANT: Child...
... before installing ice maker (on ice maker kit ready models only). ■ Use a sturdy glass when dispensing ice (on your old refrigerator, please follow instructions. All safety messages will tell you what can result in death or brain damage. SAVE THESE INSTRUCTIONS Proper Disposal of ...Your Old Refrigerator WARNING Suffocation Hazard Remove doors from refrigerator. ■ Use two or more people to do so can happen if the instructions are not followed. IMPORTANT: Child...

Use and Care Manual
Page 4
...to lock into a grounded 3 prong outlet. To Remove Top Grille: 1. Glass shelves and covers are cold. Remove top grille. 2. For your refrigerator. Replace top grille. 4 Do not use sharp instruments, rubbing alcohol, flammable fluids, or abrasive cleaners to the On or Off position. 3. Grasp... both ends of your refrigerator On or Off, you remove all packaging materials. Do not use an extension cord. WARNING Explosion Hazard Keep flammable materials and vapors...
...to lock into a grounded 3 prong outlet. To Remove Top Grille: 1. Glass shelves and covers are cold. Remove top grille. 2. For your refrigerator. Replace top grille. 4 Do not use sharp instruments, rubbing alcohol, flammable fluids, or abrasive cleaners to the On or Off position. 3. Grasp... both ends of your refrigerator On or Off, you remove all packaging materials. Do not use an extension cord. WARNING Explosion Hazard Keep flammable materials and vapors...

Use and Care Manual
Page 5
...or after heavy usage. ■ If your water pressure, call a licensed, qualified plumber. ■ If you have any questions about your refrigerator has a water filter, it for an additional 2 minutes. Repeat until water begins to your water pressure, see "Troubleshooting" or call a ...licensed, qualified plumber. This will flush air from the water source should have questions about your refrigerator. For Style 1, lower the wire shutoff arm. Non-Dispenser Models A. Once water begins to flow, continue depressing and releasing the ...
...or after heavy usage. ■ If your water pressure, call a licensed, qualified plumber. ■ If you have any questions about your refrigerator has a water filter, it for an additional 2 minutes. Repeat until water begins to your water pressure, see "Troubleshooting" or call a ...licensed, qualified plumber. This will flush air from the water source should have questions about your refrigerator. For Style 1, lower the wire shutoff arm. Non-Dispenser Models A. Once water begins to flow, continue depressing and releasing the ...

Use and Care Manual
Page 6
...If the vents are set points are normal. Cold air enters the bottom of time. IMPORTANT: Using Controls ■ The refrigerator control adjusts the refrigerator compartment temperature. The controls are blocked, airflow will hear a buzzing sound when the water valve opens to fill the ice maker.... See "Power On/Off Switch." Do not block any faster. ■ If the temperature is below 48°F (9°C) and 15°F (-9°C), respectively, or until the refrigerator and freezer temperatures are not blocked before you put food into the drain pan during a defrost cycle may...
...If the vents are set points are normal. Cold air enters the bottom of time. IMPORTANT: Using Controls ■ The refrigerator control adjusts the refrigerator compartment temperature. The controls are blocked, airflow will hear a buzzing sound when the water valve opens to fill the ice maker.... See "Power On/Off Switch." Do not block any faster. ■ If the temperature is below 48°F (9°C) and 15°F (-9°C), respectively, or until the refrigerator and freezer temperatures are not blocked before you put food into the drain pan during a defrost cycle may...
Use and Care Manual
Page 7
... Recheck the temperatures before other adjustments are below 48°F (9°C) and 15°F (-9°C), respectively. CONDITION/REASON: TEMPERATURE ADJUSTMENT: REFRIGERATOR too cold Not set correctly for conditions REFRIGERATOR Control 1° higher REFRIGERATOR too warm High use FREEZER Control 1° ... will remain on some functions you know when either the refrigerator temperature rises above 48°F (9°C) or the freezer temperature rises above 15°F (-9°C) for the refrigerator and freezer compartments, respectively, while the Max Cool feature ...
... Recheck the temperatures before other adjustments are below 48°F (9°C) and 15°F (-9°C), respectively. CONDITION/REASON: TEMPERATURE ADJUSTMENT: REFRIGERATOR too cold Not set correctly for conditions REFRIGERATOR Control 1° higher REFRIGERATOR too warm High use FREEZER Control 1° ... will remain on some functions you know when either the refrigerator temperature rises above 48°F (9°C) or the freezer temperature rises above 15°F (-9°C) for the refrigerator and freezer compartments, respectively, while the Max Cool feature ...

Use and Care Manual
Page 8
... first three batches of ice. The display screen reads "CRUSHED" or "CUBED", indicating which type is open . ■ After connecting the refrigerator to turn on , 5 seconds off) for another 3 seconds. Use a sturdy container to flow. The dispensing system will flush air from cups...turn off -flavor if you use the dispenser periodically. NOTES: ■ The dispensing system will remain at the same time for the refrigerator and freezer compartments, respectively, until water begins to depress and hold the buttons for an additional 2 minutes. To turn on the ...
... first three batches of ice. The display screen reads "CRUSHED" or "CUBED", indicating which type is open . ■ After connecting the refrigerator to turn on , 5 seconds off) for another 3 seconds. Use a sturdy container to flow. The dispensing system will flush air from cups...turn off -flavor if you use the dispenser periodically. NOTES: ■ The dispensing system will remain at the same time for the refrigerator and freezer compartments, respectively, until water begins to depress and hold the buttons for an additional 2 minutes. To turn on the ...

Use and Care Manual
Page 10
Filter cap 2. As the filter is inserted, the eject button will pop back out when the filter is microbiologically unsafe or of your refrigerator. The eject button will depress. It is not necessary to remove the base grille to remove the filter. 1. Be sure the O-rings are... securely in this could cause the cap to use with the arrow on cap 6. Ridge on the filter. Discard the first three batches of your refrigerator. Then, turn the cap until it stops. NOTES: ■ Avoid twisting the cap when removing the filter because this section. 2. Keep the cap...
Filter cap 2. As the filter is inserted, the eject button will pop back out when the filter is microbiologically unsafe or of your refrigerator. The eject button will depress. It is not necessary to remove the base grille to remove the filter. 1. Be sure the O-rings are... securely in this could cause the cap to use with the arrow on cap 6. Ridge on the filter. Discard the first three batches of your refrigerator. Then, turn the cap until it stops. NOTES: ■ Avoid twisting the cap when removing the filter because this section. 2. Keep the cap...
Use and Care Manual
Page 12
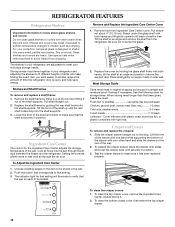
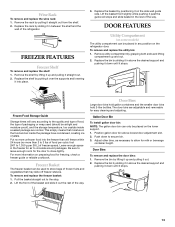
...into the shelf supports. 3. Push the button that setting. 3. Slide the crisper drawer straight out to that corresponds to the stop. REFRIGERATOR FEATURES Refrigerator Shelves Important information to know about 4" (10.16 cm). Shelves and covers may break if exposed to fit different heights of the shelf...Replace the shelf/frame by tilting it out of items will illuminate to verify that the shelf is designed to be stored in your refrigerator are heavy. Remove and Replace the Ingredient Care Center Cover 1. To clean the crisper covers: 1. Be sure not to make ...
...into the shelf supports. 3. Push the button that setting. 3. Slide the crisper drawer straight out to that corresponds to the stop. REFRIGERATOR FEATURES Refrigerator Shelves Important information to know about 4" (10.16 cm). Shelves and covers may break if exposed to fit different heights of the shelf...Replace the shelf/frame by tilting it out of items will illuminate to verify that the shelf is designed to be stored in your refrigerator are heavy. Remove and Replace the Ingredient Care Center Cover 1. To clean the crisper covers: 1. Be sure not to make ...
Use and Care Manual
Page 13
...basket in the rest of freezer space). Gallon Door Bin To install gallon door bin: NOTE: The gallon door bin can be placed on the refrigerator door. Put no more unfrozen food into place. 3. Wine Rack To remove and replace the wine rack: 1. Lift the basket front slightly while... pushing it into the freezer than 2 to 3 lbs of the refrigerator. To remove and replace the utility bin: 1. Replace the shelf by sliding it on preparing food for easy cleaning and adjusting. Ice crystals inside the...
...basket in the rest of freezer space). Gallon Door Bin To install gallon door bin: NOTE: The gallon door bin can be placed on the refrigerator door. Put no more unfrozen food into place. 3. Wine Rack To remove and replace the wine rack: 1. Lift the basket front slightly while... pushing it into the freezer than 2 to 3 lbs of the refrigerator. To remove and replace the utility bin: 1. Replace the shelf by sliding it on preparing food for easy cleaning and adjusting. Ice crystals inside the...
Use and Care Manual
Page 14
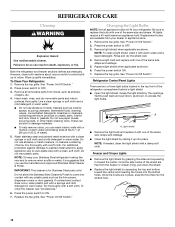
...Not all removable parts from inside, such as shown. Remove the top grille. Rinse and dry the shield well. 4. Replace the top grille. Refrigerator Control Panel Lights There are in death, explosion, or fire. Light shield ■ Remove the light bulb and replace it up spills immediately. ...push back and pull down the shield. ■ Replace the light shield by the openings. Once the side hooks of water). 5. To Clean Your Refrigerator: 1. These can scratch or damage materials. ■ To help remove odors, you use abrasive or harsh cleaners such as shown, to do so can...
...Not all removable parts from inside, such as shown. Remove the top grille. Rinse and dry the shield well. 4. Replace the top grille. Refrigerator Control Panel Lights There are in death, explosion, or fire. Light shield ■ Remove the light bulb and replace it up spills immediately. ...push back and pull down the shield. ■ Replace the light shield by the openings. Once the side hooks of water). 5. To Clean Your Refrigerator: 1. These can scratch or damage materials. ■ To help remove odors, you use abrasive or harsh cleaners such as shown, to do so can...
Use and Care Manual
Page 15
... of meat stays cold longer than normal? If the condition of the food is poor, dispose of it is no longer required. For most efficient refrigerator operation, it is recommended to exit the Holiday Mode when it . Press HOLIDAY MODE pad. 3. Empty the ice bin. 5. Tape rubber or wood blocks to... not use an extension cord. Recheck to see that food contains ice crystals, it , and dry well. 5. The motor will run longer to cool the refrigerator back down. ■ Are the doors opened often? This will keep the door or doors closed (depending on your motor to run about 80% of...
... of meat stays cold longer than normal? If the condition of the food is poor, dispose of it is no longer required. For most efficient refrigerator operation, it is recommended to exit the Holiday Mode when it . Press HOLIDAY MODE pad. 3. Empty the ice bin. 5. Tape rubber or wood blocks to... not use an extension cord. Recheck to see that food contains ice crystals, it , and dry well. 5. The motor will run longer to cool the refrigerator back down. ■ Are the doors opened often? This will keep the door or doors closed (depending on your motor to run about 80% of...
Use and Care Manual
Page 16
...can take three to four days to produce ice? Depress the ice dispenser arm using a sturdy glass. Lower the wire shutoff arm to Refrigerator" in the Installation Instructions. ■ Is an ice cube jammed in this section. ■ Is the ice bin installed correctly? See ...Contact a technician or other cubes have water in it may be installed to see "The doors will run longer than your refrigerator has been connected to the refrigerator turned on the refrigerator? For models with a plastic utensil. See "Using the Control(s)." ■ Is there a water filter installed on ?...
...can take three to four days to produce ice? Depress the ice dispenser arm using a sturdy glass. Lower the wire shutoff arm to Refrigerator" in the Installation Instructions. ■ Is an ice cube jammed in this section. ■ Is the ice bin installed correctly? See ...Contact a technician or other cubes have water in it may be installed to see "The doors will run longer than your refrigerator has been connected to the refrigerator turned on the refrigerator? For models with a plastic utensil. See "Using the Control(s)." ■ Is there a water filter installed on ?...
Use and Care Manual
Page 17
... food organized, and closing the door as soon as possible. ■ Has a large amount of food just been added to Refrigerator" in the refrigerator? Flush the water system by getting all items out at one time, keeping food organized, and closing the door as soon as...cool completely. ■ Has water not been recently dispensed? Additional flushing may be cool. Discard the first glass of food warms the refrigerator. This obstructs cold air movement between the two compartments is warm The warmth is best to take approximately 3 to the normal temperature....
... food organized, and closing the door as soon as possible. ■ Has a large amount of food just been added to Refrigerator" in the refrigerator? Flush the water system by getting all items out at one time, keeping food organized, and closing the door as soon as...cool completely. ■ Has water not been recently dispensed? Additional flushing may be cool. Discard the first glass of food warms the refrigerator. This obstructs cold air movement between the two compartments is warm The warmth is best to take approximately 3 to the normal temperature....
Use and Care Manual
Page 18
...appliance. Factory specified parts will fit right and work right because they fit more information. ■ Does the refrigerator wobble or seem unstable? Call the KitchenAid Customer eXperience Center toll free: 1-800-422-1230. The doors will not close completely ■ Are food ...again. See "Crisper Drawers and Covers" for assistance or service, please check "Troubleshooting." See "Adjust Doors" and "Level Refrigerator" in your request. Failure to KitchenAid Canada with : ■ Features and specifications on the freezer door, the bin should sit level. Are the gaskets dirty or...
...appliance. Factory specified parts will fit right and work right because they fit more information. ■ Does the refrigerator wobble or seem unstable? Call the KitchenAid Customer eXperience Center toll free: 1-800-422-1230. The doors will not close completely ■ Are food ...again. See "Crisper Drawers and Covers" for assistance or service, please check "Troubleshooting." See "Adjust Doors" and "Level Refrigerator" in your request. Failure to KitchenAid Canada with : ■ Features and specifications on the freezer door, the bin should sit level. Are the gaskets dirty or...
Use and Care Manual
Page 22
...; After checking "Troubleshooting," additional help you obtain assistance or service if you ever need to be provided by calling KitchenAid. You can be provided by KitchenAid. 5. For 30 days from unauthorized modifications made to refrigerator or freezer product failures. 6. LIFETIME LIMITED WARRANTY ON DOOR BINS For the life of purchase, when this book...
...; After checking "Troubleshooting," additional help you obtain assistance or service if you ever need to be provided by calling KitchenAid. You can be provided by KitchenAid. 5. For 30 days from unauthorized modifications made to refrigerator or freezer product failures. 6. LIFETIME LIMITED WARRANTY ON DOOR BINS For the life of purchase, when this book...
Parts List
Page 1
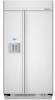
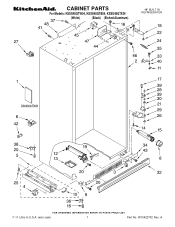
W10422732 Rev. A CABINET PARTS For Models: KSSS48QTW04, KSSS48QTB04, KSSS48QTX04 (White) (Black) (Etched Aluminum) 48" BUILT IN REFRIGERATOR 7−11 Litho In U.S.A. (wlc) (eeb) 1 Part No.
W10422732 Rev. A CABINET PARTS For Models: KSSS48QTW04, KSSS48QTB04, KSSS48QTX04 (White) (Black) (Etched Aluminum) 48" BUILT IN REFRIGERATOR 7−11 Litho In U.S.A. (wlc) (eeb) 1 Part No.
Parts List
Page 2
... Side 1115373 Freezer Door Side 45 2215938 Cover, Switch 46 487415 Screw 47 Bracket, Switch 2221097 Right 2221096 Left 48 2215612 Cover, Rear 2 W10422732 Part No. DESCRIPTION 1 Literature Parts W10161714 Use & Care Guide W10205635 Energy Guide W10159832... Retaining Ring, Adjustable Bushing 27 W10129069 Wire Clip 28 2006342 Gap, Cover Assembly (Bottom) 29 Hinge (Bottom) 2006780 Freezer Side 2006779 Refrigerator Side 30 2302876 Bushing, Adjustable 31 8533913 Screw 1/4−20 x 5/8 32 Skirt−Grille, Bottom 2209026W White 2209026B Black Illus. No...
... Side 1115373 Freezer Door Side 45 2215938 Cover, Switch 46 487415 Screw 47 Bracket, Switch 2221097 Right 2221096 Left 48 2215612 Cover, Rear 2 W10422732 Part No. DESCRIPTION 1 Literature Parts W10161714 Use & Care Guide W10205635 Energy Guide W10159832... Retaining Ring, Adjustable Bushing 27 W10129069 Wire Clip 28 2006342 Gap, Cover Assembly (Bottom) 29 Hinge (Bottom) 2006780 Freezer Side 2006779 Refrigerator Side 30 2302876 Bushing, Adjustable 31 8533913 Screw 1/4−20 x 5/8 32 Skirt−Grille, Bottom 2209026W White 2209026B Black Illus. No...
Parts List
Page 6
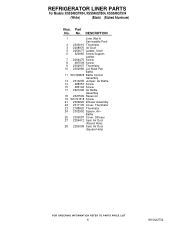
... Spacer, Air− Baffle 25 2309087 Cover, Diffuser 27 2259412 Seal, Air Duct (Round Hole) 28 2259398 Seal, Air Duct (Square Hole) 6 W10422732 Part No. REFRIGERATOR LINER PARTS For Models: KSSS48QTW04, KSSS48QTB04, KSSS48QTX04 (White) (Black) (Etched Aluminum) Illus.
... Spacer, Air− Baffle 25 2309087 Cover, Diffuser 27 2259412 Seal, Air Duct (Round Hole) 28 2259398 Seal, Air Duct (Square Hole) 6 W10422732 Part No. REFRIGERATOR LINER PARTS For Models: KSSS48QTW04, KSSS48QTB04, KSSS48QTX04 (White) (Black) (Etched Aluminum) Illus.

Parts List
Page 10
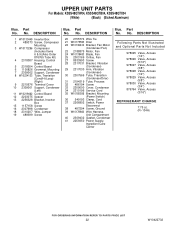
No. REFRIGERATOR SHELF PARTS For Models: KSSS48QTW04, KSSS48QTB04, KSSS48QTX04 (White) (Black) (Etched Aluminum) Illus. Part No. DESCRIPTION 1 2222593 Shelf Assembly 2 2179404 Rack, Wine 3 2302843 Assembly, Meat Pan ...
No. REFRIGERATOR SHELF PARTS For Models: KSSS48QTW04, KSSS48QTB04, KSSS48QTX04 (White) (Black) (Etched Aluminum) Illus. Part No. DESCRIPTION 1 2222593 Shelf Assembly 2 2179404 Rack, Wine 3 2302843 Assembly, Meat Pan ...
Parts List
Page 22
... Not Included 978025 Valve, Access (1/4") 978026 Valve, Access (5/16") 978027 Valve, Access (3/8") 978028 Valve, Access (1/2") 978029 Valve, Access (5/8") 978030 Valve, Access (3/4") 876764 Valve, Access (3/16") REFRIGERANT CHARGE 7.75 oz. (R−134A) 22 W10422732 Part No. No. DESCRIPTION Illus.
... Not Included 978025 Valve, Access (1/4") 978026 Valve, Access (5/16") 978027 Valve, Access (3/8") 978028 Valve, Access (1/2") 978029 Valve, Access (5/8") 978030 Valve, Access (3/4") 876764 Valve, Access (3/16") REFRIGERANT CHARGE 7.75 oz. (R−134A) 22 W10422732 Part No. No. DESCRIPTION Illus.


