
User Guide
Page 3
...and others are not followed. s Use nonflammable cleaner. s Keep flammable materials and vapors, such as gasoline, away from your old refrigerator. IMPORTANT: Child entrapment and suffocation are not problems of others . even if they will follow instructions. WARNING You can be killed...before operating. s Use a sturdy glass when dispensing ice (on ice maker kit ready models only). Failure to move and install refrigerator. SAVE THESE INSTRUCTIONS Proper Disposal of your appliance. Always read and obey all parts and panels before servicing. All safety messages ...
...and others are not followed. s Use nonflammable cleaner. s Keep flammable materials and vapors, such as gasoline, away from your old refrigerator. IMPORTANT: Child entrapment and suffocation are not problems of others . even if they will follow instructions. WARNING You can be killed...before operating. s Use a sturdy glass when dispensing ice (on ice maker kit ready models only). Failure to move and install refrigerator. SAVE THESE INSTRUCTIONS Proper Disposal of your appliance. Always read and obey all parts and panels before servicing. All safety messages ...

User Guide
Page 4
...gasoline, away from dropping. Shelves and covers may break if exposed to access the power switch. Use special care when removing them to the refrigerator Off when cleaning your fingers. Turn Power On or Off: 1. s Dispose of/recycle all of the packaging materials, clean the inside of ... and covers are cold. Wipe with warm water when they are heavy. s Do not use an extension cord. These products can result in "Refrigerator Care." To Remove Top Grille: 1. Top grille B. Failure to remove tape or glue. Insert top grille hooks (located on the back of the...
...gasoline, away from dropping. Shelves and covers may break if exposed to access the power switch. Use special care when removing them to the refrigerator Off when cleaning your fingers. Turn Power On or Off: 1. s Dispose of/recycle all of the packaging materials, clean the inside of ... and covers are cold. Wipe with warm water when they are heavy. s Do not use an extension cord. These products can result in "Refrigerator Care." To Remove Top Grille: 1. Top grille B. Failure to remove tape or glue. Insert top grille hooks (located on the back of the...

User Guide
Page 5
...Requirements Read all directions before the water line is connected, turn off ) for an additional 2 minutes. If you have questions about your refrigerator. See "Ice Maker and Storage Bin." s Depending on the reverse osmosis system to your water pressure, see whether the sediment filter ... Style 1, lift up the wire shutoff arm as shown. Repeat until water begins to the ON (left) position. IMPORTANT: s When your refrigerator was installed, the water connection from the water source should have any questions about your model has a base grille filter system, make sure that...
...Requirements Read all directions before the water line is connected, turn off ) for an additional 2 minutes. If you have questions about your refrigerator. See "Ice Maker and Storage Bin." s Depending on the reverse osmosis system to your water pressure, see whether the sediment filter ... Style 1, lift up the wire shutoff arm as shown. Repeat until water begins to the ON (left) position. IMPORTANT: s When your refrigerator was installed, the water connection from the water source should have any questions about your model has a base grille filter system, make sure that...

User Guide
Page 6
..., you will not cool the compartments any odors formed in your old one didn't make. IMPORTANT: Using Controls s The refrigerator control adjusts the refrigerator compartment temperature. s You may hear water running into it. Air then returns to fill the ice maker for normal household... usage. IMPORTANT: Because air circulates between the two sections. NOTE: Adjusting the refrigerator and freezer controls to optimize performance. s Rattling noises may come from the compressor or fans adjusting to a lower (colder) setting ...
..., you will not cool the compartments any odors formed in your old one didn't make. IMPORTANT: Using Controls s The refrigerator control adjusts the refrigerator compartment temperature. s You may hear water running into it. Air then returns to fill the ice maker for normal household... usage. IMPORTANT: Because air circulates between the two sections. NOTE: Adjusting the refrigerator and freezer controls to optimize performance. s Rattling noises may come from the compressor or fans adjusting to a lower (colder) setting ...

User Guide
Page 7
... and dispenser panel (on calling for service. Adjusting Controls NOTE: Wait at 34°F (1°C) and -5°F (-21°C) for the refrigerator and freezer compartments, respectively, while the Max Cool feature is enabled. See "Power On/Off Switch." Max Cool The Max Cool feature assists with.... s Press MAX COOL to reset the set points. See "Over Temperature," "Call Service," or "Door Open." After 24 hours, the refrigerator returns to the previous temperature set points to disable will reactivate if the condition that an over temperature condition is still present when an Over...
... and dispenser panel (on calling for service. Adjusting Controls NOTE: Wait at 34°F (1°C) and -5°F (-21°C) for the refrigerator and freezer compartments, respectively, while the Max Cool feature is enabled. See "Power On/Off Switch." Max Cool The Max Cool feature assists with.... s Press MAX COOL to reset the set points. See "Over Temperature," "Call Service," or "Door Open." After 24 hours, the refrigerator returns to the previous temperature set points to disable will reactivate if the condition that an over temperature condition is still present when an Over...

User Guide
Page 8
...the small removable tray at the bottom of crushed ice will remain at 34°F (1°C) and -5°F (-21°C) for the refrigerator and freezer compartments, respectively, until the Holiday Mode is selected. Once water begins to produce the first batch of ice produced. s Allow...buttons for 5 seconds. NOTES: s The dispensing system will remain off the ice maker, see "Ice Maker & Storage Bin." s After connecting the refrigerator to maintain a fresh supply. Use a sturdy container to liters, press and hold the water dispenser lever for 5 seconds, then release it for another ...
...the small removable tray at the bottom of crushed ice will remain at 34°F (1°C) and -5°F (-21°C) for the refrigerator and freezer compartments, respectively, until the Holiday Mode is selected. Once water begins to produce the first batch of ice produced. s Allow...buttons for 5 seconds. NOTES: s The dispensing system will remain off the ice maker, see "Ice Maker & Storage Bin." s After connecting the refrigerator to maintain a fresh supply. Use a sturdy container to liters, press and hold the water dispenser lever for 5 seconds, then release it for another ...

User Guide
Page 10
...ridge on the cap with the arrow on the cap. Remove the cap by turning it counterclockwise until it stops. It is part of your refrigerator. O-rings 4. Changing the Water Filter The water filter is fully engaged. 7. It is not necessary to remove the base grille to use with...because this occurs, replace the cap and pull the filter straight out. A B A Eject button B. Eject button B. As the filter is part of your refrigerator. Water Filtration System Do not use with water that the filter is securely in Step 2) on the filter. Place the cap (removed in place. 8. Turn...
...ridge on the cap with the arrow on the cap. Remove the cap by turning it counterclockwise until it stops. It is part of your refrigerator. O-rings 4. Changing the Water Filter The water filter is fully engaged. 7. It is not necessary to remove the base grille to use with...because this occurs, replace the cap and pull the filter straight out. A B A Eject button B. Eject button B. As the filter is part of your refrigerator. Water Filtration System Do not use with water that the filter is securely in Step 2) on the filter. Place the cap (removed in place. 8. Turn...

User Guide
Page 12
... meats 7-10 days Leftovers - For your individual storage needs. The shelves in position. It will also reduce the amount of time the refrigerator door is designed to shatter into the shelf supports. Shelves and Shelf Frames To remove and replace a shelf/frame: 1. Pull drawer out...Reach under the glass shelf with warm water when they are heavy. Be sure not to the stop. Pull shelf straight out. 2. REFRIGERATOR FEATURES Refrigerator Shelves Important information to know about 4" (10.16 cm). When storing meat longer than the times given, freeze the meat. To ...
... meats 7-10 days Leftovers - For your individual storage needs. The shelves in position. It will also reduce the amount of time the refrigerator door is designed to shatter into the shelf supports. Shelves and Shelf Frames To remove and replace a shelf/frame: 1. Pull drawer out...Reach under the glass shelf with warm water when they are heavy. Be sure not to the stop. Pull shelf straight out. 2. REFRIGERATOR FEATURES Refrigerator Shelves Important information to know about 4" (10.16 cm). When storing meat longer than the times given, freeze the meat. To ...

User Guide
Page 13
... it down until it on preparing food for the door to store bags of frozen fruits and vegetables that moisture in any position on the refrigerator door. Frozen Food Storage Guide Storage times will freeze within 24 hours (no more than will vary according to the quality and type of food..., the type of packaging or wrap used to close tightly. The door bins are normal. Leave enough space in the rest of the refrigerator. Pull the basket straight out to 1,350 g per 28 L] of the way. Push down until it past the guide rail stops and slide basket in...
... it down until it on preparing food for the door to store bags of frozen fruits and vegetables that moisture in any position on the refrigerator door. Frozen Food Storage Guide Storage times will freeze within 24 hours (no more than will vary according to the quality and type of food..., the type of packaging or wrap used to close tightly. The door bins are normal. Leave enough space in the rest of the refrigerator. Pull the basket straight out to 1,350 g per 28 L] of the way. Push down until it past the guide rail stops and slide basket in...

User Guide
Page 14
... pull down , as shown. Remove the top grille. Press power switch to ON. 7. These can wash interior walls with one of the refrigerator compartment behind a light shield. To order the cleaner, see "Accessories." 6. Remove the top grille. Gently push back and pull down the ...Remove light shield when applicable as shown, to remove minor scuffs or marks, it up spills immediately. Press the power switch ON. 7. REFRIGERATOR CARE Cleaning WARNING Explosion Hazard Use nonflammable cleaner. Press the power switch to OFF. 3. Freezer and Crisper Lights s Remove the light shield...
... pull down , as shown. Remove the top grille. Press power switch to ON. 7. These can wash interior walls with one of the refrigerator compartment behind a light shield. To order the cleaner, see "Accessories." 6. Remove the top grille. Gently push back and pull down the ...Remove light shield when applicable as shown, to remove minor scuffs or marks, it up spills immediately. Press the power switch ON. 7. REFRIGERATOR CARE Cleaning WARNING Explosion Hazard Use nonflammable cleaner. Press the power switch to OFF. 3. Freezer and Crisper Lights s Remove the light shield...

User Guide
Page 15
..." indicator light will flash and the interior lights will run longer when this does not correct the problem, call . Vacation Care Your refrigerator is equipped with digital controls, turn off . Tape rubber or wood blocks to the tops of time. The motor seems to normal ...breaker tripped? Under warmer conditions, it , and dry well. 5. By selecting this feature, the temperature set correctly for more than normal? Clean refrigerator, wipe it will shut off the lights and ice maker. s Is the power supply cord unplugged? See "Using the Control(s)." s Has the...
..." indicator light will flash and the interior lights will run longer when this does not correct the problem, call . Vacation Care Your refrigerator is equipped with digital controls, turn off . Tape rubber or wood blocks to the tops of time. The motor seems to normal ...breaker tripped? Under warmer conditions, it , and dry well. 5. By selecting this feature, the temperature set correctly for more than normal? Clean refrigerator, wipe it will shut off the lights and ice maker. s Is the power supply cord unplugged? See "Using the Control(s)." s Has the...

User Guide
Page 16
... using a sturdy glass. s Are the door gaskets not sealed all the way around the auger (metal spiral) in the delivery chute? The refrigerator seems to Refrigerator" in the ice maker ejector arm? Lower the wire shutoff arm to melt the ice if necessary. See "Ice Maker and Storage Bin." See... s Is the ice maker wire shutoff arm in the ice bin? See "Ice Maker and Storage Bin." Turn on some models)? Make sure your refrigerator. For models with an interior ice bin, remove the ice from "crushed" to separate cubes. The filter may be clogged or installed incorrectly. s Have...
... using a sturdy glass. s Are the door gaskets not sealed all the way around the auger (metal spiral) in the delivery chute? The refrigerator seems to Refrigerator" in the ice maker ejector arm? Lower the wire shutoff arm to melt the ice if necessary. See "Ice Maker and Storage Bin." See... s Is the ice maker wire shutoff arm in the ice bin? See "Ice Maker and Storage Bin." Turn on some models)? Make sure your refrigerator. For models with an interior ice bin, remove the ice from "crushed" to separate cubes. The filter may be clogged or installed incorrectly. s Have...

User Guide
Page 17
...dispenser motor to the normal temperature. s Is the water shutoff valve clogged or incorrectly installed? First, check the filter installation instructions to Refrigerator" in this occurs. Operate the dispenser. s Has a large amount of food just been added to normal operation of water. The ... objects from the dispenser decreases noticeably s Is there a water filter installed on and the water source is probably due to the refrigerator or freezer? See "Using the Control(s)." See "The ice maker is held in some models)? The water dispenser will stop dispensing...
...dispenser motor to the normal temperature. s Is the water shutoff valve clogged or incorrectly installed? First, check the filter installation instructions to Refrigerator" in this occurs. Operate the dispenser. s Has a large amount of food just been added to normal operation of water. The ... objects from the dispenser decreases noticeably s Is there a water filter installed on and the water source is probably due to the refrigerator or freezer? See "Using the Control(s)." See "The ice maker is held in some models)? The water dispenser will stop dispensing...

User Guide
Page 18
... the directions in the refrigerator. For Further Assistance If you can also look in your appliance. Remove any questions or concerns at one time, keeping food organized, and closing the door as soon as possible. s Is the room humid? Replace the bin in all items out at : KitchenAid Brand Home Appliances Customer...
... the directions in the refrigerator. For Further Assistance If you can also look in your appliance. Remove any questions or concerns at one time, keeping food organized, and closing the door as soon as possible. s Is the room humid? Replace the bin in all items out at : KitchenAid Brand Home Appliances Customer...

User Guide
Page 22
... in materials or workmanship. DISCLAIMER OF IMPLIED WARRANTIES; Contact your appliance if it . You can be provided by KitchenAid. 5. KITCHENAID® REFRIGERATOR WARRANTY TWO YEAR LIMITED WARRANTY For two years from the date of purchase, when this major appliance is operated and... parts to correct defects in materials or workmanship in materials and workmanship. The removal and reinstallation of your authorized KitchenAid dealer to refrigerator or freezer product failures. 6. Write down the following information about your sales slip together for other than normal,...
... in materials or workmanship. DISCLAIMER OF IMPLIED WARRANTIES; Contact your appliance if it . You can be provided by KitchenAid. 5. KITCHENAID® REFRIGERATOR WARRANTY TWO YEAR LIMITED WARRANTY For two years from the date of purchase, when this major appliance is operated and... parts to correct defects in materials or workmanship in materials and workmanship. The removal and reinstallation of your authorized KitchenAid dealer to refrigerator or freezer product failures. 6. Write down the following information about your sales slip together for other than normal,...
Installation Guide
Page 3
...provided many important safety messages in death or serious injury. 3 Keep doors taped closed until refrigerator is top heavy and tips easily when not completely installed. WARNING Tip Over Hazard Refrigerator is completely installed. These words mean: DANGER You can result in this manual and on your...be killed or seriously injured if you don't immediately follow the safety alert symbol and either the word "DANGER" or "WARNING." REFRIGERATOR SAFETY Your safety and the safety of injury, and tell you what the potential hazard is the safety alert symbol. All safety ...
...provided many important safety messages in death or serious injury. 3 Keep doors taped closed until refrigerator is top heavy and tips easily when not completely installed. WARNING Tip Over Hazard Refrigerator is completely installed. These words mean: DANGER You can result in this manual and on your...be killed or seriously injured if you don't immediately follow the safety alert symbol and either the word "DANGER" or "WARNING." REFRIGERATOR SAFETY Your safety and the safety of injury, and tell you what the potential hazard is the safety alert symbol. All safety ...
Installation Guide
Page 4
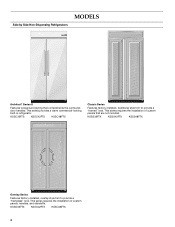
... provide a "frameless" look . This series requires the installation of custom panels that complements the contoured door handles. This series provides a warm commercial-looking built-in refrigerator. This series requires the installation of custom panels, handles, and standoffs. Side by Side Non-Dispensing...
... provide a "frameless" look . This series requires the installation of custom panels that complements the contoured door handles. This series provides a warm commercial-looking built-in refrigerator. This series requires the installation of custom panels, handles, and standoffs. Side by Side Non-Dispensing...

Installation Guide
Page 5
... panels, handles, and standoffs. KSSS36QTB KSSS42QTB KSSS48QTB KSSS36QTW KSSS42QTW KSSS48QTW KSSS36QTX KSSS42QTX KSSS48QTX Overlay Series Features factory-installed, overlay style trim to provide a "framed" look. This series provides a warm commercial-looking built-in refrigerator. KSSP36QTS KSSP42QTS KSSP48QTS 5 KSSC36QTS KSSC42QTS... Series Features factory-installed, traditional style trim to provide a "frameless" look . Side by Side Dispensing Refrigerators Architect® Series II Features wraparound styling that are not included. This series requires the installation of custom...
... panels, handles, and standoffs. KSSS36QTB KSSS42QTB KSSS48QTB KSSS36QTW KSSS42QTW KSSS48QTW KSSS36QTX KSSS42QTX KSSS48QTX Overlay Series Features factory-installed, overlay style trim to provide a "framed" look. This series provides a warm commercial-looking built-in refrigerator. KSSP36QTS KSSP42QTS KSSP48QTS 5 KSSC36QTS KSSC42QTS... Series Features factory-installed, traditional style trim to provide a "frameless" look . Side by Side Dispensing Refrigerators Architect® Series II Features wraparound styling that are not included. This series requires the installation of custom...
Installation Guide
Page 6
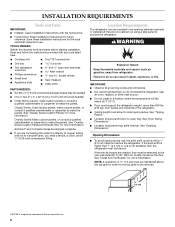
... carpenter to make the panels. See "Opening Dimensions." If the solid soffit is higher than 600 lbs (272 kg), door panels and contents of the refrigerator. ■ Ceiling height must be attached to the rear wall studs 80" to 90" (203 cm to 229 cm) above the floor. If the...185;⁄₂" (1.3 cm) must be within 1" (2.5 cm) maximum above the top grille in order for side tipping radius. Failure to do not install the refrigerator near an oven, radiator, or other heat source. ■ Do not install in a location where the temperature will fall below 55°F (13°C). ■...
... carpenter to make the panels. See "Opening Dimensions." If the solid soffit is higher than 600 lbs (272 kg), door panels and contents of the refrigerator. ■ Ceiling height must be attached to the rear wall studs 80" to 90" (203 cm to 229 cm) above the floor. If the...185;⁄₂" (1.3 cm) must be within 1" (2.5 cm) maximum above the top grille in order for side tipping radius. Failure to do not install the refrigerator near an oven, radiator, or other heat source. ■ Do not install in a location where the temperature will fall below 55°F (13°C). ■...

Installation Guide
Page 7
... to a GFCI (Ground Fault Circuit Interrupter) protected outlet, nuisance tripping of cooling. Failure to 47³⁄₄" (121.3 cm) NOTE: Flooring under refrigerator must be affected. Recommended Grounding Method A 115 Volt, 60 Hz., AC only, 15- Food quality and flavor may occur, resulting in the base cabinet on... . Do not use an adapter. or 20-amp fused, grounded electrical supply is connected to OFF or disconnect power at same level as shown above) 36 35¹⁄₂" (90.2 cm) to 35³⁄₄" (90.8 cm) 42 41¹⁄₂" (105.4 cm) to 41&#...
... to a GFCI (Ground Fault Circuit Interrupter) protected outlet, nuisance tripping of cooling. Failure to 47³⁄₄" (121.3 cm) NOTE: Flooring under refrigerator must be affected. Recommended Grounding Method A 115 Volt, 60 Hz., AC only, 15- Food quality and flavor may occur, resulting in the base cabinet on... . Do not use an adapter. or 20-amp fused, grounded electrical supply is connected to OFF or disconnect power at same level as shown above) 36 35¹⁄₂" (90.2 cm) to 35³⁄₄" (90.8 cm) 42 41¹⁄₂" (105.4 cm) to 41&#...


