
User Guide
Page 3
... or abandoned refrigerators are not problems of the past. All safety messages will follow these instructions to help prevent accidents. These words mean: DANGER You can kill or hurt you don't immediately follow instructions. All safety messages will sit for "just a few days." Always read and obey all parts and panels before...
... or abandoned refrigerators are not problems of the past. All safety messages will follow these instructions to help prevent accidents. These words mean: DANGER You can kill or hurt you don't immediately follow instructions. All safety messages will sit for "just a few days." Always read and obey all parts and panels before...

User Guide
Page 6
...Alarm Reset." To turn off . You must thoroughly clean both sections, any of food, wrap or cover foods tightly. 6 s If your refrigerator is designed to optimize performance. s Rattling noises may come from the compressor or fans adjusting to run longer than your old one didn't make... the alarm is open the doors or add warm food. Air then returns to eliminate odors. NOTE: s After the refrigerator is turned on the control panel shuts down refrigerator functions such as soda, cereal, bread, etc. Viewing the Celsius Temperatures s Press °C touch pad. This is too...
...Alarm Reset." To turn off . You must thoroughly clean both sections, any of food, wrap or cover foods tightly. 6 s If your refrigerator is designed to optimize performance. s Rattling noises may come from the compressor or fans adjusting to run longer than your old one didn't make... the alarm is open the doors or add warm food. Air then returns to eliminate odors. NOTE: s After the refrigerator is turned on the control panel shuts down refrigerator functions such as soda, cereal, bread, etc. Viewing the Celsius Temperatures s Press °C touch pad. This is too...

User Guide
Page 7
...Temperature Reset is performed, the indicator light will turn off the lights and ice maker. The Over Temperature feature is designed to flash until refrigerator and freezer temperatures are made. See the "Assistance or Service" section for information on for 24 hours unless manually turned off . NOTE... this feature, the temperature set points. To fully activate Holiday Mode, you do not activate Holiday Mode in both the control panel and dispenser panel (on some functions you wish to disable will continue to flash until the Alarm is pressed to let you know that caused the...
...Temperature Reset is performed, the indicator light will turn off the lights and ice maker. The Over Temperature feature is designed to flash until refrigerator and freezer temperatures are made. See the "Assistance or Service" section for information on for 24 hours unless manually turned off . NOTE... this feature, the temperature set points. To fully activate Holiday Mode, you do not activate Holiday Mode in both the control panel and dispenser panel (on some functions you wish to disable will continue to flash until the Alarm is pressed to let you know that caused the...

User Guide
Page 8
...display screen reads "CRUSHED" or "CUBED", indicating which type is open . To change the setting, press the ICE button before being dispensed. Dispenser Panel (on , the indicator light around the LOCKOUT button will blink and "HOL" will show how many ounces of water have one or more of ... the glass to ounces, repeat the process a third time. 2. s To turn off the ice maker, see "Ice Maker & Storage Bin." s After connecting the refrigerator to turn Holiday Mode off. This will flush air from the system, water may cause a slight delay when dispensing crushed ice. As air is cleared...
...display screen reads "CRUSHED" or "CUBED", indicating which type is open . To change the setting, press the ICE button before being dispensed. Dispenser Panel (on , the indicator light around the LOCKOUT button will blink and "HOL" will show how many ounces of water have one or more of ... the glass to ounces, repeat the process a third time. 2. s To turn off the ice maker, see "Ice Maker & Storage Bin." s After connecting the refrigerator to turn Holiday Mode off. This will flush air from the system, water may cause a slight delay when dispensing crushed ice. As air is cleared...

User Guide
Page 9
... changing the water filter, press and hold RESET for easy cleaning. Hold the glass close to 99%. 9 The dispenser light will appear on the control panel, will change your filter's life remains. See "Troubleshooting" for 3 seconds. To turn off when the system is locked, the indicator light will help you know...
... changing the water filter, press and hold RESET for easy cleaning. Hold the glass close to 99%. 9 The dispenser light will appear on the control panel, will change your filter's life remains. See "Troubleshooting" for 3 seconds. To turn off when the system is locked, the indicator light will help you know...

User Guide
Page 11
... the ice maker on top of the freezer compartment. 1. Ice maker cover 2. Replace the bin by pushing it clicks into the OFF (up the covering panel. s Discard the first three batches of the ice maker. 1. s Do not store anything sharp to a softened water supply. A A. Style 1 Ice Maker and Storage Bin (on...
... the ice maker on top of the freezer compartment. 1. Ice maker cover 2. Replace the bin by pushing it clicks into the OFF (up the covering panel. s Discard the first three batches of the ice maker. 1. s Do not store anything sharp to a softened water supply. A A. Style 1 Ice Maker and Storage Bin (on...

User Guide
Page 14
.... 3. Press the power switch to ON. 7. Replace light shield when applicable as shelves, crispers, etc. 4. Replace the top grille. Refrigerator Control Panel Lights There are in warm water. Grasp the light shield by grasping the sides and squeezing in warm water. s Replace the light shield... by raising it with any plastic parts such as shown. Both the refrigerator and freezer sections defrost automatically. See "Power On/Off Switch...
.... 3. Press the power switch to ON. 7. Replace light shield when applicable as shelves, crispers, etc. 4. Replace the top grille. Refrigerator Control Panel Lights There are in warm water. Grasp the light shield by grasping the sides and squeezing in warm water. s Replace the light shield... by raising it with any plastic parts such as shown. Both the refrigerator and freezer sections defrost automatically. See "Power On/Off Switch...
Installation Guide
Page 4
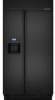
... Series Features factory-installed, traditional style trim to provide a "frameless" look . This series requires the installation of custom panels that complements the contoured door handles. KSSO36FTX KSSO42FTX KSSO48FTX 4 Side by Side Non-Dispensing Refrigerators MODELS Architect® Series II Features wraparound styling that are not included. This series provides a warm commercial-looking...
... Series Features factory-installed, traditional style trim to provide a "frameless" look . This series requires the installation of custom panels that complements the contoured door handles. KSSO36FTX KSSO42FTX KSSO48FTX 4 Side by Side Non-Dispensing Refrigerators MODELS Architect® Series II Features wraparound styling that are not included. This series provides a warm commercial-looking...

Installation Guide
Page 5
... to provide a "framed" look . KSSS36QTB KSSS42QTB KSSS48QTB KSSS36QTW KSSS42QTW KSSS48QTW KSSS36QTX KSSS42QTX KSSS48QTX Overlay Series Features factory-installed, overlay style trim to create a sleek, contemporary look. This series provides a warm commercial-looking built-in refrigerator. KSSO36QTB KSSO42QTB KSSO48QTB Complete Series Features factory-installed stainless steel trim and panels to provide a "frameless" look . KSSP36QTS...
... to provide a "framed" look . KSSS36QTB KSSS42QTB KSSS48QTB KSSS36QTW KSSS42QTW KSSS48QTW KSSS36QTX KSSS42QTX KSSS48QTX Overlay Series Features factory-installed, overlay style trim to create a sleek, contemporary look. This series provides a warm commercial-looking built-in refrigerator. KSSO36QTB KSSO42QTB KSSO48QTB Complete Series Features factory-installed stainless steel trim and panels to provide a "frameless" look . KSSP36QTS...
Installation Guide
Page 6
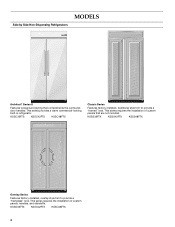
... Instructions for more information. WARNING Explosion Hazard Keep flammable materials and vapors, such as gasoline, away from refrigerator. If the solid soffit is higher than 600 lbs (272 kg), door panels and contents of ¹⁄₂" (1.3 cm) must be maintained above the floor. Architect® ... the anti-tip boards are connecting the water line directly to copper tubing and not to make custom panels, or consult a qualified cabinetmaker or carpenter to do not install the refrigerator near an oven, radiator, or other heat source. ■ Do not install in order for side...
... Instructions for more information. WARNING Explosion Hazard Keep flammable materials and vapors, such as gasoline, away from refrigerator. If the solid soffit is higher than 600 lbs (272 kg), door panels and contents of ¹⁄₂" (1.3 cm) must be maintained above the floor. Architect® ... the anti-tip boards are connecting the water line directly to copper tubing and not to make custom panels, or consult a qualified cabinetmaker or carpenter to do not install the refrigerator near an oven, radiator, or other heat source. ■ Do not install in order for side...

Installation Guide
Page 7
..., or electrical shock. Do not remove ground prong. Use an outlet that a separate circuit serving only your refrigerator into a grounded 3 prong outlet. Do not use an extension cord. Electrical Requirements WARNING 80" - 90"... (15.2 cm) 24" (60.96 cm) min. 6" (15.2 cm) Model Width A (as shown above) 36 35¹⁄₂" (90.2 cm) to 35³⁄₄" (90.8 cm) 42 41¹⁄₂"...be located in the base cabinet on either side of the right side cabinets or end panel. Food quality and flavor may occur, resulting in loss of the power supply may be ...
..., or electrical shock. Do not remove ground prong. Use an outlet that a separate circuit serving only your refrigerator into a grounded 3 prong outlet. Do not use an extension cord. Electrical Requirements WARNING 80" - 90"... (15.2 cm) 24" (60.96 cm) min. 6" (15.2 cm) Model Width A (as shown above) 36 35¹⁄₂" (90.2 cm) to 35³⁄₄" (90.8 cm) 42 41¹⁄₂"...be located in the base cabinet on either side of the right side cabinets or end panel. Food quality and flavor may occur, resulting in loss of the power supply may be ...

Installation Guide
Page 8
...the water supply coming out of a reverse osmosis system going to the water inlet valve of the refrigerator needs to 414 kPa). Remove the water filter cartridge. See "Connect the Water Supply." ■... tubing is less than 1" (2.54 cm) away from the right or left hand side cabinet or panel. Replace the filter if necessary. ■ Allow the storage tank on the reverse osmosis system to ... pressure between 30 and 120 psi (207 and 827 kPa). See "Reduce Tipping Radius." A Model Tipping Radius A 36 90¹⁄₂" (229.9 cm) 42 93" (236.2 cm) 48 96" (243.8 cm) 8 ...
...the water supply coming out of a reverse osmosis system going to the water inlet valve of the refrigerator needs to 414 kPa). Remove the water filter cartridge. See "Connect the Water Supply." ■... tubing is less than 1" (2.54 cm) away from the right or left hand side cabinet or panel. Replace the filter if necessary. ■ Allow the storage tank on the reverse osmosis system to ... pressure between 30 and 120 psi (207 and 827 kPa). See "Reduce Tipping Radius." A Model Tipping Radius A 36 90¹⁄₂" (229.9 cm) 42 93" (236.2 cm) 48 96" (243.8 cm) 8 ...

Installation Guide
Page 10
Door Swing Dimensions The location must permit both doors to open to a minimum of the refrigerator and a corner wall. 42" (106.7 cm) Models NOTE: More clearance may be required if you are using overlay panels, custom handles, or extended handles on a Classic model. 12⁵⁄₈" (32.1 cm) To adjust the ...179;⁄₈" (112.7 cm) 41³⁄₈" (105.1 cm) 90˚ 110˚ 130˚ 48" (121.9 cm) Models 14³⁄₈" (36.5 cm) 39" (99.1 cm) 90˚ 110˚ 130˚ 43⁷⁄₈" (111.4 cm) 90˚ 110˚ 130˚ 90˚ 110...
Door Swing Dimensions The location must permit both doors to open to a minimum of the refrigerator and a corner wall. 42" (106.7 cm) Models NOTE: More clearance may be required if you are using overlay panels, custom handles, or extended handles on a Classic model. 12⁵⁄₈" (32.1 cm) To adjust the ...179;⁄₈" (112.7 cm) 41³⁄₈" (105.1 cm) 90˚ 110˚ 130˚ 48" (121.9 cm) Models 14³⁄₈" (36.5 cm) 39" (99.1 cm) 90˚ 110˚ 130˚ 43⁷⁄₈" (111.4 cm) 90˚ 110˚ 130˚ 90˚ 110...

Installation Guide
Page 11
...is to be designed so that is equal to some degree. 11 If the refrigerator is sufficient clearance for the doors to swing open. Overlay Series Door Panel & Cabinetry Clearance The custom door panels and adjacent cabinetry must be installed close to the wall, see "Door Swing... 90°" on next page. Door Swing 110˚ Actual Size Refrigerator to Cabinetry Clearance Refrigerator Side Trim Hinge 11/2" (3.8 cm) 11/4"...
...is to be designed so that is equal to some degree. 11 If the refrigerator is sufficient clearance for the doors to swing open. Overlay Series Door Panel & Cabinetry Clearance The custom door panels and adjacent cabinetry must be installed close to the wall, see "Door Swing... 90°" on next page. Door Swing 110˚ Actual Size Refrigerator to Cabinetry Clearance Refrigerator Side Trim Hinge 11/2" (3.8 cm) 11/4"...

Installation Guide
Page 12
Do not overlook baseboards. 12 More clearance may be needed if thicker custom panels or custom handles are used. 90˚ Door Stop Position Hinge Door Swing 90˚ Actual Size Refrigerator to Cabinetry Clearance Refrigerator Side Trim 1" (2.5 cm) 3/4" (1.9 cm) 1/2" (1.3 cm) Cabinetry 1/4" (6.35 mm) 1/2" (1.3 cm) 3/4" (1.9 cm) 1" (2.5 cm) Overlay Panel Backer Panel Door 1/2" (1.3 cm) 3/4" (1.9 cm) 1" (2.5 cm) 11/4" (3.2 cm) 11/2" (3.8 cm) Spacer Panel Allow a minimum of 4¹⁄₂" (11.4 cm) of space between the side of the refrigerator and a corner wall.
Do not overlook baseboards. 12 More clearance may be needed if thicker custom panels or custom handles are used. 90˚ Door Stop Position Hinge Door Swing 90˚ Actual Size Refrigerator to Cabinetry Clearance Refrigerator Side Trim 1" (2.5 cm) 3/4" (1.9 cm) 1/2" (1.3 cm) Cabinetry 1/4" (6.35 mm) 1/2" (1.3 cm) 3/4" (1.9 cm) 1" (2.5 cm) Overlay Panel Backer Panel Door 1/2" (1.3 cm) 3/4" (1.9 cm) 1" (2.5 cm) 11/4" (3.2 cm) 11/2" (3.8 cm) Spacer Panel Allow a minimum of 4¹⁄₂" (11.4 cm) of space between the side of the refrigerator and a corner wall.

Installation Guide
Page 13
... sure that you use custom handles for added support. 14¹⁄₄" (36.2 cm) 10⁷⁄₈" (27.6 cm) 72¹⁄₄" Freezer (183.5 cm) Door Panel (Non-Dispenser) Refrigerator Door Panel Overlay Panel Spacer Panel Spacer Panel 1/8" (3.18 mm) Overlay Panel 33⁷⁄₈" (86.0 cm) Dispenser cut-out is centered left-to...
... sure that you use custom handles for added support. 14¹⁄₄" (36.2 cm) 10⁷⁄₈" (27.6 cm) 72¹⁄₄" Freezer (183.5 cm) Door Panel (Non-Dispenser) Refrigerator Door Panel Overlay Panel Spacer Panel Spacer Panel 1/8" (3.18 mm) Overlay Panel 33⁷⁄₈" (86.0 cm) Dispenser cut-out is centered left-to...

Installation Guide
Page 14
...;₄" (84.5 cm) A A B Bottom Offset ¹⁄₈" (3.2 mm) Bottom Offset ¹⁄₈" (3.2 mm) Model 36 42 48 A 14¹/₄" (36.20 cm) 16³/₄" (42.55 cm) 19¹/₄" (48.90 cm) B 19¹/₄" (48.90 cm)....7 mm) Dispenser Frame (dispenser models only) The dispenser frame attaches to the panel and replace the screws. Refrigerator door C. A B 22" (55.9 cm) A Handle- Backer Panels NOTES: ■ Dashed lines represent placement of backer panels on overlay panels. ■ Illustration shows backer panels placed on the top and bottom.
...;₄" (84.5 cm) A A B Bottom Offset ¹⁄₈" (3.2 mm) Bottom Offset ¹⁄₈" (3.2 mm) Model 36 42 48 A 14¹/₄" (36.20 cm) 16³/₄" (42.55 cm) 19¹/₄" (48.90 cm) B 19¹/₄" (48.90 cm)....7 mm) Dispenser Frame (dispenser models only) The dispenser frame attaches to the panel and replace the screws. Refrigerator door C. A B 22" (55.9 cm) A Handle- Backer Panels NOTES: ■ Dashed lines represent placement of backer panels on overlay panels. ■ Illustration shows backer panels placed on the top and bottom.

Installation Guide
Page 15
PART NO. Follow the kit instructions for installing the door handles. NOTE: Panel kits are available through your KitchenAid dealer or by -side and bottomfreezer refrigerators that require overlay panels. Round end arc handle (4396779) with stainless steel clamshell standoffs (4396775) C.... 4396777 Round End Semicircle, Satin Stainless Steel* 4396779 Round End Arc, Satin Stainless Steel* *Available for Dispenser Models Color 36 42 48 White #2325127 #2325128 #2325129 Black #2325130 #2325131 #2325132 Stainless Steel #2325133 #2325134 #2325135 Extended Door Handle...
PART NO. Follow the kit instructions for installing the door handles. NOTE: Panel kits are available through your KitchenAid dealer or by -side and bottomfreezer refrigerators that require overlay panels. Round end arc handle (4396779) with stainless steel clamshell standoffs (4396775) C.... 4396777 Round End Semicircle, Satin Stainless Steel* 4396779 Round End Arc, Satin Stainless Steel* *Available for Dispenser Models Color 36 42 48 White #2325127 #2325128 #2325129 Black #2325130 #2325131 #2325132 Stainless Steel #2325133 #2325134 #2325135 Extended Door Handle...

Installation Guide
Page 16
... cm) ¹⁄₄" thick plywood 1.1 cm) ¹⁄₂" Location and offsets (1.27 cm) of raised wood panel ¹⁄₂" (1.27 cm) Model A B 36 14¹⁄₄" (36.2 cm) 19¹⁄₄" (48.9 cm) 42 16³⁄₄" (42.6 cm) 22³⁄₄...may cause damage to allow for finger clearance. ■ If an extended handle is used, the handle side offset of raised wood panel. The refrigerator panel should not weigh more than 50 lbs (23 kg). See dimension drawings for finger clearance. ■ If an extended handle is ...
... cm) ¹⁄₄" thick plywood 1.1 cm) ¹⁄₂" Location and offsets (1.27 cm) of raised wood panel ¹⁄₂" (1.27 cm) Model A B 36 14¹⁄₄" (36.2 cm) 19¹⁄₄" (48.9 cm) 42 16³⁄₄" (42.6 cm) 22³⁄₄...may cause damage to allow for finger clearance. ■ If an extended handle is used, the handle side offset of raised wood panel. The refrigerator panel should not weigh more than 50 lbs (23 kg). See dimension drawings for finger clearance. ■ If an extended handle is ...

Installation Guide
Page 17
...measurement to allow the side panel to the panel and replace the screws. Classic, Architect® and Complete Series Custom Side Panels Custom side panels may want to install a support board on rear wall. Refrigerator and Side Trim Dimensions The width and height of a side panel are determined by 0.78 ...cm) on each side and ¹⁄₂" (1.27 cm) on both sides of the refrigerator or when the refrigerator is available to the back wall. NOTES...
...measurement to allow the side panel to the panel and replace the screws. Classic, Architect® and Complete Series Custom Side Panels Custom side panels may want to install a support board on rear wall. Refrigerator and Side Trim Dimensions The width and height of a side panel are determined by 0.78 ...cm) on each side and ¹⁄₂" (1.27 cm) on both sides of the refrigerator or when the refrigerator is available to the back wall. NOTES...


