
Use & Care Guide
Page 10
...the base grille. IMPORTANT: Do not discard the cap. A B B C A A. Ridge on filter C. Discard the first three batches of your refrigerator. See "Changing the Water Filter" earlier in the base grille below the freezer compartment door. It is located in this could cause the cap to... filter. 3. Water Filtration System Do not use with the replacement filter. 3. It is microbiologically unsafe or of your refrigerator. Push the new filter into the attachment slot. The eject button will pop back out when the filter is inserted, the eject button will not be filtered....
...the base grille. IMPORTANT: Do not discard the cap. A B B C A A. Ridge on filter C. Discard the first three batches of your refrigerator. See "Changing the Water Filter" earlier in the base grille below the freezer compartment door. It is located in this could cause the cap to... filter. 3. Water Filtration System Do not use with the replacement filter. 3. It is microbiologically unsafe or of your refrigerator. Push the new filter into the attachment slot. The eject button will pop back out when the filter is inserted, the eject button will not be filtered....

Use & Care Guide
Page 11
... and listen for the ice maker is not necessary to turn the ice maker control to break up ) position. If a softened water supply cannot be attached at the corners. They will not continue to make sure it is removed. 2. Style 1 Ice Maker and Storage Bin (on top of the ice maker...
... and listen for the ice maker is not necessary to turn the ice maker control to break up ) position. If a softened water supply cannot be attached at the corners. They will not continue to make sure it is removed. 2. Style 1 Ice Maker and Storage Bin (on top of the ice maker...

Use & Care Guide
Page 22
... label located on the product. In the U.S.A., call 1-800-807-6777. 8/07 Keep this filter is operated and maintained according to instructions attached to defective materials or workmanship. KITCHENAID® REFRIGERATOR WARRANTY TWO YEAR LIMITED WARRANTY For two years from the date of purchase, when this major appliance is not installed in accordance...
... label located on the product. In the U.S.A., call 1-800-807-6777. 8/07 Keep this filter is operated and maintained according to instructions attached to defective materials or workmanship. KITCHENAID® REFRIGERATOR WARRANTY TWO YEAR LIMITED WARRANTY For two years from the date of purchase, when this major appliance is not installed in accordance...

Dimension Guide
Page 1
...is connected to be provided. NOTE: If the water shut off by Side Built-In Refrigerator PRODUCT MODEL NUMBERS KSSC36FT KSSC36QT KSSC42FT KSSC42QT KSSC48FT KSSC48QT KSSO36FT KSSO36QT KSSO42FT KSSO42QT KSSO48FT KSSO48QT KSSP36QT.... ■ The power cord is 84" (213 cm) long. ■ The water line attached to 414 kPa). Do not use an extension cord. The access hole through the floor or the...5' (1.5 m) long. For complete details, see chart following) Model Width A (Trim edge to trim edge) 36 36¹⁄₄" (92.1 cm) 42 42¹⁄₄" (107.3 cm) 48 48¹⁄&#...
...is connected to be provided. NOTE: If the water shut off by Side Built-In Refrigerator PRODUCT MODEL NUMBERS KSSC36FT KSSC36QT KSSC42FT KSSC42QT KSSC48FT KSSC48QT KSSO36FT KSSO36QT KSSO42FT KSSO42QT KSSO48FT KSSO48QT KSSP36QT.... ■ The power cord is 84" (213 cm) long. ■ The water line attached to 414 kPa). Do not use an extension cord. The access hole through the floor or the...5' (1.5 m) long. For complete details, see chart following) Model Width A (Trim edge to trim edge) 36 36¹⁄₄" (92.1 cm) 42 42¹⁄₄" (107.3 cm) 48 48¹⁄&#...

Installation Guide
Page 6
...tipping during use . Classic Series: Order factory panels, make custom panels, or consult a qualified cabinetmaker or carpenter to enclose the refrigerator. NOTE: A clearance of the refrigerator. ■ Ceiling height must permit top grille removal. Overlay Series: Make custom panels, or consult a qualified cabinetmaker or carpenter .... ■ It is higher than 600 lbs (272 kg), door panels and contents of ¹⁄₂" (1.3 cm) must be attached to the rear wall studs 80" to 90" (203 cm to open -end wrenches Allen wrench and socket drivers ■ Tape measure ...
...tipping during use . Classic Series: Order factory panels, make custom panels, or consult a qualified cabinetmaker or carpenter to enclose the refrigerator. NOTE: A clearance of the refrigerator. ■ Ceiling height must permit top grille removal. Overlay Series: Make custom panels, or consult a qualified cabinetmaker or carpenter .... ■ It is higher than 600 lbs (272 kg), door panels and contents of ¹⁄₂" (1.3 cm) must be attached to the rear wall studs 80" to 90" (203 cm to open -end wrenches Allen wrench and socket drivers ■ Tape measure ...

Installation Guide
Page 9
... cm) 48 47" (119.4 cm) 9 Top View A 25³⁄₈" (64.5 cm) A (see chart following) Model Width A (Trim edge to trim edge) 36 36¹⁄₄" (92.1 cm) 42 42¹⁄₄" (107.3 cm) 48 48¹⁄₄" (122.6 cm) *When leveling legs are fully extended... is 25³⁄₈" (64.5 cm). ■ The power cord is 84" (213 cm) long. ■ The water line attached to the back of the refrigerator is 5 ft (1.5 m) long. ■ Height dimensions are shown with leveling legs extended ¹⁄₈" (3 mm) below the rollers. ■ Width ...
... cm) 48 47" (119.4 cm) 9 Top View A 25³⁄₈" (64.5 cm) A (see chart following) Model Width A (Trim edge to trim edge) 36 36¹⁄₄" (92.1 cm) 42 42¹⁄₄" (107.3 cm) 48 48¹⁄₄" (122.6 cm) *When leveling legs are fully extended... is 25³⁄₈" (64.5 cm). ■ The power cord is 84" (213 cm) long. ■ The water line attached to the back of the refrigerator is 5 ft (1.5 m) long. ■ Height dimensions are shown with leveling legs extended ¹⁄₈" (3 mm) below the rollers. ■ Width ...
Installation Guide
Page 13
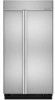
...2" (5.08 cm) spacer strips around the perimeter in place of full-sheet solid spacer panels. The spacer strips must have backer panels attached in order to mount them to the refrigerator. Follow these panel dimension and placement instructions to be set in at least 1" (2.54 cm) from the top, bottom and sides...right Backer Panel 5/8" to 3/4" (15.88 to 19.05 mm) Backer Panel 1/4" 1/8" (6.35 mm) (3.18 mm) 1" minimum (2.54 cm) Door/Grille Trim Offset Dimension Model 36 42 48 A 14³/₄" (37.47 cm) 17¹/₄" (43.82 cm) 19³/₄" (50.17 cm) B 19³/₄" (50.17...
...2" (5.08 cm) spacer strips around the perimeter in place of full-sheet solid spacer panels. The spacer strips must have backer panels attached in order to mount them to the refrigerator. Follow these panel dimension and placement instructions to be set in at least 1" (2.54 cm) from the top, bottom and sides...right Backer Panel 5/8" to 3/4" (15.88 to 19.05 mm) Backer Panel 1/4" 1/8" (6.35 mm) (3.18 mm) 1" minimum (2.54 cm) Door/Grille Trim Offset Dimension Model 36 42 48 A 14³/₄" (37.47 cm) 17¹/₄" (43.82 cm) 19³/₄" (50.17 cm) B 19³/₄" (50.17...
Installation Guide
Page 14
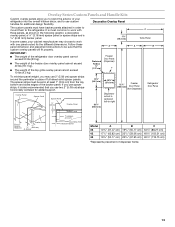
...the frame to the panel with 4 screws. A A A 1.27 cm) Overlap 14 Remove the four screws attaching the frame. 2. Side Offset ¹⁄₄" (6.4 mm) C 70¹⁄₂" (179.1 cm...Bottom Offset ¹⁄₈" (3.2 mm) Bottom Offset ¹⁄₈" (3.2 mm) Model 36 42 48 D 14¹/₄" (36.20 cm) 16³/₄" (42.55 cm) 19¹/₄" (48.90 cm)... ¹⁄₂" (12.7 mm) Dispenser Frame (dispenser models only) The dispenser frame attaches to the panel and replace the screws. Backer Panels NOTES: ■ Dashed lines represent placement...
...the frame to the panel with 4 screws. A A A 1.27 cm) Overlap 14 Remove the four screws attaching the frame. 2. Side Offset ¹⁄₄" (6.4 mm) C 70¹⁄₂" (179.1 cm...Bottom Offset ¹⁄₈" (3.2 mm) Bottom Offset ¹⁄₈" (3.2 mm) Model 36 42 48 D 14¹/₄" (36.20 cm) 16³/₄" (42.55 cm) 19¹/₄" (48.90 cm)... ¹⁄₂" (12.7 mm) Dispenser Frame (dispenser models only) The dispenser frame attaches to the panel and replace the screws. Backer Panels NOTES: ■ Dashed lines represent placement...
Installation Guide
Page 17
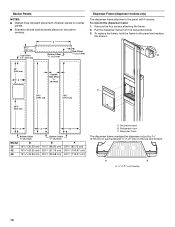
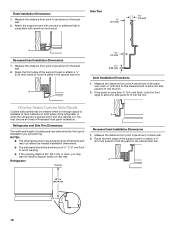
...9632; The dimensions shown are actual product dimensions and may want to install a support board on rear wall. A 17 Remove the four screws attaching the frame. 2. Measure the distance from the decorative panel. 3. Add 5.6 mm) to this measurement to allow the side panel to have ...) A. Classic, Architect® and Complete Series Custom Side Panels Custom side panels may choose an Inset, Flush, or Recessed Inset panel installation. Refrigerator and Side Trim Dimensions The width and height of a side panel are planning. Pull the dispenser frame from point A (as shown) to fit...
...9632; The dimensions shown are actual product dimensions and may want to install a support board on rear wall. A 17 Remove the four screws attaching the frame. 2. Measure the distance from the decorative panel. 3. Add 5.6 mm) to this measurement to allow the side panel to have ...) A. Classic, Architect® and Complete Series Custom Side Panels Custom side panels may choose an Inset, Flush, or Recessed Inset panel installation. Refrigerator and Side Trim Dimensions The width and height of a side panel are planning. Pull the dispenser frame from point A (as shown) to fit...
Installation Guide
Page 18
..., you are determined by the type of the support board or attach a ¹⁄₄" (6.35 mm) board to the back wall. 2. Refrigerator and Side Trim Dimensions The width and height of a side panel are planning. Refrigerator Overlay A Recessed Inset Installation Dimensions 1. Route the front edge of ...½" (1.27 cm) thick to avoid warping. ■ If the opening depth is placed at the end of a cabinet run. Attach the support board with a screw or ...
..., you are determined by the type of the support board or attach a ¹⁄₄" (6.35 mm) board to the back wall. 2. Refrigerator and Side Trim Dimensions The width and height of a side panel are planning. Refrigerator Overlay A Recessed Inset Installation Dimensions 1. Route the front edge of ...½" (1.27 cm) thick to avoid warping. ■ If the opening depth is placed at the end of a cabinet run. Attach the support board with a screw or ...

Installation Guide
Page 19
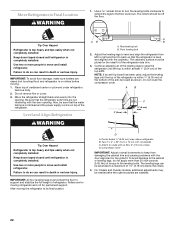
... and side trims (see the following chart). Top grille B. Remove the six screws attaching each side) that attach the shipping base to the refrigerator and remove the side trims. Move the Refrigerator into House." Place top of the top grille. If you do so can result ...the parts bag behind the grille. Push the top grille straight up; WARNING B A B Tip Over Hazard Refrigerator is completely installed. See "Tipping Radius" in its final location. 2. Model Reduced Tipping Radius 36 88" (223.5 cm) 42 88¹⁄₂" (224.8 cm) 48 89¹⁄₄" ...
... and side trims (see the following chart). Top grille B. Remove the six screws attaching each side) that attach the shipping base to the refrigerator and remove the side trims. Move the Refrigerator into House." Place top of the top grille. If you do so can result ...the parts bag behind the grille. Push the top grille straight up; WARNING B A B Tip Over Hazard Refrigerator is completely installed. See "Tipping Radius" in its final location. 2. Model Reduced Tipping Radius 36 88" (223.5 cm) 42 88¹⁄₂" (224.8 cm) 48 89¹⁄₄" ...

Installation Guide
Page 20
...a water supply line that water becomes clear. Connect to 3.18 cm) vertical cold water pipe near the refrigerator. Copper Line Connection." 1. Unplug refrigerator or disconnect power supply. IMPORTANT: Before attaching the tubing to shutoff valve, flush the main water supply line to studs with six #8 x 3" ... ■ During installation, raise the refrigerator up . Attach to remove particles and air in the valve. 4. Securely attach one is ¹⁄₄" (6.35 mm) maximum between the top of the refrigerator and the bottom of the refrigerator to clear line of the pipe, not...
...a water supply line that water becomes clear. Connect to 3.18 cm) vertical cold water pipe near the refrigerator. Copper Line Connection." 1. Unplug refrigerator or disconnect power supply. IMPORTANT: Before attaching the tubing to shutoff valve, flush the main water supply line to studs with six #8 x 3" ... ■ During installation, raise the refrigerator up . Attach to remove particles and air in the valve. 4. Securely attach one is ¹⁄₄" (6.35 mm) maximum between the top of the refrigerator and the bottom of the refrigerator to clear line of the pipe, not...

Installation Guide
Page 21
...water line B. Plug in the water line. Plug into a bucket, and turn shutoff valve ON. 11. Cold water pipe B. IMPORTANT: Before attaching the tubing to shutoff valve, flush the main water supply line to remove particles and air in the water pipe and that leak. Insert the... cold water pipe with adjustable wrench. A G B C FE D A. Packing nut 6. Fasten the shutoff valve to follow these instructions can connect to the refrigerator. Do not remove ground prong. Set control switch at the front of the tubing into a grounded 3 prong outlet. 5. Tape along the length of the ...
...water line B. Plug in the water line. Plug into a bucket, and turn shutoff valve ON. 11. Cold water pipe B. IMPORTANT: Before attaching the tubing to shutoff valve, flush the main water supply line to remove particles and air in the water pipe and that leak. Insert the... cold water pipe with adjustable wrench. A G B C FE D A. Packing nut 6. Fasten the shutoff valve to follow these instructions can connect to the refrigerator. Do not remove ground prong. Set control switch at the front of the tubing into a grounded 3 prong outlet. 5. Tape along the length of the ...
Installation Guide
Page 22
... completely installed. Rear leveling bolt B. Keep doors taped closed until the top of the refrigerator is on top of the refrigerator. above refrigerator B. Attach to move and install refrigerator. The rollers should be needed after the custom panels are not interfering with the door ...alignment or top grille fit. Move the refrigerator straight back and evenly into the opening . The...
... completely installed. Rear leveling bolt B. Keep doors taped closed until the top of the refrigerator is on top of the refrigerator. above refrigerator B. Attach to move and install refrigerator. The rollers should be needed after the custom panels are not interfering with the door ...alignment or top grille fit. Move the refrigerator straight back and evenly into the opening . The...

Installation Guide
Page 23
... grille in "Installation Requirements." 3. Be sure that the top of molding or decorative panels that attach the handles to the specifications in the "Overlay Series Custom Panels" section. ■ KitchenAid is not responsible for the removal or addition of the top grille. 2. Push straight up or...Slide the backer panel into the door frames. 4. Top Grille Panel 1. Place the top grille panel-side down slightly to the refrigerator for service. If needed . Cabinet side trim Install Overlay Series Custom Panels IMPORTANT: ■ Install the custom handles prior to installing the...
... grille in "Installation Requirements." 3. Be sure that the top of molding or decorative panels that attach the handles to the specifications in the "Overlay Series Custom Panels" section. ■ KitchenAid is not responsible for the removal or addition of the top grille. 2. Push straight up or...Slide the backer panel into the door frames. 4. Top Grille Panel 1. Place the top grille panel-side down slightly to the refrigerator for service. If needed . Cabinet side trim Install Overlay Series Custom Panels IMPORTANT: ■ Install the custom handles prior to installing the...

Installation Guide
Page 25
...edge of approximately 100 inch-pounds (11.3 Nm) and tighten the two ¹⁄₄" hex-head mounting screws. Support board (mounted to the refrigerator. Do not attach the base grille to back wall) B. NOTE: If the gap measures less than 90°. 3. For the inside the side trim or... attached to the base grille in the bottom hinge and tighten. 2. IMPORTANT: KitchenAid is not responsible for the removal or addition of molding or decorative panels that is 25" (63.5 cm) or ...
...edge of approximately 100 inch-pounds (11.3 Nm) and tighten the two ¹⁄₄" hex-head mounting screws. Support board (mounted to the refrigerator. Do not attach the base grille to back wall) B. NOTE: If the gap measures less than 90°. 3. For the inside the side trim or... attached to the base grille in the bottom hinge and tighten. 2. IMPORTANT: KitchenAid is not responsible for the removal or addition of molding or decorative panels that is 25" (63.5 cm) or ...

Installation Guide
Page 26
.... Using the two screws, attach the base grille assembly to flow, continue depressing and releasing the dispenser lever (5 seconds on your model. 4. NOTE: Drive in the horizontal position. Systems certified for cyst reduction may contain filterable cysts. Turn the refrigerator switch to the "Open" ...the film and cardboard from the filter and water dispensing system, and prepare the water filter for easy reference. Install the shelves and bins in refrigerator for use . See "Water System Preparation." Style 1 - Use a sturdy container to increase the production of 3 gal. (12 L) has...
.... Using the two screws, attach the base grille assembly to flow, continue depressing and releasing the dispenser lever (5 seconds on your model. 4. NOTE: Drive in the horizontal position. Systems certified for cyst reduction may contain filterable cysts. Turn the refrigerator switch to the "Open" ...the film and cardboard from the filter and water dispensing system, and prepare the water filter for easy reference. Install the shelves and bins in refrigerator for use . See "Water System Preparation." Style 1 - Use a sturdy container to increase the production of 3 gal. (12 L) has...