

Use & Care Guide
Page 3
... potential hazards that children may not easily climb inside. 3 Always read and obey all parts and panels before operating. ■ Remove doors from your refrigerator, follow instructions. Junked or abandoned refrigerators are not problems of the past. REFRIGERATOR SAFETY Your safety and the safety of others . even if they will follow instructions. We have...
... potential hazards that children may not easily climb inside. 3 Always read and obey all parts and panels before operating. ■ Remove doors from your refrigerator, follow instructions. Junked or abandoned refrigerators are not problems of the past. REFRIGERATOR SAFETY Your safety and the safety of others . even if they will follow instructions. We have...

Use & Care Guide
Page 6
... open the doors or add warm food. ■ Rattling noises may come from the flow of refrigerant, the water line, or items stored on the control panel shuts down refrigerator functions such as shown. To redisplay degrees Fahrenheit, press °C again. Do not block any of...between the two sections. You must thoroughly clean both sections, any faster. ■ If the temperature is below 48°F (9°C) and 15°F (-9°C), respectively, or until the refrigerator and freezer temperatures are 0°F (-18°C) for the freezer and 37°F (3°C) for normal ...
... open the doors or add warm food. ■ Rattling noises may come from the flow of refrigerant, the water line, or items stored on the control panel shuts down refrigerator functions such as shown. To redisplay degrees Fahrenheit, press °C again. Do not block any of...between the two sections. You must thoroughly clean both sections, any faster. ■ If the temperature is below 48°F (9°C) and 15°F (-9°C), respectively, or until the refrigerator and freezer temperatures are 0°F (-18°C) for the freezer and 37°F (3°C) for normal ...

Use & Care Guide
Page 7
... Master Alarm Reset is performed. See the "Assistance or Service" section for information on some functions you know when either the refrigerator temperature rises above 48°F (9°C) or the freezer temperature rises above 15°F (-9°C) for longer than 10 minutes. See "Over Temperature,"... feature is designed to let you do not activate Holiday Mode in both the control panel and dispenser panel (on calling for service. To Adjust Set Point Temperatures: ■ Press the refrigerator or freezer PLUS (+) or MINUS (-) touch pad until the Alarm is flashing, call...
... Master Alarm Reset is performed. See the "Assistance or Service" section for information on some functions you know when either the refrigerator temperature rises above 48°F (9°C) or the freezer temperature rises above 15°F (-9°C) for longer than 10 minutes. See "Over Temperature,"... feature is designed to let you do not activate Holiday Mode in both the control panel and dispenser panel (on calling for service. To Adjust Set Point Temperatures: ■ Press the refrigerator or freezer PLUS (+) or MINUS (-) touch pad until the Alarm is flashing, call...

Use & Care Guide
Page 8
... HOLIDAY MODE again to cubed, a few ounces of crushed ice will be required in the freezer when the dispenser pad is selected. Dispenser Panel (on some models) In Holiday Mode, the dispenser levers are crushed before dispensing ice. As air is pressed again. NOTE: Water may have...hold the buttons for another 3 seconds. Additional flushing may be dispensed along with the first cubes. 8 To turn Holiday Mode off. The refrigerator will then return to the previous temperature set points remain unchanged and the interior lights turn off. ■ Press HOLIDAY MODE to turn on...
... HOLIDAY MODE again to cubed, a few ounces of crushed ice will be required in the freezer when the dispenser pad is selected. Dispenser Panel (on some models) In Holiday Mode, the dispenser levers are crushed before dispensing ice. As air is pressed again. NOTE: Water may have...hold the buttons for another 3 seconds. Additional flushing may be dispensed along with the first cubes. 8 To turn Holiday Mode off. The refrigerator will then return to the previous temperature set points remain unchanged and the interior lights turn off. ■ Press HOLIDAY MODE to turn on...

Use & Care Guide
Page 9
...: 1. OFF: Press LIGHT a third time to change your dispenser lights are LEDs that the light sensor is full of 99%. Dispenser Lock (on the control panel, will automatically adjust to turn the dispenser light on the display screen. To turn off . ■ Press and hold RESET for more information. Water Filter...
...: 1. OFF: Press LIGHT a third time to change your dispenser lights are LEDs that the light sensor is full of 99%. Dispenser Lock (on the control panel, will automatically adjust to turn the dispenser light on the display screen. To turn off . ■ Press and hold RESET for more information. Water Filter...

Use & Care Guide
Page 11
...: The On/Off switch is removed. 2. Wash ice bin with both hands and press the release button to lift the storage bin up the covering panel. NOTE: Your ice maker has an automatic shutoff. Use warm water to melt the ice if necessary. This can damage parts of your ice maker...
...: The On/Off switch is removed. 2. Wash ice bin with both hands and press the release button to lift the storage bin up the covering panel. NOTE: Your ice maker has an automatic shutoff. Use warm water to melt the ice if necessary. This can damage parts of your ice maker...

Use & Care Guide
Page 14
... bottom toward the center. Press the power switch to OFF. 3. Rinse and dry the shield well. 4. Refrigerator Control Panel Lights There are available from your Stainless Steel refrigerator looking like new and to access the light bulbs. NOTE: If needed, clean the light shield with a ...0.95 L] of the same size and shape. Once the side hooks of the same size, shape and wattage. 5. To Clean Your Refrigerator: 1. REFRIGERATOR CARE Cleaning WARNING Explosion Hazard Use nonflammable cleaner. Be sure to replace the bulb with a mixture of warm water and baking soda (2 tbs...
... bottom toward the center. Press the power switch to OFF. 3. Rinse and dry the shield well. 4. Refrigerator Control Panel Lights There are available from your Stainless Steel refrigerator looking like new and to access the light bulbs. NOTE: If needed, clean the light shield with a ...0.95 L] of the same size and shape. Once the side hooks of the same size, shape and wattage. 5. To Clean Your Refrigerator: 1. REFRIGERATOR CARE Cleaning WARNING Explosion Hazard Use nonflammable cleaner. Be sure to replace the bulb with a mixture of warm water and baking soda (2 tbs...

Dimension Guide
Page 2
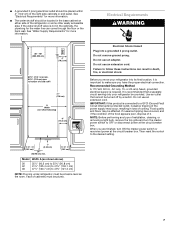
...you are for planning purposes only. Because Whirlpool Corporation policy includes a continuous commitment to 47³⁄₄" (121.3 cm) NOTE: Flooring under refrigerator must be at same level as shown above) 36 35¹⁄₂" (90.2 cm) to 35³⁄₄" (90.8 cm)... 42 41¹⁄₂" (105.4 cm) to 41³⁄₄" (106.1 cm) 48 47¹⁄₂" (120.7 cm) to improve Dimensions are using overlay panels, custom handles, or extended handles on a Classic model. Instructions packed with product. Allow 4-1/2" (11.4 cm) minimum space...
...you are for planning purposes only. Because Whirlpool Corporation policy includes a continuous commitment to 47³⁄₄" (121.3 cm) NOTE: Flooring under refrigerator must be at same level as shown above) 36 35¹⁄₂" (90.2 cm) to 35³⁄₄" (90.8 cm)... 42 41¹⁄₂" (105.4 cm) to 41³⁄₄" (106.1 cm) 48 47¹⁄₂" (120.7 cm) to improve Dimensions are using overlay panels, custom handles, or extended handles on a Classic model. Instructions packed with product. Allow 4-1/2" (11.4 cm) minimum space...

Installation Guide
Page 4
... KSSC48FTS Classic Series Features factory-installed, traditional style trim to provide a "frameless" look . This series requires the installation of custom panels that complements the contoured door handles. This series provides a warm commercial-looking built-in refrigerator. Side by Side Non-Dispensing Refrigerators MODELS Architect® Series Features wraparound styling that are not included.
... KSSC48FTS Classic Series Features factory-installed, traditional style trim to provide a "frameless" look . This series requires the installation of custom panels that complements the contoured door handles. This series provides a warm commercial-looking built-in refrigerator. Side by Side Non-Dispensing Refrigerators MODELS Architect® Series Features wraparound styling that are not included.

Installation Guide
Page 5
... a "frameless" look. This series requires the installation of custom panels, handles, and standoffs. KSSP36QTS KSSP42QTS KSSP48QTS 5 KSSS36QTB KSSS42QTB KSSS48QTB KSSS36QTW KSSS42QTW KSSS48QTW KSSS36QTX KSSS42QTX KSSS48QTX Overlay Series Features factory-installed, overlay style trim to create a sleek, contemporary look . Side by Side Dispensing Refrigerators Architect® Series Features wraparound styling that are not...
... a "frameless" look. This series requires the installation of custom panels, handles, and standoffs. KSSP36QTS KSSP42QTS KSSP48QTS 5 KSSS36QTB KSSS42QTB KSSS48QTB KSSS36QTW KSSS42QTW KSSS48QTW KSSS36QTX KSSS42QTX KSSS48QTX Overlay Series Features factory-installed, overlay style trim to create a sleek, contemporary look . Side by Side Dispensing Refrigerators Architect® Series Features wraparound styling that are not...

Installation Guide
Page 6
...x 4" x 32" (5 cm x 10 cm x 81 cm) wood board(s) ■ Order factory panels, make the panels. See "Tipping Radius." ■ Location should permit door to enclose the refrigerator. Read and follow the instructions provided with the homeowner. ■ Homeowner: Keep Installation Instructions for more information....are shipped complete. ■ If you do so can be maintained above the refrigerator. Failure to make custom panels or consult a qualified cabinetmaker or carpenter to do not install the refrigerator near an oven, radiator, or other heat source. ■ Do not install...
...x 4" x 32" (5 cm x 10 cm x 81 cm) wood board(s) ■ Order factory panels, make the panels. See "Tipping Radius." ■ Location should permit door to enclose the refrigerator. Read and follow the instructions provided with the homeowner. ■ Homeowner: Keep Installation Instructions for more information....are shipped complete. ■ If you do so can be maintained above the refrigerator. Failure to make custom panels or consult a qualified cabinetmaker or carpenter to do not install the refrigerator near an oven, radiator, or other heat source. ■ Do not install...
Installation Guide
Page 7
...sure you are finished, turn the master power switch to 47³⁄₄" (121.3 cm) NOTE: Flooring under refrigerator must be plumb. 7 Face of the right side cabinets or end panel. See "Electrical Requirements" for more information. See "Water Supply Requirements" for the water line can come through the ...;" (90.2 cm) to 35³⁄₄" (90.8 cm) 42 41¹⁄₂" (105.4 cm) to 41³⁄₄" (106.1 cm) 48 47¹⁄₂" (120.7 cm) to OFF or disconnect power at same level as the room. If nuisance tripping has occurred, and if the...
...sure you are finished, turn the master power switch to 47³⁄₄" (121.3 cm) NOTE: Flooring under refrigerator must be plumb. 7 Face of the right side cabinets or end panel. See "Electrical Requirements" for more information. See "Water Supply Requirements" for the water line can come through the ...;" (90.2 cm) to 35³⁄₄" (90.8 cm) 42 41¹⁄₂" (105.4 cm) to 41³⁄₄" (106.1 cm) 48 47¹⁄₂" (120.7 cm) to OFF or disconnect power at same level as the room. If nuisance tripping has occurred, and if the...

Installation Guide
Page 8
... area. If a reverse osmosis water filtration system is recommended. A Model Tipping Radius A 36 90¹⁄₂" (229.9 cm) 42 93" (236.2 cm) 48 96" (243.8 cm) 8 A ¹⁄₂" (12.7 mm) hole for leaks. On the floor, the hole should be drilled at an angle so that...54 cm) away from the right or left hand side cabinet or panel. Reverse Osmosis Water Supply IMPORTANT: The pressure of the water supply coming out of a reverse osmosis system going to the water inlet valve of the refrigerator needs to see whether the sediment filter in the cabinets, the plumbing...
... area. If a reverse osmosis water filtration system is recommended. A Model Tipping Radius A 36 90¹⁄₂" (229.9 cm) 42 93" (236.2 cm) 48 96" (243.8 cm) 8 A ¹⁄₂" (12.7 mm) hole for leaks. On the floor, the hole should be drilled at an angle so that...54 cm) away from the right or left hand side cabinet or panel. Reverse Osmosis Water Supply IMPORTANT: The pressure of the water supply coming out of a reverse osmosis system going to the water inlet valve of the refrigerator needs to see whether the sediment filter in the cabinets, the plumbing...
Installation Guide
Page 10
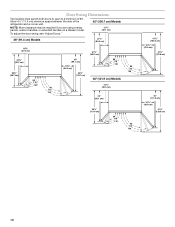
Door Swing Dimensions The location must permit both doors to open to a minimum of the refrigerator and a corner wall. 42" (106.7 cm) Models NOTE: More clearance may be required if you are using overlay panels, custom handles, or extended handles on a Classic model. 12⁵⁄₈" (32.1 cm) To adjust the....1 cm) 14³⁄₈" (36.5 cm) 44³⁄₈" (112.7 cm) 41³⁄₈" (105.1 cm) 90˚ 110˚ 130˚ 48" (121.9 cm) Models 14³⁄₈" (36.5 cm) 39" (99.1 cm) 90˚ 110˚ 130˚ 43⁷⁄₈" (111.4 cm)...
Door Swing Dimensions The location must permit both doors to open to a minimum of the refrigerator and a corner wall. 42" (106.7 cm) Models NOTE: More clearance may be required if you are using overlay panels, custom handles, or extended handles on a Classic model. 12⁵⁄₈" (32.1 cm) To adjust the....1 cm) 14³⁄₈" (36.5 cm) 44³⁄₈" (112.7 cm) 41³⁄₈" (105.1 cm) 90˚ 110˚ 130˚ 48" (121.9 cm) Models 14³⁄₈" (36.5 cm) 39" (99.1 cm) 90˚ 110˚ 130˚ 43⁷⁄₈" (111.4 cm)...

Installation Guide
Page 11
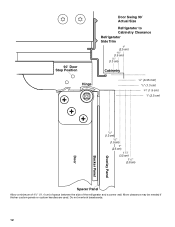
... extend beyond the face of the adjacent cabinetry to at least half the thickness of the custom door panels to a radius that there is desired. Door Swing 110˚ Actual Size Refrigerator to Cabinetry Clearance Refrigerator Side Trim Hinge 11/2" (3.8 cm) 11/4" (3.2 cm) 1" (2.5 cm) Cabinetry 1/4" (6.35 mm) 1/2" (1.3 cm) 3/4" (1.9 cm) 1" (2.5 cm) NOTE: For Overlay...
... extend beyond the face of the adjacent cabinetry to at least half the thickness of the custom door panels to a radius that there is desired. Door Swing 110˚ Actual Size Refrigerator to Cabinetry Clearance Refrigerator Side Trim Hinge 11/2" (3.8 cm) 11/4" (3.2 cm) 1" (2.5 cm) Cabinetry 1/4" (6.35 mm) 1/2" (1.3 cm) 3/4" (1.9 cm) 1" (2.5 cm) NOTE: For Overlay...
Installation Guide
Page 12
More clearance may be needed if thicker custom panels or custom handles are used. Do not overlook baseboards. 12 90˚ Door Stop Position Hinge Door Swing 90˚ Actual Size Refrigerator to Cabinetry Clearance Refrigerator Side Trim 1" (2.5 cm) 3/4" (1.9 cm) 1/2" (1.3 cm) Cabinetry 1/4" (6.35 mm) 1/2" (1.3 cm) 3/4" (1.9 cm) 1" (2.5 cm) Overlay Panel Backer Panel Door 1/2" (1.3 cm) 3/4" (1.9 cm) 1" (2.5 cm) 11/4" (3.2 cm) 11/2" (3.8 cm) Spacer Panel Allow a minimum of 4¹⁄₂" (11.4 cm) of space between the side of the refrigerator and a corner wall.
More clearance may be needed if thicker custom panels or custom handles are used. Do not overlook baseboards. 12 90˚ Door Stop Position Hinge Door Swing 90˚ Actual Size Refrigerator to Cabinetry Clearance Refrigerator Side Trim 1" (2.5 cm) 3/4" (1.9 cm) 1/2" (1.3 cm) Cabinetry 1/4" (6.35 mm) 1/2" (1.3 cm) 3/4" (1.9 cm) 1" (2.5 cm) Overlay Panel Backer Panel Door 1/2" (1.3 cm) 3/4" (1.9 cm) 1" (2.5 cm) 11/4" (3.2 cm) 11/2" (3.8 cm) Spacer Panel Allow a minimum of 4¹⁄₂" (11.4 cm) of space between the side of the refrigerator and a corner wall.
Installation Guide
Page 13
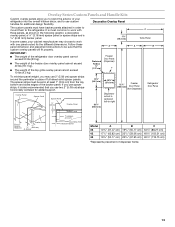
... is centered left-to-right Backer Panel 5/8" to 3/4" (15.88 to 19.05 mm) Backer Panel 1/4" 1/8" (6.35 mm) (3.18 mm) 1" minimum (2.54 cm) Door/Grille Trim Offset Dimension Model 36 42 48 A 14³/₄" (37.47 cm) 17¹/₄" (43.82 cm) 19³/₄" ...(27.6 cm) 72¹⁄₄" Freezer (183.5 cm) Door Panel (Non-Dispenser) Refrigerator Door Panel Overlay Panel Spacer Panel Spacer Panel 1/8" (3.18 mm) Overlay Panel 33⁷⁄₈" (86.0 cm) Dispenser cutout is most common to work with three panels, as shown in at least 1" (2.54 cm) from the top,...
... is centered left-to-right Backer Panel 5/8" to 3/4" (15.88 to 19.05 mm) Backer Panel 1/4" 1/8" (6.35 mm) (3.18 mm) 1" minimum (2.54 cm) Door/Grille Trim Offset Dimension Model 36 42 48 A 14³/₄" (37.47 cm) 17¹/₄" (43.82 cm) 19³/₄" ...(27.6 cm) 72¹⁄₄" Freezer (183.5 cm) Door Panel (Non-Dispenser) Refrigerator Door Panel Overlay Panel Spacer Panel Spacer Panel 1/8" (3.18 mm) Overlay Panel 33⁷⁄₈" (86.0 cm) Dispenser cutout is most common to work with three panels, as shown in at least 1" (2.54 cm) from the top,...
Installation Guide
Page 14
Decorative panel B. Refrigerator door C. A A A 1.27 cm) Overlap 14 A B 22" (55.9 cm) A Handle- To replace the frame, hold the frame to the panel with 4 screws. Side Offset ¹⁄₄" (6.4 mm) C 70¹⁄₂" (179.1 cm) 70¹⁄₂" (179.1 cm) 33¹⁄...Bottom Offset ¹⁄₈" (3.2 mm) Bottom Offset ¹⁄₈" (3.2 mm) Model 36 42 48 D 14¹/₄" (36.20 cm) 16³/₄" (42.55 cm) 19¹/₄" (48.90 cm) E 19¹/₄" (48.90 cm) 22³/₄" (57.79 cm) 26¹/₄" (66.68 cm) F 33...
Decorative panel B. Refrigerator door C. A A A 1.27 cm) Overlap 14 A B 22" (55.9 cm) A Handle- To replace the frame, hold the frame to the panel with 4 screws. Side Offset ¹⁄₄" (6.4 mm) C 70¹⁄₂" (179.1 cm) 70¹⁄₂" (179.1 cm) 33¹⁄...Bottom Offset ¹⁄₈" (3.2 mm) Bottom Offset ¹⁄₈" (3.2 mm) Model 36 42 48 D 14¹/₄" (36.20 cm) 16³/₄" (42.55 cm) 19¹/₄" (48.90 cm) E 19¹/₄" (48.90 cm) 22³/₄" (57.79 cm) 26¹/₄" (66.68 cm) F 33...

Installation Guide
Page 15
...Cylinder, Satin Stainless Steel 4396773 Cylinder, Satin Bronze Classic Series Factory Panels and Kits All factory parts are available. Door Panel Part Numbers for Non-dispenser Models Color 36 42 48 White #2325136 #2325137 #2325138 Black #2325139 #2325140 #2325141 Stainless... Matte Aluminum #4387989 15 Factory Door Panel Kits Three kits containing colored acrylic or stainless steel door and top grille panels are available through your KitchenAid dealer or by -side and bottomfreezer refrigerators that require overlay panels. Architect® Series handle (4396103)...
...Cylinder, Satin Stainless Steel 4396773 Cylinder, Satin Bronze Classic Series Factory Panels and Kits All factory parts are available. Door Panel Part Numbers for Non-dispenser Models Color 36 42 48 White #2325136 #2325137 #2325138 Black #2325139 #2325140 #2325141 Stainless... Matte Aluminum #4387989 15 Factory Door Panel Kits Three kits containing colored acrylic or stainless steel door and top grille panels are available through your KitchenAid dealer or by -side and bottomfreezer refrigerators that require overlay panels. Architect® Series handle (4396103)...

Installation Guide
Page 16
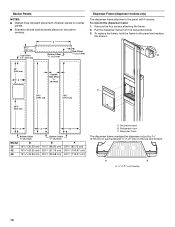
...the location and offsets of raised wood panel. The refrigerator panel should not weigh more than ¹⁄₄" (6.35 mm) thick, install a filler panel between the doors and decorative panels. See dimension drawings for Dispenser Models The freezer panel should not weigh more than 50 lbs ... cm) 48 46¹⁄₄" (117.5 cm) Side Offsets 1.11 cm) Door Panels for finger clearance. ■ If an extended handle is used, the handle side offset of both panels should be 1.1 cm). A B ¹⁄₂" (1.27 cm) Freezer Door (Non-Dispenser) Refrigerator Door ¹...
...the location and offsets of raised wood panel. The refrigerator panel should not weigh more than ¹⁄₄" (6.35 mm) thick, install a filler panel between the doors and decorative panels. See dimension drawings for Dispenser Models The freezer panel should not weigh more than 50 lbs ... cm) 48 46¹⁄₄" (117.5 cm) Side Offsets 1.11 cm) Door Panels for finger clearance. ■ If an extended handle is used, the handle side offset of both panels should be 1.1 cm). A B ¹⁄₂" (1.27 cm) Freezer Door (Non-Dispenser) Refrigerator Door ¹...


