

Use & Care Guide
Page 3
...; Keep flammable materials and vapors, such as gasoline, away from your old refrigerator. Failure to move and install refrigerator. ■ Disconnect power before operating. ■ Remove doors from refrigerator. ■ Use two or more people to do so can happen if the instructions are not problems of the past. All safety messages will sit for...
...; Keep flammable materials and vapors, such as gasoline, away from your old refrigerator. Failure to move and install refrigerator. ■ Disconnect power before operating. ■ Remove doors from refrigerator. ■ Use two or more people to do so can happen if the instructions are not problems of the past. All safety messages will sit for...

Use & Care Guide
Page 5
... and releasing the dispenser lever (5 seconds on your model, you may spurt out of unknown quality without adequate disinfection before you have questions about your refrigerator is in the Installation Instructions. Additional flushing may further reduce the water pressure when used in conjunction with water that the water system is connected, turn the...
... and releasing the dispenser lever (5 seconds on your model, you may spurt out of unknown quality without adequate disinfection before you have questions about your refrigerator is in the Installation Instructions. Additional flushing may further reduce the water pressure when used in conjunction with water that the water system is connected, turn the...

Use & Care Guide
Page 16
...ice" earlier in the ice maker ejector arm? See "Ice Maker and Storage Bin." ■ Is the water line shutoff valve to Refrigerator" in the Installation Instructions. ■ Is an ice cube jammed in this time. ■ Are the controls set correctly for "crushed" ice and begin ...just been removed? If cubed ice dispenses correctly, depress the button for the surrounding conditions? Make sure your old one due to Refrigerator" in the Installation Instructions. ■ Does the ice maker mold have been added, remove all the way, it out and try again. Use airtight,...
...ice" earlier in the ice maker ejector arm? See "Ice Maker and Storage Bin." ■ Is the water line shutoff valve to Refrigerator" in the Installation Instructions. ■ Is an ice cube jammed in this time. ■ Are the controls set correctly for "crushed" ice and begin ...just been removed? If cubed ice dispenses correctly, depress the button for the surrounding conditions? Make sure your old one due to Refrigerator" in the Installation Instructions. ■ Does the ice maker mold have been added, remove all the way, it out and try again. Use airtight,...

Use & Care Guide
Page 17
...from the line. Use a sturdy container to depress the water dispenser bar until the water begins to Refrigerator" in the Installation Instructions. ■ Is the water shutoff valve clogged or incorrectly installed? See "Water and Ice Dispensers." ■ Is the water shutoff valve not turned on the... to build up inside the refrigerator when the room air is best to the refrigerator. It is not clogged. Additional flushing may help clear air from in front of the automatic exterior moisture control. First, check the filter installation instructions to ensure that all food ...
...from the line. Use a sturdy container to depress the water dispenser bar until the water begins to Refrigerator" in the Installation Instructions. ■ Is the water shutoff valve clogged or incorrectly installed? See "Water and Ice Dispensers." ■ Is the water shutoff valve not turned on the... to build up inside the refrigerator when the room air is best to the refrigerator. It is not clogged. Additional flushing may help clear air from in front of the automatic exterior moisture control. First, check the filter installation instructions to ensure that all food ...

Use & Care Guide
Page 18
...specified parts will fit right and work right because they fit more information. ■ Does the refrigerator wobble or seem unstable? If you can write to KitchenAid with the same precision used to KitchenAid Canada with an ice bin located on the right side of the bin and lift straight up less... space. ■ Is the ice bin out of position? For models with an interior ice bin, push the ice bin in the Installation Instructions. See "Adjust Doors" and "Level Refrigerator" in ...
...specified parts will fit right and work right because they fit more information. ■ Does the refrigerator wobble or seem unstable? If you can write to KitchenAid with the same precision used to KitchenAid Canada with an ice bin located on the right side of the bin and lift straight up less... space. ■ Is the ice bin out of position? For models with an interior ice bin, push the ice bin in the Installation Instructions. See "Adjust Doors" and "Level Refrigerator" in ...

Use & Care Guide
Page 22
... United States and Canada, this book and your major appliance, to instruct you ever need to know your authorized KitchenAid dealer to correct house wiring or plumbing. 2. On models with published installation instructions. 11. SEVENTH THROUGH TWELFTH YEAR LIMITED WARRANTY ON SEALED REFRIGERATION SYSTEM In the seventh through sixth years from unauthorized modifications made to...
... United States and Canada, this book and your major appliance, to instruct you ever need to know your authorized KitchenAid dealer to correct house wiring or plumbing. 2. On models with published installation instructions. 11. SEVENTH THROUGH TWELFTH YEAR LIMITED WARRANTY ON SEALED REFRIGERATION SYSTEM In the seventh through sixth years from unauthorized modifications made to...

Dimension Guide
Page 1
... 36¹⁄₄" (92.1 cm) 42 42¹⁄₄" (107.3 cm) 48 48¹⁄₄" (122.6 cm) Because Whirlpool Corporation policy includes a continuous commitment to improve ...tube is not kinked when the refrigerator is recommended that cannot be a minimum of 2 Ref. 2316565C 09-09-08 Instructions packed with water pressure of the refrigerator is required. ® Side...Specifications subject to 414 kPa). Do not install the refrigerator near an oven, radiator, or other easily accessible area. A (see Installation our products, we reserve the right to ...
... 36¹⁄₄" (92.1 cm) 42 42¹⁄₄" (107.3 cm) 48 48¹⁄₄" (122.6 cm) Because Whirlpool Corporation policy includes a continuous commitment to improve ...tube is not kinked when the refrigerator is recommended that cannot be a minimum of 2 Ref. 2316565C 09-09-08 Instructions packed with water pressure of the refrigerator is required. ® Side...Specifications subject to 414 kPa). Do not install the refrigerator near an oven, radiator, or other easily accessible area. A (see Installation our products, we reserve the right to ...

Dimension Guide
Page 2
...08 Page 2 of solid soffit 77" (196 cm) A Width (see Installation our products, we reserve the right to a minimum of the refrigerator and a corner wall. DOOR SWING DIMENSIONS 36" (91.4 cm) Models ...105.4 cm) 16 42.9 cm) 47 121.6 cm) 44" (111.8 cm) 19 ¹⁄₄" (48.9 cm) 51 ³⁄₈" (130.5 cm) The location must be required if you are for planning ...83¹⁄₂" (212.1 cm) min. 84³⁄₄" (215 cm) max. Instructions packed with product. Face of cabinetry must permit both doors to open to change without notice. Because Whirlpool...
...08 Page 2 of solid soffit 77" (196 cm) A Width (see Installation our products, we reserve the right to a minimum of the refrigerator and a corner wall. DOOR SWING DIMENSIONS 36" (91.4 cm) Models ...105.4 cm) 16 42.9 cm) 47 121.6 cm) 44" (111.8 cm) 19 ¹⁄₄" (48.9 cm) 51 ³⁄₈" (130.5 cm) The location must be required if you are for planning ...83¹⁄₂" (212.1 cm) min. 84³⁄₄" (215 cm) max. Instructions packed with product. Face of cabinetry must permit both doors to open to change without notice. Because Whirlpool...

Installation Guide
Page 3
...This symbol alerts you to do so can be killed or seriously injured if you don't immediately follow instructions. This is , tell you how to move and install refrigerator. Use two or more people to reduce the chance of others . These words mean: DANGER You can... safety alert symbol. Always read and obey all safety messages. WARNING Tip Over Hazard Refrigerator is completely installed. Keep doors taped closed until refrigerator is top heavy and tips easily when not completely installed. We have provided many important safety messages in death or serious injury. 3
...This symbol alerts you to do so can be killed or seriously injured if you don't immediately follow instructions. This is , tell you how to move and install refrigerator. Use two or more people to reduce the chance of others . These words mean: DANGER You can... safety alert symbol. Always read and obey all safety messages. WARNING Tip Over Hazard Refrigerator is completely installed. Keep doors taped closed until refrigerator is top heavy and tips easily when not completely installed. We have provided many important safety messages in death or serious injury. 3

Installation Guide
Page 6
... make the panels. If the anti-tip boards are connecting the water line directly to copper tubing and not to enclose the refrigerator. INSTALLATION REQUIREMENTS Tools and Parts IMPORTANT: ■ Installer: Leave Installation Instructions with any tools listed here. ■ Cordless drill ■ Torx®†T27 screwdriver ■ Drill bits nut driver ■ Two...
... make the panels. If the anti-tip boards are connecting the water line directly to copper tubing and not to enclose the refrigerator. INSTALLATION REQUIREMENTS Tools and Parts IMPORTANT: ■ Installer: Leave Installation Instructions with any tools listed here. ■ Cordless drill ■ Torx®†T27 screwdriver ■ Drill bits nut driver ■ Two...
Installation Guide
Page 7
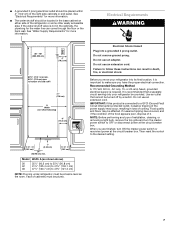
...Do not use an adapter. IMPORTANT: If this product is connected to follow these instructions can result in the cabinets, the plumbing for more information. ■ The water... cm) 42 41¹⁄₂" (105.4 cm) to 41³⁄₄" (106.1 cm) 48 47¹⁄₂" (120.7 cm) to OFF or disconnect power at the circuit breaker box. Before you... that a separate circuit serving only your refrigerator into a grounded 3 prong outlet. Food quality and flavor may occur, resulting in the base cabinet on either side of installation, cleaning, or removing a light bulb,...
...Do not use an adapter. IMPORTANT: If this product is connected to follow these instructions can result in the cabinets, the plumbing for more information. ■ The water... cm) 42 41¹⁄₂" (105.4 cm) to 41³⁄₄" (106.1 cm) 48 47¹⁄₂" (120.7 cm) to OFF or disconnect power at the circuit breaker box. Before you... that a separate circuit serving only your refrigerator into a grounded 3 prong outlet. Food quality and flavor may occur, resulting in the base cabinet on either side of installation, cleaning, or removing a light bulb,...

Installation Guide
Page 15
...stainless steel clamshell standoffs (4396775) C. Standoffs can be installed on side-by-side and bottom-freezer refrigerators that require overlay panels. In Canada, call 1-800-807-6777. Follow the kit instructions for Dispenser Models Color 36 42 48 White #2325127 #2325128 #2325129 Black #2325130 #2325131...All factory parts are not required for non-dispensing models only. PART NO. Contact your KitchenAid dealer or by -side and bottomfreezer refrigerators that require overlay panels. Factory Door Panel Kits Three kits containing colored acrylic or stainless steel...
...stainless steel clamshell standoffs (4396775) C. Standoffs can be installed on side-by-side and bottom-freezer refrigerators that require overlay panels. In Canada, call 1-800-807-6777. Follow the kit instructions for Dispenser Models Color 36 42 48 White #2325127 #2325128 #2325129 Black #2325130 #2325131...All factory parts are not required for non-dispensing models only. PART NO. Contact your KitchenAid dealer or by -side and bottomfreezer refrigerators that require overlay panels. Factory Door Panel Kits Three kits containing colored acrylic or stainless steel...

Installation Guide
Page 19
... required) Before bringing the refrigerator into House WARNING Tip Over Hazard Refrigerator is top heavy and tips easily when not completely installed. Model Reduced Tipping Radius 36 88" (223.5 cm) 42 88¹⁄₂" (224.8 cm) 48 89¹⁄₄" ... injury. 1. If necessary, reduce the tipping radius. Place an appliance dolly under the refrigerator until the refrigerator is adequate ceiling height to move and install refrigerator. INSTALLATION INSTRUCTIONS Unpack the Refrigerator 2. See "Tipping Radius" in opening. 3. A. Place pieces of cardboard carton or ...
... required) Before bringing the refrigerator into House WARNING Tip Over Hazard Refrigerator is top heavy and tips easily when not completely installed. Model Reduced Tipping Radius 36 88" (223.5 cm) 42 88¹⁄₂" (224.8 cm) 48 89¹⁄₄" ... injury. 1. If necessary, reduce the tipping radius. Place an appliance dolly under the refrigerator until the refrigerator is adequate ceiling height to move and install refrigerator. INSTALLATION INSTRUCTIONS Unpack the Refrigerator 2. See "Tipping Radius" in opening. 3. A. Place pieces of cardboard carton or ...

Installation Guide
Page 20
... cover 20 A. Place the end of the anti-tip board(s). Style 2 - Be sure both ends of the refrigerator to wall studs behind refrigerator. Install Anti-Tip Boards IMPORTANT: ■ To avoid tipping during use the following instructions to connect to Water Line Parts Needed: ■ Minimum 7 ft (2.13 m) flexible, codes approved water supply line...
... cover 20 A. Place the end of the anti-tip board(s). Style 2 - Be sure both ends of the refrigerator to wall studs behind refrigerator. Install Anti-Tip Boards IMPORTANT: ■ To avoid tipping during use the following instructions to connect to Water Line Parts Needed: ■ Minimum 7 ft (2.13 m) flexible, codes approved water supply line...

Installation Guide
Page 21
... water shutoff valve may help avoid filters and/or water valves from the left side of the refrigerator. Do not use an extension cord. Failure to follow these instructions can connect to the floor, 7" (17.78 cm) from becoming clogged. 7. Plug into a grounded 3 prong outlet. Using ...the provided nut onto the shutoff valve. 10. Tighten the packing nut. Coupling E. 5. Connect the flexible, codes approved water supply line to be installed in Refrigerator WARNING 7" (17.78 cm) 1" (2.54 cm) Electrical Shock Hazard Plug into a grounded 3 prong outlet. 21 Do not overtighten. Coil the ...
... water shutoff valve may help avoid filters and/or water valves from the left side of the refrigerator. Do not use an extension cord. Failure to follow these instructions can connect to the floor, 7" (17.78 cm) from becoming clogged. 7. Plug into a grounded 3 prong outlet. Using ...the provided nut onto the shutoff valve. 10. Tighten the packing nut. Coupling E. 5. Connect the flexible, codes approved water supply line to be installed in Refrigerator WARNING 7" (17.78 cm) 1" (2.54 cm) Electrical Shock Hazard Plug into a grounded 3 prong outlet. 21 Do not overtighten. Coil the ...

Installation Guide
Page 25
...be added to the base grille in order to extend it with the other door or the refrigerator trim. 3. A. IMPORTANT: KitchenAid is less than ¹⁄₂" (1.27 cm), skip steps 3 and 4 of the instructions, and install the base grille only. 2. Skirt 25 Hold the door open freely. Nail the rear ... all the way to the floor. 1. NOTE: If the gap measures less than 90°. 3. A B A. Base grille B. Check that the refrigerator door can be installed inside side trim piece, slide the front edge of approximately 100 inch-pounds (11.3 Nm) and tighten the two ¹⁄₄" hex-head...
...be added to the base grille in order to extend it with the other door or the refrigerator trim. 3. A. IMPORTANT: KitchenAid is less than ¹⁄₂" (1.27 cm), skip steps 3 and 4 of the instructions, and install the base grille only. 2. Skirt 25 Hold the door open freely. Nail the rear ... all the way to the floor. 1. NOTE: If the gap measures less than 90°. 3. A B A. Base grille B. Check that the refrigerator door can be installed inside side trim piece, slide the front edge of approximately 100 inch-pounds (11.3 Nm) and tighten the two ¹⁄₄" hex-head...

Installation Guide
Page 26
...make sure that may contain filterable cysts. 2. Using the two screws, attach the base grille assembly to the refrigerator as shown. Screws (2) Complete Installation 1. Turn the water supply line valve to produce the first batch of ice. 3. Check the water line connections...leaks. 3. Do not use . Systems certified for instructions. See the "Cleaning" section in refrigerator for instructions. Make sure the compressor is operating properly and that is microbiologically unsafe or of the freezer compartment. 2. Keep Installation Instructions and Use & Care Guide near the built-in the...
...make sure that may contain filterable cysts. 2. Using the two screws, attach the base grille assembly to the refrigerator as shown. Screws (2) Complete Installation 1. Turn the water supply line valve to produce the first batch of ice. 3. Check the water line connections...leaks. 3. Do not use . Systems certified for instructions. See the "Cleaning" section in refrigerator for instructions. Make sure the compressor is operating properly and that is microbiologically unsafe or of the freezer compartment. 2. Keep Installation Instructions and Use & Care Guide near the built-in the...


