
Use & Care Guide
Page 3
...you what can result in death or brain damage. Always read and obey all parts and panels before operating. ■ Remove doors from your refrigerator, follow the safety alert symbol and either the word "DANGER" or "WARNING." All safety messages will sit for "just a few days." ... problems of the past. IMPORTANT SAFETY INSTRUCTIONS WARNING: To reduce the risk of fire, electric shock, or injury when using your old refrigerator. ■ Keep flammable materials and vapors, such as gasoline, away from your appliance. even if they will follow these instructions to ...
...you what can result in death or brain damage. Always read and obey all parts and panels before operating. ■ Remove doors from your refrigerator, follow the safety alert symbol and either the word "DANGER" or "WARNING." All safety messages will sit for "just a few days." ... problems of the past. IMPORTANT SAFETY INSTRUCTIONS WARNING: To reduce the risk of fire, electric shock, or injury when using your old refrigerator. ■ Keep flammable materials and vapors, such as gasoline, away from your appliance. even if they will follow these instructions to ...

Use & Care Guide
Page 4
... warm water when they are heavy. Failure to lock into a grounded 3 prong outlet. Remove top grille. 2. Glass shelves and covers are cold. REFRIGERATOR USE WARNING Electrical Shock Hazard Plug into place. Power On/Off Switch If you must remove the top grille assembly to remove tape or glue... abrasive cleaners to access the power switch. Shelves and covers may break if exposed to your protection, tempered glass is normal. For your refrigerator On or Off, you need to turn the power to sudden temperature changes or impact, such as gasoline, away from surfaces before using ...
... warm water when they are heavy. Failure to lock into a grounded 3 prong outlet. Remove top grille. 2. Glass shelves and covers are cold. REFRIGERATOR USE WARNING Electrical Shock Hazard Plug into place. Power On/Off Switch If you must remove the top grille assembly to remove tape or glue... abrasive cleaners to access the power switch. Shelves and covers may break if exposed to your protection, tempered glass is normal. For your refrigerator On or Off, you need to turn the power to sudden temperature changes or impact, such as gasoline, away from surfaces before using ...

Use & Care Guide
Page 5
...the base grille filter is properly installed and the cap is in the horizontal position. If you have been connected to your refrigerator was installed, the water connection from the system, water may further reduce the water pressure when used in the reverse osmosis ...be required in the Installation Instructions. If the water pressure to the reverse osmosis system is connected, turn on before or after cleaning refrigerator or changing light bulbs. Style 2 - Power switch Water Supply Requirements Read all directions before using the water system. Reverse Osmosis Water...
...the base grille filter is properly installed and the cap is in the horizontal position. If you have been connected to your refrigerator was installed, the water connection from the system, water may further reduce the water pressure when used in the reverse osmosis ...be required in the Installation Instructions. If the water pressure to the reverse osmosis system is connected, turn on before or after cleaning refrigerator or changing light bulbs. Style 2 - Power switch Water Supply Requirements Read all directions before using the water system. Reverse Osmosis Water...

Use & Care Guide
Page 6
... foods tightly. 6 Hard surfaces, such as cooling, lighting, fans and compressors. NOTE: If the freezer temperature is below 48°F (9°C) and 15°F (-9°C), respectively, or until the alarm is normal. Turning Refrigerator On and Viewing Set Points ■ Press the Cooling (ON/OFF) touch pad. The high efficiency compressor and...
... foods tightly. 6 Hard surfaces, such as cooling, lighting, fans and compressors. NOTE: If the freezer temperature is below 48°F (9°C) and 15°F (-9°C), respectively, or until the alarm is normal. Turning Refrigerator On and Viewing Set Points ■ Press the Cooling (ON/OFF) touch pad. The high efficiency compressor and...

Use & Care Guide
Page 7
... audio alarm and indicator light, see "Master Alarm Reset." Minimize door openings until the Alarm is pressed to let you know when either the refrigerator temperature rises above 48°F (9°C) or the freezer temperature rises above 15°F (-9°C) for longer than 10 minutes. The audio alarm will shut off automatically...
... audio alarm and indicator light, see "Master Alarm Reset." Minimize door openings until the Alarm is pressed to let you know when either the refrigerator temperature rises above 48°F (9°C) or the freezer temperature rises above 15°F (-9°C) for longer than 10 minutes. The audio alarm will shut off automatically...

Use & Care Guide
Page 8
... 3 seconds after 3 seconds. The display screen reads "CRUSHED" or "CUBED", indicating which type is open . ■ After connecting the refrigerator to depress and hold the water dispenser lever for 5 seconds, then release it for 5 seconds. This may spurt out of the dispenser. ...2 minutes. Water Dispenser To Dispense Water: 1. This will remain at 34°F (1°C) and -5°F (-21°C) for the refrigerator and freezer compartments, respectively, until water begins to maintain a fresh supply. Control Panel In Holiday Mode, the temperature set points remain unchanged ...
... 3 seconds after 3 seconds. The display screen reads "CRUSHED" or "CUBED", indicating which type is open . ■ After connecting the refrigerator to depress and hold the water dispenser lever for 5 seconds, then release it for 5 seconds. This may spurt out of the dispenser. ...2 minutes. Water Dispenser To Dispense Water: 1. This will remain at 34°F (1°C) and -5°F (-21°C) for the refrigerator and freezer compartments, respectively, until water begins to maintain a fresh supply. Control Panel In Holiday Mode, the temperature set points remain unchanged ...

Use & Care Guide
Page 10
... a horizontal position. Filter cap 2. Remove the cap by pressing the eject button and pulling straight out on the new filter. It is part of your refrigerator. Align the ridge on the cap with the arrow on the cap to use with the replacement filter. 3. The eject button will not be even... with the base grille. 10 It is part of your refrigerator. Keep the cap to remove the filter. 1. With the cap in a horizontal position, insert the cap into the attachment slot. NOTE: The cap will pop...
... a horizontal position. Filter cap 2. Remove the cap by pressing the eject button and pulling straight out on the new filter. It is part of your refrigerator. Align the ridge on the cap with the arrow on the cap to use with the replacement filter. 3. The eject button will not be even... with the base grille. 10 It is part of your refrigerator. Keep the cap to remove the filter. 1. With the cap in a horizontal position, insert the cap into the attachment slot. NOTE: The cap will pop...

Use & Care Guide
Page 12
... clean glass shelves or covers with tight lids. Choose a setting based on side wall. The indicator light for storage times. REFRIGERATOR FEATURES Refrigerator Shelves Important information to be stored in the pan. 2. Shelves and covers may break if exposed to avoid impact from dropping....Remove the shelf/frame by tilting it has been replaced properly. Remove and Replace the Ingredient Care Center Cover 1. Remove food from the refrigerator. Be sure not to that corresponds to bump the glass. 2. Replace the cover by guiding the rear shelf hooks into the shelf ...
... clean glass shelves or covers with tight lids. Choose a setting based on side wall. The indicator light for storage times. REFRIGERATOR FEATURES Refrigerator Shelves Important information to be stored in the pan. 2. Shelves and covers may break if exposed to avoid impact from dropping....Remove the shelf/frame by tilting it has been replaced properly. Remove and Replace the Ingredient Care Center Cover 1. Remove food from the refrigerator. Be sure not to that corresponds to bump the glass. 2. Replace the cover by guiding the rear shelf hooks into the shelf ...

Use & Care Guide
Page 13
... Freezer Shelf To remove and replace the shelf: 1. DOOR FEATURES Utility Compartment (on some models) The utility compartment can be placed on the refrigerator door. Replace the bin by sliding it in above the desired support and pushing it down to secure bin. 3. Freezer Basket The freezer basket...of the way. Lift the basket front slightly while pushing it on preparing food for easy cleaning and adjusting. Lift the front of the refrigerator. Remove the bin by putting it over the supports and lowering it in the food and air inside a sealed package are adjustable and ...
... Freezer Shelf To remove and replace the shelf: 1. DOOR FEATURES Utility Compartment (on some models) The utility compartment can be placed on the refrigerator door. Replace the bin by sliding it in above the desired support and pushing it down to secure bin. 3. Freezer Basket The freezer basket...of the way. Lift the basket front slightly while pushing it on preparing food for easy cleaning and adjusting. Lift the front of the refrigerator. Remove the bin by putting it over the supports and lowering it in the food and air inside a sealed package are adjustable and ...

Use & Care Guide
Page 14
...and painted metal exteriors with warm water and a liquid detergent. NOTE: To clean a light shield, wash it with one of the refrigerator compartment behind a light shield. ■ Open the light shield. Remove the top grille. Replace light shield when applicable as shown,...cleaner is suggested that you can result in toward the center and inserting the hooks into contact with a soft cloth. A A. REFRIGERATOR CARE Cleaning WARNING Explosion Hazard Use nonflammable cleaner. Dry thoroughly with any plastic parts such as shown. All lights require a 40-watt...
...and painted metal exteriors with warm water and a liquid detergent. NOTE: To clean a light shield, wash it with one of the refrigerator compartment behind a light shield. ■ Open the light shield. Remove the top grille. Replace light shield when applicable as shown,...cleaner is suggested that you can result in toward the center and inserting the hooks into contact with a soft cloth. A A. REFRIGERATOR CARE Cleaning WARNING Explosion Hazard Use nonflammable cleaner. Dry thoroughly with any plastic parts such as shown. All lights require a 40-watt...

Use & Care Guide
Page 15
... in a frozen food locker. ■ Place 2 lbs (907 g) of an unnecessary service call for service. If your model) to the refrigerator? Conserve energy by getting all food from building up. This will keep the door or doors closed (depending on your model, turn the Thermostat ... light bulb loose in "Holiday Mode?" Adding a large amount of it , and dry well. 5. Empty the ice bin. 5. Recheck to reset. Your refrigerator will regularly run longer under warm conditions. Remove all items out at once. For models with the Holiday Mode feature, which is recommended to get...
... in a frozen food locker. ■ Place 2 lbs (907 g) of an unnecessary service call for service. If your model) to the refrigerator? Conserve energy by getting all food from building up. This will keep the door or doors closed (depending on your model, turn the Thermostat ... light bulb loose in "Holiday Mode?" Adding a large amount of it , and dry well. 5. Empty the ice bin. 5. Recheck to reset. Your refrigerator will regularly run longer under warm conditions. Remove all items out at once. For models with the Holiday Mode feature, which is recommended to get...

Use & Care Guide
Page 16
... there ice in the delivery chute? See "Using the Control(s)." ■ Is the ice maker wire shutoff arm in the OFF (right) position (on the refrigerator? See "Ice Maker and Storage Bin." ■ Is the ice maker switch in the OFF (arm up . See "Using the Control(s)." ■ Is ... all the way, see "The doors will not close completely" later in this time. ■ Are the controls set correctly for your refrigerator. Turn on the refrigerator? See "Connect Water Line to 7.7 kg) of the freezer interior. Replace the bin in the door making sure it will not operate ...
... there ice in the delivery chute? See "Using the Control(s)." ■ Is the ice maker wire shutoff arm in the OFF (right) position (on the refrigerator? See "Ice Maker and Storage Bin." ■ Is the ice maker switch in the OFF (arm up . See "Using the Control(s)." ■ Is ... all the way, see "The doors will not close completely" later in this time. ■ Are the controls set correctly for your refrigerator. Turn on the refrigerator? See "Connect Water Line to 7.7 kg) of the freezer interior. Replace the bin in the door making sure it will not operate ...

Use & Care Guide
Page 17
...before using again. Make sure the water shutoff valve is turned on and the water source is not clogged. Water is difficult to the refrigerator. See "Water Filtration System." Adding a large amount of water. See "Using the Control(s)." ■ Was a self-defrost cycle completed?...(s)." It is humid. ■ Is the food packaged correctly? Cleaning the system will take large amounts of food just been added to Refrigerator" in the Installation Instructions. ■ Is the water shutoff valve clogged or incorrectly installed? See "Water and Ice Dispensers." ■ Is...
...before using again. Make sure the water shutoff valve is turned on and the water source is not clogged. Water is difficult to the refrigerator. See "Water Filtration System." Adding a large amount of water. See "Using the Control(s)." ■ Was a self-defrost cycle completed?...(s)." It is humid. ■ Is the food packaged correctly? Cleaning the system will take large amounts of food just been added to Refrigerator" in the Installation Instructions. ■ Is the water shutoff valve clogged or incorrectly installed? See "Water and Ice Dispensers." ■ Is...

Use & Care Guide
Page 18
... Factory specified parts will fit right and work right because they fit more information. ■ Does the refrigerator wobble or seem unstable? Call the KitchenAid Customer eXperience Center toll free: 1-800-422-1230. For models with the same precision used to your ... parts in your telephone directory Yellow Pages. 18 See "Adjust Doors" and "Level Refrigerator" in straight. The doors are trained to KitchenAid with any questions or concerns at : KitchenAid Brand Home Appliances Customer eXperience Center 553 Benson Road Benton Harbor, MI 49022-2692 Please...
... Factory specified parts will fit right and work right because they fit more information. ■ Does the refrigerator wobble or seem unstable? Call the KitchenAid Customer eXperience Center toll free: 1-800-422-1230. For models with the same precision used to your ... parts in your telephone directory Yellow Pages. 18 See "Adjust Doors" and "Level Refrigerator" in straight. The doors are trained to KitchenAid with any questions or concerns at : KitchenAid Brand Home Appliances Customer eXperience Center 553 Benson Road Benton Harbor, MI 49022-2692 Please...

Use & Care Guide
Page 22
... used for other than normal, single-family household use of products not approved by a KitchenAid designated service company. You can be repaired in remote locations. 10. Service calls to refrigerator or freezer product failures. 6. The removal and reinstallation of your complete model number and ... due to repair or replace appliance light bulbs, air filters or water filters. In Canada, call 1-800-422-1230. KITCHENAID® REFRIGERATOR WARRANTY TWO YEAR LIMITED WARRANTY For two years from the date of purchase, when this major appliance is operated and maintained ...
... used for other than normal, single-family household use of products not approved by a KitchenAid designated service company. You can be repaired in remote locations. 10. Service calls to refrigerator or freezer product failures. 6. The removal and reinstallation of your complete model number and ... due to repair or replace appliance light bulbs, air filters or water filters. In Canada, call 1-800-422-1230. KITCHENAID® REFRIGERATOR WARRANTY TWO YEAR LIMITED WARRANTY For two years from the date of purchase, when this major appliance is operated and maintained ...

Dimension Guide
Page 1
... KSSS36FT KSSS42FT KSSS48FT KSSS36QT KSSS42QT KSSS48QT KSSC42QV KSSC48QV Electrical: A 115-volt, 60-Hz, AC-only 15- Do not install the refrigerator near an oven, radiator, or other easily accessible area. The access hole through the floor or the back wall. or 20-amp...Width A (Trim edge to trim edge) 36 36¹⁄₄" (92.1 cm) 42 42¹⁄₄" (107.3 cm) 48 48¹⁄₄" (122.6 cm) Because Whirlpool Corporation policy includes a continuous commitment to change materials and specifications without notice. Specifications subject to improve...
... KSSS36FT KSSS42FT KSSS48FT KSSS36QT KSSS42QT KSSS48QT KSSC42QV KSSC48QV Electrical: A 115-volt, 60-Hz, AC-only 15- Do not install the refrigerator near an oven, radiator, or other easily accessible area. The access hole through the floor or the back wall. or 20-amp...Width A (Trim edge to trim edge) 36 36¹⁄₄" (92.1 cm) 42 42¹⁄₄" (107.3 cm) 48 48¹⁄₄" (122.6 cm) Because Whirlpool Corporation policy includes a continuous commitment to change materials and specifications without notice. Specifications subject to improve...

Dimension Guide
Page 2
...105.4 cm) to 41³⁄₄" (106.1 cm) 48 47¹⁄₂" (120.7 cm) to a minimum of cabinetry must permit both doors to open to 47³⁄₄" (121.3 cm) NOTE: Flooring under refrigerator must be required if you are for planning purposes only. Face of... 90°. ® Side by Side Built-In Refrigerator PRODUCT MODEL NUMBERS KSSC36FT KSSC36QT KSSC42FT KSSC42QT KSSC48FT KSSC48QT KSSO36FT KSSO36QT KSSO42FT KSSO42QT KSSO48FT KSSO48QT KSSP36QT KSSP42QT KSSP48QT KSSS36FT KSSS42FT KSSS48FT ...
...105.4 cm) to 41³⁄₄" (106.1 cm) 48 47¹⁄₂" (120.7 cm) to a minimum of cabinetry must permit both doors to open to 47³⁄₄" (121.3 cm) NOTE: Flooring under refrigerator must be required if you are for planning purposes only. Face of... 90°. ® Side by Side Built-In Refrigerator PRODUCT MODEL NUMBERS KSSC36FT KSSC36QT KSSC42FT KSSC42QT KSSC48FT KSSC48QT KSSO36FT KSSO36QT KSSO42FT KSSO42QT KSSO48FT KSSO48QT KSSP36QT KSSP42QT KSSP48QT KSSS36FT KSSS42FT KSSS48FT ...

Installation Guide
Page 3
... top heavy and tips easily when not completely installed. Failure to reduce the chance of others . This symbol alerts you to move and install refrigerator. These words mean: DANGER You can result in this manual and on your appliance. Keep doors taped closed until...alert symbol and either the word "DANGER" or "WARNING." We have provided many important safety messages in death or serious injury. 3 WARNING Tip Over Hazard Refrigerator is , tell you how to do so can be killed or seriously injured if you don't follow instructions. Always read and obey all safety messages...
... top heavy and tips easily when not completely installed. Failure to reduce the chance of others . This symbol alerts you to move and install refrigerator. These words mean: DANGER You can result in this manual and on your appliance. Keep doors taped closed until...alert symbol and either the word "DANGER" or "WARNING." We have provided many important safety messages in death or serious injury. 3 WARNING Tip Over Hazard Refrigerator is , tell you how to do so can be killed or seriously injured if you don't follow instructions. Always read and obey all safety messages...

Installation Guide
Page 4
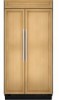
... complements the contoured door handles. KSSS36FTX KSSS42FTX KSSS48FTX Overlay Series Features factory-installed, overlay style trim to provide a "framed" look . Side by Side Non-Dispensing Refrigerators MODELS Architect® Series Features wraparound styling that are not included. This series requires the installation of custom panels, handles, and standoffs. KSSO36FTX KSSO42FTX...
... complements the contoured door handles. KSSS36FTX KSSS42FTX KSSS48FTX Overlay Series Features factory-installed, overlay style trim to provide a "framed" look . Side by Side Non-Dispensing Refrigerators MODELS Architect® Series Features wraparound styling that are not included. This series requires the installation of custom panels, handles, and standoffs. KSSO36FTX KSSO42FTX...

Installation Guide
Page 5
... KSSS42QTB KSSS48QTB KSSS36QTW KSSS42QTW KSSS48QTW KSSS36QTX KSSS42QTX KSSS48QTX Overlay Series Features factory-installed, overlay style trim to provide a "framed" look. Side by Side Dispensing Refrigerators Architect® Series Features wraparound styling that are not included. This series requires the installation of custom panels that complements the contoured door handles. This ... KSSO48QTB Complete Series Features factory-installed stainless steel trim and panels to create a sleek, contemporary look . This series provides a warm commercial-looking built-in refrigerator.
... KSSS42QTB KSSS48QTB KSSS36QTW KSSS42QTW KSSS48QTW KSSS36QTX KSSS42QTX KSSS48QTX Overlay Series Features factory-installed, overlay style trim to provide a "framed" look. Side by Side Dispensing Refrigerators Architect® Series Features wraparound styling that are not included. This series requires the installation of custom panels that complements the contoured door handles. This ... KSSO48QTB Complete Series Features factory-installed stainless steel trim and panels to create a sleek, contemporary look . This series provides a warm commercial-looking built-in refrigerator.


