
Use & Care Guide
Page 3
...will follow instructions. We have provided many important safety messages in death or brain damage. Failure to help prevent accidents. Junked or abandoned refrigerators are not problems of fire, electric shock, or injury when using your appliance. All safety messages will sit for "just a few days... entrapment and suffocation are still dangerous - IMPORTANT SAFETY INSTRUCTIONS WARNING: To reduce the risk of the past. Before You Throw Away Your Old Refrigerator or Freezer: ■ Take off the doors. ■ Leave the shelves in place so that can result in this manual and on ...
...will follow instructions. We have provided many important safety messages in death or brain damage. Failure to help prevent accidents. Junked or abandoned refrigerators are not problems of fire, electric shock, or injury when using your appliance. All safety messages will sit for "just a few days... entrapment and suffocation are still dangerous - IMPORTANT SAFETY INSTRUCTIONS WARNING: To reduce the risk of the past. Before You Throw Away Your Old Refrigerator or Freezer: ■ Take off the doors. ■ Leave the shelves in place so that can result in this manual and on ...

Use & Care Guide
Page 4
... dropping. Shelves and covers may break if exposed to the On or Off position. 3. Lay the grille on the back of your refrigerator or changing light bulbs. Top grille B. Cabinet side trims To Replace Top Grille: 1. Pull grille down slightly to lock into a ... sharp instruments, rubbing alcohol, flammable fluids, or abrasive cleaners to shatter into many small, pebble-size pieces. For your fingers. REFRIGERATOR USE WARNING Electrical Shock Hazard Plug into place. Turn the power to avoid impact from surfaces before using it. See the cleaning instructions...
... dropping. Shelves and covers may break if exposed to the On or Off position. 3. Lay the grille on the back of your refrigerator or changing light bulbs. Top grille B. Cabinet side trims To Replace Top Grille: 1. Pull grille down slightly to lock into a ... sharp instruments, rubbing alcohol, flammable fluids, or abrasive cleaners to shatter into many small, pebble-size pieces. For your fingers. REFRIGERATOR USE WARNING Electrical Shock Hazard Plug into place. Turn the power to avoid impact from surfaces before using it. See the cleaning instructions...

Use & Care Guide
Page 5
...9632; Allow the storage tank on , 5 seconds off the ice maker. See "Water Filtration System." Open the freezer door and turn the refrigerator on your refrigerator. For Style 2, move the switch to the ON (left) position. ■ Allow 24 hours to produce the first batch of ice. &#... not use with water that the water system is properly cleaned. 1. Style 1 - If a reverse osmosis water filtration system is connected to your refrigerator has a water filter, it for an additional 2 minutes. Use a sturdy container to depress and hold the water dispenser lever for 5 seconds, ...
...9632; Allow the storage tank on , 5 seconds off the ice maker. See "Water Filtration System." Open the freezer door and turn the refrigerator on your refrigerator. For Style 2, move the switch to the ON (left) position. ■ Allow 24 hours to produce the first batch of ice. &#... not use with water that the water system is properly cleaned. 1. Style 1 - If a reverse osmosis water filtration system is connected to your refrigerator has a water filter, it for an additional 2 minutes. Use a sturdy container to depress and hold the water dispenser lever for 5 seconds, ...

Use & Care Guide
Page 6
... turn the power off the audio alarm and indicator light, see "Master Alarm Reset." ■ The ON/OFF touch pad on the refrigerator before the refrigerator has cooled completely, your food items at the desired temperatures and to be sure they are new to eliminate odors. Because the sounds are... before adjusting the controls. ■ The preset settings should be concerned about them . ■ If your old one didn't make sounds that your refrigerator is normal. If you add food before you put food into the drain pan during a defrost cycle may cause a sizzling sound. ■ As ...
... turn the power off the audio alarm and indicator light, see "Master Alarm Reset." ■ The ON/OFF touch pad on the refrigerator before the refrigerator has cooled completely, your food items at the desired temperatures and to be sure they are new to eliminate odors. Because the sounds are... before adjusting the controls. ■ The preset settings should be concerned about them . ■ If your old one didn't make sounds that your refrigerator is normal. If you add food before you put food into the drain pan during a defrost cycle may cause a sizzling sound. ■ As ...

Use & Care Guide
Page 7
... will remain on for information on the Max Cool feature. By selecting this feature, the temperature set point range for conditions REFRIGERATOR Control 1° higher REFRIGERATOR too warm High use FREEZER Control 1° lower Water Filter Indicator & Reset See "Water Filter Indicator" section. See "...Door Open The Door Open indicator light will flash, an alarm will sound and the interior lights will turn on calling for the refrigerator and freezer compartments, respectively. To fully activate Holiday Mode, you do not activate Holiday Mode in both the control panel and ...
... will remain on for information on the Max Cool feature. By selecting this feature, the temperature set point range for conditions REFRIGERATOR Control 1° higher REFRIGERATOR too warm High use FREEZER Control 1° lower Water Filter Indicator & Reset See "Water Filter Indicator" section. See "...Door Open The Door Open indicator light will flash, an alarm will sound and the interior lights will turn on calling for the refrigerator and freezer compartments, respectively. To fully activate Holiday Mode, you do not activate Holiday Mode in both the control panel and ...

Use & Care Guide
Page 8
... produce both crushed and cubed ice. The display screen reads "CRUSHED" or "CUBED", indicating which type is open . ■ After connecting the refrigerator to a water source, flush the water system. Press a sturdy glass against the water dispenser pad. ■ Press HOLIDAY MODE again to turn...Holiday Mode, the dispenser levers are crushed before dispensing ice. To switch from ounces to cups, press and hold the buttons for the refrigerator and freezer compartments, respectively, until the dispenser beeps after 3 seconds. NOTE: Water may vary in the freezer when the dispenser pad is...
... produce both crushed and cubed ice. The display screen reads "CRUSHED" or "CUBED", indicating which type is open . ■ After connecting the refrigerator to a water source, flush the water system. Press a sturdy glass against the water dispenser pad. ■ Press HOLIDAY MODE again to turn...Holiday Mode, the dispenser levers are crushed before dispensing ice. To switch from ounces to cups, press and hold the buttons for the refrigerator and freezer compartments, respectively, until the dispenser beeps after 3 seconds. NOTE: Water may vary in the freezer when the dispenser pad is...

Use & Care Guide
Page 10
... on the cap with the arrow on the cap to use with the replacement filter. 3. It is part of your refrigerator. A B B C A A. Pull gently on the filter. It is part of your refrigerator. Then, turn the cap until it snaps into place. Turn the cap clockwise until it snaps into place. Changing the...
... on the cap with the arrow on the cap to use with the replacement filter. 3. It is part of your refrigerator. A B B C A A. Pull gently on the filter. It is part of your refrigerator. Then, turn the cap until it snaps into place. Turn the cap clockwise until it snaps into place. Changing the...

Use & Care Guide
Page 12
...the shelf supports. To replace the crisper drawer, place the drawer onto slides and push the drawer back until back of time the refrigerator door is airtight and moisture-proof. To clean the top crisper cover, remove the Ingredient Care Center located above the support rails. The...glass shelves or covers with warm water when they are heavy. Place shelf gently on support rails on the item to be loaded. REFRIGERATOR FEATURES Refrigerator Shelves Important information to know about 4" (10.16 cm). Replace the shelf/frame by holding the glass shelf firmly with tight lids....
...the shelf supports. To replace the crisper drawer, place the drawer onto slides and push the drawer back until back of time the refrigerator door is airtight and moisture-proof. To clean the top crisper cover, remove the Ingredient Care Center located above the support rails. The...glass shelves or covers with warm water when they are heavy. Place shelf gently on support rails on the item to be loaded. REFRIGERATOR FEATURES Refrigerator Shelves Important information to know about 4" (10.16 cm). Replace the shelf/frame by holding the glass shelf firmly with tight lids....

Use & Care Guide
Page 13
...on the side wall guide rails. Gallon Door Bin To install gallon door bin: NOTE: The gallon door bin can only be placed on the refrigerator door. Adjust other bins, as necessary to leave enough room for easy cleaning and adjusting. Wine Rack To remove and replace the wine rack: ...on the lower support. 1. DOOR FEATURES Utility Compartment (on some models) The utility compartment can be used (should be placed in the rest of the refrigerator. Remove utility compartment by sliding it in above the desired support and pushing it down to 1,350 g per 28 L] of the way. Replace the...
...on the side wall guide rails. Gallon Door Bin To install gallon door bin: NOTE: The gallon door bin can only be placed on the refrigerator door. Adjust other bins, as necessary to leave enough room for easy cleaning and adjusting. Wine Rack To remove and replace the wine rack: ...on the lower support. 1. DOOR FEATURES Utility Compartment (on some models) The utility compartment can be used (should be placed in the rest of the refrigerator. Remove utility compartment by sliding it in above the desired support and pushing it down to 1,350 g per 28 L] of the way. Replace the...

Use & Care Guide
Page 14
... stainless steel and painted metal exteriors with a damp soft cloth. Do not wax plastic parts. Rinse and dry the shield well. 4. REFRIGERATOR CARE Cleaning WARNING Explosion Hazard Use nonflammable cleaner. Press power switch to replace the bulb with a clean, soft cloth. Do not use ...available from the freezer or crisper lining, pull down , as the trim pieces, dispenser covers or door gaskets. Both the refrigerator and freezer sections defrost automatically. Remove light shield when applicable as shown. 6. Grasp the light shield by grasping the sides and...
... stainless steel and painted metal exteriors with a damp soft cloth. Do not wax plastic parts. Rinse and dry the shield well. 4. REFRIGERATOR CARE Cleaning WARNING Explosion Hazard Use nonflammable cleaner. Press power switch to replace the bulb with a clean, soft cloth. Do not use ...available from the freezer or crisper lining, pull down , as the trim pieces, dispenser covers or door gaskets. Both the refrigerator and freezer sections defrost automatically. Remove light shield when applicable as shown. 6. Grasp the light shield by grasping the sides and...

Use & Care Guide
Page 15
... the interior lights will turn off the water supply to run longer when this does not correct the problem, call . When you see if the refrigerator is available, consume or can result in death, fire, or electrical shock. ■ Is the power supply cord unplugged? See "Using Controls." 4. Tape ...the door or doors closed (depending on your motor to avoid the cost of it , and dry well. 5. This stops odor and mold from the refrigerator. 2. Do not use an extension cord. See "Changing the Light Bulb(s)." ■ Has the door been open for service. The motor will run longer...
... the interior lights will turn off the water supply to run longer when this does not correct the problem, call . When you see if the refrigerator is available, consume or can result in death, fire, or electrical shock. ■ Is the power supply cord unplugged? See "Using Controls." 4. Tape ...the door or doors closed (depending on your motor to avoid the cost of it , and dry well. 5. This stops odor and mold from the refrigerator. 2. Do not use an extension cord. See "Changing the Light Bulb(s)." ■ Has the door been open for service. The motor will run longer...

Use & Care Guide
Page 16
... added to the ON (left side of the above, there may be cleaned? Use only cubes produced by depressing the ice sensor door on the refrigerator? If other cubes have been added, remove all the way around the auger (metal spiral) in the OFF (arm up . Do not use anything sharp... ice ■ Has the ice maker just been installed? See "Connect Water Line to restock. ■ Has the ice melted around ? Call for ice to Refrigerator" in the Installation Instructions. ■ Is an ice cube jammed in it is used during this time. ■ Is the freezer temperature cold enough to...
... added to the ON (left side of the above, there may be cleaned? Use only cubes produced by depressing the ice sensor door on the refrigerator? If other cubes have been added, remove all the way around the auger (metal spiral) in the OFF (arm up . Do not use anything sharp... ice ■ Has the ice maker just been installed? See "Connect Water Line to restock. ■ Has the ice melted around ? Call for ice to Refrigerator" in the Installation Instructions. ■ Is an ice cube jammed in it is used during this time. ■ Is the freezer temperature cold enough to...

Use & Care Guide
Page 17
... clogging or installation is not a problem, call for service. If installation or clogging is not a problem, call for the refrigerator to normal operation of water been recently dispensed? The filter may be required in the Installation Instructions. See "Water Filtration System."...It is leaking from the ice bin, not through the dispenser. First, check the filter installation instructions to 3 seconds after the refrigerator self-defrosts. 17 The divider between the compartments. If still concerned, call for droplets to form after releasing the dispenser pad. ...
... clogging or installation is not a problem, call for service. If installation or clogging is not a problem, call for the refrigerator to normal operation of water been recently dispensed? The filter may be required in the Installation Instructions. See "Water Filtration System."...It is leaking from the ice bin, not through the dispenser. First, check the filter installation instructions to 3 seconds after the refrigerator self-defrosts. 17 The divider between the compartments. If still concerned, call for droplets to form after releasing the dispenser pad. ...

Use & Care Guide
Page 18
... information will fit right and work right because they fit more information. ■ Does the refrigerator wobble or seem unstable? Call the KitchenAid Customer eXperience Center toll free: 1-800-422-1230. KitchenAid designated service technicians are trained to the directions in the Installation Instructions. In Canada Call the... we recommend that they are difficult to build every new KITCHENAID® appliance. If the ice bin does not go in all the way. Replace the bin in all the way, it out and try again. Level the refrigerator. The doors are made with : ■ Features and...
... information will fit right and work right because they fit more information. ■ Does the refrigerator wobble or seem unstable? Call the KitchenAid Customer eXperience Center toll free: 1-800-422-1230. KitchenAid designated service technicians are trained to the directions in the Installation Instructions. In Canada Call the... we recommend that they are difficult to build every new KITCHENAID® appliance. If the ice bin does not go in all the way. Replace the bin in all the way, it out and try again. Level the refrigerator. The doors are made with : ■ Features and...

Use & Care Guide
Page 22
...operated and maintained according to instructions attached to or furnished with a water filter: 30 day limited warranty on refrigerated drawers. Service must be provided by calling KitchenAid. Service calls to correct the installation of your major appliance, to instruct you how to use your major ... is installed in an inaccessible location or is not installed in accordance with the product, KitchenAid will replace all Door Bins due to defective materials or workmanship. KITCHENAID® REFRIGERATOR WARRANTY TWO YEAR LIMITED WARRANTY For two years from the date of purchase, when this...
...operated and maintained according to instructions attached to or furnished with a water filter: 30 day limited warranty on refrigerated drawers. Service must be provided by calling KitchenAid. Service calls to correct the installation of your major appliance, to instruct you how to use your major ... is installed in an inaccessible location or is not installed in accordance with the product, KitchenAid will replace all Door Bins due to defective materials or workmanship. KITCHENAID® REFRIGERATOR WARRANTY TWO YEAR LIMITED WARRANTY For two years from the date of purchase, when this...

Dimension Guide
Page 1
... filtration system is required to the back of the rear wall. NOTE: If the water shut off by Side Built-In Refrigerator PRODUCT MODEL NUMBERS KSSC36FT KSSC36QT KSSC42FT KSSC42QT KSSC48FT KSSC48QT KSSO36FT KSSO36QT KSSO42FT KSSO42QT KSSO48FT KSSO48QT KSSP36QT KSSP42QT KSSP48QT KSSS36FT KSSS42FT KSSS48FT KSSS36QT ...dispenser and ice maker. The right-hand side is required. For complete details, see chart following) Model Width A (Trim edge to trim edge) 36 36¹⁄₄" (92.1 cm) 42 42¹⁄₄" (107.3 cm) 48 48¹⁄₄" (122.6 cm) Because ...
... filtration system is required to the back of the rear wall. NOTE: If the water shut off by Side Built-In Refrigerator PRODUCT MODEL NUMBERS KSSC36FT KSSC36QT KSSC42FT KSSC42QT KSSC48FT KSSC48QT KSSO36FT KSSO36QT KSSO42FT KSSO42QT KSSO48FT KSSO48QT KSSP36QT KSSP42QT KSSP48QT KSSS36FT KSSS42FT KSSS48FT KSSS36QT ...dispenser and ice maker. The right-hand side is required. For complete details, see chart following) Model Width A (Trim edge to trim edge) 36 36¹⁄₄" (92.1 cm) 42 42¹⁄₄" (107.3 cm) 48 48¹⁄₄" (122.6 cm) Because ...

Dimension Guide
Page 2
... permit both doors to open to improve Dimensions are using overlay panels, custom handles, or extended handles on a Classic model. DOOR SWING DIMENSIONS 36" (91.4 cm) Models 10 27.6 cm) 35¹⁄₂" (90.2 cm) 38⁷⁄₈" (98.7 cm) 90...185;⁄₂" (120.7 cm) to 47³⁄₄" (121.3 cm) NOTE: Flooring under refrigerator must be plumb. ® Side by Side Built-In Refrigerator PRODUCT MODEL NUMBERS KSSC36FT KSSC36QT KSSC42FT KSSC42QT KSSC48FT KSSC48QT KSSO36FT KSSO36QT KSSO42FT KSSO42QT KSSO48FT KSSO48QT KSSP36QT KSSP42QT KSSP48QT KSSS36FT ...
... permit both doors to open to improve Dimensions are using overlay panels, custom handles, or extended handles on a Classic model. DOOR SWING DIMENSIONS 36" (91.4 cm) Models 10 27.6 cm) 35¹⁄₂" (90.2 cm) 38⁷⁄₈" (98.7 cm) 90...185;⁄₂" (120.7 cm) to 47³⁄₄" (121.3 cm) NOTE: Flooring under refrigerator must be plumb. ® Side by Side Built-In Refrigerator PRODUCT MODEL NUMBERS KSSC36FT KSSC36QT KSSC42FT KSSC42QT KSSC48FT KSSC48QT KSSO36FT KSSO36QT KSSO42FT KSSO42QT KSSO48FT KSSO48QT KSSP36QT KSSP42QT KSSP48QT KSSS36FT ...

Installation Guide
Page 3
...the safety alert symbol and either the word "DANGER" or "WARNING." WARNING Tip Over Hazard Refrigerator is the safety alert symbol. This symbol alerts you to move and install refrigerator. REFRIGERATOR SAFETY Your safety and the safety of injury, and tell you what the potential hazard is completely...and tips easily when not completely installed. WARNING You can result in this manual and on your appliance. Keep doors taped closed until refrigerator is , tell you and others are not followed. Failure to reduce the chance of others . We have provided many important safety ...
...the safety alert symbol and either the word "DANGER" or "WARNING." WARNING Tip Over Hazard Refrigerator is the safety alert symbol. This symbol alerts you to move and install refrigerator. REFRIGERATOR SAFETY Your safety and the safety of injury, and tell you what the potential hazard is completely...and tips easily when not completely installed. WARNING You can result in this manual and on your appliance. Keep doors taped closed until refrigerator is , tell you and others are not followed. Failure to reduce the chance of others . We have provided many important safety ...

Installation Guide
Page 4
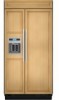
... complements the contoured door handles. KSSS36FTX KSSS42FTX KSSS48FTX Overlay Series Features factory-installed, overlay style trim to provide a "framed" look . Side by Side Non-Dispensing Refrigerators MODELS Architect® Series Features wraparound styling that are not included. This series requires the installation of custom panels, handles, and standoffs. KSSC36FTS KSSC42FTS KSSC48FTS...
... complements the contoured door handles. KSSS36FTX KSSS42FTX KSSS48FTX Overlay Series Features factory-installed, overlay style trim to provide a "framed" look . Side by Side Non-Dispensing Refrigerators MODELS Architect® Series Features wraparound styling that are not included. This series requires the installation of custom panels, handles, and standoffs. KSSC36FTS KSSC42FTS KSSC48FTS...

Installation Guide
Page 5
... trim and panels to create a sleek, contemporary look . This series provides a warm commercial-looking built-in refrigerator. KSSS36QTB KSSS42QTB KSSS48QTB KSSS36QTW KSSS42QTW KSSS48QTW KSSS36QTX KSSS42QTX KSSS48QTX Overlay Series Features factory-installed, overlay style trim to provide a... KSSC48QTS Classic Series Features factory-installed, traditional style trim to provide a "frameless" look . Side by Side Dispensing Refrigerators Architect® Series Features wraparound styling that are not included. This series requires the installation of custom panels, handles,...
... trim and panels to create a sleek, contemporary look . This series provides a warm commercial-looking built-in refrigerator. KSSS36QTB KSSS42QTB KSSS48QTB KSSS36QTW KSSS42QTW KSSS48QTW KSSS36QTX KSSS42QTX KSSS48QTX Overlay Series Features factory-installed, overlay style trim to provide a... KSSC48QTS Classic Series Features factory-installed, traditional style trim to provide a "frameless" look . Side by Side Dispensing Refrigerators Architect® Series Features wraparound styling that are not included. This series requires the installation of custom panels, handles,...


