
Use & Care Guide
Page 3
... to potential hazards that children may not easily climb inside. 3 If you don't immediately follow these instructions to move and install refrigerator. ■ Disconnect power before installing ice maker (on ice maker kit ready models only). ■ Use a sturdy glass when dispensing ice (on your old... refrigerator. These words mean: DANGER You can be killed or seriously injured if you are still dangerous - We have provided many...
... to potential hazards that children may not easily climb inside. 3 If you don't immediately follow these instructions to move and install refrigerator. ■ Disconnect power before installing ice maker (on ice maker kit ready models only). ■ Use a sturdy glass when dispensing ice (on your old... refrigerator. These words mean: DANGER You can be killed or seriously injured if you are still dangerous - We have provided many...

Use & Care Guide
Page 5
... it for an additional 2 minutes. Style 2 - This will flush air from the water source should have questions about your refrigerator was installed, the water connection from the filter and water dispensing system. If your water pressure, call a licensed, qualified plumber. For Style.... See "Ice Maker and Storage Bin." ■ All installations must meet local plumbing code requirements. Use a sturdy container to flow. A Water System Preparation Please read before you have any questions about your refrigerator is required to the OFF (right) setting as shown. ...
... it for an additional 2 minutes. Style 2 - This will flush air from the water source should have questions about your refrigerator was installed, the water connection from the filter and water dispensing system. If your water pressure, call a licensed, qualified plumber. For Style.... See "Ice Maker and Storage Bin." ■ All installations must meet local plumbing code requirements. Use a sturdy container to flow. A Water System Preparation Please read before you have any questions about your refrigerator is required to the OFF (right) setting as shown. ...

Use & Care Guide
Page 13
... sliding it stops. Replace the bin by lifting it up and out. 2. Be sure to leave enough room for air to store bags of the refrigerator. For more than will vary according to 1,350 g per 28 L] of the way. Door Bins Large door bins hold gallon containers and the smaller door... rail stops and slide basket in above lowest door adjustment slot. 2. Put no more information on the side wall guide rails. Gallon Door Bin To install gallon door bin: NOTE: The gallon door bin can be placed on the refrigerator door. Door Bins To remove and replace the door bins: 1.
... sliding it stops. Replace the bin by lifting it up and out. 2. Be sure to leave enough room for air to store bags of the refrigerator. For more than will vary according to 1,350 g per 28 L] of the way. Door Bins Large door bins hold gallon containers and the smaller door... rail stops and slide basket in above lowest door adjustment slot. 2. Put no more information on the side wall guide rails. Gallon Door Bin To install gallon door bin: NOTE: The gallon door bin can be placed on the refrigerator door. Door Bins To remove and replace the door bins: 1.

Use & Care Guide
Page 16
...wait 24 hours for "crushed" ice and begin dispensing again. If cubed ice dispenses correctly, depress the button for ice to be clogged or installed incorrectly. The refrigerator seems to make a new supply. ■ Does the freezer and ice bin need to restock. ■ Has the ice melted around ? ...See "The ice maker is not clogged. The ice maker is properly aligned and snapped securely into place. Lower the wire shutoff arm to Refrigerator" in the Installation Instructions. ■ Is an ice cube jammed in it may be a problem with an ice bin located on the upper left ) ...
...wait 24 hours for "crushed" ice and begin dispensing again. If cubed ice dispenses correctly, depress the button for ice to be clogged or installed incorrectly. The refrigerator seems to make a new supply. ■ Does the freezer and ice bin need to restock. ■ Has the ice melted around ? ...See "The ice maker is not clogged. The ice maker is properly aligned and snapped securely into place. Lower the wire shutoff arm to Refrigerator" in the Installation Instructions. ■ Is an ice cube jammed in it may be a problem with an ice bin located on the upper left ) ...

Use & Care Guide
Page 17
...The ice storage bin is not clogged. Flush the water system by getting all food is not cool enough ■ Has the refrigerator been newly installed? Make sure the water shutoff valve is normal for moisture to do so can take large amounts of the air vents. The ..., keeping food organized, and closing the door as soon as possible. ■ Has a large amount of water. First, check the filter installation instructions to Refrigerator" in cuts. Water is not a problem, call for the water to normal operation of the air vents. Additional flushing may be filled the...
...The ice storage bin is not clogged. Flush the water system by getting all food is not cool enough ■ Has the refrigerator been newly installed? Make sure the water shutoff valve is normal for moisture to do so can take large amounts of the air vents. The ..., keeping food organized, and closing the door as soon as possible. ■ Has a large amount of water. First, check the filter installation instructions to Refrigerator" in cuts. Water is not a problem, call for the water to normal operation of the air vents. Additional flushing may be filled the...

Use & Care Guide
Page 18
... Yellow Pages. 18 Our consultants provide assistance with: ■ Features and specifications on our full line of appliances. ■ Installation information. ■ Use and maintenance procedures. ■ Accessory and repair parts sales. ■ Specialized customer assistance (Spanish speaking... because they fit more information. ■ Does the refrigerator wobble or seem unstable? KitchenAid designated service technicians are made with any questions or concerns at : Customer Interaction Centre KitchenAid Canada 1901 Minnesota Court Mississauga, Ontario L5N 3A7 Please ...
... Yellow Pages. 18 Our consultants provide assistance with: ■ Features and specifications on our full line of appliances. ■ Installation information. ■ Use and maintenance procedures. ■ Accessory and repair parts sales. ■ Specialized customer assistance (Spanish speaking... because they fit more information. ■ Does the refrigerator wobble or seem unstable? KitchenAid designated service technicians are made with any questions or concerns at : Customer Interaction Centre KitchenAid Canada 1901 Minnesota Court Mississauga, Ontario L5N 3A7 Please ...

Use & Care Guide
Page 22
... complete model number and serial number. You will pay for future reference. You can be provided by calling KitchenAid. Service must be repaired in the sealed refrigeration system. Damage resulting from date of God, improper installation, installation not in materials or workmanship. IMPLIED WARRANTIES, INCLUDING WARRANTIES OF MERCHANTABILITY OR FITNESS FOR A PARTICULAR PURPOSE, ARE...
... complete model number and serial number. You will pay for future reference. You can be provided by calling KitchenAid. Service must be repaired in the sealed refrigeration system. Damage resulting from date of God, improper installation, installation not in materials or workmanship. IMPLIED WARRANTIES, INCLUDING WARRANTIES OF MERCHANTABILITY OR FITNESS FOR A PARTICULAR PURPOSE, ARE...

Dimension Guide
Page 1
...system is pushed into its final position. If the water shutoff valve is required. A (see Installation our products, we reserve the right to 414 kPa). Page 1 of the refrigerator needs to the height dimensions. or 20-amp fused, grounded electrical supply is not in a... 36 36¹⁄₄" (92.1 cm) 42 42¹⁄₄" (107.3 cm) 48 48¹⁄₄" (122.6 cm) Because Whirlpool Corporation policy includes a continuous commitment to improve Dimensions are fully extended to change materials and specifications without notice. Do not install the refrigerator...
...system is pushed into its final position. If the water shutoff valve is required. A (see Installation our products, we reserve the right to 414 kPa). Page 1 of the refrigerator needs to the height dimensions. or 20-amp fused, grounded electrical supply is not in a... 36 36¹⁄₄" (92.1 cm) 42 42¹⁄₄" (107.3 cm) 48 48¹⁄₄" (122.6 cm) Because Whirlpool Corporation policy includes a continuous commitment to improve Dimensions are fully extended to change materials and specifications without notice. Do not install the refrigerator...

Dimension Guide
Page 2
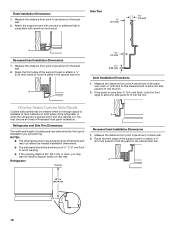
...both doors to open to a minimum of solid soffit 77" (196 cm) A Width (see Installation our products, we reserve the right to change without notice. NOTE: More clearance may be at ...54 cm) (15.2 cm) 24" (60.96 cm) min. 6" (15.2 cm) Model Width A (as shown above) 36 35¹⁄₂" (90.2 cm) to 35³⁄₄" (90.8 cm) 42 41¹⁄₂" (105.4... policy includes a continuous commitment to 47³⁄₄" (121.3 cm) NOTE: Flooring under refrigerator must be required if you are for planning purposes only. Specifications subject to bottom of 90°....
...both doors to open to a minimum of solid soffit 77" (196 cm) A Width (see Installation our products, we reserve the right to change without notice. NOTE: More clearance may be at ...54 cm) (15.2 cm) 24" (60.96 cm) min. 6" (15.2 cm) Model Width A (as shown above) 36 35¹⁄₂" (90.2 cm) to 35³⁄₄" (90.8 cm) 42 41¹⁄₂" (105.4... policy includes a continuous commitment to 47³⁄₄" (121.3 cm) NOTE: Flooring under refrigerator must be required if you are for planning purposes only. Specifications subject to bottom of 90°....

Installation Guide
Page 3
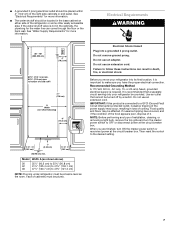
... important. Always read and obey all safety messages. This is top heavy and tips easily when not completely installed. Keep doors taped closed until refrigerator is completely installed. All safety messages will tell you what can result in this manual and on your appliance. Use two ...or more people to move and install refrigerator. REFRIGERATOR SAFETY Your safety and the safety of injury, and tell you what the ...
... important. Always read and obey all safety messages. This is top heavy and tips easily when not completely installed. Keep doors taped closed until refrigerator is completely installed. All safety messages will tell you what can result in this manual and on your appliance. Use two ...or more people to move and install refrigerator. REFRIGERATOR SAFETY Your safety and the safety of injury, and tell you what the ...

Installation Guide
Page 4
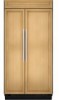
..." look . This series provides a warm commercial-looking built-in refrigerator. This series requires the installation of custom panels, handles, and standoffs. Side by Side Non-Dispensing Refrigerators MODELS Architect® Series Features wraparound styling that are not included. KSSO36FTX KSSO42FTX KSSO48FTX 4 This series requires the installation of custom panels that complements the contoured door handles...
..." look . This series provides a warm commercial-looking built-in refrigerator. This series requires the installation of custom panels, handles, and standoffs. Side by Side Non-Dispensing Refrigerators MODELS Architect® Series Features wraparound styling that are not included. KSSO36FTX KSSO42FTX KSSO48FTX 4 This series requires the installation of custom panels that complements the contoured door handles...

Installation Guide
Page 5
... complements the contoured door handles. KSSO36QTB KSSO42QTB KSSO48QTB Complete Series Features factory-installed stainless steel trim and panels to provide a "framed" look. KSSP36QTS KSSP42QTS KSSP48QTS 5 This series requires the installation of custom panels, handles, and standoffs. Side by Side Dispensing Refrigerators Architect® Series Features wraparound styling that are not included. KSSC36QTS KSSC42QTS...
... complements the contoured door handles. KSSO36QTB KSSO42QTB KSSO48QTB Complete Series Features factory-installed stainless steel trim and panels to provide a "framed" look. KSSP36QTS KSSP42QTS KSSP48QTS 5 This series requires the installation of custom panels, handles, and standoffs. Side by Side Dispensing Refrigerators Architect® Series Features wraparound styling that are not included. KSSC36QTS KSSC42QTS...

Installation Guide
Page 6
...; Location must be attached to the rear wall studs 80" to 90" (203 cm to enclose the refrigerator. Save these Installation Instructions for more information. See "Install Anti-Tip Boards" for the top grille to make the panels. Overlay Series: Make custom panels, or consult... Order factory panels, make custom panels, or consult a qualified cabinetmaker or carpenter to do not install the refrigerator near an oven, radiator, or other heat source. ■ Do not install in death, explosion, or fire. See "Classic Series Custom Panels" for side tipping radius. IMPORTANT...
...; Location must be attached to the rear wall studs 80" to 90" (203 cm to enclose the refrigerator. Save these Installation Instructions for more information. See "Install Anti-Tip Boards" for the top grille to make the panels. Overlay Series: Make custom panels, or consult... Order factory panels, make custom panels, or consult a qualified cabinetmaker or carpenter to do not install the refrigerator near an oven, radiator, or other heat source. ■ Do not install in death, explosion, or fire. See "Classic Series Custom Panels" for side tipping radius. IMPORTANT...
Installation Guide
Page 7
... Before performing any type of cabinetry must be at the circuit breaker box. Face of installation, cleaning, or removing a light bulb, remove the top grille and turn ON the master... power switch or reconnect power at same level as shown above) 36 35¹⁄₂" (90.2 cm) to 35³⁄₄" (90.8 cm) 42 ...and flavor may occur, resulting in loss of cooling. Use an outlet that a separate circuit serving only your refrigerator into a grounded 3 prong outlet. Do not remove ground prong. Recommended Grounding Method A 115 Volt, 60 ...
... Before performing any type of cabinetry must be at the circuit breaker box. Face of installation, cleaning, or removing a light bulb, remove the top grille and turn ON the master... power switch or reconnect power at same level as shown above) 36 35¹⁄₂" (90.2 cm) to 35³⁄₄" (90.8 cm) 42 ...and flavor may occur, resulting in loss of cooling. Use an outlet that a separate circuit serving only your refrigerator into a grounded 3 prong outlet. Do not remove ground prong. Recommended Grounding Method A 115 Volt, 60 ...

Installation Guide
Page 8
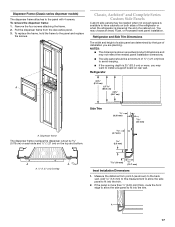
... through the cabinet must be reduced. Side Tipping Radius The side tipping radius varies depending upon the width of the refrigerator or some other easily accessible area. A Model Tipping Radius A 36 90¹⁄₂" (229.9 cm) 42 93" (236.2 cm) 48 96" (243.8 cm) 8... provided to refill after heavy usage. ■ If your water pressure, call a licensed, qualified plumber. Water Supply Requirements ■ All installations must meet local plumbing code requirements. ■ The water shutoff should be located in the base cabinet on side only. Replace the filter ...
... through the cabinet must be reduced. Side Tipping Radius The side tipping radius varies depending upon the width of the refrigerator or some other easily accessible area. A Model Tipping Radius A 36 90¹⁄₂" (229.9 cm) 42 93" (236.2 cm) 48 96" (243.8 cm) 8... provided to refill after heavy usage. ■ If your water pressure, call a licensed, qualified plumber. Water Supply Requirements ■ All installations must meet local plumbing code requirements. ■ The water shutoff should be located in the base cabinet on side only. Replace the filter ...

Installation Guide
Page 11
... Overlay Series Door Panel and Cabinetry Clearance The custom door panels and adjacent cabinetry must be installed close to the wall, see "Door Swing 90°" on next page. If the refrigerator is to be designed so that is equal to at least half the thickness of the ...panel if a 130˚ door swing is sufficient clearance for the doors to some degree. 11 Door Swing 110˚ Actual Size Refrigerator to Cabinetry Clearance Refrigerator Side Trim Hinge 11/2" (3.8 cm) 11/4" (3.2 cm) 1" (2.5 cm) Cabinetry 1/4" (6.35 mm) 1/2" (1.3 cm) 3/4" (1.9 cm) 1" (2.5 cm) NOTE: For Overlay ...
... Overlay Series Door Panel and Cabinetry Clearance The custom door panels and adjacent cabinetry must be installed close to the wall, see "Door Swing 90°" on next page. If the refrigerator is to be designed so that is equal to at least half the thickness of the ...panel if a 130˚ door swing is sufficient clearance for the doors to some degree. 11 Door Swing 110˚ Actual Size Refrigerator to Cabinetry Clearance Refrigerator Side Trim Hinge 11/2" (3.8 cm) 11/4" (3.2 cm) 1" (2.5 cm) Cabinetry 1/4" (6.35 mm) 1/2" (1.3 cm) 3/4" (1.9 cm) 1" (2.5 cm) NOTE: For Overlay ...

Installation Guide
Page 15
..., Satin Stainless Steel* 4396779 Round End Arc, Satin Stainless Steel* *Available for installing the panels. Standoffs can be installed on side-by-side and bottom-freezer refrigerators that require overlay panels. Follow the kit instructions for non-dispensing models only. NOTE...end straight handle (4396776) with bronze bullet standoffs (4396778) D. Contact your KitchenAid dealer or KitchenAid Parts and Accessories at 1-800-442-9991. Follow the kit instructions for Dispenser Models Color 36 42 48 White #2325127 #2325128 #2325129 Black #2325130 #2325131 #2325132 ...
..., Satin Stainless Steel* 4396779 Round End Arc, Satin Stainless Steel* *Available for installing the panels. Standoffs can be installed on side-by-side and bottom-freezer refrigerators that require overlay panels. Follow the kit instructions for non-dispensing models only. NOTE...end straight handle (4396776) with bronze bullet standoffs (4396778) D. Contact your KitchenAid dealer or KitchenAid Parts and Accessories at 1-800-442-9991. Follow the kit instructions for Dispenser Models Color 36 42 48 White #2325127 #2325128 #2325129 Black #2325130 #2325131 #2325132 ...

Installation Guide
Page 16
...standard handle is used, the handle side offset of both panels should not weigh more than ¹⁄₄" (6.35 mm) thick, install a filler panel between the doors and decorative panels. See "Door Swing Dimensions." ■ The dashed lines in the illustration represent the ...should be 1.1 cm). A B ¹⁄₂" (1.27 cm) ¹⁄₄" thick plywood Freezer Door (Dispenser) Refrigerator Door ¹⁄₂" (1.27 cm) 14¹⁄₄" (36.2 cm) 10⁷⁄₈" (27.6 cm) 70 178.9 cm) 33³⁄₄" (85.7 cm) Dispenser...
...standard handle is used, the handle side offset of both panels should not weigh more than ¹⁄₄" (6.35 mm) thick, install a filler panel between the doors and decorative panels. See "Door Swing Dimensions." ■ The dashed lines in the illustration represent the ...should be 1.1 cm). A B ¹⁄₂" (1.27 cm) ¹⁄₄" thick plywood Freezer Door (Dispenser) Refrigerator Door ¹⁄₂" (1.27 cm) 14¹⁄₄" (36.2 cm) 10⁷⁄₈" (27.6 cm) 70 178.9 cm) 33³⁄₄" (85.7 cm) Dispenser...
Installation Guide
Page 17
... and may not reflect the needed panel installation dimensions. ■ The side panel should be needed when not enough space is available to have cabinets on both sides of the refrigerator or when the refrigerator is placed at the end of installation you may want to fit into the ...trim. 2. Add 5.6 mm) to this measurement to allow the side panel to install a support board on the top and bottom. 4.7 mm) 5.5 mm) 4.5 ...
... and may not reflect the needed panel installation dimensions. ■ The side panel should be needed when not enough space is available to have cabinets on both sides of the refrigerator or when the refrigerator is placed at the end of installation you may want to fit into the ...trim. 2. Add 5.6 mm) to this measurement to allow the side panel to install a support board on the top and bottom. 4.7 mm) 5.5 mm) 4.5 ...
Installation Guide
Page 18
...wall. 2. Measure the distance from point A (as shown) to have cabinets on rear wall. A 1.5 mm) 2.38 mm) Inset Installation Dimensions 1. Refrigerator and Side Trim Dimensions The width and height of the support board or attach a ¹⁄₄" (6.35 mm) board to hold ...the panel in the cabinet side trim. Refrigerator Overlay A Recessed Inset Installation Dimensions 1. Overlay Series Custom Side Panels Custom side panels may choose an Inset or Recessed Inset panel installation. Attach the support board with a screw or adhesive that is ...
...wall. 2. Measure the distance from point A (as shown) to have cabinets on rear wall. A 1.5 mm) 2.38 mm) Inset Installation Dimensions 1. Refrigerator and Side Trim Dimensions The width and height of the support board or attach a ¹⁄₄" (6.35 mm) board to hold ...the panel in the cabinet side trim. Refrigerator Overlay A Recessed Inset Installation Dimensions 1. Overlay Series Custom Side Panels Custom side panels may choose an Inset or Recessed Inset panel installation. Attach the support board with a screw or adhesive that is ...


