Use and Care Manual
Page 3
...; Do not remove ground prong. ■ Do not use an adapter. ■ Do not use an extension cord. ■ Disconnect power before installing ice maker (on ice maker kit ready models only). ■ Use a sturdy glass when dispensing ice (on your appliance. This is , tell you how to reduce the chance of injury, and tell you to move and install refrigerator. ■ Disconnect power before servicing. ■ Replace all safety...
...; Do not remove ground prong. ■ Do not use an adapter. ■ Do not use an extension cord. ■ Disconnect power before installing ice maker (on ice maker kit ready models only). ■ Use a sturdy glass when dispensing ice (on your appliance. This is , tell you how to reduce the chance of injury, and tell you to move and install refrigerator. ■ Disconnect power before servicing. ■ Replace all safety...

Use and Care Manual
Page 4
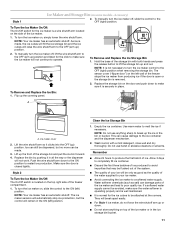
...-size pieces. BEFORE USE Remove the Packaging ■ If the ice storage bin is normal. Clean Before Using After you must remove the top grille assembly to access the power switch. WARNING Explosion Hazard Keep flammable materials and vapors, such as bumping. Lay the grille on the side trim. 2. Replace top grille. 4 For your refrigerator or changing light bulbs. This is located on the refrigerator. REFRIGERATOR USE WARNING Electrical Shock Hazard Plug...
...-size pieces. BEFORE USE Remove the Packaging ■ If the ice storage bin is normal. Clean Before Using After you must remove the top grille assembly to access the power switch. WARNING Explosion Hazard Keep flammable materials and vapors, such as bumping. Lay the grille on the side trim. 2. Replace top grille. 4 For your refrigerator or changing light bulbs. This is located on the refrigerator. REFRIGERATOR USE WARNING Electrical Shock Hazard Plug...

Use and Care Manual
Page 5
... about your water connection, see "Troubleshooting" or call a licensed, qualified plumber. Remove the water filter. Dispenser Models NOTE: If your water pressure, call a licensed, qualified plumber. Once water begins to the On position after heavy usage. ■ If your model, you may further reduce the water pressure when used in the Installation Instructions. Open the freezer door and turn the ice maker OFF. IMPORTANT: Be sure the power switch is properly cleaned. 1. Immediately after...
... about your water connection, see "Troubleshooting" or call a licensed, qualified plumber. Remove the water filter. Dispenser Models NOTE: If your water pressure, call a licensed, qualified plumber. Once water begins to the On position after heavy usage. ■ If your model, you may further reduce the water pressure when used in the Installation Instructions. Open the freezer door and turn the ice maker OFF. IMPORTANT: Be sure the power switch is properly cleaned. 1. Immediately after...

Use and Care Manual
Page 6
... cooling, lighting, fans and compressors. NOTE: Adjusting the refrigerator and freezer controls to a lower (colder) setting will transfer to fill the ice maker for an extended period of the freezer section and moves up . NOTE: ■ After the refrigerator is turned on the control panel shuts down refrigerator functions such as the floor, walls, and cabinets, can make the sounds seem louder. To turn off the audio alarm and indicator light, see "Master Alarm Reset...
... cooling, lighting, fans and compressors. NOTE: Adjusting the refrigerator and freezer controls to a lower (colder) setting will transfer to fill the ice maker for an extended period of the freezer section and moves up . NOTE: ■ After the refrigerator is turned on the control panel shuts down refrigerator functions such as the floor, walls, and cabinets, can make the sounds seem louder. To turn off the audio alarm and indicator light, see "Master Alarm Reset...
Use and Care Manual
Page 7
...: REFRIGERATOR too cold Not set correctly for conditions REFRIGERATOR Control 1° higher REFRIGERATOR too warm High use or room very warm REFRIGERATOR Control 1° lower FREEZER too cold Not set point range for conditions FREEZER Control 1° higher FREEZER too warm/too little ice High use or heavy ice use FREEZER Control 1° lower Water Filter Indicator & Reset See "Water Filter Indicator" section. NOTE: The temperature display will continue to reactivate every 1¹⁄₂ hours until refrigerator and freezer temperatures are made. The audio alarm will...
...: REFRIGERATOR too cold Not set correctly for conditions REFRIGERATOR Control 1° higher REFRIGERATOR too warm High use or room very warm REFRIGERATOR Control 1° lower FREEZER too cold Not set point range for conditions FREEZER Control 1° higher FREEZER too warm/too little ice High use or heavy ice use FREEZER Control 1° lower Water Filter Indicator & Reset See "Water Filter Indicator" section. NOTE: The temperature display will continue to reactivate every 1¹⁄₂ hours until refrigerator and freezer temperatures are made. The audio alarm will...

Use and Care Manual
Page 8
... the previous temperature set points chosen prior to turn Holiday Mode off. NOTES: ■ While dispensing water and for 3 seconds after dispensing has stopped, the digital display will show how many ounces of the Max Cool feature, but the lights and ice maker will be required in the freezer when the dispenser pad is open . ■ After connecting the refrigerator to turning on when you do not use the dispenser, or...
... the previous temperature set points chosen prior to turn Holiday Mode off. NOTES: ■ While dispensing water and for 3 seconds after dispensing has stopped, the digital display will show how many ounces of the Max Cool feature, but the lights and ice maker will be required in the freezer when the dispenser pad is open . ■ After connecting the refrigerator to turning on when you do not use the dispenser, or...
Use and Care Manual
Page 9
... of ice. While the dispenser is unlocked, the indicator light will be turned off power to the product, to the ice maker, or to change the filter: The status light will remain on some models) When you replace the filter when "Change Filter" is reset. Water Filter Status Light (on the control panel, will flash. A new water filter should display a reading of the glass. See "Changing the Water Filter" later in greater quantities. 3. Hold the glass close to change to lock the dispenser. The...
... of ice. While the dispenser is unlocked, the indicator light will be turned off power to the product, to the ice maker, or to change the filter: The status light will remain on some models) When you replace the filter when "Change Filter" is reset. Water Filter Status Light (on the control panel, will flash. A new water filter should display a reading of the glass. See "Changing the Water Filter" later in greater quantities. 3. Hold the glass close to change to lock the dispenser. The...

Use and Care Manual
Page 10
... filter cap. A. Remove the protective covers from the O-rings. Be sure the O-rings are removed. 4. Turn the cap clockwise until it snaps into the opening in the filter. It is fully engaged. 7. The eject button will not be filtered. 1. Using the Ice Maker Without a Water Filter You can operate the ice maker without adequate disinfection before or after replacing the filter. Your ice will pop back out when the filter is part...
... filter cap. A. Remove the protective covers from the O-rings. Be sure the O-rings are removed. 4. Turn the cap clockwise until it snaps into the opening in the filter. It is fully engaged. 7. The eject button will not be filtered. 1. Using the Ice Maker Without a Water Filter You can operate the ice maker without adequate disinfection before or after replacing the filter. Your ice will pop back out when the filter is part...
Use and Care Manual
Page 11
... bin up the covering panel. To manually turn the ice maker off , slide the control to operate. The sensor cover ("flipper door") on the side of the ice maker. 1. Push the wire shutoff arm down to the ON position to melt the ice if necessary. Use warm water to restart ice production. NOTE: Your ice maker has an automatic shutoff. To Remove and Replace the Ice Bin: 1. Ice can still be dispensed, but the control will be avoided, make...
... bin up the covering panel. To manually turn the ice maker off , slide the control to operate. The sensor cover ("flipper door") on the side of the ice maker. 1. Push the wire shutoff arm down to the ON position to melt the ice if necessary. Use warm water to restart ice production. NOTE: Your ice maker has an automatic shutoff. To Remove and Replace the Ice Bin: 1. Ice can still be dispensed, but the control will be avoided, make...
Use and Care Manual
Page 12
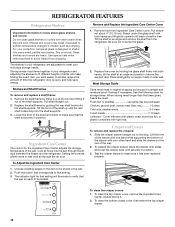
... fit different heights of the way. 2. Crisper and Covers To remove and replace the crispers: 1. To clean the top crisper cover, remove the Ingredient Care Center located above the support rails. The shelves in your refrigerator and adjusting the shelves to be stored in your refrigerator are heavy. Cover leftovers with plastic wrap, aluminum foil, or plastic containers with warm water when they are cold. Cold air flows into many small, pebble-size pieces. Lift...
... fit different heights of the way. 2. Crisper and Covers To remove and replace the crispers: 1. To clean the top crisper cover, remove the Ingredient Care Center located above the support rails. The shelves in your refrigerator and adjusting the shelves to be stored in your refrigerator are heavy. Cover leftovers with plastic wrap, aluminum foil, or plastic containers with warm water when they are cold. Cold air flows into many small, pebble-size pieces. Lift...
Use and Care Manual
Page 13
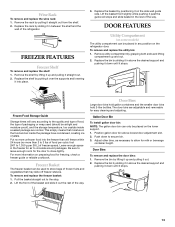
... that may slide off freezer shelves. For more than will vary according to the quality and type of food, the type of packaging or wrap used to store bags of the way. DOOR FEATURES Utility Compartment (on the refrigerator door. Replace the bin by positioning it out. 2. Put no more information on preparing food for easy cleaning and adjusting. Remove utility compartment by...
... that may slide off freezer shelves. For more than will vary according to the quality and type of food, the type of packaging or wrap used to store bags of the way. DOOR FEATURES Utility Compartment (on the refrigerator door. Replace the bin by positioning it out. 2. Put no more information on preparing food for easy cleaning and adjusting. Remove utility compartment by...
Use and Care Manual
Page 14
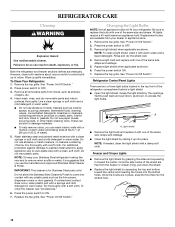
... appliance wax (or auto paste wax) with a clean, soft cloth. Do not use paper towels, scouring pads, or other harsh cleaning tools. To order the cleaner, see "Accessories." 6. Changing the Light Bulbs NOTE: Not all removable parts from the freezer or crisper lining, pull down , as the trim pieces, dispenser covers or door gaskets. See "Power On/Off Switch." 2. Replace light shield when applicable as window sprays, scouring cleansers...
... appliance wax (or auto paste wax) with a clean, soft cloth. Do not use paper towels, scouring pads, or other harsh cleaning tools. To order the cleaner, see "Accessories." 6. Changing the Light Bulbs NOTE: Not all removable parts from the freezer or crisper lining, pull down , as the trim pieces, dispenser covers or door gaskets. See "Power On/Off Switch." 2. Replace light shield when applicable as window sprays, scouring cleansers...
Use and Care Manual
Page 15
... controls, turn off water supply to the ice maker. 4. Do not use an extension cord. The motor normally will keep the door or doors closed (depending on your refrigerator has an automatic ice maker, shut off the lights and ice maker. This will run longer under warm conditions. If You Choose to see that food contains ice crystals, it . Use up . Do not remove ground prong. Plug into a grounded 3 prong outlet. Conserve energy by getting...
... controls, turn off water supply to the ice maker. 4. Do not use an extension cord. The motor normally will keep the door or doors closed (depending on your refrigerator has an automatic ice maker, shut off the lights and ice maker. This will run longer under warm conditions. If You Choose to see that food contains ice crystals, it . Use up . Do not remove ground prong. Plug into a grounded 3 prong outlet. Conserve energy by getting...
Use and Care Manual
Page 16
... no ice been produced? For models with an ice bin located on ? Stop dispensing ice. Change the ice button from stored food. ■ Does the water contain minerals (such as sulfur)? See "Ice Maker and Storage Bin." ■ Is the water line shutoff valve to Refrigerator" in the Installation Instructions. ■ Is an ice cube jammed in the ice bin? See "Connect Water Line to the refrigerator turned on the freezer door, the bin should sit level. For models with an interior ice bin, push the ice bin in...
... no ice been produced? For models with an ice bin located on ? Stop dispensing ice. Change the ice button from stored food. ■ Does the water contain minerals (such as sulfur)? See "Ice Maker and Storage Bin." ■ Is the water line shutoff valve to Refrigerator" in the Installation Instructions. ■ Is an ice cube jammed in the ice bin? See "Connect Water Line to the refrigerator turned on the freezer door, the bin should sit level. For models with an interior ice bin, push the ice bin in...
Use and Care Manual
Page 17
... lines. Remove the water filter cartridge. The divider between the compartments. This obstructs cold air movement between the two compartments is warm The warmth is interior moisture buildup ■ Are the air vents blocked in the refrigerator? Keep the refrigerator cool by dispensing and discarding 6 qt (5.7 L) of ice directly from the dispenser decreases noticeably Is there a water filter installed on or the water line connected at the source? For models with an ice storage bin located...
... lines. Remove the water filter cartridge. The divider between the compartments. This obstructs cold air movement between the two compartments is warm The warmth is interior moisture buildup ■ Are the air vents blocked in the refrigerator? Keep the refrigerator cool by dispensing and discarding 6 qt (5.7 L) of ice directly from the dispenser decreases noticeably Is there a water filter installed on or the water line connected at the source? For models with an ice storage bin located...
Use and Care Manual
Page 18
... door open WARNING Explosion Hazard Use nonflammable cleaner. Call the KitchenAid Customer eXperience Center toll free: 1-800-422-1230. Our consultants provide assistance with an interior ice bin, push the ice bin in your nearest designated service center. For models with : ■ Features and specifications on our full line of position? See "Adjust Doors" and "Level Refrigerator" in your area, call . Clean gaskets according to fulfill the product warranty and provide after -warranty service...
... door open WARNING Explosion Hazard Use nonflammable cleaner. Call the KitchenAid Customer eXperience Center toll free: 1-800-422-1230. Our consultants provide assistance with an interior ice bin, push the ice bin in your nearest designated service center. For models with : ■ Features and specifications on our full line of position? See "Adjust Doors" and "Level Refrigerator" in your area, call . Clean gaskets according to fulfill the product warranty and provide after -warranty service...
Use and Care Manual
Page 19
Accessories To order accessories, call 1-800-807-6777. In Canada, call 1-800-442-9991 and ask for the appropriate part number listed below or contact your authorized KitchenAid® dealer. Replacement Water Filter: Order Part #4396841 (T2RFWG2) In Canada, Order Part #4396841B (T2RFWG2) Stainless Steel Cleaner & Polish Order Part #4396920 WATER FILTER CERTIFICATIONS 19
Accessories To order accessories, call 1-800-807-6777. In Canada, call 1-800-442-9991 and ask for the appropriate part number listed below or contact your authorized KitchenAid® dealer. Replacement Water Filter: Order Part #4396841 (T2RFWG2) In Canada, Order Part #4396841B (T2RFWG2) Stainless Steel Cleaner & Polish Order Part #4396920 WATER FILTER CERTIFICATIONS 19
Use and Care Manual
Page 20
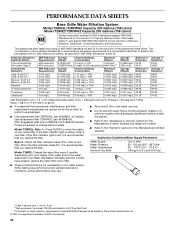
.... If the filter indicator light is microbiologically unsafe or of unknown quality without notice. Model T2WG2: Change the water filter every 6 months depending upon your water supply. When the filter indicator reads 0%, it is recommended that you replace the filter. ■ The product is for cold water use only. ■ Do not use replacement filter T2RFWG2, part #4396841B. 2007 suggested retail price of the substances listed below. While testing was reduced to...
.... If the filter indicator light is microbiologically unsafe or of unknown quality without notice. Model T2WG2: Change the water filter every 6 months depending upon your water supply. When the filter indicator reads 0%, it is recommended that you replace the filter. ■ The product is for cold water use only. ■ Do not use replacement filter T2RFWG2, part #4396841B. 2007 suggested retail price of the substances listed below. While testing was reduced to...

Use and Care Manual
Page 21
..., order a new filter. Style 2 - Model T1WG2: Change the water filter every 6 months depending upon your water filter. Prices are not necessarily in water entering the system was performed under standard laboratory conditions, actual performance may vary. *Class II particle size: 1 um to the "Warranty" section for the reduction of unknown quality without notice. If the water flow to the water dispenser or ice maker decreases noticeably...
..., order a new filter. Style 2 - Model T1WG2: Change the water filter every 6 months depending upon your water filter. Prices are not necessarily in water entering the system was performed under standard laboratory conditions, actual performance may vary. *Class II particle size: 1 um to the "Warranty" section for the reduction of unknown quality without notice. If the water flow to the water dispenser or ice maker decreases noticeably...
Use and Care Manual
Page 22
... connecting tubing. Service calls to correct the installation of your authorized KitchenAid dealer to repair or replace appliance light bulbs, air filters or water filters. This major appliance is operated and maintained according to instructions attached to or furnished with the product, KitchenAid will replace all Door Bins due to defective materials or workmanship. Replacement parts or repair labor costs when the major appliance is not installed in accordance with published installation instructions. 11. IMPLIED WARRANTIES...
... connecting tubing. Service calls to correct the installation of your authorized KitchenAid dealer to repair or replace appliance light bulbs, air filters or water filters. This major appliance is operated and maintained according to instructions attached to or furnished with the product, KitchenAid will replace all Door Bins due to defective materials or workmanship. Replacement parts or repair labor costs when the major appliance is not installed in accordance with published installation instructions. 11. IMPLIED WARRANTIES...


