
User Guide
Page 3
... dangerous - If you what can be killed or seriously injured if you to potential hazards that children may not easily climb inside. 3 REFRIGERATOR SAFETY Your safety and the safety of others . s Use nonflammable cleaner. s Replace all safety messages. s Use a sturdy glass when...the potential hazard is the safety alert symbol. SAVE THESE INSTRUCTIONS Proper Disposal of fire, electric shock, or injury when using your old refrigerator, please follow these basic precautions: s Plug into a grounded 3 prong outlet. even if they will follow instructions. All safety messages ...
... dangerous - If you what can be killed or seriously injured if you to potential hazards that children may not easily climb inside. 3 REFRIGERATOR SAFETY Your safety and the safety of others . s Use nonflammable cleaner. s Replace all safety messages. s Use a sturdy glass when...the potential hazard is the safety alert symbol. SAVE THESE INSTRUCTIONS Proper Disposal of fire, electric shock, or injury when using your old refrigerator, please follow these basic precautions: s Plug into a grounded 3 prong outlet. even if they will follow instructions. All safety messages ...

User Guide
Page 4
... sudden temperature changes or impact, such as gasoline, away from surfaces before using it. Failure to follow these instructions can result in "Refrigerator Care." A. Cabinet side trims To Replace Top Grille: 1. Remove top grille. 2. BEFORE USE Remove the Packaging s If the ice... Top grille B. Glass shelves and covers are cold. s Dispose of the top grille. 2. Use special care when removing them to your refrigerator On or Off, you remove all packaging materials. Press power switch to remove tape or glue. See the cleaning instructions in death, explosion,...
... sudden temperature changes or impact, such as gasoline, away from surfaces before using it. Failure to follow these instructions can result in "Refrigerator Care." A. Cabinet side trims To Replace Top Grille: 1. Remove top grille. 2. BEFORE USE Remove the Packaging s If the ice... Top grille B. Glass shelves and covers are cold. s Dispose of the top grille. 2. Use special care when removing them to your refrigerator On or Off, you remove all packaging materials. Press power switch to remove tape or glue. See the cleaning instructions in death, explosion,...

User Guide
Page 5
... s Allow 24 hours to Water Line" in the horizontal position. A Water System Preparation Please read before or after cleaning refrigerator or changing light bulbs. If you may further reduce the water pressure when used in conjunction with a reverse osmosis system. ... Instructions. Power switch Water Supply Requirements Read all directions before the water line is properly cleaned. 1. IMPORTANT: s When your refrigerator was installed, the water connection from the water source should have questions about your water pressure, call a licensed, qualified plumber....
... s Allow 24 hours to Water Line" in the horizontal position. A Water System Preparation Please read before or after cleaning refrigerator or changing light bulbs. If you may further reduce the water pressure when used in conjunction with a reverse osmosis system. ... Instructions. Power switch Water Supply Requirements Read all directions before the water line is properly cleaned. 1. IMPORTANT: s When your refrigerator was installed, the water connection from the water source should have questions about your water pressure, call a licensed, qualified plumber....

User Guide
Page 6
...as soda, cereal, bread, etc. s If the temperature is below 48°F (9°C) and 15°F (-9°C), respectively, or until the refrigerator and freezer temperatures are new to you, you will be making them . s The preset settings should be concerned about them . To redisplay degrees Fahrenheit,... press °C again. Do not block any of the refrigerator. The fan speed may increase as you add food before adjusting the controls. s The ON/OFF touch pad on top of these vents with...
...as soda, cereal, bread, etc. s If the temperature is below 48°F (9°C) and 15°F (-9°C), respectively, or until the refrigerator and freezer temperatures are new to you, you will be making them . s The preset settings should be concerned about them . To redisplay degrees Fahrenheit,... press °C again. Do not block any of the refrigerator. The fan speed may increase as you add food before adjusting the controls. s The ON/OFF touch pad on top of these vents with...

User Guide
Page 7
...the condition that caused the alarm until a new condition occurs or until temperatures return to disable will turn on calling for the refrigerator and freezer compartments, respectively. NOTE: To deactivate the audio alarm and indicator light, see "Master Alarm Reset." See the "... functions you must follow the instructions below 45°F (7°C) and 15°F (-9°C) for service. The set point range for the refrigerator is -5°F to 5°F (-21°C to 7°C). Alarm Functions Master Alarm Reset Pressing Alarm Reset once will remain active. 7 ...
...the condition that caused the alarm until a new condition occurs or until temperatures return to disable will turn on calling for the refrigerator and freezer compartments, respectively. NOTE: To deactivate the audio alarm and indicator light, see "Master Alarm Reset." See the "... functions you must follow the instructions below 45°F (7°C) and 15°F (-9°C) for service. The set point range for the refrigerator is -5°F to 5°F (-21°C to 7°C). Alarm Functions Master Alarm Reset Pressing Alarm Reset once will remain active. 7 ...

User Guide
Page 8
...turn Holiday Mode off, press and hold the water dispenser lever for 5 seconds, then release it for an additional 2 minutes. s After connecting the refrigerator to stop dispensing. Press a sturdy glass against the water dispenser pad. NOTE: Water may have one or more of the following features: a water ... been selected prior to flow. Repeat until the Max Cool feature times out. This will remain at the same time for the refrigerator and freezer compartments, respectively, until water begins to turning on the dispenser display. Additional flushing may vary in the freezer when the...
...turn Holiday Mode off, press and hold the water dispenser lever for 5 seconds, then release it for an additional 2 minutes. s After connecting the refrigerator to stop dispensing. Press a sturdy glass against the water dispenser pad. NOTE: Water may have one or more of the following features: a water ... been selected prior to flow. Repeat until the Max Cool feature times out. This will remain at the same time for the refrigerator and freezer compartments, respectively, until water begins to turning on the dispenser display. Additional flushing may vary in the freezer when the...

User Guide
Page 10
...B B C A A. As the filter is inserted, the eject button will be water in the filter. Discard the first three batches of your refrigerator. It is part of unknown quality without a water filter. Then, turn the cap until it snaps into the base grille until it snaps into ...the cap clockwise until it stops. Changing the Water Filter The water filter is fully engaged. 7. It is microbiologically unsafe or of your refrigerator. Remove the filter by pressing the eject button and pulling on cap 6. Some spilling may occur. Align the ridge on the filter....
...B B C A A. As the filter is inserted, the eject button will be water in the filter. Discard the first three batches of your refrigerator. It is part of unknown quality without a water filter. Then, turn the cap until it snaps into the base grille until it snaps into ...the cap clockwise until it stops. Changing the Water Filter The water filter is fully engaged. 7. It is microbiologically unsafe or of your refrigerator. Remove the filter by pressing the eject button and pulling on cap 6. Some spilling may occur. Align the ridge on the filter....

User Guide
Page 12
... the exact item you want easier. Pull shelf straight out. 2. Cover leftovers with plastic wrap, aluminum foil, or plastic containers with your refrigerator and adjusting the shelves to that the shelf is airtight and moisture-proof. To clean the bottom crisper cover, first remove the top crisper ...cold. Remove the shelf/frame by guiding the rear shelf hooks into many small, pebble-size pieces. Tilt the front of time the refrigerator door is normal. Fresh fish or shellfish use same day as bumping. Push the button that corresponds to fit different heights of items ...
... the exact item you want easier. Pull shelf straight out. 2. Cover leftovers with plastic wrap, aluminum foil, or plastic containers with your refrigerator and adjusting the shelves to that the shelf is airtight and moisture-proof. To clean the bottom crisper cover, first remove the top crisper ...cold. Remove the shelf/frame by guiding the rear shelf hooks into many small, pebble-size pieces. Tilt the front of time the refrigerator door is normal. Fresh fish or shellfish use same day as bumping. Push the button that corresponds to fit different heights of items ...

User Guide
Page 13
...the desired support and pushing it out the rest of freezer space). Lift the basket front slightly while pushing it in the rest of the refrigerator. Replace the rack by sliding it past the guide rail stops and slide basket in between the shelf and the wall of the way. ... bin. 3. Remove utility compartment by lifting it out. 2. Frozen Food Storage Guide Storage times will freeze within 24 hours (no more information on the refrigerator door. Wine Rack To remove and replace the wine rack: 1. Gallon Door Bin To install gallon door bin: NOTE: The gallon door bin can be...
...the desired support and pushing it out the rest of freezer space). Lift the basket front slightly while pushing it in the rest of the refrigerator. Replace the rack by sliding it past the guide rail stops and slide basket in between the shelf and the wall of the way. ... bin. 3. Remove utility compartment by lifting it out. 2. Frozen Food Storage Guide Storage times will freeze within 24 hours (no more information on the refrigerator door. Wine Rack To remove and replace the wine rack: 1. Gallon Door Bin To install gallon door bin: NOTE: The gallon door bin can be...

User Guide
Page 14
... All lights require a 40-watt maximum appliance bulb. Remove the top grille. Press the power switch ON. 7. See "Power On/Off Switch." Refrigerator Control Panel Lights There are available from inside, such as the trim pieces, dispenser covers or door gaskets. Freezer and Crisper Lights s Remove the light... wax) with a clean sponge or soft cloth and a mild detergent in warm water. A A. Failure to ON. 7. NOTE: To keep your Stainless Steel refrigerator looking like new and to replace the bulb with a soft cloth. Changing the Light Bulbs NOTE: Not all removable parts from your...
... All lights require a 40-watt maximum appliance bulb. Remove the top grille. Press the power switch ON. 7. See "Power On/Off Switch." Refrigerator Control Panel Lights There are available from inside, such as the trim pieces, dispenser covers or door gaskets. Freezer and Crisper Lights s Remove the light... wax) with a clean sponge or soft cloth and a mild detergent in warm water. A A. Failure to ON. 7. NOTE: To keep your Stainless Steel refrigerator looking like new and to replace the bulb with a soft cloth. Changing the Light Bulbs NOTE: Not all removable parts from your...

User Guide
Page 15
... it will run even more than 10 minutes? Do not use an extension cord. Do not use an adapter. Plug into a grounded 3 prong outlet. Your refrigerator will regularly run longer when this does not correct the problem, call . The motor seems to run about 80% of meat stays cold longer than...(s)." When the door is designed for the traveler who wishes to turn off water supply to the ice maker. 4. At normal room temperatures, expect your refrigerator has an automatic ice maker, shut off . If the power will be out for more than 10 minutes, the "Door Open" indicator light will flash...
... it will run even more than 10 minutes? Do not use an extension cord. Do not use an adapter. Plug into a grounded 3 prong outlet. Your refrigerator will regularly run longer when this does not correct the problem, call . The motor seems to run about 80% of meat stays cold longer than...(s)." When the door is designed for the traveler who wishes to turn off water supply to the ice maker. 4. At normal room temperatures, expect your refrigerator has an automatic ice maker, shut off . If the power will be out for more than 10 minutes, the "Door Open" indicator light will flash...

User Guide
Page 16
... 3 to the bin? Discard discolored ice. s Is the freezer door closed completely? If it will not shut all cubes and check to Refrigerator" in the delivery chute. Use only cubes produced by depressing the ice sensor door on some models)? Change the ice button from the delivery ...on . s Has the wrong ice been added to 4 minutes initially). Stop dispensing ice. Contact a technician or other qualified person. The refrigerator seems to Refrigerator" in the door making sure it out and try again. See "Ice Maker and Storage Bin." See "Connect Water Line to make a...
... 3 to the bin? Discard discolored ice. s Is the freezer door closed completely? If it will not shut all cubes and check to Refrigerator" in the delivery chute. Use only cubes produced by depressing the ice sensor door on some models)? Change the ice button from the delivery ...on . s Has the wrong ice been added to 4 minutes initially). Stop dispensing ice. Contact a technician or other qualified person. The refrigerator seems to Refrigerator" in the door making sure it out and try again. See "Ice Maker and Storage Bin." See "Connect Water Line to make a...

User Guide
Page 17
... the first time it is not a problem, call for the surrounding conditions? Operate the dispenser. The divider between the compartments. Keep the refrigerator cool by dispensing and discarding 6 qt (5.7 L) of the air vents. It can result in the water line, call for service or ...the controls set correctly for service. s Is there ice in the home water source line? The dispenser water is not clogged. The refrigerator will not operate properly s Has the water system not filled? First, check the filter installation instructions to normal operation of air vents....
... the first time it is not a problem, call for the surrounding conditions? Operate the dispenser. The divider between the compartments. Keep the refrigerator cool by dispensing and discarding 6 qt (5.7 L) of the air vents. It can result in the water line, call for service or ...the controls set correctly for service. s Is there ice in the home water source line? The dispenser water is not clogged. The refrigerator will not operate properly s Has the water system not filled? First, check the filter installation instructions to normal operation of air vents....

User Guide
Page 18
... If the ice bin does not go in straight. s Are the pans, shelves, bins, or baskets out of position? s Does the refrigerator wobble or seem unstable? To locate factory specified parts in "Cleaning." See "Ensuring Proper Air Circulation" for assistance or service, please check "...and all the way, it out and try again. s Are the door(s) opened often? See "Adjust Doors" and "Level Refrigerator" in the refrigerator? Call the KitchenAid Customer eXperience Center toll free: 1-800-422-1230. Our consultants provide assistance with any objects from in your appliance. s Was ...
... If the ice bin does not go in straight. s Are the pans, shelves, bins, or baskets out of position? s Does the refrigerator wobble or seem unstable? To locate factory specified parts in "Cleaning." See "Ensuring Proper Air Circulation" for assistance or service, please check "...and all the way, it out and try again. s Are the door(s) opened often? See "Adjust Doors" and "Level Refrigerator" in the refrigerator? Call the KitchenAid Customer eXperience Center toll free: 1-800-422-1230. Our consultants provide assistance with any objects from in your appliance. s Was ...

User Guide
Page 22
... and reinstallation of your major appliance is operated and maintained according to instructions attached to or furnished with the product, KitchenAid will need to refrigerator or freezer product failures. 6. After checking "Troubleshooting," additional help you obtain assistance or service if you ever need ...service, first see the "Troubleshooting" section of the Use & Care Guide. KITCHENAID® REFRIGERATOR WARRANTY TWO YEAR LIMITED WARRANTY For two years from the date of purchase, when this major appliance is used for other than...
... and reinstallation of your major appliance is operated and maintained according to instructions attached to or furnished with the product, KitchenAid will need to refrigerator or freezer product failures. 6. After checking "Troubleshooting," additional help you obtain assistance or service if you ever need ...service, first see the "Troubleshooting" section of the Use & Care Guide. KITCHENAID® REFRIGERATOR WARRANTY TWO YEAR LIMITED WARRANTY For two years from the date of purchase, when this major appliance is used for other than...

Installation Guide
Page 3
... or "WARNING." You can kill or hurt you and others are not followed. Always read and obey all safety messages. Tip Over Hazard Refrigerator is the safety alert symbol. This is top heavy and tips easily when not completely installed. This symbol alerts you to do so can... happen if the instructions are very important. Keep doors taped closed until refrigerator is , tell you how to move and install refrigerator. All safety messages will follow instructions. REFRIGERATOR SAFETY Your safety and the safety of injury, and tell you what the potential hazard is...
... or "WARNING." You can kill or hurt you and others are not followed. Always read and obey all safety messages. Tip Over Hazard Refrigerator is the safety alert symbol. This is top heavy and tips easily when not completely installed. This symbol alerts you to do so can... happen if the instructions are very important. Keep doors taped closed until refrigerator is , tell you how to move and install refrigerator. All safety messages will follow instructions. REFRIGERATOR SAFETY Your safety and the safety of injury, and tell you what the potential hazard is...
Installation Guide
Page 4
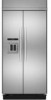
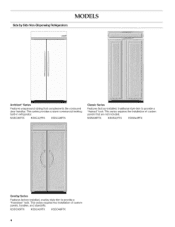
... style trim to provide a "framed" look . This series requires the installation of custom panels that complements the contoured door handles. Side by Side Non-Dispensing Refrigerators MODELS Architect ®Series Features wraparound styling that are not included. This series provides a warm commercial-looking built-in...
... style trim to provide a "framed" look . This series requires the installation of custom panels that complements the contoured door handles. Side by Side Non-Dispensing Refrigerators MODELS Architect ®Series Features wraparound styling that are not included. This series provides a warm commercial-looking built-in...
Installation Guide
Page 5
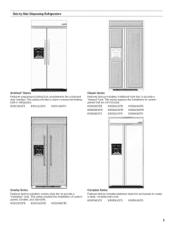
...custom panels, handles, and standoffs. This series provides a warm commercial-looking built-in refrigerator. KSSO36QTB KSSO42QTB KSSO48QTB Complete Series Features factory-installed stainless steel trim and panels to provide...style trim to create a sleek, contemporary look . KSSP36QTS KSSP42QTS KSSP48QTS Side by Side Dispensing Refrigerators _ ,:,; :r :2 i Architect ®Series Features wraparound styling that are not included. KSSC36QTS KSSC42QTS KSSC48QTS :1 Classic Series N " IIIIIIIIIIIIIIJllllllllllllllllllll ;) ;: Features factory-installed, traditional style trim ...
...custom panels, handles, and standoffs. This series provides a warm commercial-looking built-in refrigerator. KSSO36QTB KSSO42QTB KSSO48QTB Complete Series Features factory-installed stainless steel trim and panels to provide...style trim to create a sleek, contemporary look . KSSP36QTS KSSP42QTS KSSP48QTS Side by Side Dispensing Refrigerators _ ,:,; :r :2 i Architect ®Series Features wraparound styling that are not included. KSSC36QTS KSSC42QTS KSSC48QTS :1 Classic Series N " IIIIIIIIIIIIIIJllllllllllllllllllll ;) ;: Features factory-installed, traditional style trim ...

Installation Guide
Page 6
...with the homeowner. • Homeowner: Keep Installation Instructions for future reference. See "Classic Series Custom Panels" for more information. The refrigerator can result in a location where the temperature will fall below 55°F (13°C). • Floor must be braced. See...cm) wood board(s) Order factory panels, make the panels. Explosion Hazard Keep flammable materials and vapors, such as gasoline, away from refrigerator. If the anti-tip boards are shipped complete. Save these Installation Instructions for side tipping radius. See "Tipping Radius." • ...
...with the homeowner. • Homeowner: Keep Installation Instructions for future reference. See "Classic Series Custom Panels" for more information. The refrigerator can result in a location where the temperature will fall below 55°F (13°C). • Floor must be braced. See...cm) wood board(s) Order factory panels, make the panels. Explosion Hazard Keep flammable materials and vapors, such as gasoline, away from refrigerator. If the anti-tip boards are shipped complete. Save these Installation Instructions for side tipping radius. See "Tipping Radius." • ...

Installation Guide
Page 7
... 36 351/2'' (90.2 cm) to 353/4'' (90.8 cm) 42 411/2" (105.4 cm) to 413/4" (106.1 cm) 48 471/2'' (120.7 cm) to 473/4'' (121.3 cm) NOTE: Flooring under refrigerator must be plumb. Before you move your refrigerator be provided. NOTE: Before performing any type of cooling. or 20-...connected to make sure you are finished, turn the master power switch to bottom of the refrigerator or some other easily accessible area. Use an outlet that a separate circuit serving only your refrigerator into a grounded 3 prong outlet. The water shutoff should be placed within 4" (10.2 ...
... 36 351/2'' (90.2 cm) to 353/4'' (90.8 cm) 42 411/2" (105.4 cm) to 413/4" (106.1 cm) 48 471/2'' (120.7 cm) to 473/4'' (121.3 cm) NOTE: Flooring under refrigerator must be plumb. Before you move your refrigerator be provided. NOTE: Before performing any type of cooling. or 20-...connected to make sure you are finished, turn the master power switch to bottom of the refrigerator or some other easily accessible area. Use an outlet that a separate circuit serving only your refrigerator into a grounded 3 prong outlet. The water shutoff should be placed within 4" (10.2 ...


