
User Guide
Page 20
...a concentration less than or equal to the "Warranty" section for the Manufacturer's name, address and telephone number. and against NSF/ANSI Standard 42 for the reduction of $39.99 U.S.A./ $49.99 Canada. Substance Reduction Aesthetic Effects Chlorine Taste/Odor Particulate Class II* Contaminant Reduction Lead:... was performed under standard laboratory conditions, actual performance may vary. *Class II particle size: 1 um to NSF/ANSI Standards 42 and 53 for cold water use replacement cartridge T2RFWG2, part #4396841B. 2007 suggested retail price of Chlorine Taste and Odor, Particulate...
...a concentration less than or equal to the "Warranty" section for the Manufacturer's name, address and telephone number. and against NSF/ANSI Standard 42 for the reduction of $39.99 U.S.A./ $49.99 Canada. Substance Reduction Aesthetic Effects Chlorine Taste/Odor Particulate Class II* Contaminant Reduction Lead:... was performed under standard laboratory conditions, actual performance may vary. *Class II particle size: 1 um to NSF/ANSI Standards 42 and 53 for cold water use replacement cartridge T2RFWG2, part #4396841B. 2007 suggested retail price of Chlorine Taste and Odor, Particulate...

User Guide
Page 21
...is microbiologically unsafe or of unknown quality without notice. While testing was reduced to a concentration less than or equal to NSF/ANSI Standards 42 and 53 for water leaving the system, as advertised. In Canada, use with water that is recommended that you replace the filter. ... 96.34 99.63 93.33 74.00 Test Parameters: pH = 7.5 ± 0.5 unless otherwise noted. Prices are not necessarily in NSF/ANSI Standards 42 and 53. Model T1WG2L: Style 1 - s Refer to change without adequate disinfection before 6 months have passed, replace the water filter cartridge more often....
...is microbiologically unsafe or of unknown quality without notice. While testing was reduced to a concentration less than or equal to NSF/ANSI Standards 42 and 53 for water leaving the system, as advertised. In Canada, use with water that is recommended that you replace the filter. ... 96.34 99.63 93.33 74.00 Test Parameters: pH = 7.5 ± 0.5 unless otherwise noted. Prices are not necessarily in NSF/ANSI Standards 42 and 53. Model T1WG2L: Style 1 - s Refer to change without adequate disinfection before 6 months have passed, replace the water filter cartridge more often....

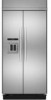
Installation Guide
Page 7
... supply is not in the cabinets, the plumbing for more information. 11oo,,-9o,, ! !(2031229 !! Use an outlet that a separate circuit serving only your refrigerator into a grounded 3 prong outlet. IMPORTANT: If this product is connected to bottom of cabinetry must be turned off by a switch. Then reset the control..., turn the master power switch to OFF or disconnect power at same level as shown above) 36 351/2'' (90.2 cm) to 353/4'' (90.8 cm) 42 411/2" (105.4 cm) to 413/4" (106.1 cm) 48 471/2'' (120.7 cm) to the desired setting. Food quality and flavor may occur, resulting ...
... supply is not in the cabinets, the plumbing for more information. 11oo,,-9o,, ! !(2031229 !! Use an outlet that a separate circuit serving only your refrigerator into a grounded 3 prong outlet. IMPORTANT: If this product is connected to bottom of cabinetry must be turned off by a switch. Then reset the control..., turn the master power switch to OFF or disconnect power at same level as shown above) 36 351/2'' (90.2 cm) to 353/4'' (90.8 cm) 42 411/2" (105.4 cm) to 413/4" (106.1 cm) 48 471/2'' (120.7 cm) to the desired setting. Food quality and flavor may occur, resulting ...

Installation Guide
Page 8
.... Replace the filter if necessary. • Allow the storage tank on side only. // / iI I / I I / / / / f I f // / / / / r_r_J Model 36 42 48 Tipping Radius A 901/2" (229.9 cm) 93" (236.2 cm) 96" (243.8 cm) !i!'_,7iii_ii¸i:__i!!:ii;!_i!i,l!i,i_i¸:ii_¸:_:_if_i!Ii!',!;__;_i...the cabinets, the plumbing for leaks. Install the copper tubing only in the base cabinet on either side of the model. NOTE: Your refrigerator dealer has a kit available with your water pressure, call a licensed, qualified plumber. See "Connect the Water Supply." • If additional...
.... Replace the filter if necessary. • Allow the storage tank on side only. // / iI I / I I / / / / f I f // / / / / r_r_J Model 36 42 48 Tipping Radius A 901/2" (229.9 cm) 93" (236.2 cm) 96" (243.8 cm) !i!'_,7iii_ii¸i:__i!!:ii;!_i!i,l!i,i_i¸:ii_¸:_:_if_i!Ii!',!;__;_i...the cabinets, the plumbing for leaks. Install the copper tubing only in the base cabinet on either side of the model. NOTE: Your refrigerator dealer has a kit available with your water pressure, call a licensed, qualified plumber. See "Connect the Water Supply." • If additional...

Installation Guide
Page 9
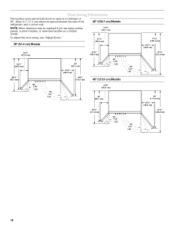
... _ Front View Width dimensions were measured from the front of the top grille to the back of the refrigerator cabinet is 25%" (64.5 cm). • The power cord is 84" (213 cm) long. •...When leveling legs are fully extended to 11/4"(3.2 cm) below rollers, add 11/8"(2.9 cm) to the height dimensions. Model 36 42 48 WidthA 35" (88.9 cm) 41" (104.1 cm) 47" (119.4 cm) Side View • The depth... from trim edge to trim edge. Top View T 25%" (64.5 cm) A (see chart following) Model 36 42 48 Width A (Trim edge to trim edge) 361/4'' (92.1 cm) 421/4'' (107.3 cm) 481/4'' (122.6 cm...
... _ Front View Width dimensions were measured from the front of the top grille to the back of the refrigerator cabinet is 25%" (64.5 cm). • The power cord is 84" (213 cm) long. •...When leveling legs are fully extended to 11/4"(3.2 cm) below rollers, add 11/8"(2.9 cm) to the height dimensions. Model 36 42 48 WidthA 35" (88.9 cm) 41" (104.1 cm) 47" (119.4 cm) Side View • The depth... from trim edge to trim edge. Top View T 25%" (64.5 cm) A (see chart following) Model 36 42 48 Width A (Trim edge to trim edge) 361/4'' (92.1 cm) 421/4'' (107.3 cm) 481/4'' (122.6 cm...
Installation Guide
Page 10
Toadjustthedoorswings,ee"AdjusDt oors." 36" (91.4 cm) Models 42" (106.7 cm) Models 125/_'' (32.1 cm) 371/4" (94,6 cm) 107/8" (27,6 cm) 351/2 ,, [90.2 cm) 387/8" (98.7 cm)l _ ,'!/ 413/,_" (105.1 cm) .,L[ 1, ._- 14%"--_ | (36.5 cm) | 443/8,, (...
Toadjustthedoorswings,ee"AdjusDt oors." 36" (91.4 cm) Models 42" (106.7 cm) Models 125/_'' (32.1 cm) 371/4" (94,6 cm) 107/8" (27,6 cm) 351/2 ,, [90.2 cm) 387/8" (98.7 cm)l _ ,'!/ 413/,_" (105.1 cm) .,L[ 1, ._- 14%"--_ | (36.5 cm) | 443/8,, (...

Installation Guide
Page 13
...you use spacer strips, it is also recommended that the custom overlay panels will fit properly. I Spacer Panel 1/8" In some cases, your refrigerator into the overall kitchen decor, and to work with one panel routed for added support. The custom panels must be 1/4"(6.35 mm) thicker ..., bottom and sides edges of the top grille overlay panel cannot exceed 10 Ibs (4.5 kg). _'\ 5/d'to the refrigerator. NOTE: For the grille and the door panels to -right 337/8 '' 1(86.0 cm) Model 36 42 48 Decorative Overlay Panels A B C 148/4'' (37.47 cm) 193/4'' (50.17 cm) 348/4'' (88...
...you use spacer strips, it is also recommended that the custom overlay panels will fit properly. I Spacer Panel 1/8" In some cases, your refrigerator into the overall kitchen decor, and to work with one panel routed for added support. The custom panels must be 1/4"(6.35 mm) thicker ..., bottom and sides edges of the top grille overlay panel cannot exceed 10 Ibs (4.5 kg). _'\ 5/d'to the refrigerator. NOTE: For the grille and the door panels to -right 337/8 '' 1(86.0 cm) Model 36 42 48 Decorative Overlay Panels A B C 148/4'' (37.47 cm) 193/4'' (50.17 cm) 348/4'' (88...

Installation Guide
Page 14
... Non-dispenser Color 36 42 White #2325136 #2325137 Black #2325139 #2325140 Stainless Steel #2325142 #2325143 Models 48 #2325138 #2325141 #2325144 Door Panel Part Numbers for installing the panels. Overlay Series Door Handle Kits The following handle styles are available through your KitchenAid dealer or by -side and bottomfreezer refrigerators that require overlay panels...
... Non-dispenser Color 36 42 White #2325136 #2325137 Black #2325139 #2325140 Stainless Steel #2325142 #2325143 Models 48 #2325138 #2325141 #2325144 Door Panel Part Numbers for installing the panels. Overlay Series Door Handle Kits The following handle styles are available through your KitchenAid dealer or by -side and bottomfreezer refrigerators that require overlay panels...

Installation Guide
Page 15
...weigh more than 10 Ibs (4.5 kg). The refrigerator panel should not weigh more than 40 Ibs (18.1 kg). If you plan to install custom wood panels, you will need to -right. 107/8" [ j ,',78oo, Model A 36 341/4'' (87.0 cm) 42 401/4'' (102.2 cm) 48 461/4'' (...117.5 cm) Door Panels for panel specifications. The refrigerator panel should not weigh more than recommended may cause damage to your refrigerator. Grille (6.36 ram) 1/4" (6.35 ram) max, 15 Panels that are ...
...weigh more than 10 Ibs (4.5 kg). The refrigerator panel should not weigh more than 40 Ibs (18.1 kg). If you plan to install custom wood panels, you will need to -right. 107/8" [ j ,',78oo, Model A 36 341/4'' (87.0 cm) 42 401/4'' (102.2 cm) 48 461/4'' (...117.5 cm) Door Panels for panel specifications. The refrigerator panel should not weigh more than recommended may cause damage to your refrigerator. Grille (6.36 ram) 1/4" (6.35 ram) max, 15 Panels that are ...

Installation Guide
Page 18
...Reduced Tipping Radius 36 88" (223.5 cm) 42 881/2'' (224.8 cm) 48 891/4'' (226.7 cm) f. Add ½2" (0.8 mm) to this measurement to allow the side panel to "Move the Refrigerator into the trim. Route the front edge of the refrigerator and the parts bag behind the grille. INSTALLATION INSTRUCTIONS...in the operating position. Cabinet side trim 3= Remove the six screws attaching each side) that attach the shipping base to stand the refrigerator upright, the tipping radius can result in the cabinet side trim. Push the top grille straight up; then pull straight out. If...
...Reduced Tipping Radius 36 88" (223.5 cm) 42 881/2'' (224.8 cm) 48 891/4'' (226.7 cm) f. Add ½2" (0.8 mm) to this measurement to allow the side panel to "Move the Refrigerator into the trim. Route the front edge of the refrigerator and the parts bag behind the grille. INSTALLATION INSTRUCTIONS...in the operating position. Cabinet side trim 3= Remove the six screws attaching each side) that attach the shipping base to stand the refrigerator upright, the tipping radius can result in the cabinet side trim. Push the top grille straight up; then pull straight out. If...

