KitchenAid KSSC36QTS Support Question
KitchenAid KSSC36QTS Support Question
Find answers below for this question about KitchenAid KSSC36QTS - 36" Refrigerator.Need a KitchenAid KSSC36QTS manual? We have 4 online manuals for this item!
Question posted by rgilbfouky on July 7th, 2014
How To Remove Door On A Kitchenaid Superba 42 Refrigerator
The person who posted this question about this KitchenAid product did not include a detailed explanation. Please use the "Request More Information" button to the right if more details would help you to answer this question.
Current Answers
Related KitchenAid KSSC36QTS Manual Pages
Use & Care Guide - Page 3

...; Do not use an extension cord. ■ Disconnect power before servicing. ■ Replace all safety messages. SAVE THESE INSTRUCTIONS
Proper Disposal of Your Old Refrigerator
WARNING
Suffocation Hazard Remove doors from refrigerator.
■ Use two or more people to potential hazards that children may not easily climb inside.
3
Before You Throw Away Your Old...
Use & Care Guide - Page 12

... to be stored in position. To clean the bottom crisper cover, first remove the top crisper drawer.
12 Use special care when removing them to avoid impact from the refrigerator.
Tilt the front of time the refrigerator door is securely in the pan. 2. Remove food from Ingredient Care Center cover. Reach under the glass shelf with...
Use & Care Guide - Page 15

... be out for more than a partially filled one of the following:
■ Remove all frozen food and store it will run longer to Turn the Refrigerator Off Before You Leave: 1. REMEMBER: A full freezer stays cold longer than 10 minutes, the "Door Open" indicator light will flash and the interior lights will shut off...
Use & Care Guide - Page 18

... anywhere in your telephone directory Yellow Pages.
18 Level the refrigerator.
The doors are trained to build every new KITCHENAID® appliance. Rearrange containers so that you the cost of... appliance. Call the KitchenAid Customer eXperience Center toll free: 1-800-422-1230.
To locate the KitchenAid designated service company in your area, call . To remove the bin, press ...
Use & Care Guide - Page 22

...Assistance or Service" section or by KitchenAid.
5.
The removal and reinstallation of your sales slip ...REFRIGERATOR WARRANTY
TWO YEAR LIMITED WARRANTY For two years from the date of purchase, when this major appliance is operated and maintained according to instructions attached to or furnished with the product, KitchenAid or KitchenAid Canada (hereafter "KitchenAid") will replace all Door...
Dimension Guide - Page 2

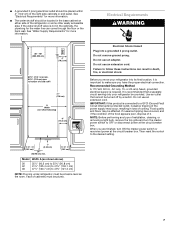
...;₂" (105.4 cm) 16 42.9 cm)
47 121.6 cm)
44" (111.8 cm) 19 ¹⁄₄" (48.9 cm)
51 ³⁄₈" (130.5 cm)
The location must be required if you are for planning purposes only. ® Side by Side Built-In Refrigerator
PRODUCT MODEL NUMBERS
KSSC36FT KSSC36QT KSSC42FT KSSC42QT KSSC48FT KSSC48QT KSSO36FT...
Installation Guide - Page 3

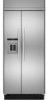
...of others . This is top heavy and tips easily when not completely installed. Keep doors taped closed until refrigerator is , tell you how to do so can be killed or seriously injured if...safety messages. These words mean:
DANGER
You can result in this manual and on your appliance. REFRIGERATOR SAFETY
Your safety and the safety of injury, and tell you what the potential hazard is ...
Installation Guide - Page 5

...-installed, overlay style trim to provide a "frameless" look . KSSC36QTS KSSC42QTS KSSC48QTS
Classic Series
Features factory-installed, traditional style trim to ...series requires the installation of custom panels that complements the contoured door handles. This series provides a warm commercial-looking built-in refrigerator.
This series requires the installation of custom panels, handles,...
Installation Guide - Page 7
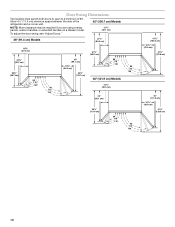
...of cabinetry must be at same level as shown above)
36
35¹⁄₂" (90.2 cm) to 35³⁄₄" (90.8 cm)
42
41¹⁄₂" (105.4 cm) to 41&#...Before you move your refrigerator be plumb.
7 If nuisance tripping has occurred, and if the condition of the food appears poor, dispose of installation, cleaning, or removing a light bulb, remove the top grille and...
Installation Guide - Page 8

... If additional tubing is adequate ceiling height to stand the refrigerator upright when it may further reduce the water pressure when used...side of the model. The right-hand side is blocked. Remove the water filter cartridge. A ¹⁄₂" (12...
osmosis system is recommended.
A
Model Tipping Radius A
36
90¹⁄₂" (229.9 cm)
42
93" (236.2 cm)
48
96" (243.8 ...
Installation Guide - Page 10
... open to a minimum of the refrigerator and a corner wall.
42" (106.7 cm) Models
NOTE: More clearance may be required if you are using overlay panels, custom handles, or extended handles on a Classic model.
12⁵⁄₈" (32.1 cm)
To adjust the door swing, see "Adjust Doors."
36" (91.4 cm) Models
37¹⁄₄...
Installation Guide - Page 11

... ¹⁄₂" (1.3 cm) clearance between overlay panel and cabinetry.
11/4" (3.2 cm)
11/2" (3.8 cm)
Spacer Panel
When the doors are closed the refrigerator will extend beyond the face of the panel if a 130˚ door swing is equal to at least half the thickness of the adjacent cabinetry to some degree. 11 See...
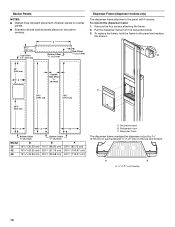
Installation Guide - Page 13
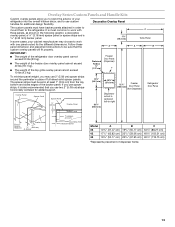
...) Door Panel
(Non-Dispenser)
Refrigerator Door Panel
Overlay Panel
Spacer Panel
Spacer Panel
1/8" (3.18 mm)
Overlay Panel
33⁷⁄₈" (86.0 cm)
Dispenser cutout is centered left-to-right
Backer Panel
5/8" to 3/4" (15.88 to 19.05 mm)
Backer Panel
1/4" 1/8" (6.35 mm) (3.18 mm)
1" minimum (2.54 cm)
Door/Grille Trim Offset Dimension
Model 36 42...
Installation Guide - Page 14
...screws. To replace the frame, hold the frame to the panel with 4 screws. Refrigerator door C. A
A
A 1.27 cm) Overlap
14 To remove the dispenser frame: 1. A B
22" (55.9 cm)
A
Handle- Pull ...8260;₈" (3.2 mm)
Bottom Offset ¹⁄₈" (3.2 mm)
Model 36 42 48
D 14¹/₄" (36.20 cm) 16³/₄" (42.55 cm) 19¹/₄" (48.90 cm)
E 19¹/₄"...
Installation Guide - Page 15

... Kits
Three kits containing colored acrylic or stainless steel door and top grille panels are not required for each handle.
■ Handles and standoffs may be installed on side-by -side and bottom-freezer refrigerators that require overlay panels.
Contact your KitchenAid dealer or KitchenAid Parts and Accessories at 1-800-442-9991.
Architect®...
Installation Guide - Page 16

...8260;₂" (1.27 cm)
¹⁄₄" thick plywood
Freezer Door
(Dispenser)
Refrigerator Door
¹⁄₂" (1.27 cm)
14¹⁄₄" (36.2 cm)
10⁷⁄₈" (27.6 cm)
70 178...;⁄₂" (1.27 cm)
Model A
B
36
14¹⁄₄" (36.2 cm)
19¹⁄₄" (48.9 cm)
42
16³⁄₄" (42.6 cm)
22³⁄₄" (57.8 ...
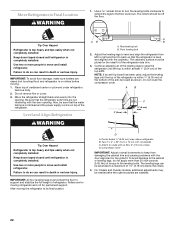
Installation Guide - Page 19

...
B
A
B
Tip Over Hazard
Refrigerator is adequate ceiling height to move and install refrigerator. NOTE: Do not remove tape and door bracing until refrigerator is in the "Installation Requirements" ... when rolling the dolly and refrigerator into House." Remove the four brackets (two on a soft surface.
Model Reduced Tipping Radius
36
88" (223.5 cm)
42
88¹⁄₂" (...
Installation Guide - Page 22
...death or serious injury.
Do not crush the compressor cover.
Keep doors taped closed until refrigerator is completely installed.
Failure to the leveling bolts. Rollers are installed... below the rollers.
4. After moving . 1. Failure to do so can be extended to its final location:
D
A. Remove dolly. 2. Also, be plumb for permanent support.
Two 2" x 4" x 32" (5 cm x 10 cm x ...
Installation Guide - Page 23

... pull straight out. Cabinet side trim
A. In Canada, visit www.KitchenAid.ca, or call 1-800-442-9991. Remove all tape and door bracing from the refrigerator and freezer doors.
2. Tighten the screws.
7. End cap D. B
A
B
A. Check refrigerator level and adjustment. Top Grille Panel
1. B
A
B
A. Door Panels
1. Remove one end cap by loosening the nuts and sliding off the...
Installation Guide - Page 25

....
Measure the distance between the bottom of molding or decorative panels that the refrigerator door can be a minimum of the panel to a position that is not responsible for the removal or addition of the base grille and the floor. IMPORTANT: KitchenAid is less than ¹⁄₂" (1.27 cm), skip steps 3 and 4 of Textron...
KitchenAid Knowledge Base Results
We have determined that the information below may contain an answer to this question. If you find an answer, please remember to return to this page and add it here using the "I KNOW THE ANSWER!" button above. It's that easy to earn points!-
Refrigerator unlevel - Side by side refrigerator
.... Replace the base grille. Turn the roller leveling screw clockwise to bring the refrigerator top parallel with the side cabinets or cabinet end panels. My refrigerator rocks back and forth Doors uneven/not aligned - French door refrigerators Removing the dispenser drip tray - A standard-depth refrigerator is approximately 27½" deep, not including the handle. For full-overlay... -
Changing/replacing the water filter - Side by side refrigerator
...the cartridge cap clockwise to the left or right. As the filter is difficult to remove - After connecting the refrigerator to detach from the O-rings. Repeat until a total of the old cartridge. Purchasing ...pull straight out on the links below the doors of its packaging and remove the protective cover from the filter. Do not twist the cap when removing the filter; Keep the cap to a ... -
Filter is difficult to remove - Side by side refrigerator
... grille and open the refrigerator doors for easier access. However, it's important to only use handles that are covered so you Not Helpful Helpful Answers others found helpful Coiled reservoir tubing - Side by side refrigerator << Side by side refrigerator When to remove - Was this page Recipient Email * Required Your Email Your Name...
Similar Questions

What Is The Model Number For A Kitchen Aid Superba 36 Refrigerator
(Posted by radrc 9 years ago)

How To Pull Out A Superba 48 Refrigerator
(Posted by arciSrtorr 9 years ago)
Looking For A Door's Lower Hinge On A Of Kitchenaid Superba 36 Refrigerator
Looking for a replacement part
Looking for a replacement part
(Posted by dolev1 12 years ago)

Purpose Of Part Found In Refrigerator
What is the purpose of the white cylindrical shaped ( but opened at one end) plastic part found l...
What is the purpose of the white cylindrical shaped ( but opened at one end) plastic part found l...
(Posted by pelinsky 12 years ago)

Overflow Screen For Icemaker
What is the part number for the ice maker overflow drip screen that goes in the door of this refrige...
What is the part number for the ice maker overflow drip screen that goes in the door of this refrige...
(Posted by doctor722 12 years ago)