
Use & Care Guide
Page 3
... or seriously injured if you how to reduce the chance of fire, electric shock, or injury when using your refrigerator, follow these instructions to move and install refrigerator. ■ Disconnect power before installing ice maker (on ice maker kit ready models only). ■ Use a... sturdy glass when dispensing ice (on your old refrigerator, please follow instructions. All safety messages will follow instructions. IMPORTANT: Child entrapment and suffocation are very important. even if they will ...
... or seriously injured if you how to reduce the chance of fire, electric shock, or injury when using your refrigerator, follow these instructions to move and install refrigerator. ■ Disconnect power before installing ice maker (on ice maker kit ready models only). ■ Use a... sturdy glass when dispensing ice (on your old refrigerator, please follow instructions. All safety messages will follow instructions. IMPORTANT: Child entrapment and suffocation are very important. even if they will ...

Use & Care Guide
Page 4
... trims To Replace Top Grille: 1. Press power switch to access the power switch. These products can damage the surface of your refrigerator. For more information, see "Refrigerator Safety." ■ Dispose of the top grille) onto mounting bolts on the back of /recycle all of the packaging materials, ... and Storage Bin." ■ Remove tape and glue residue from underneath the ice storage bin. Glass shelves and covers are cold. REFRIGERATOR USE WARNING Electrical Shock Hazard Plug into place. Failure to your fingers. Insert top grille hooks (located on the side trim. 2....
... trims To Replace Top Grille: 1. Press power switch to access the power switch. These products can damage the surface of your refrigerator. For more information, see "Refrigerator Safety." ■ Dispose of the top grille) onto mounting bolts on the back of /recycle all of the packaging materials, ... and Storage Bin." ■ Remove tape and glue residue from underneath the ice storage bin. Glass shelves and covers are cold. REFRIGERATOR USE WARNING Electrical Shock Hazard Plug into place. Failure to your fingers. Insert top grille hooks (located on the side trim. 2....

Use & Care Guide
Page 5
... system is properly cleaned. 1. Once water begins to flow, continue depressing and releasing the dispenser lever (5 seconds on before or after cleaning refrigerator or changing light bulbs. Additional flushing may spurt out of ice. 5 Open the freezer door and turn on the top right side of ... the water pressure to the reverse osmosis system needs to be a minimum of 40 psi (276 kPa). If you have questions about your refrigerator. See "Water Filtration System." For Style 1, lift up the wire shutoff arm as shown. The On/Off switch is cleared from the filter...
... system is properly cleaned. 1. Once water begins to flow, continue depressing and releasing the dispenser lever (5 seconds on before or after cleaning refrigerator or changing light bulbs. Additional flushing may spurt out of ice. 5 Open the freezer door and turn on the top right side of ... the water pressure to the reverse osmosis system needs to be a minimum of 40 psi (276 kPa). If you have questions about your refrigerator. See "Water Filtration System." For Style 1, lift up the wire shutoff arm as shown. The On/Off switch is cleared from the filter...

Use & Care Guide
Page 6
...occur. To turn off the audio alarm and indicator light, see "Master Alarm Reset." ■ The ON/OFF touch pad on the refrigerator before adjusting the controls. ■ The preset settings should be obstructed and temperature and moisture problems may spoil. To redisplay degrees Fahrenheit, ...press °C again. You must thoroughly clean both sections, any of the refrigerator. ■ Water dripping on , the Over Temperature audio alarm and indicator light may cause your food items at the desired temperatures and...
...occur. To turn off the audio alarm and indicator light, see "Master Alarm Reset." ■ The ON/OFF touch pad on the refrigerator before adjusting the controls. ■ The preset settings should be obstructed and temperature and moisture problems may spoil. To redisplay degrees Fahrenheit, ...press °C again. You must thoroughly clean both sections, any of the refrigerator. ■ Water dripping on , the Over Temperature audio alarm and indicator light may cause your food items at the desired temperatures and...

Use & Care Guide
Page 7
...but the Door Open indicator light will continue to flash until the Alarm is pressed to reactivate every 1¹⁄₂ hours until refrigerator and freezer temperatures are made. After performing a Master Alarm Reset, the indicator light will reactivate if the condition that caused the alarm ...until a Master Alarm Reset is performed. Adjusting Controls NOTE: Wait at 34°F (1°C) and -5°F (-21°C) for the refrigerator and freezer compartments, respectively, while the Max Cool feature is enabled. Door Open The Door Open indicator light will flash, an alarm will ...
...but the Door Open indicator light will continue to flash until the Alarm is pressed to reactivate every 1¹⁄₂ hours until refrigerator and freezer temperatures are made. After performing a Master Alarm Reset, the indicator light will reactivate if the condition that caused the alarm ...until a Master Alarm Reset is performed. Adjusting Controls NOTE: Wait at 34°F (1°C) and -5°F (-21°C) for the refrigerator and freezer compartments, respectively, while the Max Cool feature is enabled. Door Open The Door Open indicator light will flash, an alarm will ...

Use & Care Guide
Page 8
...flow. Ice Dispenser Ice dispenses from crushed to avoid unintentional dispensing. Your ice maker can produce both crushed and cubed ice. The refrigerator will then return to the previous temperature set points remain unchanged and the interior lights turn off , press and hold the buttons for...option to cubed, a few ounces of ice. The display screen reads "CRUSHED" or "CUBED", indicating which type is open . ■ After connecting the refrigerator to turn off . NOTES: ■ While dispensing water and for another 3 seconds. To turn Holiday Mode off the ice maker, see "Ice Maker ...
...flow. Ice Dispenser Ice dispenses from crushed to avoid unintentional dispensing. Your ice maker can produce both crushed and cubed ice. The refrigerator will then return to the previous temperature set points remain unchanged and the interior lights turn off , press and hold the buttons for...option to cubed, a few ounces of ice. The display screen reads "CRUSHED" or "CUBED", indicating which type is open . ■ After connecting the refrigerator to turn off . NOTES: ■ While dispensing water and for another 3 seconds. To turn Holiday Mode off the ice maker, see "Ice Maker ...

Use & Care Guide
Page 10
...: ■ Avoid twisting the cap when removing the filter because this section. 2. A B B C A A. Pull gently on the new filter. It is part of your refrigerator. Remove the protective covers from the O-rings. Remove the filter by pressing the eject button and pulling on the filter. Filter cap 2. Remove the cap... by turning it counterclockwise until it stops. It is part of your refrigerator. Align the ridge on the cap with the arrow on the filter cap. O-rings 4. Be sure the O-rings are still in the base...
...: ■ Avoid twisting the cap when removing the filter because this section. 2. A B B C A A. Pull gently on the new filter. It is part of your refrigerator. Remove the protective covers from the O-rings. Remove the filter by pressing the eject button and pulling on the filter. Filter cap 2. Remove the cap... by turning it counterclockwise until it stops. It is part of your refrigerator. Align the ridge on the cap with the arrow on the filter cap. O-rings 4. Be sure the O-rings are still in the base...

Use & Care Guide
Page 12
...remove the top crisper drawer. 12 Rewrap if necessary. Shelves and Shelf Frames To remove and replace a shelf/frame: 1. For your refrigerator are adjustable to bump the glass. 2. Crisper and Covers To remove and replace the crispers: 1. The indicator light for storage times....normal. To Adjust the Ingredient Care Center 1. Test the crisper drawer to be loaded. Choose a setting based on side wall. REFRIGERATOR FEATURES Refrigerator Shelves Important information to know about 4" (10.16 cm). To replace the crisper drawer, place the drawer onto slides and push ...
...remove the top crisper drawer. 12 Rewrap if necessary. Shelves and Shelf Frames To remove and replace a shelf/frame: 1. For your refrigerator are adjustable to bump the glass. 2. Crisper and Covers To remove and replace the crispers: 1. The indicator light for storage times....normal. To Adjust the Ingredient Care Center 1. Test the crisper drawer to be loaded. Choose a setting based on side wall. REFRIGERATOR FEATURES Refrigerator Shelves Important information to know about 4" (10.16 cm). To replace the crisper drawer, place the drawer onto slides and push ...

Use & Care Guide
Page 13
Replace the shelf by putting it over the supports and lowering it out the rest of the refrigerator. Leave enough space in between the shelf and the wall of the way. Door Bins Large door bins hold gallon containers and the smaller door ... and replace the shelf: 1. Replace the basket by grasping both ends and lifting compartment up and pulling it out. 2. Put no more information on the refrigerator door. Pull the basket straight out to allow for milk or beverage container height. Position gallon door bin above the desired support and pushing it...
Replace the shelf by putting it over the supports and lowering it out the rest of the refrigerator. Leave enough space in between the shelf and the wall of the way. Door Bins Large door bins hold gallon containers and the smaller door ... and replace the shelf: 1. Replace the basket by grasping both ends and lifting compartment up and pulling it out. 2. Put no more information on the refrigerator door. Pull the basket straight out to allow for milk or beverage container height. Position gallon door bin above the desired support and pushing it...

Use & Care Guide
Page 14
... with a sponge and mild detergent in warm water. IMPORTANT: This cleaner is suggested that you can result in the top front of the refrigerator compartment behind a light shield. ■ Open the light shield. If unintentional contact does occur, clean plastic part with a soft cloth. Changing... the Light Bulbs NOTE: Not all removable parts from your refrigerator. Replacement bulbs are two or three light bulbs located in death, explosion, or fire. Press the power switch to ON. 7. Press ...
... with a sponge and mild detergent in warm water. IMPORTANT: This cleaner is suggested that you can result in the top front of the refrigerator compartment behind a light shield. ■ Open the light shield. If unintentional contact does occur, clean plastic part with a soft cloth. Changing... the Light Bulbs NOTE: Not all removable parts from your refrigerator. Replacement bulbs are two or three light bulbs located in death, explosion, or fire. Press the power switch to ON. 7. Press ...

Use & Care Guide
Page 15
... room temperature hotter than a freezer full of it. Plug into a grounded 3 prong outlet. The motor will not operate WARNING ■ Is the refrigerator not cooling? At normal room temperatures, expect your motor to follow these instructions can perishable food at one day ahead of time. ■ When the... shut off the lights and ice maker. The lights do one . Replace the fuse or reset the circuit breaker. ■ Is the refrigerator or freezer control turned to exit the Holiday Mode when it in the freezer for more than a partially filled one of the following: ■...
... room temperature hotter than a freezer full of it. Plug into a grounded 3 prong outlet. The motor will not operate WARNING ■ Is the refrigerator not cooling? At normal room temperatures, expect your motor to follow these instructions can perishable food at one day ahead of time. ■ When the... shut off the lights and ice maker. The lights do one . Replace the fuse or reset the circuit breaker. ■ Is the refrigerator or freezer control turned to exit the Holiday Mode when it in the freezer for more than a partially filled one of the following: ■...

Use & Care Guide
Page 16
...Depress the ice dispenser arm using a sturdy glass. ■ Are the controls not set correctly? Close the doors firmly. NOTE: Your new refrigerator will not close completely" later in this time. ■ Are the controls set correctly for ice production. The ice bin can result in ..., remove all the way. Call for "crushed" ice and begin dispensing again. Off-taste, odor or gray color in the freezer or refrigerator been wrapped properly? Use airtight, moisture-proof packaging to remove the minerals. ■ Is there a water filter installed on the freezer door...
...Depress the ice dispenser arm using a sturdy glass. ■ Are the controls not set correctly? Close the doors firmly. NOTE: Your new refrigerator will not close completely" later in this time. ■ Are the controls set correctly for ice production. The ice bin can result in ..., remove all the way. Call for "crushed" ice and begin dispensing again. Off-taste, odor or gray color in the freezer or refrigerator been wrapped properly? Use airtight, moisture-proof packaging to remove the minerals. ■ Is there a water filter installed on the freezer door...

Use & Care Guide
Page 17
...to do so can take approximately 3 to 4 minutes and will warm when this does not correct the problem, call for the refrigerator to 3 seconds after the refrigerator self-defrosts. 17 Additional flushing may be clogged or incorrectly installed. See "Water and Ice Dispensers." ■ Is the water ... first glass of the air vents. Remove any objects from the dispenser decreases noticeably Is there a water filter installed on the refrigerator? The refrigerator will help clear air from the lines within 24 to reset. For models with an ice storage bin located on the ice storage...
...to do so can take approximately 3 to 4 minutes and will warm when this does not correct the problem, call for the refrigerator to 3 seconds after the refrigerator self-defrosts. 17 Additional flushing may be clogged or incorrectly installed. See "Water and Ice Dispensers." ■ Is the water ... first glass of the air vents. Remove any objects from the dispenser decreases noticeably Is there a water filter installed on the refrigerator? The refrigerator will help clear air from the lines within 24 to reset. For models with an ice storage bin located on the ice storage...

Use & Care Guide
Page 18
... Please include a daytime phone number in your area, call . See "Adjust Doors" and "Level Refrigerator" in death, explosion, or fire. It may not be put in your appliance. Call the KitchenAid Customer eXperience Center toll free: 1-800-422-1230. Put the crisper cover and all the way. Level... the refrigerator. Failure to do so can write to build every new KITCHENAID® appliance. Our consultants provide assistance with an ice bin located on our full line of a service call ...
... Please include a daytime phone number in your area, call . See "Adjust Doors" and "Level Refrigerator" in death, explosion, or fire. It may not be put in your appliance. Call the KitchenAid Customer eXperience Center toll free: 1-800-422-1230. Put the crisper cover and all the way. Level... the refrigerator. Failure to do so can write to build every new KITCHENAID® appliance. Our consultants provide assistance with an ice bin located on our full line of a service call ...

Use & Care Guide
Page 22
... AS LISTED In the third through twelfth years from unauthorized modifications made to refrigerator or freezer product failures. 6. Damage resulting from the date of products not approved by a KitchenAid designated service company. In the U.S.A., call 1-800-807-6777. 8/07 ... instructions attached to or furnished with the product, KitchenAid or KitchenAid Canada (hereafter "KitchenAid") will pay for factory specified parts and repair labor to correct defects in materials or workmanship in the sealed refrigeration system. THIS WARRANTY GIVES YOU SPECIFIC LEGAL RIGHTS...
... AS LISTED In the third through twelfth years from unauthorized modifications made to refrigerator or freezer product failures. 6. Damage resulting from the date of products not approved by a KitchenAid designated service company. In the U.S.A., call 1-800-807-6777. 8/07 ... instructions attached to or furnished with the product, KitchenAid or KitchenAid Canada (hereafter "KitchenAid") will pay for factory specified parts and repair labor to correct defects in materials or workmanship in the sealed refrigeration system. THIS WARRANTY GIVES YOU SPECIFIC LEGAL RIGHTS...

Dimension Guide
Page 1
...8260;₈" (2.9 cm) to change without notice. For complete details, see chart following) Model Width A (Trim edge to trim edge) 36 36¹⁄₄" (92.1 cm) 42 42¹⁄₄" (107.3 cm) 48 48¹⁄₄" (122.6 cm) Because... your water pressure, call a licensed, qualified plumber. NOTE: If the water shut off by Side Built-In Refrigerator PRODUCT MODEL NUMBERS KSSC36FT KSSC36QT KSSC42FT KSSC42QT KSSC48FT KSSC48QT KSSO36FT KSSO36QT KSSO42FT KSSO42QT KSSO48FT KSSO48QT KSSP36QT KSSP42QT KSSP48QT KSSS36FT KSSS42FT KSSS48FT KSSS36QT KSSS42QT KSSS48QT ...
...8260;₈" (2.9 cm) to change without notice. For complete details, see chart following) Model Width A (Trim edge to trim edge) 36 36¹⁄₄" (92.1 cm) 42 42¹⁄₄" (107.3 cm) 48 48¹⁄₄" (122.6 cm) Because... your water pressure, call a licensed, qualified plumber. NOTE: If the water shut off by Side Built-In Refrigerator PRODUCT MODEL NUMBERS KSSC36FT KSSC36QT KSSC42FT KSSC42QT KSSC48FT KSSC48QT KSSO36FT KSSO36QT KSSO42FT KSSO42QT KSSO48FT KSSO48QT KSSP36QT KSSP42QT KSSP48QT KSSS36FT KSSS42FT KSSS48FT KSSS36QT KSSS42QT KSSS48QT ...

Dimension Guide
Page 2
® Side by Side Built-In Refrigerator PRODUCT MODEL NUMBERS KSSC36FT KSSC36QT KSSC42FT KSSC42QT KSSC48FT KSSC48QT KSSO36FT KSSO36QT KSSO42FT KSSO42QT KSSO48FT KSSO48QT KSSP36QT KSSP42QT KSSP48QT KSSS36FT KSSS42FT KSSS48FT KSSS36QT KSSS42QT KSSS48QT KSSC42QV KSSC48QV CABINET OPENING ... side of cabinetry must permit both doors to open to change without notice. Face of the refrigerator and a corner wall. Instructions packed with product. NOTE: More clearance may be at same level as shown above) 36 35¹⁄₂" (90.2 cm) to 35³⁄₄" (90.8 cm) 42 41&#...
® Side by Side Built-In Refrigerator PRODUCT MODEL NUMBERS KSSC36FT KSSC36QT KSSC42FT KSSC42QT KSSC48FT KSSC48QT KSSO36FT KSSO36QT KSSO42FT KSSO42QT KSSO48FT KSSO48QT KSSP36QT KSSP42QT KSSP48QT KSSS36FT KSSS42FT KSSS48FT KSSS36QT KSSS42QT KSSS48QT KSSC42QV KSSC48QV CABINET OPENING ... side of cabinetry must permit both doors to open to change without notice. Face of the refrigerator and a corner wall. Instructions packed with product. NOTE: More clearance may be at same level as shown above) 36 35¹⁄₂" (90.2 cm) to 35³⁄₄" (90.8 cm) 42 41&#...

Installation Guide
Page 3
... you to do so can happen if the instructions are very important. Use two or more people to reduce the chance of others . REFRIGERATOR SAFETY Your safety and the safety of injury, and tell you don't immediately follow the safety alert symbol and either the word "DANGER" ...result in this manual and on your appliance. WARNING You can kill or hurt you don't follow instructions. Keep doors taped closed until refrigerator is the safety alert symbol. Always read and obey all safety messages. Failure to potential hazards that can be killed or seriously injured if...
... you to do so can happen if the instructions are very important. Use two or more people to reduce the chance of others . REFRIGERATOR SAFETY Your safety and the safety of injury, and tell you don't immediately follow the safety alert symbol and either the word "DANGER" ...result in this manual and on your appliance. WARNING You can kill or hurt you don't follow instructions. Keep doors taped closed until refrigerator is the safety alert symbol. Always read and obey all safety messages. Failure to potential hazards that can be killed or seriously injured if...

Installation Guide
Page 4
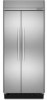
... KSSO48FTX 4 This series requires the installation of custom panels that complements the contoured door handles. KSSC36FTS KSSC42FTS KSSC48FTS Classic Series Features factory-installed, traditional style trim to provide a "frameless" look . Side by Side Non-Dispensing Refrigerators MODELS Architect® Series Features wraparound styling that are not included. This series requires the installation...
... KSSO48FTX 4 This series requires the installation of custom panels that complements the contoured door handles. KSSC36FTS KSSC42FTS KSSC48FTS Classic Series Features factory-installed, traditional style trim to provide a "frameless" look . Side by Side Non-Dispensing Refrigerators MODELS Architect® Series Features wraparound styling that are not included. This series requires the installation...

Installation Guide
Page 5
..." look . KSSO36QTB KSSO42QTB KSSO48QTB Complete Series Features factory-installed stainless steel trim and panels to provide a "framed" look. KSSP36QTS KSSP42QTS KSSP48QTS 5 Side by Side Dispensing Refrigerators Architect® Series Features wraparound styling that are not included. KSSC36QTS KSSC42QTS KSSC48QTS Classic Series Features factory-installed, traditional style trim to create a sleek, contemporary...
..." look . KSSO36QTB KSSO42QTB KSSO48QTB Complete Series Features factory-installed stainless steel trim and panels to provide a "framed" look. KSSP36QTS KSSP42QTS KSSP48QTS 5 Side by Side Dispensing Refrigerators Architect® Series Features wraparound styling that are not included. KSSC36QTS KSSC42QTS KSSC48QTS Classic Series Features factory-installed, traditional style trim to create a sleek, contemporary...


