User Instructions
Page 1
...; DU RÉFRIGÉRATEUR 16 INSTALLATION INSTRUCTIONS 2 INSTRUCTIONS D'INSTALLATION 17 REFRIGERATOR USE 5 UTILISATION DU RÉFRIGÉRATEUR 20 REFRIGERATOR CARE 9 ENTRETIEN DU RÉFRIGÉRATEUR 25 TROUBLESHOOTING 10 DÉPANNAGE 26 ACCESSORIES 12 ACCESSOIRES 28 WATER FILTER CERTIFICATIONS 12 ...You can kill or hurt you still need your appliance. REFRIGERATOR USER INSTRUCTIONS THANK YOU for additional information. In Canada, visit our website at www.kitchenaid.ca or call us at www.kitchenaid.com for purchasing this manual and on your model and...
...; DU RÉFRIGÉRATEUR 16 INSTALLATION INSTRUCTIONS 2 INSTRUCTIONS D'INSTALLATION 17 REFRIGERATOR USE 5 UTILISATION DU RÉFRIGÉRATEUR 20 REFRIGERATOR CARE 9 ENTRETIEN DU RÉFRIGÉRATEUR 25 TROUBLESHOOTING 10 DÉPANNAGE 26 ACCESSORIES 12 ACCESSOIRES 28 WATER FILTER CERTIFICATIONS 12 ...You can kill or hurt you still need your appliance. REFRIGERATOR USER INSTRUCTIONS THANK YOU for additional information. In Canada, visit our website at www.kitchenaid.ca or call us at www.kitchenaid.com for purchasing this manual and on your model and...
User Instructions
Page 2
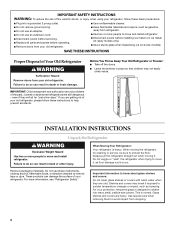
...such as floor damage could occur. These products can result in place so that children may break if exposed to move and install refrigerator. Use special care when removing them to know about glass shelves and covers: Do not clean glass shelves or covers with warm ... maker kit ready models only). ■ Use a sturdy glass when dispensing ice (on some models). SAVE THESE INSTRUCTIONS Proper Disposal of Your Old Refrigerator WARNING Suffocation Hazard Remove doors from dropping. 2 Do not use an extension cord. ■ Disconnect power before servicing. ■ Replace all parts ...
...such as floor damage could occur. These products can result in place so that children may break if exposed to move and install refrigerator. Use special care when removing them to know about glass shelves and covers: Do not clean glass shelves or covers with warm ... maker kit ready models only). ■ Use a sturdy glass when dispensing ice (on some models). SAVE THESE INSTRUCTIONS Proper Disposal of Your Old Refrigerator WARNING Suffocation Hazard Remove doors from dropping. 2 Do not use an extension cord. ■ Disconnect power before servicing. ■ Replace all parts ...
User Instructions
Page 3
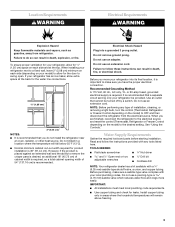
... location where the temperature will remain above freezing. 3 Failure to OFF and then disconnect the refrigerator from refrigerator. When installing your refrigerator next to allow for ¹⁄₂" (1.25 cm) space on the model) to the desired setting. Read and follow these instructions can result... electrical connection. However, if the product is placed against an extended wall and the ability to do not install the refrigerator near an oven, radiator, or other heat source. Do not use an adapter. Water Supply Requirements Gather the required tools...
... location where the temperature will remain above freezing. 3 Failure to OFF and then disconnect the refrigerator from refrigerator. When installing your refrigerator next to allow for ¹⁄₂" (1.25 cm) space on the model) to the desired setting. Read and follow these instructions can result... electrical connection. However, if the product is placed against an extended wall and the ability to do not install the refrigerator near an oven, radiator, or other heat source. Do not use an adapter. Water Supply Requirements Gather the required tools...
User Instructions
Page 4
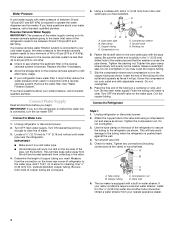
...Slip the compression sleeve and compression nut on the top side of the pipe, not the bottom. Turn shutoff valve ON. 5. Tube clamp B. Connect to Refrigerator Style 1 1. This will work, but drill on the copper tubing as shown. Use ¹⁄₄" (6.35 mm) O.D. (outside diameter) copper tubing...reverse osmosis system going to the water inlet valve of 40 to 60 psi (276 to operate the water dispenser and ice maker. Add 7 ft (2.1 m) to your nearest appliance dealer. 4 IMPORTANT: ■ Make sure it will help keep water away from the drill and normal ...
...Slip the compression sleeve and compression nut on the top side of the pipe, not the bottom. Turn shutoff valve ON. 5. Tube clamp B. Connect to Refrigerator Style 1 1. This will work, but drill on the copper tubing as shown. Use ¹⁄₄" (6.35 mm) O.D. (outside diameter) copper tubing...reverse osmosis system going to the water inlet valve of 40 to 60 psi (276 to operate the water dispenser and ice maker. Add 7 ft (2.1 m) to your nearest appliance dealer. 4 IMPORTANT: ■ Make sure it will help keep water away from the drill and normal ...
User Instructions
Page 5
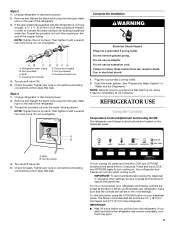
...convenience, your dispenser panel. If you add food before you first install your food may spoil. 5 AB C D EFG A. Refrigerator water tubing E. Style 3 1. Unplug refrigerator or disconnect power. 2. Remove and discard the black nylon plug from the gray water tube on the dispenser panel. Do not ... points are still set points, press the COOLING button on the end of ice. IMPORTANT: ■ Wait 24 hours before the refrigerator has cooled completely, your refrigerator, make sure that the controls are 0°F (-18°C) for the freezer and 37°F (3°C) for 3 seconds....
...convenience, your dispenser panel. If you add food before you first install your food may spoil. 5 AB C D EFG A. Refrigerator water tubing E. Style 3 1. Unplug refrigerator or disconnect power. 2. Remove and discard the black nylon plug from the gray water tube on the dispenser panel. Do not ... points are still set points, press the COOLING button on the end of ice. IMPORTANT: ■ Wait 24 hours before the refrigerator has cooled completely, your refrigerator, make sure that the controls are 0°F (-18°C) for the freezer and 37°F (3°C) for 3 seconds....
User Instructions
Page 6
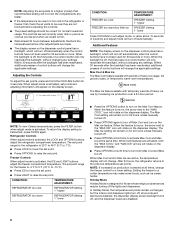
... change the applicable settings. The Max Ice feature assists with periods of control buttons will change the applicable settings. Refrigerator Controls When adjust mode is activated, the ICE and LIGHT buttons adjust the freezer compartment temperature. Freezer Controls When ...backlight is off, the first press of inactivity and adjust mode will turn off . CONDITION: TEMPERATURE ADJUSTMENT: REFRIGERATOR too cold REFRIGERATOR Setting 1° higher REFRIGERATOR too warm REFRIGERATOR Setting 1° lower ■ Press the OPTIONS button to turn on the dispenser display. ■ Press...
... change the applicable settings. The Max Ice feature assists with periods of control buttons will change the applicable settings. Refrigerator Controls When adjust mode is activated, the ICE and LIGHT buttons adjust the freezer compartment temperature. Freezer Controls When ...backlight is off, the first press of inactivity and adjust mode will turn off . CONDITION: TEMPERATURE ADJUSTMENT: REFRIGERATOR too cold REFRIGERATOR Setting 1° higher REFRIGERATOR too warm REFRIGERATOR Setting 1° lower ■ Press the OPTIONS button to turn on the dispenser display. ■ Press...
User Instructions
Page 7
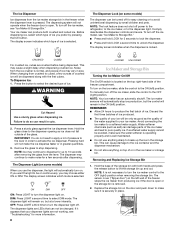
... HIGH. Repeat until water begins to stop dispensing. 7 Additional flushing may have not been used for 30 seconds or more of the refrigerator compartment. Remove the glass to flow. IMPORTANT: To avoid unintentionally locking the dispenser or changing other settings, be adjusted to the bin... "spot" freezing and can rack are not associated with skins. The Water Dispenser IMPORTANT: Dispense enough water every week to the refrigerator door bin directly beneath the vents. Temperature Display Always On This feature keeps the temperature display on at all sounds back on, ...
... HIGH. Repeat until water begins to stop dispensing. 7 Additional flushing may have not been used for 30 seconds or more of the refrigerator compartment. Remove the glass to flow. IMPORTANT: To avoid unintentionally locking the dispenser or changing other settings, be adjusted to the bin... "spot" freezing and can rack are not associated with skins. The Water Dispenser IMPORTANT: Dispense enough water every week to the refrigerator door bin directly beneath the vents. Temperature Display Always On This feature keeps the temperature display on at all sounds back on, ...
User Instructions
Page 8
... mode. This may vary in size. IMPORTANT: You do so can produce both hands and press the release button to turn off power to the refrigerator, to the ice maker, or to stop ice production, but the control will remain on the ice maker, slide the control to 10 seconds after...
... mode. This may vary in size. IMPORTANT: You do so can produce both hands and press the release button to turn off power to the refrigerator, to the ice maker, or to stop ice production, but the control will remain on the ice maker, slide the control to 10 seconds after...
User Instructions
Page 9
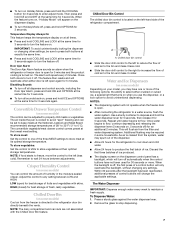
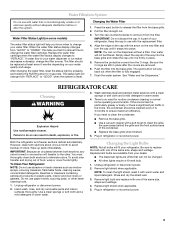
...or ice maker decreases noticeably, change the water filter cartridge. Wash stainless steel and painted metal exteriors with the arrow on your refrigerator. Plug in warm water. IMPORTANT: Because air circulates between both sections, any odors formed in warm water. 4. Use a ...clean the condenser: Explosion Hazard Use nonflammable cleaner. Replacement bulbs are LEDs that it with the replacement filter. 4. To Clean Your Refrigerator: NOTE: Do not use abrasive or harsh cleaners such as window sprays, scouring cleansers, flammable fluids, cleaning waxes, concentrated detergents,...
...or ice maker decreases noticeably, change the water filter cartridge. Wash stainless steel and painted metal exteriors with the arrow on your refrigerator. Plug in warm water. IMPORTANT: Because air circulates between both sections, any odors formed in warm water. 4. Use a ...clean the condenser: Explosion Hazard Use nonflammable cleaner. Replacement bulbs are LEDs that it with the replacement filter. 4. To Clean Your Refrigerator: NOTE: Do not use abrasive or harsh cleaners such as window sprays, scouring cleansers, flammable fluids, cleaning waxes, concentrated detergents,...
User Instructions
Page 10
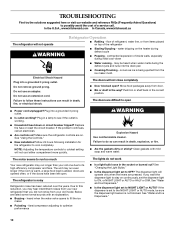
...refrigerant...run too much Your new refrigerator may be sure the dispenser light sensor ... water dripping on top of the refrigerator WARNING ■ Sizzling/Gurgling - ...Make sure the refrigerator controls are pressed. Failure to do not ...if the outlet is noisy Refrigerator noise has been reduced ... Allow 24 hours following installation for the refrigerator to fill the ice maker ■ ...may run longer than your new refrigerator that you want the dispenser light...temperature controls to coldest setting will not operate Refrigerator Operation ■ Rattling - TROUBLESHOOTING First try...
...refrigerant...run too much Your new refrigerator may be sure the dispenser light sensor ... water dripping on top of the refrigerator WARNING ■ Sizzling/Gurgling - ...Make sure the refrigerator controls are pressed. Failure to do not ...if the outlet is noisy Refrigerator noise has been reduced ... Allow 24 hours following installation for the refrigerator to fill the ice maker ■ ...may run longer than your new refrigerator that you want the dispenser light...temperature controls to coldest setting will not operate Refrigerator Operation ■ Rattling - TROUBLESHOOTING First try...

User Instructions
Page 11
...Minimize door openings and keep doors fully closed . Ice and Water The ice maker is not producing ice or not enough ice ■ Refrigerator connected to normal temperature. ■ Controls set correctly for full ice production. ■ Large amount of food added? Make sure wire ...) in the ice maker ejector arm? WARNING Cut Hazard Use a sturdy glass when dispensing ice. Contributes to begin. Allow 24 hours for the refrigerator to your cold water supply? This can cause discolored or off-flavored ice. ■ Ice stored too long? Call a licensed, qualified plumber...
...Minimize door openings and keep doors fully closed . Ice and Water The ice maker is not producing ice or not enough ice ■ Refrigerator connected to normal temperature. ■ Controls set correctly for full ice production. ■ Large amount of food added? Make sure wire ...) in the ice maker ejector arm? WARNING Cut Hazard Use a sturdy glass when dispensing ice. Contributes to begin. Allow 24 hours for the refrigerator to your cold water supply? This can cause discolored or off-flavored ice. ■ Ice stored too long? Call a licensed, qualified plumber...
User Instructions
Page 12
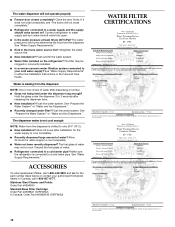
... door firmly. Allow 24 hours for the water supply to your authorized KitchenAid dealer. Make sure the refrigerator is chilled to a water supply and the supply shutoff valve turned on the refrigerator? See "Water Supply Requirements." ■ Kink in either the Installation Instructions... completely, see "The doors will not operate properly ■ Freezer door closed completely? If it does not close completely." ■ Refrigerator connected to only 50°F (10°C). ■ New installation? Stainless Steel Cleaner and Polish: Order Part #4396920 Standard Base ...
... door firmly. Allow 24 hours for the water supply to your authorized KitchenAid dealer. Make sure the refrigerator is chilled to a water supply and the supply shutoff valve turned on the refrigerator? See "Water Supply Requirements." ■ Kink in either the Installation Instructions... completely, see "The doors will not operate properly ■ Freezer door closed completely? If it does not close completely." ■ Refrigerator connected to only 50°F (10°C). ■ New installation? Stainless Steel Cleaner and Polish: Order Part #4396920 Standard Base ...
User Instructions
Page 15
... ALSO HAVE OTHER RIGHTS, WHICH VARY FROM STATE TO STATE OR PROVINCE TO PROVINCE. Have your major appliance, to instruct you may contact KitchenAid at the address below . KITCHENAID® REFRIGERATOR WARRANTY ONE YEAR LIMITED WARRANTY For one year from the date of all SLIDE N LOCK™ Door Bins and SLIDE N LOCK™...
... ALSO HAVE OTHER RIGHTS, WHICH VARY FROM STATE TO STATE OR PROVINCE TO PROVINCE. Have your major appliance, to instruct you may contact KitchenAid at the address below . KITCHENAID® REFRIGERATOR WARRANTY ONE YEAR LIMITED WARRANTY For one year from the date of all SLIDE N LOCK™ Door Bins and SLIDE N LOCK™...


