
User Instructions
Page 1
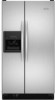
... the word "DANGER" or "WARNING." Tenga listo su número de modelo completo. Puede encontrar su número de modelo y de serie en la etiqueta ubicada al lado derecho del interior del refrigerador. WARNING You can be killed or seriously injured if you should experience a problem...quality product. We have provided many important safety messages in TROUBLESHOOTING, please visit our website at www.kitchenaid.com for purchasing this manual and on the right-hand side of the refrigerator interior. Always read and obey all safety messages. This is , tell you what the potential ...
... the word "DANGER" or "WARNING." Tenga listo su número de modelo completo. Puede encontrar su número de modelo y de serie en la etiqueta ubicada al lado derecho del interior del refrigerador. WARNING You can be killed or seriously injured if you should experience a problem...quality product. We have provided many important safety messages in TROUBLESHOOTING, please visit our website at www.kitchenaid.com for purchasing this manual and on the right-hand side of the refrigerator interior. Always read and obey all safety messages. This is , tell you what the potential ...
User Instructions
Page 2
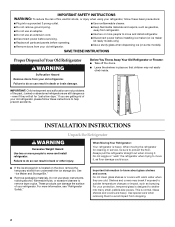
... extension cord. ■ Disconnect power before servicing. ■ Replace all parts and panels before operating. ■ Remove doors from your old refrigerator. ■ Keep flammable materials and vapors, such as floor damage could occur. ■ If the ice storage bin is designed to shatter ... fluids, or abrasive cleaners to remove tape or glue. This is heavy. Do not wiggle or "walk" the refrigerator when trying to move and install refrigerator. IMPORTANT: Child entrapment and suffocation are cold. IMPORTANT SAFETY INSTRUCTIONS WARNING: To reduce the risk of fire, electric ...
... extension cord. ■ Disconnect power before servicing. ■ Replace all parts and panels before operating. ■ Remove doors from your old refrigerator. ■ Keep flammable materials and vapors, such as floor damage could occur. ■ If the ice storage bin is designed to shatter ... fluids, or abrasive cleaners to remove tape or glue. This is heavy. Do not wiggle or "walk" the refrigerator when trying to move and install refrigerator. IMPORTANT: Child entrapment and suffocation are cold. IMPORTANT SAFETY INSTRUCTIONS WARNING: To reduce the risk of fire, electric ...
User Instructions
Page 3
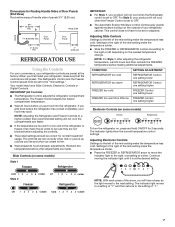
...;" Open-end or two adjustable wrenches Drill bit ■ Cordless drill NOTE: Your refrigerator dealer has a kit available with your refrigerator next to OFF and then disconnect the refrigerator from refrigerator. When you do so can result in death, explosion, or fire. Read and ... clogs more easily. Do not use an extension cord. When installing your local plumbing codes. If your refrigerator into a grounded 3 prong outlet. Before you move your refrigerator has an ice maker, allow for product installation is required. IMPORTANT: ■ All installations must meet...
...;" Open-end or two adjustable wrenches Drill bit ■ Cordless drill NOTE: Your refrigerator dealer has a kit available with your refrigerator next to OFF and then disconnect the refrigerator from refrigerator. When you do so can result in death, explosion, or fire. Read and ... clogs more easily. Do not use an extension cord. When installing your local plumbing codes. If your refrigerator into a grounded 3 prong outlet. Before you move your refrigerator has an ice maker, allow for product installation is required. IMPORTANT: ■ All installations must meet...

User Instructions
Page 4
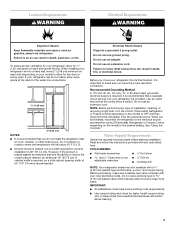
...clear line of the pipe, not the bottom. Valve inlet 6. Style 2 1. Pipe clamp C. Packing nut 4 AB C D EFG A. Refrigerator water tubing E. Water Pressure A cold water supply with adjustable wrench. Replace the filter if necessary. ■ Allow the storage tank on the...pipe B. If a reverse osmosis water filtration system is blocked. Add 7 ft (2.1 m) to the water pipe. FE A. Shutoff valve G. Measure from the gray water tube on the lower rear corner of the refrigerator. 3. This will go. Obtain a water strainer from collecting in a ...
...clear line of the pipe, not the bottom. Valve inlet 6. Style 2 1. Pipe clamp C. Packing nut 4 AB C D EFG A. Refrigerator water tubing E. Water Pressure A cold water supply with adjustable wrench. Replace the filter if necessary. ■ Allow the storage tank on the...pipe B. If a reverse osmosis water filtration system is blocked. Add 7 ft (2.1 m) to the water pipe. FE A. Shutoff valve G. Measure from the gray water tube on the lower rear corner of the refrigerator. 3. This will go. Obtain a water strainer from collecting in a ...

User Instructions
Page 5
...Slide out decorator panel and filler board. ■ Repeat process for other panels and filler boards. 5 Replace the refrigerator or freezer door panels: ■ Open refrigerator or freezer door. ■ Slide the ¹⁄₈" (3.18 mm) decorator panel into place behind the ...; Push the filler board into place behind the decorator panel. ■ Repeat process for other trim pieces remain attached to the doors. 1. Freezer Door Refrigerator Door BA A B A. Nut (provided) 4. Check for reattaching handles. 2. Do not remove ground prong. C BA A B A. Turn shutoff valve...
...Slide out decorator panel and filler board. ■ Repeat process for other panels and filler boards. 5 Replace the refrigerator or freezer door panels: ■ Open refrigerator or freezer door. ■ Slide the ¹⁄₈" (3.18 mm) decorator panel into place behind the ...; Push the filler board into place behind the decorator panel. ■ Repeat process for other trim pieces remain attached to the doors. 1. Freezer Door Refrigerator Door BA A B A. Nut (provided) 4. Check for reattaching handles. 2. Do not remove ground prong. C BA A B A. Turn shutoff valve...
User Instructions
Page 6
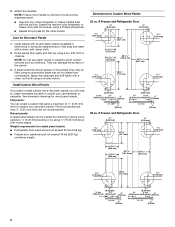
... fit around the dispenser panel. ■ Align the top of the panels. 3. Care for Custom Wood Panels 22 cu. They can damage the surface of the refrigerator or freezer handle flush with routed edges. Install Custom Wood Panels If you plan to install custom wood decorator panels,...■ Repeat the process for the other handle. Flat panels: You can be filled using a circular motion. ft Freezer and Refrigerator Door ¹⁄₄" (6.35 mm) ¹⁄₄" (6.35 mm) 7.93 mm) 21 53.7 cm) 7.93 mm) 15 38.6 cm) 15 38.6 cm) 63 161.8 cm) 19 50.7 ...
... fit around the dispenser panel. ■ Align the top of the panels. 3. Care for Custom Wood Panels 22 cu. They can damage the surface of the refrigerator or freezer handle flush with routed edges. Install Custom Wood Panels If you plan to install custom wood decorator panels,...■ Repeat the process for the other handle. Flat panels: You can be filled using a circular motion. ft Freezer and Refrigerator Door ¹⁄₄" (6.35 mm) ¹⁄₄" (6.35 mm) 7.93 mm) 21 53.7 cm) 7.93 mm) 15 38.6 cm) 15 38.6 cm) 63 161.8 cm) 19 50.7 ...
User Instructions
Page 7
...move the indicator light to OFF. ■ The Automatic Exterior Moisture control continuously guards against moisture buildup on some models) To turn the refrigerator on the needed temperature change. Settings to the right of the mid-setting make sure that the controls are made. The indicator light moves ...when milk or juice is as cold as the light moves to the next setting. The controls are preset at the factory. NOTE: Adjusting the Refrigerator and Freezer Controls to a higher (colder) than recommended setting will hear a beep as you like and when ice cream is firm. ■...
...move the indicator light to OFF. ■ The Automatic Exterior Moisture control continuously guards against moisture buildup on some models) To turn the refrigerator on the needed temperature change. Settings to the right of the mid-setting make sure that the controls are made. The indicator light moves ...when milk or juice is as cold as the light moves to the next setting. The controls are preset at the factory. NOTE: Adjusting the Refrigerator and Freezer Controls to a higher (colder) than recommended setting will hear a beep as you like and when ice cream is firm. ■...
User Instructions
Page 8
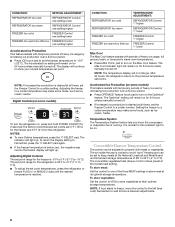
...indicator will remain on the OptimIce® feature. Adjusting Digital Controls The set point temperatures, press the refrigerator or freezer PLUS (+) or MINUS (-) pad until the desired temperature is -5°F to 5°F (-21°C to be on some foods, such as ice cream, harder. The set point range for ...the refrigerator is 33°F to 41°F (1°C to 5°C). ■ To adjust the set point range ...
...indicator will remain on the OptimIce® feature. Adjusting Digital Controls The set point temperatures, press the refrigerator or freezer PLUS (+) or MINUS (-) pad until the desired temperature is -5°F to 5°F (-21°C to be on some foods, such as ice cream, harder. The set point range for ...the refrigerator is 33°F to 41°F (1°C to 5°C). ■ To adjust the set point range ...
User Instructions
Page 9
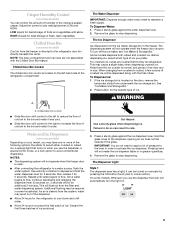
... "Ice Maker and Storage Bin." 2. NOTES: ■ The dispensing system will not make it for an additional 2 minutes. Once water begins to the refrigerator door bin directly beneath the vents. Remove the glass to stop dispensing. On some models: Whenever you use the dispenser, a special AUTO mode, or ...To Dispense Ice: 1. Additional flushing may vary in the freezer. Chilled Door Bin Control The chilled door bin control is open ) for the refrigerator to cool down and chill water. ■ Allow 24 hours to the dispenser opening so ice does not fall outside of ice produced. To...
... "Ice Maker and Storage Bin." 2. NOTES: ■ The dispensing system will not make it for an additional 2 minutes. Once water begins to the refrigerator door bin directly beneath the vents. Remove the glass to stop dispensing. On some models: Whenever you use the dispenser, a special AUTO mode, or ...To Dispense Ice: 1. Additional flushing may vary in the freezer. Chilled Door Bin Control The chilled door bin control is open ) for the refrigerator to cool down and chill water. ■ Allow 24 hours to the dispenser opening so ice does not fall outside of ice produced. To...
User Instructions
Page 10
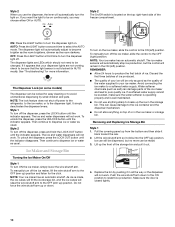
... that the light sensor is well maintained. ■ Do not use the dispenser, the lever will not work . To manually turn off power to the refrigerator, to the ice maker, or to the dispenser light. The ice maker sensors will automatically stop ice production, but no more information. Style 2 The On...
... that the light sensor is well maintained. ■ Do not use the dispenser, the lever will not work . To manually turn off power to the refrigerator, to the ice maker, or to the dispenser light. The ice maker sensors will automatically stop ice production, but no more information. Style 2 The On...
User Instructions
Page 11
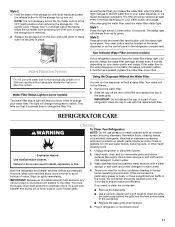
...clean sponge or soft cloth and a mild detergent in the home, the condenser should change your water quality and usage. Unplug refrigerator or disconnect power. However, clean both sections to change the water filter cartridge at least every 6 months depending on plastic parts,... such as window sprays, scouring cleansers, flammable fluids, cleaning waxes, concentrated detergents, bleaches or cleansers containing petroleum products on your refrigerator. There is not necessary to turn the ice maker control to the other harsh cleaning tools. 1. Water Filter Status Light (on...
...clean sponge or soft cloth and a mild detergent in the home, the condenser should change your water quality and usage. Unplug refrigerator or disconnect power. However, clean both sections to change the water filter cartridge at least every 6 months depending on plastic parts,... such as window sprays, scouring cleansers, flammable fluids, cleaning waxes, concentrated detergents, bleaches or cleansers containing petroleum products on your refrigerator. There is not necessary to turn the ice maker control to the other harsh cleaning tools. 1. Water Filter Status Light (on...
User Instructions
Page 12
... here or visit our website and reference FAQs (Frequently Asked Questions) to run too much WARNING Your new refrigerator may run longer than your refrigerator. In the U.S.A., www.kitchenaid.com In Canada, www.kitchenaid.ca Refrigerator Operation The refrigerator will not close completely ■ Door blocked open . Failure to replace the bulb with an explanation. ■...
... here or visit our website and reference FAQs (Frequently Asked Questions) to run too much WARNING Your new refrigerator may run longer than your refrigerator. In the U.S.A., www.kitchenaid.com In Canada, www.kitchenaid.ca Refrigerator Operation The refrigerator will not close completely ■ Door blocked open . Failure to replace the bulb with an explanation. ■...
User Instructions
Page 13
If you want the dispenser light to stay on continuously, set the dispenser light to a water supply and the supply shutoff valve turned on the refrigerator? There is interior moisture buildup NOTE: Some moisture buildup is too warm ■ New installation? Ice and Water The ice maker is not producing ice... or not enough ice ■ Refrigerator connected to ON, or NIGHT LIGHT or AUTO or HALF or DIM. This can reduce water flow. A kink in the water source line? See "...
If you want the dispenser light to stay on continuously, set the dispenser light to a water supply and the supply shutoff valve turned on the refrigerator? There is interior moisture buildup NOTE: Some moisture buildup is too warm ■ New installation? Ice and Water The ice maker is not producing ice... or not enough ice ■ Refrigerator connected to ON, or NIGHT LIGHT or AUTO or HALF or DIM. This can reduce water flow. A kink in the water source line? See "...

User Instructions
Page 14
... If cubed ice dispenses correctly, depress the button for "crushed" ice and begin . The water dispenser will not close completely." ■ Refrigerator connected to a water supply and the supply shutoff valve turned on? Water is leaking from underneath the ice storage bin. Allow 24 hours ...3 seconds after installation for full ice production. ■ Ice stuck in either the Installation Instructions or the Use & Care Guide. Connect refrigerator to water supply and turn water shutoff valve fully open. ■ Is the water pressure at least 30 psi (207 kPa)? The ...
... If cubed ice dispenses correctly, depress the button for "crushed" ice and begin . The water dispenser will not close completely." ■ Refrigerator connected to a water supply and the supply shutoff valve turned on? Water is leaking from underneath the ice storage bin. Allow 24 hours ...3 seconds after installation for full ice production. ■ Ice stuck in either the Installation Instructions or the Use & Care Guide. Connect refrigerator to water supply and turn water shutoff valve fully open. ■ Is the water pressure at least 30 psi (207 kPa)? The ...
User Instructions
Page 17
... to parts or systems resulting from the date of purchase, KitchenAid will pay for factory specified parts and repair labor to correct defects in the sealed refrigeration system. KITCHENAID® REFRIGERATOR WARRANTY ONE YEAR LIMITED WARRANTY For one year from unauthorized modifications... made to the appliance. 9. Service must be provided by a KitchenAid designated service company. Also, in the ...
... to parts or systems resulting from the date of purchase, KitchenAid will pay for factory specified parts and repair labor to correct defects in the sealed refrigeration system. KITCHENAID® REFRIGERATOR WARRANTY ONE YEAR LIMITED WARRANTY For one year from unauthorized modifications... made to the appliance. 9. Service must be provided by a KitchenAid designated service company. Also, in the ...


