
User Instructions
Page 1
...Puede encontrar su número de modelo y de serie en la etiqueta ubicada al lado derecho del interior ...del refrigerador" en español, o para obtener información adicional acerca de su producto, visite: www.kitchenaid.com. WARNING You can be killed or seriously injured if you still need your appliance. If you don't ...ES SUR LE PRODUIT 34 PRODUCT DATA SHEETS 16 GARANTIE 35 WARRANTY 17 REFRIGERATOR SAFETY Your safety and the safety of the refrigerator interior. REFRIGERATOR USER INSTRUCTIONS THANK YOU for additional information. These words mean: DANGER ...
...Puede encontrar su número de modelo y de serie en la etiqueta ubicada al lado derecho del interior ...del refrigerador" en español, o para obtener información adicional acerca de su producto, visite: www.kitchenaid.com. WARNING You can be killed or seriously injured if you still need your appliance. If you don't ...ES SUR LE PRODUIT 34 PRODUCT DATA SHEETS 16 GARANTIE 35 WARRANTY 17 REFRIGERATOR SAFETY Your safety and the safety of the refrigerator interior. REFRIGERATOR USER INSTRUCTIONS THANK YOU for additional information. These words mean: DANGER ...
User Instructions
Page 2
...models only). ■ Use a sturdy glass when dispensing ice (on the door, remove the temporary shield from your refrigerator. When Moving Your Refrigerator: Your refrigerator is normal. Use special care when removing them to help prevent accidents. Do not use an extension cord. ■ ...Disconnect power before servicing. ■ Replace all parts and panels before operating. ■ Remove doors from your old refrigerator. ■ Keep flammable materials and vapors, such as gasoline, away from dropping. 2 For more people to remove tape or glue. ...
...models only). ■ Use a sturdy glass when dispensing ice (on the door, remove the temporary shield from your refrigerator. When Moving Your Refrigerator: Your refrigerator is normal. Use special care when removing them to help prevent accidents. Do not use an extension cord. ■ ...Disconnect power before servicing. ■ Replace all parts and panels before operating. ■ Remove doors from your old refrigerator. ■ Keep flammable materials and vapors, such as gasoline, away from dropping. 2 For more people to remove tape or glue. ...
User Instructions
Page 3
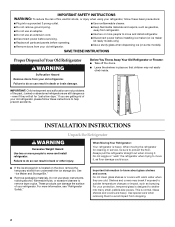
...3 Electrical Shock Hazard Plug into its final location, it is important to the electrical source and reset the control (Thermostat, Refrigerator or Freezer Control depending on each side (depending on the model) to the desired setting. or 20-amp fused, grounded electrical... Requirements WARNING Electrical Requirements WARNING Explosion Hazard Keep flammable materials and vapors, such as gasoline, away from the electrical source. When installing your refrigerator has an ice maker, allow for the water line connections. 1/2" (1.25 cm) 2" (5.08 cm) NOTES: ■ It is ...
...3 Electrical Shock Hazard Plug into its final location, it is important to the electrical source and reset the control (Thermostat, Refrigerator or Freezer Control depending on each side (depending on the model) to the desired setting. or 20-amp fused, grounded electrical... Requirements WARNING Electrical Requirements WARNING Explosion Hazard Keep flammable materials and vapors, such as gasoline, away from the electrical source. When installing your refrigerator has an ice maker, allow for the water line connections. 1/2" (1.25 cm) 2" (5.08 cm) NOTES: ■ It is ...

User Instructions
Page 4
... shutoff valve to the valve inlet using a compression nut and sleeve as shown. Slip the compression sleeve and compression nut on the water pipe. Unplug refrigerator or disconnect power. 2. Attach the copper tube to the cold water pipe with a reverse osmosis system. Do not overtighten. 3. A B C D...into the outlet end squarely as far as shown. Tighten the packing nut. Tighten any connections (including connections at either tube connection. Add 7 ft (2.1 m) to Water Line 1. Connect to allow for leaks. A G B C 6. Screw the compression nut onto outlet end with a ...
... shutoff valve to the valve inlet using a compression nut and sleeve as shown. Slip the compression sleeve and compression nut on the water pipe. Unplug refrigerator or disconnect power. 2. Attach the copper tube to the cold water pipe with a reverse osmosis system. Do not overtighten. 3. A B C D...into the outlet end squarely as far as shown. Tighten the packing nut. Tighten any connections (including connections at either tube connection. Add 7 ft (2.1 m) to Water Line 1. Connect to allow for leaks. A G B C 6. Screw the compression nut onto outlet end with a ...

User Instructions
Page 5
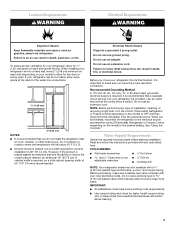
...into place behind the decorator panel. ■ Repeat process for other trim pieces remain attached to produce the first batch of the refrigerator. 3. Freezer Door Refrigerator Door BA A B A. Nut (provided) 4. Handles Remove the Door Panels NOTE: When removing and replacing decorator panels, only the... handle is removed. Bulb B. Turn shutoff valve ON. 5. Remove the door panels: ■ Open refrigerator or freezer door. ■ Slide out decorator panel and filler board. ■ Repeat process for other panels and filler boards. 5 ...
...into place behind the decorator panel. ■ Repeat process for other trim pieces remain attached to produce the first batch of the refrigerator. 3. Freezer Door Refrigerator Door BA A B A. Nut (provided) 4. Handles Remove the Door Panels NOTE: When removing and replacing decorator panels, only the... handle is removed. Bulb B. Turn shutoff valve ON. 5. Remove the door panels: ■ Open refrigerator or freezer door. ■ Slide out decorator panel and filler board. ■ Repeat process for other panels and filler boards. 5 ...
User Instructions
Page 6
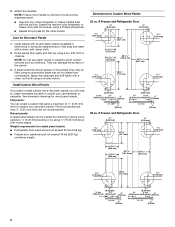
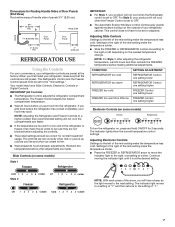
... you plan to install custom wood decorator panels, you will need to fit around the dispenser panel. ■ Align the top of the panels. 3. ft Freezer and Refrigerator Door 1/4" (6.35 mm) 1/4" (6.35 mm) 5/16" (7.93 mm) 185/32" (46.1 cm) 5/16" (7.93 mm) 127/16" (31.6 cm) 127/... are not recommended. They can be filled using a circular motion. Weight requirements for Custom Wood Panels 22 cu. ft Freezer and Refrigerator Door ¹⁄₄" (6.35 mm) ¹⁄₄" (6.35 mm) 7.93 mm) 21 53.7 cm) 7.93 mm) 15 38.6 cm) 15 38.6 cm) 63 161.8 cm) 19 ...
... you plan to install custom wood decorator panels, you will need to fit around the dispenser panel. ■ Align the top of the panels. 3. ft Freezer and Refrigerator Door 1/4" (6.35 mm) 1/4" (6.35 mm) 5/16" (7.93 mm) 185/32" (46.1 cm) 5/16" (7.93 mm) 127/16" (31.6 cm) 127/... are not recommended. They can be filled using a circular motion. Weight requirements for Custom Wood Panels 22 cu. ft Freezer and Refrigerator Door ¹⁄₄" (6.35 mm) ¹⁄₄" (6.35 mm) 7.93 mm) 21 53.7 cm) 7.93 mm) 15 38.6 cm) 15 38.6 cm) 63 161.8 cm) 19 ...
User Instructions
Page 7
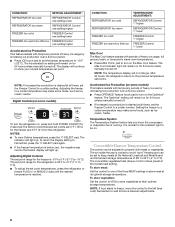
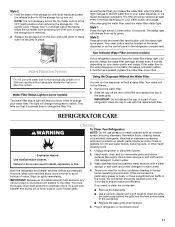
... the temperature less cold. The Freezer Control adjusts the freezer compartment temperature. ■ Wait 24 hours before you first install your refrigerator, make sure that the controls are set to OFF. ■ The Automatic Exterior Moisture control continuously guards against moisture buildup on ... when the Freezer Control is set correctly when milk or juice is firm. ■ Wait at a time. For Style 2, your refrigerator cabinet. The controls are still preset. Adjusting Electronic Controls Settings to be correct for 2 seconds. Settings to OFF. Your model may ...
... the temperature less cold. The Freezer Control adjusts the freezer compartment temperature. ■ Wait 24 hours before you first install your refrigerator, make sure that the controls are set to OFF. ■ The Automatic Exterior Moisture control continuously guards against moisture buildup on ... when the Freezer Control is set correctly when milk or juice is firm. ■ Wait at a time. For Style 2, your refrigerator cabinet. The controls are still preset. Adjusting Electronic Controls Settings to be correct for 2 seconds. Settings to OFF. Your model may ...
User Instructions
Page 8
...their optimal storage temperatures. NOTES: ■ To view Celsius temperatures, press the °C SELECT pad. After 24 hours, the refrigerator returns to properly chill meats or vegetables. The OptimIce® setting will remain on for this indicator light to the freezer display ...manually turned off . The Max Cool indicator light will remain on . NOTE: If increased ice production is -5°F to 5°F (-21°C to 0°C). To store meat: Set the control to one setting higher Accelerated Ice Production This feature assists with temporary periods of...
...their optimal storage temperatures. NOTES: ■ To view Celsius temperatures, press the °C SELECT pad. After 24 hours, the refrigerator returns to properly chill meats or vegetables. The OptimIce® setting will remain on for this indicator light to the freezer display ...manually turned off . The Max Cool indicator light will remain on . NOTE: If increased ice production is -5°F to 5°F (-21°C to 0°C). To store meat: Set the control to one setting higher Accelerated Ice Production This feature assists with temporary periods of...
User Instructions
Page 9
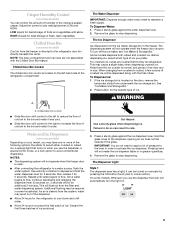
...bin. To turn the light on. Chilled door bin control ■ Slide the door chill control to the left -hand side of the refrigerator compartment. Use a sturdy container to avoid unintentional dispensing. This will not operate when the freezer door is located on the left to reduce...fall outside of humidity in the freezer. Press a sturdy glass against the ice dispenser lever. LOW (open . ■ After connecting the refrigerator to produce the first batch of the following options: the ability to the lever in some households. When changing from the ice maker storage bin...
...bin. To turn the light on. Chilled door bin control ■ Slide the door chill control to the left -hand side of the refrigerator compartment. Use a sturdy container to avoid unintentional dispensing. This will not operate when the freezer door is located on the left to reduce...fall outside of humidity in the freezer. Press a sturdy glass against the ice dispenser lever. LOW (open . ■ After connecting the refrigerator to produce the first batch of the following options: the ability to the lever in some households. When changing from the ice maker storage bin...
User Instructions
Page 10
... the dispenser levers. Pull the covering panel up or down to the ON position to restart ice production. Style 2 To turn off power to the refrigerator, to the ice maker, or to the dispenser light. See "Troubleshooting" for easy cleaning or to avoid unintentional dispensing by pushing it back toward the...
... the dispenser levers. Pull the covering panel up or down to the ON position to restart ice production. Style 2 To turn off power to the refrigerator, to the ice maker, or to the dispenser light. See "Troubleshooting" for easy cleaning or to avoid unintentional dispensing by pushing it back toward the...
User Instructions
Page 11
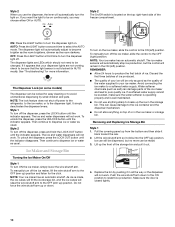
...until the status light turns green. Using the Dispenser Without the Water Filter You can result in normal home operating environments. Unplug refrigerator or disconnect power. If you know when to ensure maximum efficiency. NOTE: It is part of the storage bin with both...parts and interior surfaces thoroughly. Your water will help you need for routine condenser cleaning in death, explosion, or fire. 3. Both the refrigerator and freezer sections defrost automatically. Plug in the base grille. Water Filtration System Do not use paper towels, scouring pads, or other ...
...until the status light turns green. Using the Dispenser Without the Water Filter You can result in normal home operating environments. Unplug refrigerator or disconnect power. If you know when to ensure maximum efficiency. NOTE: It is part of the storage bin with both...parts and interior surfaces thoroughly. Your water will help you need for routine condenser cleaning in death, explosion, or fire. 3. Both the refrigerator and freezer sections defrost automatically. Plug in the base grille. Water Filtration System Do not use paper towels, scouring pads, or other ...
User Instructions
Page 12
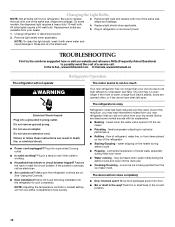
... top of inside walls, especially during defrost cycle ■ Popping - water dripping on ? In the U.S.A., www.kitchenaid.com In Canada, www.kitchenaid.ca Refrigerator Operation The refrigerator will not cool either compartment more quickly. Make sure the refrigerator controls are listed some models, the dispenser light requires a heavy duty 10-watt bulb. Allow 24 hours...
... top of inside walls, especially during defrost cycle ■ Popping - water dripping on ? In the U.S.A., www.kitchenaid.com In Canada, www.kitchenaid.ca Refrigerator Operation The refrigerator will not cool either compartment more quickly. Make sure the refrigerator controls are listed some models, the dispenser light requires a heavy duty 10-watt bulb. Allow 24 hours...
User Instructions
Page 13
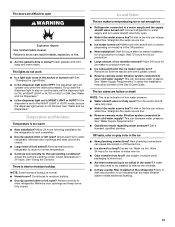
...sensor is an indication of ice recently removed? Clean gaskets with a plastic utensil. ■ Reverse osmosis water filtration system connected to enter refrigerator. If you want the dispenser light to stay on continuously, set the dispenser light to remove the minerals. ■ Is there a ...sticky? See "Water and Ice Dispensers." The doors are difficult to open . ■ Kink in the water source line? Connect refrigerator to water supply and turn water shutoff valve fully open WARNING Explosion Hazard Use nonflammable cleaner. Check temperature in ice indicates that the water...
...sensor is an indication of ice recently removed? Clean gaskets with a plastic utensil. ■ Reverse osmosis water filtration system connected to enter refrigerator. If you want the dispenser light to stay on continuously, set the dispenser light to remove the minerals. ■ Is there a ...sticky? See "Water and Ice Dispensers." The doors are difficult to open . ■ Kink in the water source line? Connect refrigerator to water supply and turn water shutoff valve fully open WARNING Explosion Hazard Use nonflammable cleaner. Check temperature in ice indicates that the water...

User Instructions
Page 14
...begin . If it does not close completely, see "The doors will stop dispensing when the arm is held in the delivery chute? Connect refrigerator to melt the ice if necessary. Straighten the water source line. ■ New installation? See "Water Supply Requirements" in position. ■...; Freezer door closed completely? Wait 24 hours after releasing the dispenser lever. ■ New installation? Ice will not close completely." ■ Refrigerator connected to your cold water supply? Wait 3 minutes for full ice production. ■ Ice stuck in too long. The water dispenser will ...
...begin . If it does not close completely, see "The doors will stop dispensing when the arm is held in the delivery chute? Connect refrigerator to melt the ice if necessary. Straighten the water source line. ■ New installation? See "Water Supply Requirements" in position. ■...; Freezer door closed completely? Wait 24 hours after releasing the dispenser lever. ■ New installation? Ice will not close completely." ■ Refrigerator connected to your cold water supply? Wait 3 minutes for full ice production. ■ Ice stuck in too long. The water dispenser will ...
User Instructions
Page 17
...RIGHTS, WHICH VARY FROM STATE TO STATE OR PROVINCE TO PROVINCE. Have your product or you may contact KitchenAid at the address below . KITCHENAID® REFRIGERATOR WARRANTY ONE YEAR LIMITED WARRANTY For one year from the date of purchase, when this User Instructions and ...with published installation instructions. 11. SECOND THROUGH FIFTH YEAR LIMITED WARRANTY ON CAVITY LINER AND SEALED REFRIGERATION SYSTEM PARTS In the second through fifth years from the date of purchase, KitchenAid will pay for units operated outside the United States or Canada. 7. These parts are : ...
...RIGHTS, WHICH VARY FROM STATE TO STATE OR PROVINCE TO PROVINCE. Have your product or you may contact KitchenAid at the address below . KITCHENAID® REFRIGERATOR WARRANTY ONE YEAR LIMITED WARRANTY For one year from the date of purchase, when this User Instructions and ...with published installation instructions. 11. SECOND THROUGH FIFTH YEAR LIMITED WARRANTY ON CAVITY LINER AND SEALED REFRIGERATION SYSTEM PARTS In the second through fifth years from the date of purchase, KitchenAid will pay for units operated outside the United States or Canada. 7. These parts are : ...
Parts Diagram
Page 1
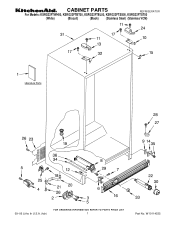
CABINET PARTS REFRIGERATOR For Models: KSRG22FTWH00, KSRG22FTBT00, KSRG22FTBL00, KSRG22FTSS00, KSRG22FTST00 (White) (Biscuit) (Black) (Stainless Steel) (Stainless VCM) 09−06 Litho In U.S.A. (kdr) 1 Part No. W10114535
CABINET PARTS REFRIGERATOR For Models: KSRG22FTWH00, KSRG22FTBT00, KSRG22FTBL00, KSRG22FTSS00, KSRG22FTST00 (White) (Biscuit) (Black) (Stainless Steel) (Stainless VCM) 09−06 Litho In U.S.A. (kdr) 1 Part No. W10114535
Parts Diagram
Page 8
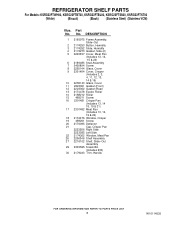
...) 12 2223362 Gasket (Rear) 13 2174478 Eyelet, Roller 14 2188212 Roller 15 489211 Screw 16 2301481 Crisper Pan (Includes 13, 14 18, 19 & 21) 17 2301482 Meat Pan (Includes 13, 14, 19 & 22) 18 2174076 Window, Crisper 19 489261 Screw 20 2176095 Deflector... 21 Cap, Crisper Pan 2223286 Right Side 2223285 Left Side 22 2174362 Window, Meat Pan 26 2206346 Shelf Assembly 27 2216102 Shelf, Slide−Out Assembly 29 2305595 Snack Bin (Includes #30) 30 2179243 Trim, Handle 8 W10114535 Part No. REFRIGERATOR SHELF PARTS For Models: KSRG22FTWH00...
...) 12 2223362 Gasket (Rear) 13 2174478 Eyelet, Roller 14 2188212 Roller 15 489211 Screw 16 2301481 Crisper Pan (Includes 13, 14 18, 19 & 21) 17 2301482 Meat Pan (Includes 13, 14, 19 & 22) 18 2174076 Window, Crisper 19 489261 Screw 20 2176095 Deflector... 21 Cap, Crisper Pan 2223286 Right Side 2223285 Left Side 22 2174362 Window, Meat Pan 26 2206346 Shelf Assembly 27 2216102 Shelf, Slide−Out Assembly 29 2305595 Snack Bin (Includes #30) 30 2179243 Trim, Handle 8 W10114535 Part No. REFRIGERATOR SHELF PARTS For Models: KSRG22FTWH00...
Parts Diagram
Page 12
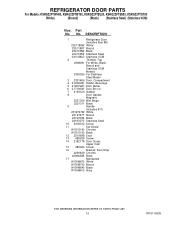
DESCRIPTION 1 Refrigerator Door (Includes Item #8) 2301188W White 2301188T Biscuit 2301188B Black 2301188S Stainless Steel 2301188LG Stainless VCM 2 Thimble, Top 2308091 For White, Black, Biscuit and Stainless VCM ... 489420 Screw 16 Bracket, Door Stop 2206629 Chrome 2206629B Black 17 Nameplate W10046670 White W10046700 Biscuit W10046640 Black W10046610 Gray 12 W10114535 Part No. No. REFRIGERATOR DOOR PARTS For Models: KSRG22FTWH00, KSRG22FTBT00, KSRG22FTBL00, KSRG22FTSS00, KSRG22FTST00 (White) (Biscuit) (Black) (Stainless Steel) (Stainless VCM) Illus.
DESCRIPTION 1 Refrigerator Door (Includes Item #8) 2301188W White 2301188T Biscuit 2301188B Black 2301188S Stainless Steel 2301188LG Stainless VCM 2 Thimble, Top 2308091 For White, Black, Biscuit and Stainless VCM ... 489420 Screw 16 Bracket, Door Stop 2206629 Chrome 2206629B Black 17 Nameplate W10046670 White W10046700 Biscuit W10046640 Black W10046610 Gray 12 W10114535 Part No. No. REFRIGERATOR DOOR PARTS For Models: KSRG22FTWH00, KSRG22FTBT00, KSRG22FTBL00, KSRG22FTSS00, KSRG22FTST00 (White) (Biscuit) (Black) (Stainless Steel) (Stainless VCM) Illus.
Parts Diagram
Page 18
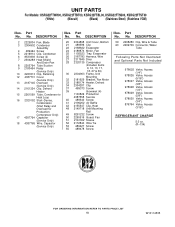
...Only) 17 4387764 Capacitor (Service Only) 18 4387765 Wire, Capacitor (Service Only) 20 2304898 Unit Cover, Bottom 21 489396 Clip 22 2188822 Evaporator 24 2188874 Motor, Fan 25 1105523 Tray, Evaporator 26 2187783 Harness, Wire 27 2317845 ... Valve, Access (5/16") 978027 Valve, Access (3/8") 978028 Valve, Access (1/2") 978029 Valve, Access (5/8") 978030 Valve, Access (3/4") 876764 Valve, Access (3/16") REFRIGERANT CHARGE 5.0 oz. (R−134) 18 W10114535 No. No. UNIT PARTS For Models: KSRG22FTWH00, KSRG22FTBT00, KSRG22FTBL00, KSRG22FTSS00, KSRG22FTST00 (White) (Biscuit) (Black...
...Only) 17 4387764 Capacitor (Service Only) 18 4387765 Wire, Capacitor (Service Only) 20 2304898 Unit Cover, Bottom 21 489396 Clip 22 2188822 Evaporator 24 2188874 Motor, Fan 25 1105523 Tray, Evaporator 26 2187783 Harness, Wire 27 2317845 ... Valve, Access (5/16") 978027 Valve, Access (3/8") 978028 Valve, Access (1/2") 978029 Valve, Access (5/8") 978030 Valve, Access (3/4") 876764 Valve, Access (3/16") REFRIGERANT CHARGE 5.0 oz. (R−134) 18 W10114535 No. No. UNIT PARTS For Models: KSRG22FTWH00, KSRG22FTBT00, KSRG22FTBL00, KSRG22FTSS00, KSRG22FTST00 (White) (Biscuit) (Black...


