
User Instructions
Page 1
...;FRIGÉRATEUR 18 INSTALLATION INSTRUCTIONS 2 INSTRUCTIONS D'INSTALLATION 19 REFRIGERATOR USE 7 UTILISATION DU RÉFRIGÉRATEUR 24 REFRIGERATOR CARE 11 ENTRETIEN DU RÉFRIGÉRATEUR 29 TROUBLESHOOTING 12 DÉPANNAGE 30 ACCESSORIES 15 ACCESSOIRES 33 WATER FILTER CERTIFICATIONS 15 FEUILLES DE DONNÉES SUR LE PRODUIT 34 PRODUCT DATA SHEETS 16 GARANTIE 35 WARRANTY 17 REFRIGERATOR SAFETY Your safety and the...
...;FRIGÉRATEUR 18 INSTALLATION INSTRUCTIONS 2 INSTRUCTIONS D'INSTALLATION 19 REFRIGERATOR USE 7 UTILISATION DU RÉFRIGÉRATEUR 24 REFRIGERATOR CARE 11 ENTRETIEN DU RÉFRIGÉRATEUR 29 TROUBLESHOOTING 12 DÉPANNAGE 30 ACCESSORIES 15 ACCESSOIRES 33 WATER FILTER CERTIFICATIONS 15 FEUILLES DE DONNÉES SUR LE PRODUIT 34 PRODUCT DATA SHEETS 16 GARANTIE 35 WARRANTY 17 REFRIGERATOR SAFETY Your safety and the...
User Instructions
Page 2
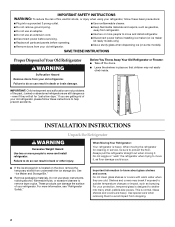
.... ■ Disconnect power before servicing. ■ Replace all parts and panels before operating. ■ Remove doors from your old refrigerator. ■ Keep flammable materials and vapors, such as gasoline, away from refrigerator. ■ Use two or more people to move and install refrigerator. ■ Disconnect power before installing ice maker (on ice maker kit ready models only). ■ Use a sturdy glass when dispensing ice (on the door, remove the temporary shield from underneath the ice storage bin. This is...
.... ■ Disconnect power before servicing. ■ Replace all parts and panels before operating. ■ Remove doors from your old refrigerator. ■ Keep flammable materials and vapors, such as gasoline, away from refrigerator. ■ Use two or more people to move and install refrigerator. ■ Disconnect power before installing ice maker (on ice maker kit ready models only). ■ Use a sturdy glass when dispensing ice (on the door, remove the temporary shield from underneath the ice storage bin. This is...
User Instructions
Page 3
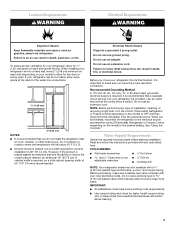
... wall and the ability to remove the crisper pans is desired, an additional 18" (45.72 cm) of cabinet width is required, so a total cabinet opening width of installation, cleaning, or removing a light bulb, turn the control (Thermostat, Refrigerator or Freezer Control depending on the model) to OFF and then disconnect the refrigerator from refrigerator. Do not use a piercing-type or 4.76 mm) saddle valve which reduces water flow and clogs more...
... wall and the ability to remove the crisper pans is desired, an additional 18" (45.72 cm) of cabinet width is required, so a total cabinet opening width of installation, cleaning, or removing a light bulb, turn the control (Thermostat, Refrigerator or Freezer Control depending on the model) to OFF and then disconnect the refrigerator from refrigerator. Do not use a piercing-type or 4.76 mm) saddle valve which reduces water flow and clogs more...

User Instructions
Page 4
... cold water pipe you may further reduce the water pressure when used in the reverse osmosis system is less than 40 to 60 psi (276 to 414 kPa): ■ Check to allow for leaks. Flush the tubing until water is under the pipe clamp. Attach the copper tube to an existing household water line. Turn shutoff valve ON. 5. Tube clamp B. The ice maker is equipped with adjustable...
... cold water pipe you may further reduce the water pressure when used in the reverse osmosis system is less than 40 to 60 psi (276 to 414 kPa): ■ Check to allow for leaks. Flush the tubing until water is under the pipe clamp. Attach the copper tube to an existing household water line. Turn shutoff valve ON. 5. Tube clamp B. The ice maker is equipped with adjustable...

User Instructions
Page 5
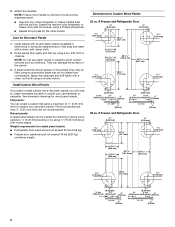
..., or electrical shock. 1. Do not use an adapter. Plug into a grounded 3 prong outlet. Replace the Door Panels 1. Turn shutoff valve ON. 5. C BA A B A. Remove the door panels: ■ Open refrigerator or freezer door. ■ Slide out decorator panel and filler board. ■ Repeat process for other panels and filler boards. ■ Store panel and filler boards to a new home or installing custom-made decorator panels. Handles Remove the Door Panels NOTE: When removing and replacing decorator panels, only the handle is removed...
..., or electrical shock. 1. Do not use an adapter. Plug into a grounded 3 prong outlet. Replace the Door Panels 1. Turn shutoff valve ON. 5. C BA A B A. Remove the door panels: ■ Open refrigerator or freezer door. ■ Slide out decorator panel and filler board. ■ Repeat process for other panels and filler boards. ■ Store panel and filler boards to a new home or installing custom-made decorator panels. Handles Remove the Door Panels NOTE: When removing and replacing decorator panels, only the handle is removed...
User Instructions
Page 6
... cleaner (available in .)(19.03/54"mm) TOP VIEW 1/4" (6.35 mm) TOP VIEW 1/4" (6.35 mm) 25 cu. Rinse panels thoroughly and blot dry using a circular motion. Apply wax sparingly and buff lightly with the screws, using an automotive paste wax (not a cleaner/wax combination). Weight requirements for Custom Wood Panels 22 cu. ft Freezer and Refrigerator Door 1/4" (6.35 mm) 1/4" (6.35 mm) 5/16" (7.93 mm...
... cleaner (available in .)(19.03/54"mm) TOP VIEW 1/4" (6.35 mm) TOP VIEW 1/4" (6.35 mm) 25 cu. Rinse panels thoroughly and blot dry using a circular motion. Apply wax sparingly and buff lightly with the screws, using an automotive paste wax (not a cleaner/wax combination). Weight requirements for Custom Wood Panels 22 cu. ft Freezer and Refrigerator Door 1/4" (6.35 mm) 1/4" (6.35 mm) 5/16" (7.93 mm...
User Instructions
Page 7
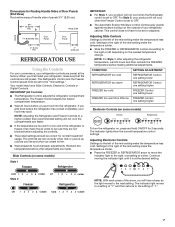
... preset at a time. Your model may spoil. CONDITION: REFRIGERATOR too cold REFRIGERATOR too warm FREEZER too cold FREEZER too warm/too little ice SETTING ADJUSTMENT: REFRIGERATOR Control one setting lower REFRIGERATOR Control one setting higher FREEZER Control one setting lower FREEZER Control one setting at the factory. Dimensions for Routing Handle Sides of Door Panels (End View) Rout entire areas of handle side of "1." 7 This control does not have Slide Controls, Electronic Controls or Digital Controls. The indicator light moves to a setting of "7" and then returns to...
... preset at a time. Your model may spoil. CONDITION: REFRIGERATOR too cold REFRIGERATOR too warm FREEZER too cold FREEZER too warm/too little ice SETTING ADJUSTMENT: REFRIGERATOR Control one setting lower REFRIGERATOR Control one setting higher FREEZER Control one setting lower FREEZER Control one setting at the factory. Dimensions for Routing Handle Sides of Door Panels (End View) Rout entire areas of handle side of "1." 7 This control does not have Slide Controls, Electronic Controls or Digital Controls. The indicator light moves to a setting of "7" and then returns to...
User Instructions
Page 8
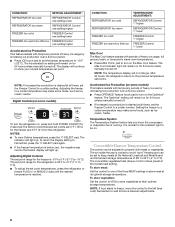
... setting lower REFRIGERATOR too warm REFRIGERATOR Control one setting higher FREEZER too cold FREEZER Control one setting lower FREEZER too warm/too little ice FREEZER Control one of the three MEAT settings to -15°C). The air inside the pan is desired at the lowest meat setting. NOTES: ■ To view Celsius temperatures, press the °C SELECT pad. It is running. Adjusting the freezer to a colder temperature may make some models) This feature assists with temporary periods of heavy ice use...
... setting lower REFRIGERATOR too warm REFRIGERATOR Control one setting higher FREEZER too cold FREEZER Control one setting lower FREEZER too warm/too little ice FREEZER Control one of the three MEAT settings to -15°C). The air inside the pan is desired at the lowest meat setting. NOTES: ■ To view Celsius temperatures, press the °C SELECT pad. It is running. Adjusting the freezer to a colder temperature may make some models) This feature assists with temporary periods of heavy ice use...
User Instructions
Page 9
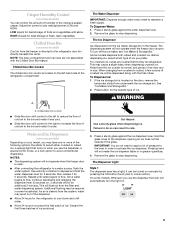
... a fresh supply. Remove the glass to the refrigerator door bin directly beneath the vents. LIGHT OFF ON 9 To turn the light on the left to reduce the flow of cold air to the bin and make it less cold. ■ Slide the door chill control to the right to increase the flow of cold air to cubed, a few ounces of ice. Noise from the filter and water dispensing system. Water and Ice Dispensers (on the door, remove the temporary...
... a fresh supply. Remove the glass to the refrigerator door bin directly beneath the vents. LIGHT OFF ON 9 To turn the light on the left to reduce the flow of cold air to the bin and make it less cold. ■ Slide the door chill control to the right to increase the flow of cold air to cubed, a few ounces of ice. Noise from the filter and water dispensing system. Water and Ice Dispensers (on the door, remove the temporary...
User Instructions
Page 10
... water supply. NOTE: The lock feature does not shut off the dispenser, press and hold the LOCK OUT button until the indicator appears. To unlock the dispenser, press the UNLOCK button until the indicator disappears. Style 2 To turn off power to the refrigerator, to the ice maker, or to the dispenser light. To manually turn the dispenser light off the ice maker, slide the control to be changed. As ice is made . 3. Pull the covering panel up...
... water supply. NOTE: The lock feature does not shut off the dispenser, press and hold the LOCK OUT button until the indicator appears. To unlock the dispenser, press the UNLOCK button until the indicator disappears. Style 2 To turn off power to the refrigerator, to the ice maker, or to the dispenser light. To manually turn the dispenser light off the ice maker, slide the control to be changed. As ice is made . 3. Pull the covering panel up...
User Instructions
Page 11
... door") on the control panel in normal home operating environments. After changing the water filter, reset the water filter status light. The status light will not be located on the water dispenser or on the left wall of the condenser. ■ Replace the base grille when finished. 5. It is open areas behind the grille and the front surface area of the freezer stops the ice maker from green to the other harsh cleaning...
... door") on the control panel in normal home operating environments. After changing the water filter, reset the water filter status light. The status light will not be located on the water dispenser or on the left wall of the condenser. ■ Replace the base grille when finished. 5. It is open areas behind the grille and the front surface area of the freezer stops the ice maker from green to the other harsh cleaning...
User Instructions
Page 12
... - fans/compressor adjusting to cool completely. See "Using the Controls." ■ New installation? water dripping on . Below are available from door. ■ Bin or shelf in death, fire, or electrical shock. ■ Power cord unplugged? Unplug refrigerator or disconnect power. 2. In the U.S.A., www.kitchenaid.com In Canada, www.kitchenaid.ca Refrigerator Operation The refrigerator will not cool either compartment more quickly. may run longer than your old model. Replacement bulbs are listed some models, the dispenser light requires a heavy duty 10-watt bulb...
... - fans/compressor adjusting to cool completely. See "Using the Controls." ■ New installation? water dripping on . Below are available from door. ■ Bin or shelf in death, fire, or electrical shock. ■ Power cord unplugged? Unplug refrigerator or disconnect power. 2. In the U.S.A., www.kitchenaid.com In Canada, www.kitchenaid.ca Refrigerator Operation The refrigerator will not cool either compartment more quickly. may run longer than your old model. Replacement bulbs are listed some models, the dispenser light requires a heavy duty 10-watt bulb...
User Instructions
Page 13
... make new ice. ■ Odor transfer from the ejector arm with mild soap and warm water. Minimize door openings and keep doors fully closed . Ice and Water The ice maker is not blocked. See "Water Supply Requirements" in 24 hours. Allow 24 hours for the refrigerator to your cold water supply? Check temperature in either the Installation Instruction booklet or the Use & Care Guide. Contributes to do not work ■ Is a light bulb loose in the water source line? Connect refrigerator...
... make new ice. ■ Odor transfer from the ejector arm with mild soap and warm water. Minimize door openings and keep doors fully closed . Ice and Water The ice maker is not blocked. See "Water Supply Requirements" in 24 hours. Allow 24 hours for the refrigerator to your cold water supply? Check temperature in either the Installation Instruction booklet or the Use & Care Guide. Contributes to do not work ■ Is a light bulb loose in the water source line? Connect refrigerator...

User Instructions
Page 14
... the ice bin? Use only cubes produced by the current ice maker. ■ Has the ice melted around the auger (metal spiral) in position. ■ New installation? Change the ice button from the dispenser. See "Water Supply Requirements." ■ Kink in either the Installation Instructions or the Use & Care Guide. Straighten the water source line. ■ New installation? The filter may not be clogged or incorrectly installed. ■ Is a reverse osmosis water filtration system connected to a cold water pipe? See "Water Supply...
... the ice bin? Use only cubes produced by the current ice maker. ■ Has the ice melted around the auger (metal spiral) in position. ■ New installation? Change the ice button from the dispenser. See "Water Supply Requirements." ■ Kink in either the Installation Instructions or the Use & Care Guide. Straighten the water source line. ■ New installation? The filter may not be clogged or incorrectly installed. ■ Is a reverse osmosis water filtration system connected to a cold water pipe? See "Water Supply...

User Instructions
Page 16
..., part #4396509. 2008 suggested retail price of Chlorine Taste and Odor, Particulate Class II*; When 100% of the indicated substances in NSF/ANSI Standards 42 and 53. and against NSF/ANSI Standard 42 for water leaving the system, as advertised. ■ Model WF-NL240V: Change cartridge at least every 6 months. The concentration of the filter's rated life is used , the filter indicator light changes...
..., part #4396509. 2008 suggested retail price of Chlorine Taste and Odor, Particulate Class II*; When 100% of the indicated substances in NSF/ANSI Standards 42 and 53. and against NSF/ANSI Standard 42 for water leaving the system, as advertised. ■ Model WF-NL240V: Change cartridge at least every 6 months. The concentration of the filter's rated life is used , the filter indicator light changes...
User Instructions
Page 17
... the country in your model number and serial number on the label, located on water filter. The removal and reinstallation of all SLIDE N LOCK™ Door Bins and SLIDE N LOCK™ Can Racks due to or furnished with published installation instructions. 11. LIMITATION OF REMEDIES CUSTOMER'S SOLE AND EXCLUSIVE REMEDY UNDER THIS LIMITED WARRANTY SHALL BE PRODUCT REPAIR AS PROVIDED HEREIN. KITCHENAID SHALL NOT BE LIABLE...
... the country in your model number and serial number on the label, located on water filter. The removal and reinstallation of all SLIDE N LOCK™ Door Bins and SLIDE N LOCK™ Can Racks due to or furnished with published installation instructions. 11. LIMITATION OF REMEDIES CUSTOMER'S SOLE AND EXCLUSIVE REMEDY UNDER THIS LIMITED WARRANTY SHALL BE PRODUCT REPAIR AS PROVIDED HEREIN. KITCHENAID SHALL NOT BE LIABLE...
Parts Diagram
Page 2
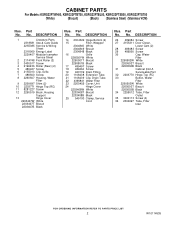
Part No. No. Part No. Part No. DESCRIPTION 1 Literature Parts 2318581 Use & Care Guide 2255385 Service & Wiring Sheet 2318969 Energy Label 2220407 Modular Icemaker Service Sheet 2 2174748 Front Roller (2) 3 3400517 Screw 4 2196236 Roller (Rear) (2) 5 489427 Screw 6 2155013 Clip, Grille 7 488500 Screw 8 2260507 Housing, Water Filter 9 2209697 Shim (2) 10 2203771 Hinge Top (RC) 11 8281227 Screw 12 2260519 Block, Housing Support 13 Hinge Cover 2203407W White 2203407T Biscuit 2203407B Black Illus. No...
Part No. No. Part No. Part No. DESCRIPTION 1 Literature Parts 2318581 Use & Care Guide 2255385 Service & Wiring Sheet 2318969 Energy Label 2220407 Modular Icemaker Service Sheet 2 2174748 Front Roller (2) 3 3400517 Screw 4 2196236 Roller (Rear) (2) 5 489427 Screw 6 2155013 Clip, Grille 7 488500 Screw 8 2260507 Housing, Water Filter 9 2209697 Shim (2) 10 2203771 Hinge Top (RC) 11 8281227 Screw 12 2260519 Block, Housing Support 13 Hinge Cover 2203407W White 2203407T Biscuit 2203407B Black Illus. No...
Parts Diagram
Page 12
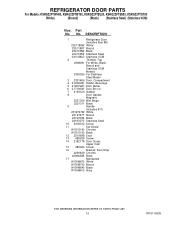
... 5 2165792K Dish, Butter 6 2171063K Door Bin (4) 7 2159124 Gasket 8 Door Gasket, Magnetic 2221300 Mist Beige 2221311 Black 9 Handle (Includes #11) 2319727W White 2319727T Biscuit 2319727B Black 2319727S Stainless Steel 10 3400012 Screw 11 Set Screw W10010140 Chrome W10010150 Black 12 2219698 Stud 13 488208 Screw 14 2182178 Door Closer, Upper Cam 15 489420 Screw 16 Bracket, Door Stop 2206629 Chrome 2206629B Black...
... 5 2165792K Dish, Butter 6 2171063K Door Bin (4) 7 2159124 Gasket 8 Door Gasket, Magnetic 2221300 Mist Beige 2221311 Black 9 Handle (Includes #11) 2319727W White 2319727T Biscuit 2319727B Black 2319727S Stainless Steel 10 3400012 Screw 11 Set Screw W10010140 Chrome W10010150 Black 12 2219698 Stud 13 488208 Screw 14 2182178 Door Closer, Upper Cam 15 489420 Screw 16 Bracket, Door Stop 2206629 Chrome 2206629B Black...

Parts Diagram
Page 14
DESCRIPTION 1 Freezer Door (Includes Item #8 And Dispenser Front Parts) 2318956W White 2318956T Biscuit 2318956B Black 2318957S Stainless Steel 2318956LG Stainless VCM 2 Handle (Includes #4) 2319727W White 2319727T Biscuit 2319727B Black 2319727S Stainless Steel 3 489000 Screw 4 Set Screw W10010140 Chrome W10010150 Black 5 488208 Screw 6 2171071K Trivet, Shelf (3) 7 Thimble, Top 2182181 For White, Black, Biscuit and Stainless VCM Models 2301049 For Stainless Steel Model 8 Door Gasket, Magnetic 2221301 Mist Beige...
DESCRIPTION 1 Freezer Door (Includes Item #8 And Dispenser Front Parts) 2318956W White 2318956T Biscuit 2318956B Black 2318957S Stainless Steel 2318956LG Stainless VCM 2 Handle (Includes #4) 2319727W White 2319727T Biscuit 2319727B Black 2319727S Stainless Steel 3 489000 Screw 4 Set Screw W10010140 Chrome W10010150 Black 5 488208 Screw 6 2171071K Trivet, Shelf (3) 7 Thimble, Top 2182181 For White, Black, Biscuit and Stainless VCM Models 2301049 For Stainless Steel Model 8 Door Gasket, Magnetic 2221301 Mist Beige...
Parts Diagram
Page 18
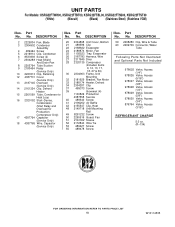
... 4387731 Cover (Service Only) 13 2187145 Overload (Service Only) 14 2161324 Clip, Defrost Heater 15 2261599 Tube, Condenser to Heat Loop 16 2320152 Start−Device, Combination (Start Relay and Overload for Production Compressor Only) 17 4387764 Capacitor (Service Only) 18 4387765 Wire, Capacitor (Service Only) 20 2304898 Unit Cover, Bottom 21 489396 Clip 22 2188822 Evaporator 24 2188874 Motor, Fan 25 1105523 Tray, Evaporator 26...
... 4387731 Cover (Service Only) 13 2187145 Overload (Service Only) 14 2161324 Clip, Defrost Heater 15 2261599 Tube, Condenser to Heat Loop 16 2320152 Start−Device, Combination (Start Relay and Overload for Production Compressor Only) 17 4387764 Capacitor (Service Only) 18 4387765 Wire, Capacitor (Service Only) 20 2304898 Unit Cover, Bottom 21 489396 Clip 22 2188822 Evaporator 24 2188874 Motor, Fan 25 1105523 Tray, Evaporator 26...


