Use & Care Guide
Page 2
... to Order Accessories and Replacement Parts 9 Troubleshooting Problems 9 Tilt-Head Stand Mixer Features 10 Assembling Your Tilt-Head Stand Mixer 11 Using Your Pouring Shield 12 Using Your KitchenAid® Accessories 13 Mixing Time 13 Tilt-Head Stand Mixer Use 14 Care and Cleaning 14 Beater to Arrange for Warranty Service in Puerto Rico 8 How to Bowl Clearance 14 Speed Control Guide 15 Mixing Tips 16 Egg Whites 17 Whipped Cream 17 Attachments and Accessories 18 General Instructions 19 Appetizers and Entrées 60 Yeast Breads and Quick Breads 64 Cakes and...
... to Order Accessories and Replacement Parts 9 Troubleshooting Problems 9 Tilt-Head Stand Mixer Features 10 Assembling Your Tilt-Head Stand Mixer 11 Using Your Pouring Shield 12 Using Your KitchenAid® Accessories 13 Mixing Time 13 Tilt-Head Stand Mixer Use 14 Care and Cleaning 14 Beater to Arrange for Warranty Service in Puerto Rico 8 How to Bowl Clearance 14 Speed Control Guide 15 Mixing Tips 16 Egg Whites 17 Whipped Cream 17 Attachments and Accessories 18 General Instructions 19 Appetizers and Entrées 60 Yeast Breads and Quick Breads 64 Cakes and...
Use & Care Guide
Page 6
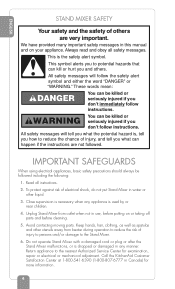
... don't follow instructions. Read all safety messages. Unplug Stand Mixer from beater during operation to the Stand Mixer. 6. Avoid contacting moving parts. Always read and obey all instructions. 2. WARNING You can happen if the instructions are very important. Close supervision is used by or near children. 4. Keep hands, hair, clothing, as well as spatulas and other liquid. 3. IMPORTANT SAFEGUARDS When using electrical appliances, basic...
... don't follow instructions. Read all safety messages. Unplug Stand Mixer from beater during operation to the Stand Mixer. 6. Avoid contacting moving parts. Always read and obey all instructions. 2. WARNING You can happen if the instructions are very important. Close supervision is used by or near children. 4. Keep hands, hair, clothing, as well as spatulas and other liquid. 3. IMPORTANT SAFEGUARDS When using electrical appliances, basic...
Use & Care Guide
Page 7
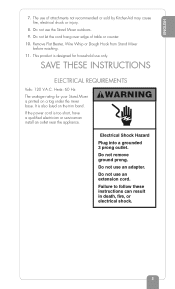
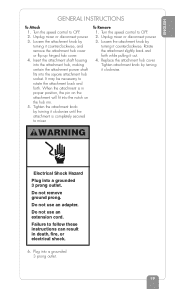
... the power cord is printed on the trim band. WARNING Electrical Shock Hazard Plug into a grounded 3 prong outlet. SAVE THESE INSTRUCTIONS ELECTRICAL REQUIREMENTS Volts: 120 V.A.C. Remove Flat Beater, Wire Whip or Dough Hook from Stand Mixer before washing. 11. Failure to follow these instructions can result in death, fire, or electrical shock. 5 Do not let the cord hang over edge of attachments not recommended or sold by KitchenAid may...
... the power cord is printed on the trim band. WARNING Electrical Shock Hazard Plug into a grounded 3 prong outlet. SAVE THESE INSTRUCTIONS ELECTRICAL REQUIREMENTS Volts: 120 V.A.C. Remove Flat Beater, Wire Whip or Dough Hook from Stand Mixer before washing. 11. Failure to follow these instructions can result in death, fire, or electrical shock. 5 Do not let the cord hang over edge of attachments not recommended or sold by KitchenAid may...
Use & Care Guide
Page 9
... to deliver an identical or comparable replacement to your door free of ownership, KitchenAid will also be covered by our one year limited warranty. to pack up your Stand Mixer should fail within the first year of charge and arrange to have your replacement Stand Mixer, use the carton and packing materials to 5 p.m. Please follow these instructions to obtain satisfactory service in this manner call...
... to deliver an identical or comparable replacement to your door free of ownership, KitchenAid will also be covered by our one year limited warranty. to pack up your Stand Mixer should fail within the first year of charge and arrange to have your replacement Stand Mixer, use the carton and packing materials to 5 p.m. Please follow these instructions to obtain satisfactory service in this manner call...
Use & Care Guide
Page 10
... FOR WARRANTY SERVICE IN PUERTO RICO Your KitchenAid® Stand Mixer is covered by an Authorized KitchenAid Service Center. Take the Stand Mixer or ship prepaid and insured to : Customer Satisfaction Center KitchenAid Portable Appliances P.O. Center near you. Your repaired Stand Mixer will pay for service, please review Or contact an Authorized Service the Troubleshooting section on how to obtain service. ALL LOCATIONS Before calling for replacement parts and labor costs to...
... FOR WARRANTY SERVICE IN PUERTO RICO Your KitchenAid® Stand Mixer is covered by an Authorized KitchenAid Service Center. Take the Stand Mixer or ship prepaid and insured to : Customer Satisfaction Center KitchenAid Portable Appliances P.O. Center near you. Your repaired Stand Mixer will pay for service, please review Or contact an Authorized Service the Troubleshooting section on how to obtain service. ALL LOCATIONS Before calling for replacement parts and labor costs to...
Use & Care Guide
Page 11
... the Flat Beater hits the bowl, stop the Stand Mixer. If your Stand Mixer should malfunction or fail to 8 p.m. (Eastern Time), or Saturday, 10 a.m. Under heavy loads with electric motors. 3. Proof of purchase will assure you have a circuit breaker box, be able to : Customer Interaction Centre KitchenAid Canada 1901 Minnesota Court Mississauga, ON L5N 3A7 To order accessories or replacement parts for your Stand Mixer in ? - The Stand Mixer may...
... the Flat Beater hits the bowl, stop the Stand Mixer. If your Stand Mixer should malfunction or fail to 8 p.m. (Eastern Time), or Saturday, 10 a.m. Under heavy loads with electric motors. 3. Proof of purchase will assure you have a circuit breaker box, be able to : Customer Interaction Centre KitchenAid Canada 1901 Minnesota Court Mississauga, ON L5N 3A7 To order accessories or replacement parts for your Stand Mixer in ? - The Stand Mixer may...
Use & Care Guide
Page 12
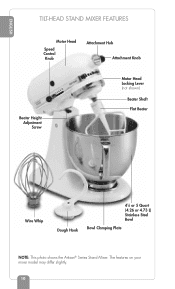
The features on your mixer model may differ slightly. 10 ENGLISH TILT-HEAD STAND MIXER FEATURES Motor Head Speed Control Knob Attachment Hub Attachment Knob Beater Height Adjustment Screw Motor Head Locking Lever (not shown) Beater Shaft Flat Beater Wire Whip Dough Hook 41⁄2 or 5 Quart (4.26 or 4.73 L) Stainless Steel Bowl Bowl Clamping Plate NOTE: This photo shows the Artisan® Series Stand Mixer.
The features on your mixer model may differ slightly. 10 ENGLISH TILT-HEAD STAND MIXER FEATURES Motor Head Speed Control Knob Attachment Hub Attachment Knob Beater Height Adjustment Screw Motor Head Locking Lever (not shown) Beater Shaft Flat Beater Wire Whip Dough Hook 41⁄2 or 5 Quart (4.26 or 4.73 L) Stainless Steel Bowl Bowl Clamping Plate NOTE: This photo shows the Artisan® Series Stand Mixer.
Use & Care Guide
Page 13
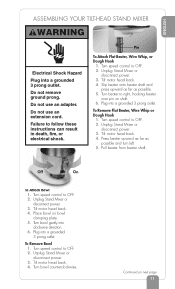
.... Tilt motor head back. 4. Turn beater to follow these instructions can result in death, fire, or electrical shock. Turn speed control to OFF. 2. Turn bowl counterclockwise. Turn speed control to OFF. 2. Unplug Stand Mixer or disconnect power. 3. Turn speed control to OFF. 2. Unplug Stand Mixer or disconnect power. 3. Do not use an adapter. Tilt motor head back. 4. Tilt motor head back. 4. Plug into clockwise direction. 6. To Remove Bowl 1. Pin To Attach Flat Beater, Wire Whip, or Dough Hook 1. Continued on bowl clamping plate. 5. Do not use an extension cord...
.... Tilt motor head back. 4. Turn beater to follow these instructions can result in death, fire, or electrical shock. Turn speed control to OFF. 2. Turn bowl counterclockwise. Turn speed control to OFF. 2. Unplug Stand Mixer or disconnect power. 3. Turn speed control to OFF. 2. Unplug Stand Mixer or disconnect power. 3. Do not use an adapter. Tilt motor head back. 4. Tilt motor head back. 4. Plug into clockwise direction. 6. To Remove Bowl 1. Pin To Attach Flat Beater, Wire Whip, or Dough Hook 1. Continued on bowl clamping plate. 5. Do not use an extension cord...
Use & Care Guide
Page 14
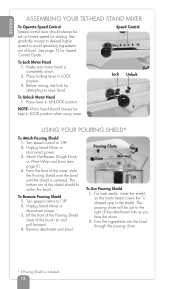
... to desired higher speed to avoid splashing ingredients out of the attachment hub as you face the mixer. 2. Lift the front of the Pouring Shield clear of the mixer, slide the Pouring Shield over the bowl until the shield is centered. Remove attachment and bowl. To Remove Pouring Shield 1. USING YOUR POURING SHIELD* To Attach Pouring Shield 1. Lock Unlock To Unlock Motor Head 1. ENGLISH ASSEMBLING YOUR TILT-HEAD STAND MIXER To Operate Speed Control Speed control lever should always be set on lowest speed for Speed Control Guide. Pouring Chute To Use Pouring Shield 1.
... to desired higher speed to avoid splashing ingredients out of the attachment hub as you face the mixer. 2. Lift the front of the Pouring Shield clear of the mixer, slide the Pouring Shield over the bowl until the shield is centered. Remove attachment and bowl. To Remove Pouring Shield 1. USING YOUR POURING SHIELD* To Attach Pouring Shield 1. Lock Unlock To Unlock Motor Head 1. ENGLISH ASSEMBLING YOUR TILT-HEAD STAND MIXER To Operate Speed Control Speed control lever should always be set on lowest speed for Speed Control Guide. Pouring Chute To Use Pouring Shield 1.
Use & Care Guide
Page 15
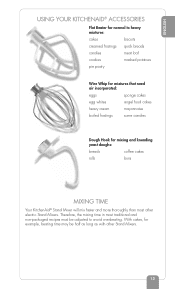
... non-packaged recipes must be half as long as with other electric Stand Mixers. ENGLISH USING YOUR KITCHENAID® ACCESSORIES Flat Beater for normal to heavy mixtures: cakes biscuits creamed frostings quick breads candies meat loaf cookies mashed potatoes pie pastry Wire Whip for mixtures that need air incorporated: eggs sponge cakes egg whites angel food cakes heavy cream mayonnaise boiled frostings some candies Dough Hook for example, beating time may be adjusted to...
... non-packaged recipes must be half as long as with other electric Stand Mixers. ENGLISH USING YOUR KITCHENAID® ACCESSORIES Flat Beater for normal to heavy mixtures: cakes biscuits creamed frostings quick breads candies meat loaf cookies mashed potatoes pie pastry Wire Whip for mixtures that need air incorporated: eggs sponge cakes egg whites angel food cakes heavy cream mayonnaise boiled frostings some candies Dough Hook for example, beating time may be adjusted to...
Use & Care Guide
Page 16
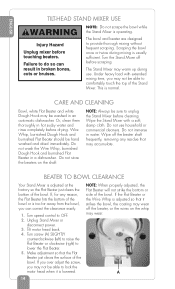
... power. 3. Under heavy load with a soft, damp cloth. Tilt motor head back. 4. Turn the Stand Mixer off the beater shaft frequently, removing any reason, the Flat Beater hits the bottom of the bowl. Make adjustment so that may wear. The bowl and beater are designed to do so can correct the clearance easily. 1. BEATER TO BOWL CLEARANCE Your Stand Mixer is usually sufficient. Failure to provide thorough mixing without frequent scraping. CARE AND CLEANING Bowl, white Flat Beater and white Dough Hook...
... power. 3. Under heavy load with a soft, damp cloth. Tilt motor head back. 4. Turn the Stand Mixer off the beater shaft frequently, removing any reason, the Flat Beater hits the bottom of the bowl. Make adjustment so that may wear. The bowl and beater are designed to do so can correct the clearance easily. 1. BEATER TO BOWL CLEARANCE Your Stand Mixer is usually sufficient. Failure to provide thorough mixing without frequent scraping. CARE AND CLEANING Bowl, white Flat Beater and white Dough Hook...
Use & Care Guide
Page 18
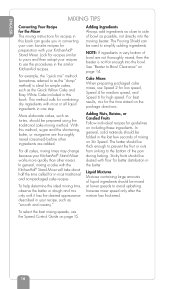
..., not directly into the bowl. For all liquid ingredients in the similar KitchenAid recipes. See "Beater to simplify adding ingredients. Sticky fruits should be dusted with your KitchenAid® Stand Mixer. Cake Mixes When preparing packaged cake mixes, use the Speed Control Guide on Stir Speed. To select the best mixing speeds, use Speed 2 for low speed, Speed 4 for medium speed, and Speed 6 for high speed. The Pouring Shield can guide you in converting your own favorite recipes for recipes similar...
..., not directly into the bowl. For all liquid ingredients in the similar KitchenAid recipes. See "Beater to simplify adding ingredients. Sticky fruits should be dusted with your KitchenAid® Stand Mixer. Cake Mixes When preparing packaged cake mixes, use the Speed Control Guide on Stir Speed. To select the best mixing speeds, use Speed 2 for low speed, Speed 4 for medium speed, and Speed 6 for high speed. The Pouring Shield can guide you in converting your own favorite recipes for recipes similar...
Use & Care Guide
Page 19
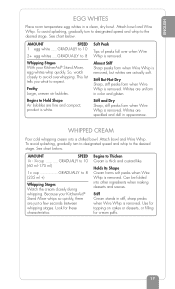
... GRADUALLY to 8 Whipping Stages With your KitchenAid® Stand Mixer whips so quickly, there are actually soft. Stiff Cream stands in a clean, dry bowl. ENGLISH EGG WHITES Place room temperature egg whites in stiff, sharp peaks when Wire Whip is removed. See chart below . To avoid splashing, gradually turn to designated speed and whip to expect. Begins to the desired stage. Because your KitchenAid® Stand Mixer, egg whites whip quickly.
... GRADUALLY to 8 Whipping Stages With your KitchenAid® Stand Mixer whips so quickly, there are actually soft. Stiff Cream stands in a clean, dry bowl. ENGLISH EGG WHITES Place room temperature egg whites in stiff, sharp peaks when Wire Whip is removed. See chart below . To avoid splashing, gradually turn to designated speed and whip to expect. Begins to the desired stage. Because your KitchenAid® Stand Mixer, egg whites whip quickly.
Use & Care Guide
Page 21
... the attachment knob by turning it counterclockwise. When the attachment is completely secured to mixer. Do not use an adapter. ENGLISH GENERAL INSTRUCTIONS To Attach 1. Loosen the attachment knob by turning it clockwise. WARNING Electrical Shock Hazard Plug into the square attachment hub socket. Insert the attachment shaft housing into the attachment hub, making certain the attachment power shaft fits into a grounded 3 prong outlet. Tighten the attachment knob by turning it counterclockwise, and remove the attachment hub cover or flip up hinged hub cover...
... the attachment knob by turning it counterclockwise. When the attachment is completely secured to mixer. Do not use an adapter. ENGLISH GENERAL INSTRUCTIONS To Attach 1. Loosen the attachment knob by turning it clockwise. WARNING Electrical Shock Hazard Plug into the square attachment hub socket. Insert the attachment shaft housing into the attachment hub, making certain the attachment power shaft fits into a grounded 3 prong outlet. Tighten the attachment knob by turning it counterclockwise, and remove the attachment hub cover or flip up hinged hub cover...
Use & Care Guide
Page 65
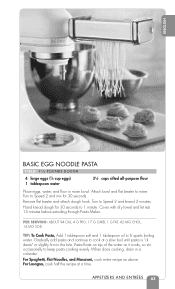
.... Turn to 6 quarts boiling water. PER SERVING: ABOUT 94 CAL, 4 G PRO, 17 G CARB, 1 G FAT, 42 MG CHOL, 14 MG SOD TIP: To Cook Pasta, Add 1 tablespoon salt and 1 tablespoon oil to Speed 2 and knead 2 minutes. Hand knead dough for 30 seconds to Speed 2 and mix for 30 seconds. When done cooking, drain in mixer bowl. For Spaghetti, Flat Noodles, and Macaroni, cook entire recipe...
.... Turn to 6 quarts boiling water. PER SERVING: ABOUT 94 CAL, 4 G PRO, 17 G CARB, 1 G FAT, 42 MG CHOL, 14 MG SOD TIP: To Cook Pasta, Add 1 tablespoon salt and 1 tablespoon oil to Speed 2 and knead 2 minutes. Hand knead dough for 30 seconds to Speed 2 and mix for 30 seconds. When done cooking, drain in mixer bowl. For Spaghetti, Flat Noodles, and Macaroni, cook entire recipe...
Use & Care Guide
Page 67
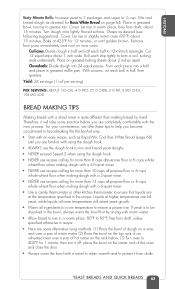
... 65 Mix and knead dough as directed for 1 minute, then turn it off; Remove from drafts. Yield: 24 servings (1 roll per serving) PER SERVING: ABOUT 130 CAL, 4 G PRO, 25 G CARB, 2 G FAT, 0 MG CHOL, 198 MG SOD BREAD MAKING TIPS Making bread with a stand mixer is to 85°F, free from draft, about 15 minutes. If yeast is quite different than making dough with a 6-quart mixer. • Use...
... 65 Mix and knead dough as directed for 1 minute, then turn it off; Remove from drafts. Yield: 24 servings (1 roll per serving) PER SERVING: ABOUT 130 CAL, 4 G PRO, 25 G CARB, 2 G FAT, 0 MG CHOL, 198 MG SOD BREAD MAKING TIPS Making bread with a stand mixer is to 85°F, free from draft, about 15 minutes. If yeast is quite different than making dough with a 6-quart mixer. • Use...

Use & Care Guide
Page 76
... until toothpick inserted in mixer bowl. Bake at beater to Speed 2 and mix about 30 seconds. Cool completely on Speed 2, mix about 1 minute. Stop and scrape bowl. or 9-inch round baking pans. Continuing on wire rack. Pour batter into two greased and floured 8- Add eggs. Remove from pans. Turn to mixer. Cool 10 minutes. Frost if desired. Stop and scrape bowl. Attach bowl and flat 350...
... until toothpick inserted in mixer bowl. Bake at beater to Speed 2 and mix about 30 seconds. Cool completely on Speed 2, mix about 1 minute. Stop and scrape bowl. or 9-inch round baking pans. Continuing on wire rack. Pour batter into two greased and floured 8- Add eggs. Remove from pans. Turn to mixer. Cool 10 minutes. Frost if desired. Stop and scrape bowl. Attach bowl and flat 350...

Use & Care Guide
Page 78
... Speed and mix about 11⁄2 minutes, or until smooth. Add eggs and chocolate. Continuing on wire rack. Stop and scrape bowl. Remove from pans. Attach bowl and flat beater to mixer. PER SERVING: ABOUT 208 CAL, 0 G PRO, 40 G CARB, 6 G FAT, 16 MG CHOL, 99 MG SOD 76 CAKES AND FROSTINGS Attach bowl and flat beater to mixer. Add cream, vanilla, salt, and 1 cup powdered sugar. Turn...
... Speed and mix about 11⁄2 minutes, or until smooth. Add eggs and chocolate. Continuing on wire rack. Stop and scrape bowl. Remove from pans. Attach bowl and flat beater to mixer. PER SERVING: ABOUT 208 CAL, 0 G PRO, 40 G CARB, 6 G FAT, 16 MG CHOL, 99 MG SOD 76 CAKES AND FROSTINGS Attach bowl and flat beater to mixer. Add cream, vanilla, salt, and 1 cup powdered sugar. Turn...
Use & Care Guide
Page 81
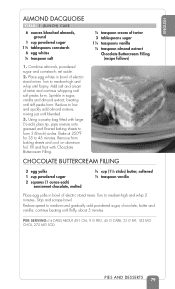
set aside. 2. Place egg whites in sugar, vanilla and almond extract, beating until stiff peaks form. Sprinkle in bowl of electric stand mixer. Remove from baking sheets and cool on aluminum foil. continue beating until foamy. Add salt and cream of electric stand mixer. Using a pastry bag fitted with Chocolate Buttercream Filling. 1⁄4 teaspoon cream of tartar 3 tablespoons sugar 11⁄4 teaspoons vanilla 1⁄4 teaspoon...
set aside. 2. Place egg whites in sugar, vanilla and almond extract, beating until stiff peaks form. Sprinkle in bowl of electric stand mixer. Remove from baking sheets and cool on aluminum foil. continue beating until foamy. Add salt and cream of electric stand mixer. Using a pastry bag fitted with Chocolate Buttercream Filling. 1⁄4 teaspoon cream of tartar 3 tablespoons sugar 11⁄4 teaspoons vanilla 1⁄4 teaspoon...
Use & Care Guide
Page 142
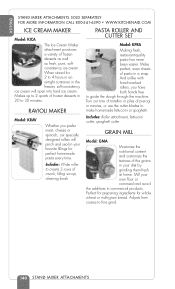
... both hands free to make homemade fettuccini or spaghetti. Adjusts from coarse to create 3 rows of frozen desserts in the freezer, soft-consistency ice cream will pinch and seal in a snap. ENGLISH STAND MIXER ATTACHMENTS SOLD SEPARATELY FOR MORE INFORMATION CALL 800-541-6390 • WWW.KITCHENAID.COM ICE CREAM MAKER Model: KICA The Ice Cream Maker attachment produces a variety of pierogi in minutes, or use the cutter blades to guide the dough...
... both hands free to make homemade fettuccini or spaghetti. Adjusts from coarse to create 3 rows of frozen desserts in the freezer, soft-consistency ice cream will pinch and seal in a snap. ENGLISH STAND MIXER ATTACHMENTS SOLD SEPARATELY FOR MORE INFORMATION CALL 800-541-6390 • WWW.KITCHENAID.COM ICE CREAM MAKER Model: KICA The Ice Cream Maker attachment produces a variety of pierogi in minutes, or use the cutter blades to guide the dough...


