Use & Care Guide
Page 7
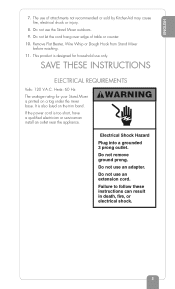
.... The use an adapter. This product is designed for your Stand Mixer is too short, have a qualified electrician or serviceman install an outlet near the appliance. Do not remove ground prong. Failure to follow these ... table or counter. 10. Do not use the Stand Mixer outdoors. 9. Remove Flat Beater, Wire Whip or Dough Hook from Stand Mixer before washing. 11. If the power cord is printed on the trim band. Do not let the cord hang over edge of attachments not recommended or sold by KitchenAid may cause fire, electrical shock or...
.... The use an adapter. This product is designed for your Stand Mixer is too short, have a qualified electrician or serviceman install an outlet near the appliance. Do not remove ground prong. Failure to follow these ... table or counter. 10. Do not use the Stand Mixer outdoors. 9. Remove Flat Beater, Wire Whip or Dough Hook from Stand Mixer before washing. 11. If the power cord is printed on the trim band. Do not let the cord hang over edge of attachments not recommended or sold by KitchenAid may cause fire, electrical shock or...
Use & Care Guide
Page 12
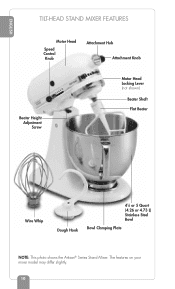
ENGLISH TILT-HEAD STAND MIXER FEATURES Motor Head Speed Control Knob Attachment Hub Attachment Knob Beater Height Adjustment Screw Motor Head Locking Lever (not shown) Beater Shaft Flat Beater Wire Whip Dough Hook 41⁄2 or 5 Quart (4.26 or 4.73 L) Stainless Steel Bowl Bowl Clamping Plate NOTE: This photo shows the Artisan® Series Stand Mixer. The features on your mixer model may differ slightly. 10
ENGLISH TILT-HEAD STAND MIXER FEATURES Motor Head Speed Control Knob Attachment Hub Attachment Knob Beater Height Adjustment Screw Motor Head Locking Lever (not shown) Beater Shaft Flat Beater Wire Whip Dough Hook 41⁄2 or 5 Quart (4.26 or 4.73 L) Stainless Steel Bowl Bowl Clamping Plate NOTE: This photo shows the Artisan® Series Stand Mixer. The features on your mixer model may differ slightly. 10
Use & Care Guide
Page 13
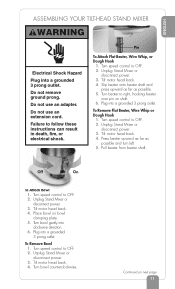
...Stand Mixer or disconnect power. 3. Place bowl on next page 11 Turn speed control to OFF. 2. Pull beater from beater shaft. Tilt motor head back. 4. Do not remove ground prong. Pin To Attach Flat Beater, Wire Whip, or Dough Hook 1. To Remove Flat Beater, Wire Whip or Dough Hook... 1. Turn bowl gently into a grounded 3 prong outlet. Do not use an extension cord. Plug into a grounded 3 prong outlet. ENGLISH ASSEMBLING YOUR TILT-HEAD STAND MIXER WARNING Electrical Shock Hazard Plug into...
...Stand Mixer or disconnect power. 3. Place bowl on next page 11 Turn speed control to OFF. 2. Pull beater from beater shaft. Tilt motor head back. 4. Do not remove ground prong. Pin To Attach Flat Beater, Wire Whip, or Dough Hook 1. To Remove Flat Beater, Wire Whip or Dough Hook... 1. Turn bowl gently into a grounded 3 prong outlet. Do not use an extension cord. Plug into a grounded 3 prong outlet. ENGLISH ASSEMBLING YOUR TILT-HEAD STAND MIXER WARNING Electrical Shock Hazard Plug into...
Use & Care Guide
Page 14
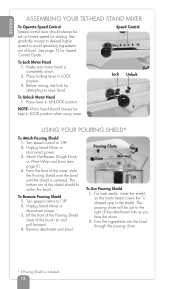
...rim and pull forward. 4. Lift the front of the Pouring Shield clear of the shield should fit within the bowl. Attach Flat Beater, Dough Hook, or Wire Whip and bowl (see page 11). 4. The pouring chute will be set on lowest speed for Speed Control Guide. For ...* If Pouring Shield is included. 12 ENGLISH ASSEMBLING YOUR TILT-HEAD STAND MIXER To Operate Speed Control Speed control lever should always be just to the right of the attachment hub as you face the mixer. 2. Unplug Stand Mixer or disconnect power. 3. To Remove Pouring Shield 1. Remove attachment and bowl. Turn ...
...rim and pull forward. 4. Lift the front of the Pouring Shield clear of the shield should fit within the bowl. Attach Flat Beater, Dough Hook, or Wire Whip and bowl (see page 11). 4. The pouring chute will be set on lowest speed for Speed Control Guide. For ...* If Pouring Shield is included. 12 ENGLISH ASSEMBLING YOUR TILT-HEAD STAND MIXER To Operate Speed Control Speed control lever should always be just to the right of the attachment hub as you face the mixer. 2. Unplug Stand Mixer or disconnect power. 3. To Remove Pouring Shield 1. Remove attachment and bowl. Turn ...
Use & Care Guide
Page 15
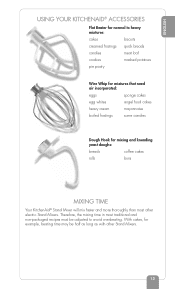
...; ACCESSORIES Flat Beater for normal to avoid overbeating. With cakes, for mixing and kneading yeast doughs: breads coffee cakes rolls buns MIXING TIME Your KitchenAid® Stand Mixer will mix faster and more thoroughly than most traditional and non-packaged recipes must be adjusted to heavy mixtures: cakes... that need air incorporated: eggs sponge cakes egg whites angel food cakes heavy cream mayonnaise boiled frostings some candies Dough Hook for example, beating time may be half as long as with other electric Stand Mixers. Therefore, the mixing time in most other...
...; ACCESSORIES Flat Beater for normal to avoid overbeating. With cakes, for mixing and kneading yeast doughs: breads coffee cakes rolls buns MIXING TIME Your KitchenAid® Stand Mixer will mix faster and more thoroughly than most traditional and non-packaged recipes must be adjusted to heavy mixtures: cakes... that need air incorporated: eggs sponge cakes egg whites angel food cakes heavy cream mayonnaise boiled frostings some candies Dough Hook for example, beating time may be half as long as with other electric Stand Mixers. Therefore, the mixing time in most other...
Use & Care Guide
Page 16
... the bottom or side of the Stand Mixer. Turn the Stand Mixer off before cleaning. CARE AND CLEANING Bowl, white Flat Beater and white Dough Hook may accumulate. Do not wash the Wire Whip, burnished Dough Hook and burnished Flat Beater in an...Stand Mixer or disconnect power. 3. Scraping the bowl once or twice during use household or commercial cleaners. The Stand Mixer may not be hand washed and dried immediately. Under heavy load with a soft, damp cloth. NOTE: Do not scrape the bowl while the Stand Mixer is usually sufficient. Wire Whip, burnished Dough Hook...
... the bottom or side of the Stand Mixer. Turn the Stand Mixer off before cleaning. CARE AND CLEANING Bowl, white Flat Beater and white Dough Hook may accumulate. Do not wash the Wire Whip, burnished Dough Hook and burnished Flat Beater in an...Stand Mixer or disconnect power. 3. Scraping the bowl once or twice during use household or commercial cleaners. The Stand Mixer may not be hand washed and dried immediately. Under heavy load with a soft, damp cloth. NOTE: Do not scrape the bowl while the Stand Mixer is usually sufficient. Wire Whip, burnished Dough Hook...
Use & Care Guide
Page 65
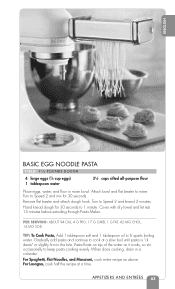
...before extruding through Pasta Maker. When done cooking, drain in mixer bowl. Hand knead dough for 30 seconds to Speed 2 and mix for 30 seconds. APPETIZERS AND ENTRÉES 63 ENGLISH BASIC EGG NOODLE PASTA YIELD: 11⁄4 POUNDS DOUGH 4 large eggs (7⁄8 cup eggs) 1 tablespoon water...purpose flour Place eggs, water, and flour in a colander. Remove flat a time. Turn to mixer. For Lasagna, cook half the recipe at beater and attach dough hook. Attach bowl and flat a slow boil until pasta is "al dente" or slightly firm to 6 quarts...
...before extruding through Pasta Maker. When done cooking, drain in mixer bowl. Hand knead dough for 30 seconds to Speed 2 and mix for 30 seconds. APPETIZERS AND ENTRÉES 63 ENGLISH BASIC EGG NOODLE PASTA YIELD: 11⁄4 POUNDS DOUGH 4 large eggs (7⁄8 cup eggs) 1 tablespoon water...purpose flour Place eggs, water, and flour in a colander. Remove flat a time. Turn to mixer. For Lasagna, cook half the recipe at beater and attach dough hook. Attach bowl and flat a slow boil until pasta is "al dente" or slightly firm to 6 quarts...

Use & Care Guide
Page 66
...1003;21⁄2-inch loaf pans. Place in small bowl. Remove from draft, about 2 minutes longer, or until golden brown. Attach bowl and dough hook to the touch. Knead on wire racks. Cover. Let rise in warm place, free from pans immediately and cool on Speed 2 about 1 hour.... Finish rolling and shaping loaves. Cover. Continuing on wire racks. If desired, brush tops with half of bowl, about 1 minute. Punch dough down and divide in warmed mixer bowl. PER SERVING: ABOUT 95 CAL, 3 G PRO, 18 G CARB, 1 G FAT, 0 MG CHOL, 148 MG SOD VARIATIONS Cinnamon Bread...
...1003;21⁄2-inch loaf pans. Place in small bowl. Remove from draft, about 2 minutes longer, or until golden brown. Attach bowl and dough hook to the touch. Knead on wire racks. Cover. Let rise in warm place, free from pans immediately and cool on Speed 2 about 1 hour.... Finish rolling and shaping loaves. Cover. Continuing on wire racks. If desired, brush tops with half of bowl, about 1 minute. Punch dough down and divide in warmed mixer bowl. PER SERVING: ABOUT 95 CAL, 3 G PRO, 18 G CARB, 1 G FAT, 0 MG CHOL, 148 MG SOD VARIATIONS Cinnamon Bread...
Use & Care Guide
Page 67
... oven to breadmaking the KitchenAid way. • Start...dough hook. • ALWAYS use the dough hook to mix and knead yeast doughs. • NEVER exceed Speed 2 when using the dough hook. • NEVER use recipes calling for more than 8 cups all-purpose flour or 6 cups whole wheat flour when making dough with a 41⁄2-quart mixer...dough on a wire rack over a pan of the oven and close the door. • Always cover the bowl with a 6-quart mixer. • Use a candy thermometer or other kitchen thermometer to ensure that liquids are completely comfortable with a stand mixer...
... oven to breadmaking the KitchenAid way. • Start...dough hook. • ALWAYS use the dough hook to mix and knead yeast doughs. • NEVER exceed Speed 2 when using the dough hook. • NEVER use recipes calling for more than 8 cups all-purpose flour or 6 cups whole wheat flour when making dough with a 41⁄2-quart mixer...dough on a wire rack over a pan of the oven and close the door. • Always cover the bowl with a 6-quart mixer. • Use a candy thermometer or other kitchen thermometer to ensure that liquids are completely comfortable with a stand mixer...

Use & Care Guide
Page 68
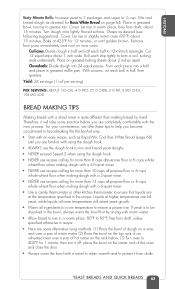
... 9ϫ14 inches. A rolling pin will climb the hook. This usually indicates that the dough is added, the less likely the dough will smooth the dough and remove gas bubbles. The sooner all but the last cup of the hook. Freshly baked loaves and rolls should be used. Also,... in bulk when indentation marks remain after each half into dough. Knead after you press the dough lightly with the dough, kneading will be accomplished. • Some large recipes and soft doughs may not form a ball on the hook. Place the dough, seam side down, in your fingers. •...
... 9ϫ14 inches. A rolling pin will climb the hook. This usually indicates that the dough is added, the less likely the dough will smooth the dough and remove gas bubbles. The sooner all but the last cup of the hook. Freshly baked loaves and rolls should be used. Also,... in bulk when indentation marks remain after each half into dough. Knead after you press the dough lightly with the dough, kneading will be accomplished. • Some large recipes and soft doughs may not form a ball on the hook. Place the dough, seam side down, in your fingers. •...
Use & Care Guide
Page 69
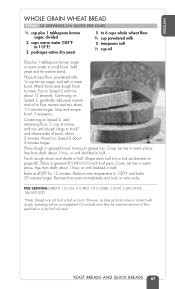
..., about 2 minutes. YEAST BREADS AND QUICK BREADS 67 Punch dough down and divide in mixer bowl. Let rise in bulk. Continuing on wire racks. Remove from draft, about 11⁄2 minutes longer. Attach bowl and dough hook to grease top. Add yeast and let mixture stand. Reduce oven temperature to 6 cups whole wheat flour...
..., about 2 minutes. YEAST BREADS AND QUICK BREADS 67 Punch dough down and divide in mixer bowl. Let rise in bulk. Continuing on wire racks. Remove from draft, about 11⁄2 minutes longer. Attach bowl and dough hook to grease top. Add yeast and let mixture stand. Reduce oven temperature to 6 cups whole wheat flour...
Use & Care Guide
Page 70
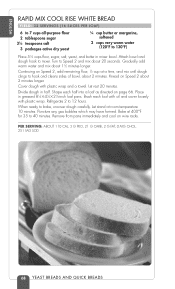
... YEAST BREADS AND QUICK BREADS Continuing on page 66. Let stand at 400°F for 35 to 40 minutes. Bake at room temperature 10 minutes. When ready to mixer. Puncture any gas bubbles which may have formed. Attach bowl and dough hook to bake, uncover dough carefully. Gradually add warm water and mix about 20...
... YEAST BREADS AND QUICK BREADS Continuing on page 66. Let stand at 400°F for 35 to 40 minutes. Bake at room temperature 10 minutes. When ready to mixer. Puncture any gas bubbles which may have formed. Attach bowl and dough hook to bake, uncover dough carefully. Gradually add warm water and mix about 20...
Use & Care Guide
Page 71
Remove dough hook and bowl from the mixer, and then the dough from the hook and bowl. Attach bowl and dough hook. YEAST BREADS AND QUICK BREADS 69 Place yeast and all other dry ingredients before liquid is smooth and elastic, for 2 minutes. 6. Turn to Speed 2 and mix until dough is added, ... are added too quickly in mixer bowl. 2. It is slightly more temperature tolerant because the yeast is mixed with dry ingredients rather than with other dry ingredients except 1 to 2 cups flour in Step 3, they will form a pool around the dough hook and slow down the mixing ...
Remove dough hook and bowl from the mixer, and then the dough from the hook and bowl. Attach bowl and dough hook. YEAST BREADS AND QUICK BREADS 69 Place yeast and all other dry ingredients before liquid is smooth and elastic, for 2 minutes. 6. Turn to Speed 2 and mix until dough is added, ... are added too quickly in mixer bowl. 2. It is slightly more temperature tolerant because the yeast is mixed with dry ingredients rather than with other dry ingredients except 1 to 2 cups flour in Step 3, they will form a pool around the dough hook and slow down the mixing ...
Use & Care Guide
Page 72
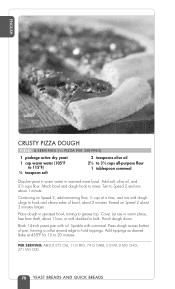
...2 minutes longer. Punch dough down. PER SERVING: ABOUT 373 CAL, 11 G PRO, 74 G CARB, 3 G FAT, 0 MG CHOL, 271 MG SOD 70 YEAST BREADS AND QUICK BREADS Attach bowl and dough hook to grease top. Turn to hold toppings. Let rise in greased bowl, turning to mixer. Bake at a time,... and mix until doubled in warmed mixer bowl. ENGLISH CRUSTY PIZZA DOUGH YIELD: 4 SERVINGS (1⁄4 PIZZA PER SERVING) 1 package ...
...2 minutes longer. Punch dough down. PER SERVING: ABOUT 373 CAL, 11 G PRO, 74 G CARB, 3 G FAT, 0 MG CHOL, 271 MG SOD 70 YEAST BREADS AND QUICK BREADS Attach bowl and dough hook to grease top. Turn to hold toppings. Let rise in greased bowl, turning to mixer. Bake at a time,... and mix until doubled in warmed mixer bowl. ENGLISH CRUSTY PIZZA DOUGH YIELD: 4 SERVINGS (1⁄4 PIZZA PER SERVING) 1 package ...


