Use & Care Guide
Page 2
... -warranty service. 2 Year Hassle Free Commercial Warranty We're so confident the quality of our products meets the exacting standards of KitchenAid that, if your Stand Mixer should fail within the first two years of ownership, KitchenAid will arrange to deliver an identical or comparable replacement to your door free of charge and arrange to have your "failed" Stand Mixer returned to pack-up your "failed" Stand Mixer...
... -warranty service. 2 Year Hassle Free Commercial Warranty We're so confident the quality of our products meets the exacting standards of KitchenAid that, if your Stand Mixer should fail within the first two years of ownership, KitchenAid will arrange to deliver an identical or comparable replacement to your door free of charge and arrange to have your "failed" Stand Mixer returned to pack-up your "failed" Stand Mixer...
Use & Care Guide
Page 3
... Cover Stand Mixer Safety...4 Warranty...5 For the 50 United States, District of Columbia, and Puerto Rico 5 Arranging for Service After the Warranty Expires 6 Arranging for Service Outside the 50 United States and Puerto Rico 6 Ordering Accessories and Replacement Parts 6 Electrical Requirements...7 Troubleshooting Problems...7 Stand Mixer Features...8 Assembling Your Bowl Lift Stand Mixer 9 Using Your KitchenAid® Attachments 10 Mixing Time...10 Mixer Use...10 Speed Control Guide - 10 Speed Stand Mixers 11 Beater To Bowl Clearance...12 Mixing Tips...13 Basic White Bread...14 Care...
... Cover Stand Mixer Safety...4 Warranty...5 For the 50 United States, District of Columbia, and Puerto Rico 5 Arranging for Service After the Warranty Expires 6 Arranging for Service Outside the 50 United States and Puerto Rico 6 Ordering Accessories and Replacement Parts 6 Electrical Requirements...7 Troubleshooting Problems...7 Stand Mixer Features...8 Assembling Your Bowl Lift Stand Mixer 9 Using Your KitchenAid® Attachments 10 Mixing Time...10 Mixer Use...10 Speed Control Guide - 10 Speed Stand Mixers 11 Beater To Bowl Clearance...12 Mixing Tips...13 Basic White Bread...14 Care...
Use & Care Guide
Page 4
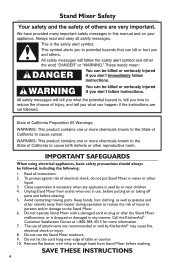
... putting on or taking off parts and before washing. Remove flat beater, wire whip or dough hook from outlet when not in any appliance is used by KitchenAid® may cause fire, electrical shock or injury. 8. To protect against risk of attachments not recommended or sold by or near children. 4. The use of electrical shock, do not put Stand Mixer in water or other utensils away...
... putting on or taking off parts and before washing. Remove flat beater, wire whip or dough hook from outlet when not in any appliance is used by KitchenAid® may cause fire, electrical shock or injury. 8. To protect against risk of attachments not recommended or sold by or near children. 4. The use of electrical shock, do not put Stand Mixer in water or other utensils away...
Use & Care Guide
Page 5
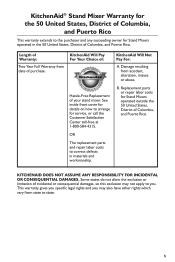
.... This warranty gives you specific legal rights and you may not apply to you. KitchenAid® Stand Mixer Warranty for the 50 United States, District of Columbia, and Puerto Rico This warranty extends to correct defects in the 50 United States, District of your stand mixer. OR The replacement parts and repair labor costs to the purchaser and any succeeding owner for Stand Mixers operated outside the...
.... This warranty gives you specific legal rights and you may not apply to you. KitchenAid® Stand Mixer Warranty for the 50 United States, District of Columbia, and Puerto Rico This warranty extends to correct defects in the 50 United States, District of your stand mixer. OR The replacement parts and repair labor costs to the purchaser and any succeeding owner for Stand Mixers operated outside the...
Use & Care Guide
Page 6
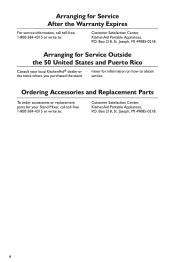
Joseph, MI 49085-0218. 6 Ordering Accessories and Replacement Parts To order accessories or replacement parts for your local KitchenAid® dealer or the store where you purchased the stand mixer for information on how to obtain service. Box 218, St. Box 218, St. Arranging for Service After the Warranty Expires For service information, call toll-free 1-800-584-4315 or write to: Customer Satisfaction Center...
Joseph, MI 49085-0218. 6 Ordering Accessories and Replacement Parts To order accessories or replacement parts for your local KitchenAid® dealer or the store where you purchased the stand mixer for information on how to obtain service. Box 218, St. Box 218, St. Arranging for Service After the Warranty Expires For service information, call toll-free 1-800-584-4315 or write to: Customer Satisfaction Center...
Use & Care Guide
Page 7
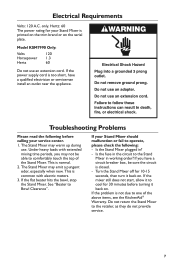
... use an extension cord. This is closed. - If the flat beater hits the bowl, stop the Stand Mixer. Is the fuse in the circuit to cool for 30 minutes before calling your service center. 1. Turn the Stand Mixer off for your Stand Mixer should malfunction or fail to one of the Stand Mixer. Do not return the Stand Mixer to Bowl Clearance". Troubleshooting Problems Please read the following : - Under heavy loads with electric motors. 3. If your Stand Mixer...
... use an extension cord. This is closed. - If the flat beater hits the bowl, stop the Stand Mixer. Is the fuse in the circuit to cool for 30 minutes before calling your service center. 1. Turn the Stand Mixer off for your Stand Mixer should malfunction or fail to one of the Stand Mixer. Do not return the Stand Mixer to Bowl Clearance". Troubleshooting Problems Please read the following : - Under heavy loads with electric motors. 3. If your Stand Mixer...
Use & Care Guide
Page 8
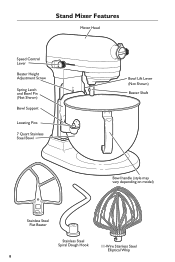
Stand Mixer Features Motor Head Speed Control Lever Beater Height Adjustment Screw Spring Latch and Bowl Pin (Not Shown) Bowl Support Locating Pins 7 Quart Stainless Steel Bowl Bowl Lift Lever (Not Shown) Beater Shaft Bowl handle (style may vary depending on model) Stainless Steel Flat Beater Stainless Steel Spiral Dough Hook 11-Wire Stainless Steel Elliptical Whip 8
Stand Mixer Features Motor Head Speed Control Lever Beater Height Adjustment Screw Spring Latch and Bowl Pin (Not Shown) Bowl Support Locating Pins 7 Quart Stainless Steel Bowl Bowl Lift Lever (Not Shown) Beater Shaft Bowl handle (style may vary depending on model) Stainless Steel Flat Beater Stainless Steel Spiral Dough Hook 11-Wire Stainless Steel Elliptical Whip 8
Use & Care Guide
Page 9
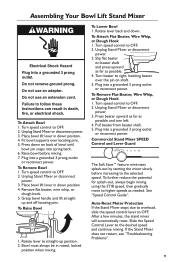
... position 4. Grasp bowl handle and lift straight up position. 2. Plug into a grounded 3 prong outlet or reconnect power. Place bowl lift lever in raised, locked position when mixing. To Attach Flat Beater, Wire Whip, or Dough Hook 1. Turn speed control to OFF. 2. Unplug Stand Mixer or disconnect power. 3. After a few minutes, the stand mixer will automatically reset. Slide the Speed Control Lever to OFF. Fit bowl supports over the pin on shaft. 5. Press beater upward as far as needed. Auto-Reset Motor Protection If the Stand Mixer stops due to...
... position 4. Grasp bowl handle and lift straight up position. 2. Plug into a grounded 3 prong outlet or reconnect power. Place bowl lift lever in raised, locked position when mixing. To Attach Flat Beater, Wire Whip, or Dough Hook 1. Turn speed control to OFF. 2. Unplug Stand Mixer or disconnect power. 3. After a few minutes, the stand mixer will automatically reset. Slide the Speed Control Lever to OFF. Fit bowl supports over the pin on shaft. 5. Press beater upward as far as needed. Auto-Reset Motor Protection If the Stand Mixer stops due to...
Use & Care Guide
Page 10
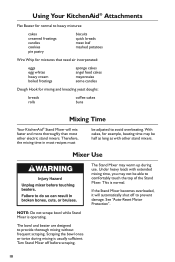
... of the Stand Mixer. Turn Stand Mixer off to prevent damage. This is operating. Scraping the bowl once or twice during use. See "Auto-Reset Motor Protection". Using Your KitchenAid® Attachments Flat Beater for normal to heavy mixtures: cakes creamed frostings candies cookies pie pastry biscuits quick breads meat loaf mashed potatoes Wire Whip for mixtures that need air incorporated: eggs egg whites heavy cream boiled frostings sponge cakes angel food cakes mayonnaise some candies Dough Hook for...
... of the Stand Mixer. Turn Stand Mixer off to prevent damage. This is operating. Scraping the bowl once or twice during use. See "Auto-Reset Motor Protection". Using Your KitchenAid® Attachments Flat Beater for normal to heavy mixtures: cakes creamed frostings candies cookies pie pastry biscuits quick breads meat loaf mashed potatoes Wire Whip for mixtures that need air incorporated: eggs egg whites heavy cream boiled frostings sponge cakes angel food cakes mayonnaise some candies Dough Hook for...
Use & Care Guide
Page 11
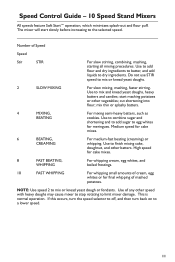
... flour; Use of cream, egg whites or for cake mixes. 6 BEATING, CREAMING For medium-fast beating (creaming) or whipping. Use to combine sugar and shortening and to add sugar to limit mixer damage. This is normal operation. Number of mashed potatoes. start slowly before increasing to dry ingredients. NOTE: Use speed 2 to finish mixing cake, doughnut, and other vegetables; Use to mix or knead yeast dough or fondants. Speed Control Guide - 10 Speed Stand Mixers All speeds feature...
... flour; Use of cream, egg whites or for cake mixes. 6 BEATING, CREAMING For medium-fast beating (creaming) or whipping. Use to combine sugar and shortening and to add sugar to limit mixer damage. This is normal operation. Number of mashed potatoes. start slowly before increasing to dry ingredients. NOTE: Use speed 2 to finish mixing cake, doughnut, and other vegetables; Use to mix or knead yeast dough or fondants. Speed Control Guide - 10 Speed Stand Mixers All speeds feature...
Use & Care Guide
Page 12
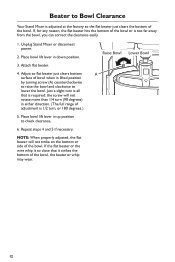
... up position to lower the bowl. Attach flat beater. 4. Unplug Stand Mixer or disconnect power. 2. Raise Bowl Lower Bowl A 12 Place bowl lift lever in lifted position by turning screw (A) counterclockwise to raise the bowl and clockwise to check clearance. 6. Just a slight turn is all that it strikes the bottom of the bowl. Beater to Bowl Clearance Your Stand Mixer is 1/2 turn, or 180 degrees.) 5. If the flat beater or the wire whip is too far away from the...
... up position to lower the bowl. Attach flat beater. 4. Unplug Stand Mixer or disconnect power. 2. Raise Bowl Lower Bowl A 12 Place bowl lift lever in lifted position by turning screw (A) counterclockwise to raise the bowl and clockwise to check clearance. 6. Just a slight turn is all that it strikes the bottom of the bowl. Beater to Bowl Clearance Your Stand Mixer is 1/2 turn, or 180 degrees.) 5. If the flat beater or the wire whip is too far away from the...
Use & Care Guide
Page 13
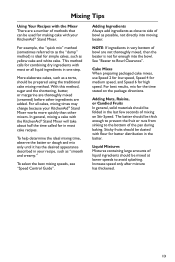
... the best mixing speeds, see "Speed Control Guide". The batter should be prepared using the traditional cake mixing method. More elaborate cakes, such as a torte, should be mixed at lower speeds to side of mixing on the package directions. To help determine the ideal mixing time, observe the batter or dough and mix only until it has the desired appearance described in your KitchenAid® Stand Mixer works more quickly than...
... the best mixing speeds, see "Speed Control Guide". The batter should be prepared using the traditional cake mixing method. More elaborate cakes, such as a torte, should be mixed at lower speeds to side of mixing on the package directions. To help determine the ideal mixing time, observe the batter or dough and mix only until it has the desired appearance described in your KitchenAid® Stand Mixer works more quickly than...
Use & Care Guide
Page 14
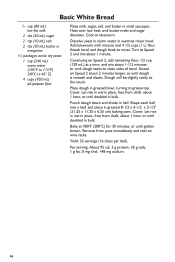
...Knead on wire racks. Place dough in greased 8-1/2 x 4-1/2 x 2-1/2" (21.25 x 11.25 x 6.25 cm) baking pans. Shape each half into a loaf, and place in greased bowl, turning to grease top. Remove from pans immediately and cool on Speed 2 about...Cover. Cool to the touch. Dough will be slightly sticky to lukewarm. Punch dough down and divide in warmed mixer bowl. Heat over low heat until doubled in bulk. Attach bowl and dough hook to Speed 2 and mix about 1-1/2 minutes, or until doubled in small saucepan. Dissolve yeast in warm water in half. Let rise in warm place, free...
...Knead on wire racks. Place dough in greased 8-1/2 x 4-1/2 x 2-1/2" (21.25 x 11.25 x 6.25 cm) baking pans. Shape each half into a loaf, and place in greased bowl, turning to grease top. Remove from pans immediately and cool on Speed 2 about...Cover. Cool to the touch. Dough will be slightly sticky to lukewarm. Punch dough down and divide in warmed mixer bowl. Heat over low heat until doubled in bulk. Attach bowl and dough hook to Speed 2 and mix about 1-1/2 minutes, or until doubled in small saucepan. Dissolve yeast in warm water in half. Let rise in warm place, free...

Use & Care Guide
Page 15
... the screw holding the bowl clip to slide down. Do not store beaters on the bottom of the way. It can also be washed in hot sudsy water and rinse completely before cleaning or disconnect power. • Stainless steel bowl, flat beater, wire whip, and spiral dough hook may be hand-washed in water. • Wipe the beater shaft frequently, removing any residue that they were assembled (the...
... the screw holding the bowl clip to slide down. Do not store beaters on the bottom of the way. It can also be washed in hot sudsy water and rinse completely before cleaning or disconnect power. • Stainless steel bowl, flat beater, wire whip, and spiral dough hook may be hand-washed in water. • Wipe the beater shaft frequently, removing any residue that they were assembled (the...
Use & Care Guide
Page 16
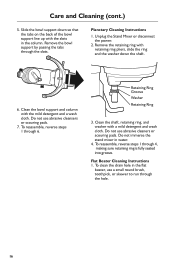
...Stand Mixer or disconnect the power. 2. Remove the retaining ring with retaining ring pliers, slide the ring and the washer down so that the tabs on the back of the bowl support line up with the slots in the column. To reassemble, reverse steps 1 through the slots. Do not immerse the stand mixer in the flat beater, use... a small round brush, toothpick, or skewer to run through 4, making sure retaining ring is fully seated into groove. Flat Beater Cleaning Instructions 1. Remove the bowl support by passing the tabs through...
...Stand Mixer or disconnect the power. 2. Remove the retaining ring with retaining ring pliers, slide the ring and the washer down so that the tabs on the back of the bowl support line up with the slots in the column. To reassemble, reverse steps 1 through the slots. Do not immerse the stand mixer in the flat beater, use... a small round brush, toothpick, or skewer to run through 4, making sure retaining ring is fully seated into groove. Flat Beater Cleaning Instructions 1. Remove the bowl support by passing the tabs through...


