Use & Care Guide
Page 2
... Outside these Locations 8 How to Order Accessories and Replacement Parts 9 Troubleshooting Problems 9 Tilt-Head Stand Mixer Features 10 Assembling Your Tilt-Head Stand Mixer 11 Using Your Pouring Shield 12 Using Your KitchenAid® Accessories 13 Mixing Time 13 Tilt-Head Stand Mixer Use 14 Care and Cleaning 14 Beater to Arrange for Service after the Warranty Expires - All Locations 8 How to Bowl Clearance 14 Speed Control Guide 15 Mixing Tips 16 Egg Whites 17 Whipped Cream 17 Attachments and Accessories 18 General Instructions 19 Appetizers and Entrées 60 Yeast...
... Outside these Locations 8 How to Order Accessories and Replacement Parts 9 Troubleshooting Problems 9 Tilt-Head Stand Mixer Features 10 Assembling Your Tilt-Head Stand Mixer 11 Using Your Pouring Shield 12 Using Your KitchenAid® Accessories 13 Mixing Time 13 Tilt-Head Stand Mixer Use 14 Care and Cleaning 14 Beater to Arrange for Service after the Warranty Expires - All Locations 8 How to Bowl Clearance 14 Speed Control Guide 15 Mixing Tips 16 Egg Whites 17 Whipped Cream 17 Attachments and Accessories 18 General Instructions 19 Appetizers and Entrées 60 Yeast...
Use & Care Guide
Page 6
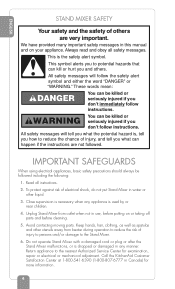
...) for examination, repair or electrical or mechanical adjustment. Do not operate Stand Mixer with a damaged cord or plug or after the Stand Mixer malfunctions, or is used by or near children. 4. Return appliance to reduce the chance of injury, and tell you what can be killed or seriously injured if you don't follow instructions. All safety messages will follow instructions. Keep hands, hair...
...) for examination, repair or electrical or mechanical adjustment. Do not operate Stand Mixer with a damaged cord or plug or after the Stand Mixer malfunctions, or is used by or near children. 4. Return appliance to reduce the chance of injury, and tell you what can be killed or seriously injured if you don't follow instructions. All safety messages will follow instructions. Keep hands, hair...
Use & Care Guide
Page 7
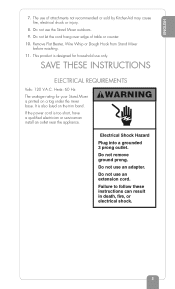
... or counter. 10. Remove Flat Beater, Wire Whip or Dough Hook from Stand Mixer before washing. 11. SAVE THESE INSTRUCTIONS ELECTRICAL REQUIREMENTS Volts: 120 V.A.C. Do not use an extension cord. This product is too short, have a qualified electrician or serviceman install an outlet near the appliance. If the power cord is designed for your Stand Mixer is also listed on a tag under the mixer base. Failure to follow...
... or counter. 10. Remove Flat Beater, Wire Whip or Dough Hook from Stand Mixer before washing. 11. SAVE THESE INSTRUCTIONS ELECTRICAL REQUIREMENTS Volts: 120 V.A.C. Do not use an extension cord. This product is too short, have a qualified electrician or serviceman install an outlet near the appliance. If the power cord is designed for your Stand Mixer is also listed on a tag under the mixer base. Failure to follow...
Use & Care Guide
Page 11
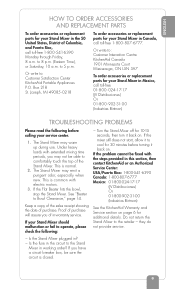
... heavy loads with extended mixing time periods, you may not be sure the circuit is closed. 9 Do not return the Stand Mixer to Bowl Clearance," page 14. Or write to: Customer Interaction Centre KitchenAid Canada 1901 Minnesota Court Mississauga, ON L5N 3A7 To order accessories or replacement parts for 10-15 seconds, then turn it back on . If the Flat Beater hits the bowl, stop the Stand Mixer...
... heavy loads with extended mixing time periods, you may not be sure the circuit is closed. 9 Do not return the Stand Mixer to Bowl Clearance," page 14. Or write to: Customer Interaction Centre KitchenAid Canada 1901 Minnesota Court Mississauga, ON L5N 3A7 To order accessories or replacement parts for 10-15 seconds, then turn it back on . If the Flat Beater hits the bowl, stop the Stand Mixer...
Use & Care Guide
Page 12
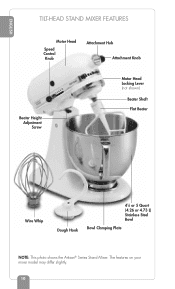
The features on your mixer model may differ slightly. 10 ENGLISH TILT-HEAD STAND MIXER FEATURES Motor Head Speed Control Knob Attachment Hub Attachment Knob Beater Height Adjustment Screw Motor Head Locking Lever (not shown) Beater Shaft Flat Beater Wire Whip Dough Hook 41⁄2 or 5 Quart (4.26 or 4.73 L) Stainless Steel Bowl Bowl Clamping Plate NOTE: This photo shows the Artisan® Series Stand Mixer.
The features on your mixer model may differ slightly. 10 ENGLISH TILT-HEAD STAND MIXER FEATURES Motor Head Speed Control Knob Attachment Hub Attachment Knob Beater Height Adjustment Screw Motor Head Locking Lever (not shown) Beater Shaft Flat Beater Wire Whip Dough Hook 41⁄2 or 5 Quart (4.26 or 4.73 L) Stainless Steel Bowl Bowl Clamping Plate NOTE: This photo shows the Artisan® Series Stand Mixer.
Use & Care Guide
Page 13
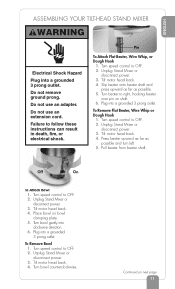
...death, fire, or electrical shock. Place bowl on next page 11 Failure to OFF. 2. Unplug Stand Mixer or disconnect power. 3. Unplug Stand Mixer or disconnect power. 3. To Remove Bowl 1. Do not remove ground prong. Turn bowl gently into a grounded 3 prong outlet. Pin To Attach Flat Beater, Wire Whip, or Dough Hook 1. Tilt motor head back. 4. Turn speed control to right, hooking beater over pin on shaft. 6. Turn bowl counterclockwise. Turn beater to OFF. 2. Tilt motor head back. 4. ENGLISH ASSEMBLING YOUR TILT-HEAD STAND MIXER WARNING Electrical Shock Hazard Plug into...
...death, fire, or electrical shock. Place bowl on next page 11 Failure to OFF. 2. Unplug Stand Mixer or disconnect power. 3. Unplug Stand Mixer or disconnect power. 3. To Remove Bowl 1. Do not remove ground prong. Turn bowl gently into a grounded 3 prong outlet. Pin To Attach Flat Beater, Wire Whip, or Dough Hook 1. Tilt motor head back. 4. Turn speed control to right, hooking beater over pin on shaft. 6. Turn bowl counterclockwise. Turn beater to OFF. 2. Tilt motor head back. 4. ENGLISH ASSEMBLING YOUR TILT-HEAD STAND MIXER WARNING Electrical Shock Hazard Plug into...
Use & Care Guide
Page 14
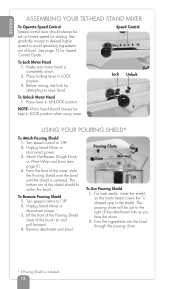
... ASSEMBLING YOUR TILT-HEAD STAND MIXER To Operate Speed Control Speed control lever should always be set on lowest speed for Speed Control Guide. Make sure motor head is included. 12 Lock Unlock To Unlock Motor Head 1. NOTE: Motor head should fit within the bowl. Unplug Stand Mixer or disconnect power. 3. From the front of bowl. To Remove Pouring Shield 1. Speed Control To Lock Motor Head 1. Remove attachment and bowl. Pour the ingredients into the bowl through the pouring chute. * If Pouring Shield is completely down. 2. Unplug Stand Mixer or disconnect power...
... ASSEMBLING YOUR TILT-HEAD STAND MIXER To Operate Speed Control Speed control lever should always be set on lowest speed for Speed Control Guide. Make sure motor head is included. 12 Lock Unlock To Unlock Motor Head 1. NOTE: Motor head should fit within the bowl. Unplug Stand Mixer or disconnect power. 3. From the front of bowl. To Remove Pouring Shield 1. Speed Control To Lock Motor Head 1. Remove attachment and bowl. Pour the ingredients into the bowl through the pouring chute. * If Pouring Shield is completely down. 2. Unplug Stand Mixer or disconnect power...
Use & Care Guide
Page 15
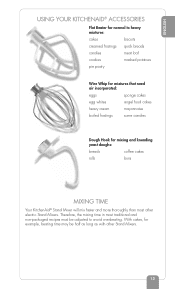
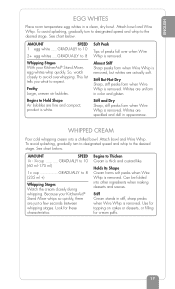
... Wire Whip for mixtures that need air incorporated: eggs sponge cakes egg whites angel food cakes heavy cream mayonnaise boiled frostings some candies Dough Hook for mixing and kneading yeast doughs: breads coffee cakes rolls buns MIXING TIME Your KitchenAid® Stand Mixer will mix faster and more thoroughly than most traditional and non-packaged recipes must be half as long as with other electric Stand Mixers. Therefore, the mixing time in most other Stand Mixers...
... Wire Whip for mixtures that need air incorporated: eggs sponge cakes egg whites angel food cakes heavy cream mayonnaise boiled frostings some candies Dough Hook for mixing and kneading yeast doughs: breads coffee cakes rolls buns MIXING TIME Your KitchenAid® Stand Mixer will mix faster and more thoroughly than most traditional and non-packaged recipes must be half as long as with other electric Stand Mixers. Therefore, the mixing time in most other Stand Mixers...
Use & Care Guide
Page 16
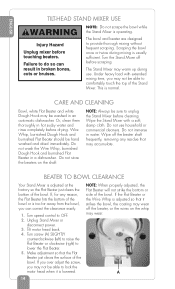
... be washed in water. Wipe off the beater shaft frequently, removing any reason, the Flat Beater hits the bottom of the Stand Mixer. A CARE AND CLEANING Bowl, white Flat Beater and white Dough Hook may warm up during mixing is too far away from the bowl, you may accumulate. Do not use . Turn speed control to lower the Flat Beater. 5. Tilt motor head back. 4. Turn screw (A) SLIGHTLY counterclockwise (left) to raise the Flat Beater or clockwise (right) to OFF. 2. If you...
... be washed in water. Wipe off the beater shaft frequently, removing any reason, the Flat Beater hits the bottom of the Stand Mixer. A CARE AND CLEANING Bowl, white Flat Beater and white Dough Hook may warm up during mixing is too far away from the bowl, you may accumulate. Do not use . Turn speed control to lower the Flat Beater. 5. Tilt motor head back. 4. Turn screw (A) SLIGHTLY counterclockwise (left) to raise the Flat Beater or clockwise (right) to OFF. 2. If you...
Use & Care Guide
Page 17
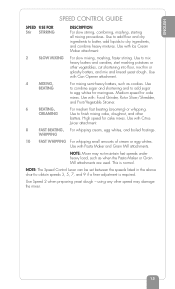
... whipping cream, egg whites, and boiled frostings. ENGLISH SPEED CONTROL GUIDE SPEED USE FOR Stir STIRRING DESCRIPTION For slow stirring, combining, mashing, starting all mixing procedures. Use with Pasta Maker and Grain Mill attachments. WHIPPING 10 FAST WHIPPING For whipping small amounts of cream or egg whites. Use with Ice Cream Maker attachment. 2 SLOW MIXING For slow mixing, mashing, faster stirring. NOTE: Mixer may damage the mixer. 15 High speed for cake mixes. NOTE: The Speed Control Lever can be set between the speeds listed in...
... whipping cream, egg whites, and boiled frostings. ENGLISH SPEED CONTROL GUIDE SPEED USE FOR Stir STIRRING DESCRIPTION For slow stirring, combining, mashing, starting all mixing procedures. Use with Pasta Maker and Grain Mill attachments. WHIPPING 10 FAST WHIPPING For whipping small amounts of cream or egg whites. Use with Ice Cream Maker attachment. 2 SLOW MIXING For slow mixing, mashing, faster stirring. NOTE: Mixer may damage the mixer. 15 High speed for cake mixes. NOTE: The Speed Control Lever can be set between the speeds listed in...
Use & Care Guide
Page 18
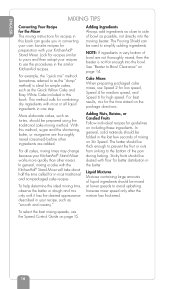
... KitchenAid recipes. The Pouring Shield can guide you in converting your own favorite recipes for preparation with the KitchenAid® Stand Mixer will take about half the time called for high speed. Adding Nuts, Raisins, or Candied Fruits Follow individual recipes for guidelines on page 15. 16 Liquid Mixtures Mixtures containing large amounts of mixing on page 14. Cake Mixes When preparing packaged cake mixes, use the Speed Control Guide...
... KitchenAid recipes. The Pouring Shield can guide you in converting your own favorite recipes for preparation with the KitchenAid® Stand Mixer will take about half the time called for high speed. Adding Nuts, Raisins, or Candied Fruits Follow individual recipes for guidelines on page 15. 16 Liquid Mixtures Mixtures containing large amounts of mixing on page 14. Cake Mixes When preparing packaged cake mixes, use the Speed Control Guide...
Use & Care Guide
Page 19
... turn to designated speed and whip to expect. So, watch closely to 8 (235 ml +) Whipping Stages Watch the cream closely during whipping. Stiff Cream stands in a clean, dry bowl. Soft Peak Tips of peaks fall over when Wire Whip is removed. This list tells you what to the desired stage. Because your KitchenAid® Stand Mixer, egg whites whip quickly. Holds Its Shape Cream forms soft peaks when Wire Whip is removed...
... turn to designated speed and whip to expect. So, watch closely to 8 (235 ml +) Whipping Stages Watch the cream closely during whipping. Stiff Cream stands in a clean, dry bowl. Soft Peak Tips of peaks fall over when Wire Whip is removed. This list tells you what to the desired stage. Because your KitchenAid® Stand Mixer, egg whites whip quickly. Holds Its Shape Cream forms soft peaks when Wire Whip is removed...
Use & Care Guide
Page 21
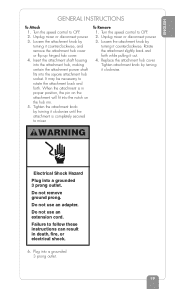
To Remove 1. Replace the attachment hub cover. WARNING Electrical Shock Hazard Plug into the square attachment hub socket. ENGLISH GENERAL INSTRUCTIONS To Attach 1. Insert the attachment shaft housing into the attachment hub, making certain the attachment power shaft fits into a grounded 3 prong outlet. Tighten the attachment knob by turning it out. 4. Turn the speed control to follow these instructions can result in proper position, the pin on the attachment will fit into a grounded 3 prong outlet. 19 Loosen the attachment knob by turning it clockwise...
To Remove 1. Replace the attachment hub cover. WARNING Electrical Shock Hazard Plug into the square attachment hub socket. ENGLISH GENERAL INSTRUCTIONS To Attach 1. Insert the attachment shaft housing into the attachment hub, making certain the attachment power shaft fits into a grounded 3 prong outlet. Tighten the attachment knob by turning it out. 4. Turn the speed control to follow these instructions can result in proper position, the pin on the attachment will fit into a grounded 3 prong outlet. 19 Loosen the attachment knob by turning it clockwise...
Use & Care Guide
Page 65
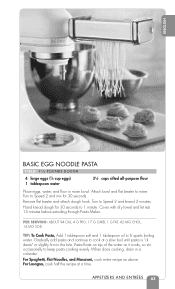
.... Hand knead dough for 30 seconds. PER SERVING: ABOUT 94 CAL, 4 G PRO, 17 G CARB, 1 G FAT, 42 MG CHOL, 14 MG SOD TIP: To Cook Pasta, Add 1 tablespoon salt and 1 tablespoon oil to Speed 2 and knead 2 minutes. Gradually add pasta and continue to mixer. Turn to 6 quarts boiling water. For Lasagna, cook half the recipe at beater to cook at beater and attach dough hook. Turn to Speed 2 and mix...
.... Hand knead dough for 30 seconds. PER SERVING: ABOUT 94 CAL, 4 G PRO, 17 G CARB, 1 G FAT, 42 MG CHOL, 14 MG SOD TIP: To Cook Pasta, Add 1 tablespoon salt and 1 tablespoon oil to Speed 2 and knead 2 minutes. Gradually add pasta and continue to mixer. Turn to 6 quarts boiling water. For Lasagna, cook half the recipe at beater to cook at beater and attach dough hook. Turn to Speed 2 and mix...
Use & Care Guide
Page 67
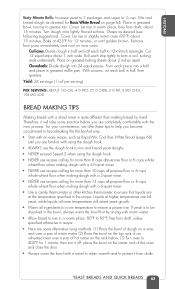
... these tips to help you are familiar with using the dough hook. • ALWAYS use the dough hook to mix and knead yeast doughs. • NEVER exceed Speed 2 when using the dough hook. • NEVER use recipes calling for more than 8 cups all-purpose flour or 6 cups whole wheat flour when making dough with a 41⁄2-quart mixer. • NEVER use recipes calling for 1 minute, then turn it from draft...
... these tips to help you are familiar with using the dough hook. • ALWAYS use the dough hook to mix and knead yeast doughs. • NEVER exceed Speed 2 when using the dough hook. • NEVER use recipes calling for more than 8 cups all-purpose flour or 6 cups whole wheat flour when making dough with a 41⁄2-quart mixer. • NEVER use recipes calling for 1 minute, then turn it from draft...

Use & Care Guide
Page 76
...10 minutes. Add eggs. Stop and scrape bowl. or 9-inch round baking pans. Remove from pans. Cool completely on Speed 2, mix about 30 seconds. ENGLISH QUICK YELLOW CAKE YIELD: 12 TO 16 SERVINGS 21⁄4 cups all-purpose flour 11⁄3 cups sugar 3 teaspoons baking powder 1⁄...inserted in mixer bowl. Bake at beater to Speed 2 and mix about 1 minute. Add shortening, milk, and vanilla. Turn to mixer. PER SERVING: ABOUT 272 CAL, 4 G PRO, 42 G CARB, 10 G FAT, 37 MG CHOL, 175 MG SOD 74 CAKES AND FROSTINGS Continuing on wire rack. Frost if desired. Pour batter into...
...10 minutes. Add eggs. Stop and scrape bowl. or 9-inch round baking pans. Remove from pans. Cool completely on Speed 2, mix about 30 seconds. ENGLISH QUICK YELLOW CAKE YIELD: 12 TO 16 SERVINGS 21⁄4 cups all-purpose flour 11⁄3 cups sugar 3 teaspoons baking powder 1⁄...inserted in mixer bowl. Bake at beater to Speed 2 and mix about 1 minute. Add shortening, milk, and vanilla. Turn to mixer. PER SERVING: ABOUT 272 CAL, 4 G PRO, 42 G CARB, 10 G FAT, 37 MG CHOL, 175 MG SOD 74 CAKES AND FROSTINGS Continuing on wire rack. Frost if desired. Pour batter into...

Use & Care Guide
Page 78
... CAL, 0 G PRO, 40 G CARB, 6 G FAT, 16 MG CHOL, 99 MG SOD 76 CAKES AND FROSTINGS Stop and scrape bowl. or 9-inch round baking pans. Add cream, vanilla, salt, and 1 cup powdered sugar. Stop and scrape bowl. Turn to mixer. Cool 10 minutes. Remove from pans. Attach bowl and flat beater to Speed 2 and mix about 30 seconds. Turn to Stir Speed. Turn to Stir Speed and mix about 1 minute. Attach bowl and...
... CAL, 0 G PRO, 40 G CARB, 6 G FAT, 16 MG CHOL, 99 MG SOD 76 CAKES AND FROSTINGS Stop and scrape bowl. or 9-inch round baking pans. Add cream, vanilla, salt, and 1 cup powdered sugar. Stop and scrape bowl. Turn to mixer. Cool 10 minutes. Remove from pans. Attach bowl and flat beater to Speed 2 and mix about 30 seconds. Turn to Stir Speed. Turn to Stir Speed and mix about 1 minute. Attach bowl and...

Use & Care Guide
Page 82
... PIES AND DESSERTS Attach bowl and flat a time, mixing until ingredients are lightly browned. Turn to Stir Speed and mix until shortening particles are size of small peas, 30 to 10 minutes, or until edges are moistened and dough begins to mixer. or 9-inch pie plate and unfold, pressing firmly against bottom and sides. Using second half of...
... PIES AND DESSERTS Attach bowl and flat a time, mixing until ingredients are lightly browned. Turn to Stir Speed and mix until shortening particles are size of small peas, 30 to 10 minutes, or until edges are moistened and dough begins to mixer. or 9-inch pie plate and unfold, pressing firmly against bottom and sides. Using second half of...
Parts List
Page 5
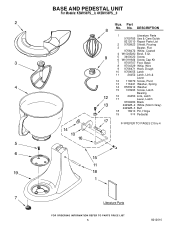
.... BASE AND PEDESTAL UNIT For Models: KSM150PS__0, 4KSM150PS__0 Illus. DESCRIPTION 1 Literature Parts 9709785 Use & Care Guide 8212010 Repair Parts List 2 9709923 Shield, Pouring 3 Beater, Flat 9708472 White, Coated 4 W10245282 Bowl, 5 Qt. 5 3400020 Screw 6 W10191926 Screw Cap Kit 7 9709707 Foot, Base 8 9704329 Whip, Wire 9 9708471 Hook, Dough 10 9709055 Latch 11 24452 Latch, Link & Lever 12 110679 Screw, Pivot 13 116241 Washer, Spring 14 8533912 Washer 15 103993 Screw, Latch Bearing 16 24450 Link, Latch...
.... BASE AND PEDESTAL UNIT For Models: KSM150PS__0, 4KSM150PS__0 Illus. DESCRIPTION 1 Literature Parts 9709785 Use & Care Guide 8212010 Repair Parts List 2 9709923 Shield, Pouring 3 Beater, Flat 9708472 White, Coated 4 W10245282 Bowl, 5 Qt. 5 3400020 Screw 6 W10191926 Screw Cap Kit 7 9709707 Foot, Base 8 9704329 Whip, Wire 9 9708471 Hook, Dough 10 9709055 Latch 11 24452 Latch, Link & Lever 12 110679 Screw, Pivot 13 116241 Washer, Spring 14 8533912 Washer 15 103993 Screw, Latch Bearing 16 24450 Link, Latch...

Parts List
Page 10
... (RVSA) 9709923 Pouring Shield 4164774 Fruit/Vegetable Strainer and Food Grinder (FVSFGA) 4396709 Cover, Quilted (KMCC1WH) 241675 Food Tray (FT) 4164748 Juicer (JE) 4164747 Can Opener (CO) 4164803 Sausage Stuffer Kit (SSA) 8212519 Ice Cream Maker (KICA0WH0) 9709314 Bowl Cover, (KBC90N1) 242550−2 Bowl, 4.5 QT. W10154769 Bowl, Glass 5 Qt. (K5GB) W10223140 Cover, Glass Bowl KPEXTA Pasta Extruder w/6 Discs 8212010 10 Part No. No. No. ACCESSORY PARTS For Models: KSM150PS__0, 4KSM150PS__0 Illus. Part No. Part No.
... (RVSA) 9709923 Pouring Shield 4164774 Fruit/Vegetable Strainer and Food Grinder (FVSFGA) 4396709 Cover, Quilted (KMCC1WH) 241675 Food Tray (FT) 4164748 Juicer (JE) 4164747 Can Opener (CO) 4164803 Sausage Stuffer Kit (SSA) 8212519 Ice Cream Maker (KICA0WH0) 9709314 Bowl Cover, (KBC90N1) 242550−2 Bowl, 4.5 QT. W10154769 Bowl, Glass 5 Qt. (K5GB) W10223140 Cover, Glass Bowl KPEXTA Pasta Extruder w/6 Discs 8212010 10 Part No. No. No. ACCESSORY PARTS For Models: KSM150PS__0, 4KSM150PS__0 Illus. Part No. Part No.


