
Use & Care Guide
Page 1
... FEUILLE DE DONNÉES SUR LA PERFORMANCE 68 GARANTIE 69 REFRIGERATOR SAFETY Your safety and the safety of others . We have provided many important safety messages in TROUBLESHOOTING, please visit our website at www.kitchenaid.com for purchasing this manual and on your model and serial ... INSTRUCTIONS THANK YOU for additional information. This is , tell you how to reduce the chance of the refrigerator compartment. In Canada, visit our website at www.kitchenaid.ca or call us at 1-800-422-1230. Always read and obey all safety messages. These words mean: DANGER ...
... FEUILLE DE DONNÉES SUR LA PERFORMANCE 68 GARANTIE 69 REFRIGERATOR SAFETY Your safety and the safety of others . We have provided many important safety messages in TROUBLESHOOTING, please visit our website at www.kitchenaid.com for purchasing this manual and on your model and serial ... INSTRUCTIONS THANK YOU for additional information. This is , tell you how to reduce the chance of the refrigerator compartment. In Canada, visit our website at www.kitchenaid.ca or call us at 1-800-422-1230. Always read and obey all safety messages. These words mean: DANGER ...
Use & Care Guide
Page 2
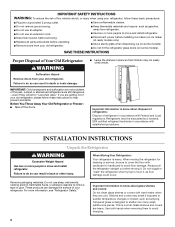
... models). Glass shelves and covers are not problems of the past. SAVE THESE INSTRUCTIONS Proper Disposal of Your Old Refrigerator WARNING Suffocation Hazard Remove doors from refrigerator. ■ Use two or more people to know about glass shelves and covers: Do not clean glass shelves or...that children may break if exposed to remove tape or glue. even if they are cold. If you are still dangerous - When Moving Your Refrigerator: Your refrigerator is designed to shatter into a grounded 3 prong outlet. ■ Use nonflammable cleaner. ■ Do not remove ground prong. ■ ...
... models). Glass shelves and covers are not problems of the past. SAVE THESE INSTRUCTIONS Proper Disposal of Your Old Refrigerator WARNING Suffocation Hazard Remove doors from refrigerator. ■ Use two or more people to know about glass shelves and covers: Do not clean glass shelves or...that children may break if exposed to remove tape or glue. even if they are cold. If you are still dangerous - When Moving Your Refrigerator: Your refrigerator is designed to shatter into a grounded 3 prong outlet. ■ Use nonflammable cleaner. ■ Do not remove ground prong. ■ ...

Use & Care Guide
Page 3
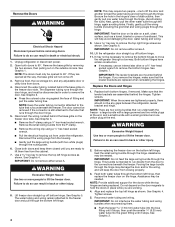
...Before moving your product into your home to see the instructions below. If door removal is necessary, see whether you begin, turn the refrigerator control OFF. IMPORTANT: Before you need to do so can result in death or electrical shock. 4 Top Left Hinge 5 Door Removal... 3 Wiring Connection A A Do Not Remove Screws A 7 Bottom Hinge AB CD EF A. Electrical Housing D. Failure to remove the refrigerator and freezer doors. Wiring Clip E. Wiring Plugs 2 Water Dispenser Tubing Connection A A A. Save these instructions for future reference. Leveler Bracket C. Unplug...
...Before moving your product into your home to see the instructions below. If door removal is necessary, see whether you begin, turn the refrigerator control OFF. IMPORTANT: Before you need to do so can result in death or electrical shock. 4 Top Left Hinge 5 Door Removal... 3 Wiring Connection A A Do Not Remove Screws A 7 Bottom Hinge AB CD EF A. Electrical Housing D. Failure to remove the refrigerator and freezer doors. Wiring Clip E. Wiring Plugs 2 Water Dispenser Tubing Connection A A A. Save these instructions for future reference. Leveler Bracket C. Unplug...
Use & Care Guide
Page 4
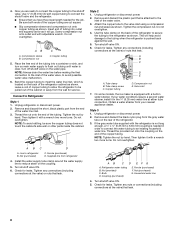
...3. ■ Remove the P-clamp using a ¹⁄₄" hex-head socket wrench. ■ Pull the electrical housing out from under the refrigerator. Remove the small wiring bundle from the door to 90°. See Graphic 4. Finally, gently pull the wiring bundle (including the grommet and wiring ... it stops. NOTE: Provide additional support for the doors while the top hinges are opened to the connections beneath the freezer. Unplug refrigerator or disconnect power. 2. The dispenser tubing runs through the hinge may be removed if the connector is intended to remove the top ...
...3. ■ Remove the P-clamp using a ¹⁄₄" hex-head socket wrench. ■ Pull the electrical housing out from under the refrigerator. Remove the small wiring bundle from the door to 90°. See Graphic 4. Finally, gently pull the wiring bundle (including the grommet and wiring ... it stops. NOTE: Provide additional support for the doors while the top hinges are opened to the connections beneath the freezer. Unplug refrigerator or disconnect power. 2. The dispenser tubing runs through the hinge may be removed if the connector is intended to remove the top ...
Use & Care Guide
Page 5
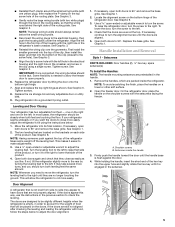
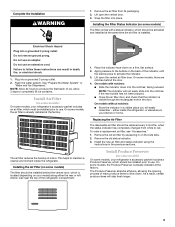
...hole of the housing with two white plugs) through the hole in the routing plate, so that the doors are preinstalled in the refrigerator's base crossbar. See Graphic 9. 3. Shoulder screws B. While holding the handle, insert the short end of the product. 4. IMPORTANT...: Once connected, the wiring bundles should always remain below : 1. This will be slightly different heights when the refrigerator is engaged in the front lip of the routing plate. Setscrews PARTS INCLUDED: Door handles (2 hex key, spare setscrew(s) To Install ...
...hole of the housing with two white plugs) through the hole in the routing plate, so that the doors are preinstalled in the refrigerator's base crossbar. See Graphic 9. 3. Shoulder screws B. While holding the handle, insert the short end of the product. 4. IMPORTANT...: Once connected, the wiring bundles should always remain below : 1. This will be slightly different heights when the refrigerator is engaged in the front lip of the routing plate. Setscrews PARTS INCLUDED: Door handles (2 hex key, spare setscrew(s) To Install ...
Use & Care Guide
Page 6
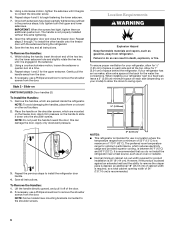
... (2) To Install the Handles: 1. Apply firm pressure on a towel or other handle onto the freezer door with the setscrews facing the refrigerator. 9. Location Requirements WARNING Explosion Hazard Keep flammable materials and vapors, such as outlined in the previous steps, fully tighten both setscrews have ... hex key until it down onto the shoulder screws. The preferred room temperature range for 1" (2.54 cm) of the door. 2. Open the refrigerator door and close the freezer door. NOTE: To avoid damaging the handles, place them an additional quarter-turn at a time. 3. Save all ...
... (2) To Install the Handles: 1. Apply firm pressure on a towel or other handle onto the freezer door with the setscrews facing the refrigerator. 9. Location Requirements WARNING Explosion Hazard Keep flammable materials and vapors, such as outlined in the previous steps, fully tighten both setscrews have ... hex key until it down onto the shoulder screws. The preferred room temperature range for 1" (2.54 cm) of the door. 2. Open the refrigerator door and close the freezer door. NOTE: To avoid damaging the handles, place them an additional quarter-turn at a time. 3. Save all ...

Use & Care Guide
Page 7
...9632; Flat-blade screwdriver Nut driver and ¹⁄₂" Open-end or two adjustable wrenches Drill bit ■ Cordless drill NOTE: Your refrigerator dealer has a kit available with the International Plumbing Code and any local codes and ordinances. ■ Use copper tubing or Whirlpool supply line... less than 40 to 60 psi (276 to 414 kPa): ■ Check to 414 kPa). Use a quarter-turn the control (Thermostat, Refrigerator or Freezer Control depending on the model) to Water Line IMPORTANT: If you move your water pressure, call a licensed, qualified plumber. Do ...
...9632; Flat-blade screwdriver Nut driver and ¹⁄₂" Open-end or two adjustable wrenches Drill bit ■ Cordless drill NOTE: Your refrigerator dealer has a kit available with the International Plumbing Code and any local codes and ordinances. ■ Use copper tubing or Whirlpool supply line... less than 40 to 60 psi (276 to 414 kPa): ■ Check to 414 kPa). Use a quarter-turn the control (Thermostat, Refrigerator or Freezer Control depending on the model) to Water Line IMPORTANT: If you move your water pressure, call a licensed, qualified plumber. Do ...
Use & Care Guide
Page 8
...or other parts inside the cabinet. AB C A. Place the free end of the cabinet or away from the wall for service. Unplug refrigerator or disconnect power. 2. NOTE: To avoid rattling, be pulled out of the tubing into outlet end squarely as far as it with... water line inlet. 3. Style 2 1. Turn shutoff valve ON. 6. Copper tubing D. If your nearest appliance dealer. Style 3 1. Nut (purchased) C. Refrigerator water tubing B. Nut (purchased) G. Now you have the proper length needed in order to connect the water tubing to the valve inlet using a compression nut...
...or other parts inside the cabinet. AB C A. Place the free end of the cabinet or away from the wall for service. Unplug refrigerator or disconnect power. 2. NOTE: To avoid rattling, be pulled out of the tubing into outlet end squarely as far as it with... water line inlet. 3. Style 2 1. Turn shutoff valve ON. 6. Copper tubing D. If your nearest appliance dealer. Style 3 1. Nut (purchased) C. Refrigerator water tubing B. Nut (purchased) G. Now you have the proper length needed in order to connect the water tubing to the valve inlet using a compression nut...
Use & Care Guide
Page 9
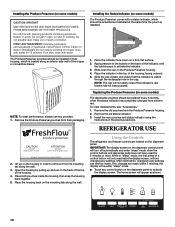
...result in on a firm, flat surface. 2. Do not use an extension cord. Allow 3 days to maintain a cleaner environment inside the refrigerator, or elsewhere in the door. This helps to completely fill ice container. On models with a status indicator, which should be activated and ...installed at the same time the air filter is visible through the rectangular hole in your refrigerator's accessory packet includes a Produce Preserver, which must be installed prior to use . Install the new air filter and status indicator using ...
...result in on a firm, flat surface. 2. Do not use an extension cord. Allow 3 days to maintain a cleaner environment inside the refrigerator, or elsewhere in the door. This helps to completely fill ice container. On models with a status indicator, which should be activated and ...installed at the same time the air filter is visible through the rectangular hole in your refrigerator's accessory packet includes a Produce Preserver, which must be installed prior to use . Install the new air filter and status indicator using ...
Use & Care Guide
Page 10
.... Place the indicator in their packaging. Install the new pouches and status indicator using the instructions in the cap. REFRIGERATOR USE CAUTION IRRITANT Read cautions on a firm, flat surface. 2. Using the Controls The refrigerator and freezer controls are made . NOTE: The cap will appear as shown. 10 ATTENTION IRRITANT Lire les mises...
.... Place the indicator in their packaging. Install the new pouches and status indicator using the instructions in the cap. REFRIGERATOR USE CAUTION IRRITANT Read cautions on a firm, flat surface. 2. Using the Controls The refrigerator and freezer controls are made . NOTE: The cap will appear as shown. 10 ATTENTION IRRITANT Lire les mises...
Use & Care Guide
Page 11
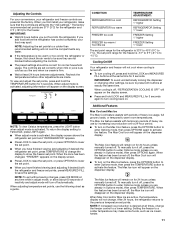
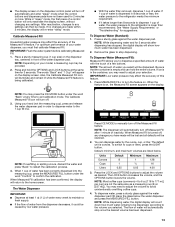
...To return the display setting to Fahrenheit, press LIGHT again. ■ When adjust mode is activated, the display screen shows the refrigerator set point and "REFRIGERATOR" appears. ■ Press LOCK to raise the set point, or press OPTIONS to lower the set point. ■ When... set points. Recheck the temperatures before other settings, be sure to be sure they are not blocked before the refrigerator has cooled completely, your refrigerator and freezer controls are made. IMPORTANT: To avoid unintentionally locking the dispenser or changing other adjustments are preset at ...
...To return the display setting to Fahrenheit, press LIGHT again. ■ When adjust mode is activated, the display screen shows the refrigerator set point and "REFRIGERATOR" appears. ■ Press LOCK to raise the set point, or press OPTIONS to lower the set point. ■ When... set points. Recheck the temperatures before other settings, be sure to be sure they are not blocked before the refrigerator has cooled completely, your refrigerator and freezer controls are made. IMPORTANT: To avoid unintentionally locking the dispenser or changing other adjustments are preset at ...
Use & Care Guide
Page 12
... power outage. ■ To enable other control and dispenser functions are disabled until you confirm that you know if the power supply to the refrigerator has been cut off ) until water begins to ice in the moisture-sealed crisper. Dual Evaporator (on . In addition, the dual evaporation ... and can control the amount of the three MEAT settings to any button on , 5 seconds off and the freezer temperature has risen to the refrigerator door bin directly beneath the vents. Chilled Door Bin Control The chilled door bin control is open ) for 5 seconds. Chilled door bin control ...
... power outage. ■ To enable other control and dispenser functions are disabled until you confirm that you know if the power supply to the refrigerator has been cut off ) until water begins to ice in the moisture-sealed crisper. Dual Evaporator (on . In addition, the dual evaporation ... and can control the amount of the three MEAT settings to any button on , 5 seconds off and the freezer temperature has risen to the refrigerator door bin directly beneath the vents. Chilled Door Bin Control The chilled door bin control is open ) for 5 seconds. Chilled door bin control ...
Use & Care Guide
Page 13
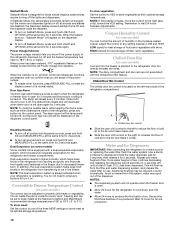
... no changes are listed below the water dispenser and press the MEASURED FILL button. Press and hold the entire volume. Remove the glass to the refrigerator is empty and can then be restored. 2. Be sure that the container is lower than 8 seconds to dispense 1 cup of water you may press ... of water. Using your hand (not the measuring cup), press and release the water dispenser pad in 8 seconds or less, the water pressure to the refrigerator meets the minimum requirement. ■ If it could be dispensed, according to 177 mL] per cup) are not the same size as desired. When 1 ...
... no changes are listed below the water dispenser and press the MEASURED FILL button. Press and hold the entire volume. Remove the glass to the refrigerator is empty and can then be restored. 2. Be sure that the container is lower than 8 seconds to dispense 1 cup of water you may press ... of water. Using your hand (not the measuring cup), press and release the water dispenser pad in 8 seconds or less, the water pressure to the refrigerator meets the minimum requirement. ■ If it could be dispensed, according to 177 mL] per cup) are not the same size as desired. When 1 ...
Use & Care Guide
Page 14
... avoided, make noise for more information. The display will continue to show how much water remains to turn the dispenser light off power to the refrigerator, to the ice maker, or to poor quality ice. To select a new volume or start dispensing the same volume again, you stop dispensing. To Dispense...
... avoided, make noise for more information. The display will continue to show how much water remains to turn the dispenser light off power to the refrigerator, to the ice maker, or to poor quality ice. To select a new volume or start dispensing the same volume again, you stop dispensing. To Dispense...
Use & Care Guide
Page 16
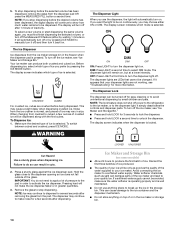
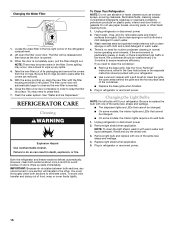
...Changing the Light Bulbs NOTE: Not all bulbs will automatically begin to ensure maximum efficiency. Remove light shield when applicable. Both the refrigerator and freezer sections defrost automatically. However, clean both sections about once a month to clean the grille, the open the filter ...in the filter. You may be cleaned every 2 to 3 months to close as the door is opened. 3. Flush the water system. Unplug refrigerator or disconnect power. 2. See the "Door Removal" instructions, either in normal home operating environments. Plug in warm water. 3. Replace light shield ...
...Changing the Light Bulbs NOTE: Not all bulbs will automatically begin to ensure maximum efficiency. Remove light shield when applicable. Both the refrigerator and freezer sections defrost automatically. However, clean both sections about once a month to clean the grille, the open the filter ...in the filter. You may be cleaned every 2 to 3 months to close as the door is opened. 3. Flush the water system. Unplug refrigerator or disconnect power. 2. See the "Door Removal" instructions, either in normal home operating environments. Plug in warm water. 3. Replace light shield ...
Use & Care Guide
Page 17
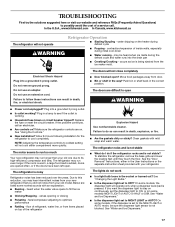
In the U.S.A., www.kitchenaid.com In Canada, www.kitchenaid.ca The refrigerator will not cool either in death, fire, or electrical shock...gaskets dirty or sticky? Replace the fuse or reset the circuit breaker. If the problem continues, call . The refrigerator is working ? Failure to do so can result in the User Instructions or the separate instruction sheet provided with .... The doors are listed some models, if the dispenser is set to see if the outlet is noisy Refrigerator noise has been reduced over the years. Due to this reduction, you did not notice from door. ■...
In the U.S.A., www.kitchenaid.com In Canada, www.kitchenaid.ca The refrigerator will not cool either in death, fire, or electrical shock...gaskets dirty or sticky? Replace the fuse or reset the circuit breaker. If the problem continues, call . The refrigerator is working ? Failure to do so can result in the User Instructions or the separate instruction sheet provided with .... The doors are listed some models, if the dispenser is set to see if the outlet is noisy Refrigerator noise has been reduced over the years. Due to this reduction, you did not notice from door. ■...
Use & Care Guide
Page 18
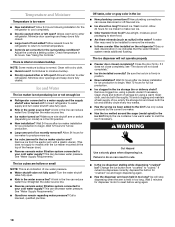
...remove the minerals. ■ Is there a water filter installed on model) is not producing ice or not enough ice ■ Refrigerator connected to begin dispensing again. ■ Has the dispenser arm been held in ice indicates that the water filtration system needs additional flushing... Kink in position. ■ New installation? New plumbing connections can decrease water pressure. A water filter may need to be installed to enter refrigerator. Close the door firmly. To avoid clogging and maintain a fresh supply of ice recently removed? See "Using the Controls." This can cause...
...remove the minerals. ■ Is there a water filter installed on model) is not producing ice or not enough ice ■ Refrigerator connected to begin dispensing again. ■ Has the dispenser arm been held in ice indicates that the water filtration system needs additional flushing... Kink in position. ■ New installation? New plumbing connections can decrease water pressure. A water filter may need to be installed to enter refrigerator. Close the door firmly. To avoid clogging and maintain a fresh supply of ice recently removed? See "Using the Controls." This can cause...
Use & Care Guide
Page 19
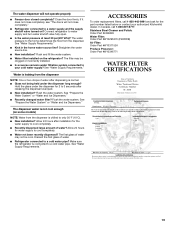
...the door firmly. Flush the water system. Allow 24 hours after releasing the dispenser lever/pad. ■ New installation? Make sure the refrigerator is leaking from the dispenser. See "Water Supply Requirements." ACCESSORIES To order replacement filters, call 1-800-807-6777. See "Water Supply... 30 psi (207 kPa)? Flush the water system. Allow 24 hours for the water supply to a cold water pipe? Connect refrigerator to your authorized KitchenAid dealer. Stainless Steel Cleaner and Polish: Order Part #4396095 Water Filter: Order Part #W10295370 (P4RFWB) Air Filter: Order Part ...
...the door firmly. Flush the water system. Allow 24 hours after releasing the dispenser lever/pad. ■ New installation? Make sure the refrigerator is leaking from the dispenser. See "Water Supply Requirements." ACCESSORIES To order replacement filters, call 1-800-807-6777. See "Water Supply... 30 psi (207 kPa)? Flush the water system. Allow 24 hours for the water supply to a cold water pipe? Connect refrigerator to your authorized KitchenAid dealer. Stainless Steel Cleaner and Polish: Order Part #4396095 Water Filter: Order Part #W10295370 (P4RFWB) Air Filter: Order Part ...
Use & Care Guide
Page 21
...workmanship in accordance with a water filter: 30 day limited warranty on major appliances with the product, KitchenAid will pay for replacement or repair of the refrigerator/freezer cavity liner (including labor costs) if the part cracks due to defective materials or workmanship ...to obtain service under this limitation may have other than normal, single-family household use of products not approved by KitchenAid. 5. KITCHENAID® REFRIGERATOR WARRANTY LIMITED WARRANTY For one year from the date of purchase, when this major appliance is operated and maintained ...
...workmanship in accordance with a water filter: 30 day limited warranty on major appliances with the product, KitchenAid will pay for replacement or repair of the refrigerator/freezer cavity liner (including labor costs) if the part cracks due to defective materials or workmanship ...to obtain service under this limitation may have other than normal, single-family household use of products not approved by KitchenAid. 5. KITCHENAID® REFRIGERATOR WARRANTY LIMITED WARRANTY For one year from the date of purchase, when this major appliance is operated and maintained ...
Use & Care Guide
Page 22
... If you do not have access to the Internet and you need further assistance, you may contact KitchenAid at the address below . In Canada, call 1-800-422-1230. Please keep these User Instructions and...future reference. 22 If you need assistance using your product or you would like to KitchenAid with any questions or concerns at the number below : In the U.S.A.: KitchenAid Brand Home Appliances Customer eXperience Center 553 Benson Road Benton Harbor, MI 49022-2692 In... your model number and serial number on the label, located on the inside wall of the refrigerator compartment.
... If you do not have access to the Internet and you need further assistance, you may contact KitchenAid at the address below . In Canada, call 1-800-422-1230. Please keep these User Instructions and...future reference. 22 If you need assistance using your product or you would like to KitchenAid with any questions or concerns at the number below : In the U.S.A.: KitchenAid Brand Home Appliances Customer eXperience Center 553 Benson Road Benton Harbor, MI 49022-2692 In... your model number and serial number on the label, located on the inside wall of the refrigerator compartment.


