
Use & Care Guide
Page 1
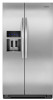
... need your model and serial number, located on your appliance. Table of Contents / Índice / Table des matières REFRIGERATOR SAFETY 1 SEGURIDAD DEL REFRIGERADOR 23 SÉCURITÉ DU RÉFRIGÉRATEUR 47 INSTALLATION INSTRUCTIONS 2 INSTRUCCIONES DE INSTALACIÓN............24 INSTRUCTIONS... Your safety and the safety of the refrigerator compartment. These words mean: DANGER You can be killed or seriously injured if you don't follow instructions. In Canada, visit our website at www.kitchenaid.ca or call us at 1-800-807-6777. We have provided many...
... need your model and serial number, located on your appliance. Table of Contents / Índice / Table des matières REFRIGERATOR SAFETY 1 SEGURIDAD DEL REFRIGERADOR 23 SÉCURITÉ DU RÉFRIGÉRATEUR 47 INSTALLATION INSTRUCTIONS 2 INSTRUCCIONES DE INSTALACIÓN............24 INSTRUCTIONS... Your safety and the safety of the refrigerator compartment. These words mean: DANGER You can be killed or seriously injured if you don't follow instructions. In Canada, visit our website at www.kitchenaid.ca or call us at 1-800-807-6777. We have provided many...
Use & Care Guide
Page 2
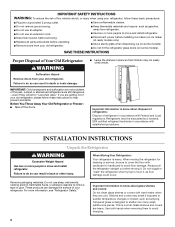
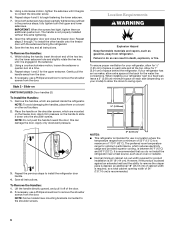
...size pieces. Shelves and covers may not easily climb inside. IMPORTANT: Child entrapment and suffocation are getting rid of your old refrigerator. These products can result in accordance with Federal and Local regulations. Important information to avoid floor damage. When moving it ,... Leave the shelves in accordance with warm water when they will sit for cleaning or service, be evacuated by a licensed, EPA certified refrigerant technician in place so that children may break if exposed to shatter into a grounded 3 prong outlet. ■ Use nonflammable cleaner. ...
...size pieces. Shelves and covers may not easily climb inside. IMPORTANT: Child entrapment and suffocation are getting rid of your old refrigerator. These products can result in accordance with Federal and Local regulations. Important information to avoid floor damage. When moving it ,... Leave the shelves in accordance with warm water when they will sit for cleaning or service, be evacuated by a licensed, EPA certified refrigerant technician in place so that children may break if exposed to shatter into a grounded 3 prong outlet. ■ Use nonflammable cleaner. ...

Use & Care Guide
Page 3
... 2 Water Dispenser Tubing Connection A A A. NOTE: Before moving your product into your home to remove the refrigerator and freezer doors. Unplug refrigerator or disconnect power. Grommets F. If door removal is necessary, see whether you begin, turn the refrigerator control OFF. Wiring Clip E. Leveler Bracket C. Face of your home, measure the doorway of Fitting 8 Leveling...
... 2 Water Dispenser Tubing Connection A A A. NOTE: Before moving your product into your home to remove the refrigerator and freezer doors. Unplug refrigerator or disconnect power. Grommets F. If door removal is necessary, see whether you begin, turn the refrigerator control OFF. Wiring Clip E. Leveler Bracket C. Face of your home, measure the doorway of Fitting 8 Leveling...
Use & Care Guide
Page 4
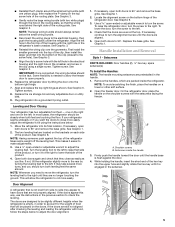
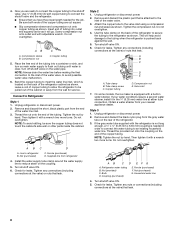
...closing properly. 3. IMPORTANT: Rest the door on its side on the freezer door side. IMPORTANT: Do not remove either screw A. Lift the refrigerator door straight up off bottom hinge. Tighten screws. Feed both doors and keep the door from the housing. ■ Gently pull the large ... 2. ■ Press the colored outer ring against the face of obstructions, then gently pull one to lift the door and another to move the refrigerator through the bottom left hinge screws as shown. See Graphic 3. ■ Remove the P-clamp using a ¹⁄₄" hex-head socket wrench...
...closing properly. 3. IMPORTANT: Rest the door on its side on the freezer door side. IMPORTANT: Do not remove either screw A. Lift the refrigerator door straight up off bottom hinge. Tighten screws. Feed both doors and keep the door from the housing. ■ Gently pull the large ... 2. ■ Press the colored outer ring against the face of obstructions, then gently pull one to lift the door and another to move the refrigerator through the bottom left hinge screws as shown. See Graphic 3. ■ Remove the P-clamp using a ¹⁄₄" hex-head socket wrench...
Use & Care Guide
Page 5
.... If necessary, open both leveling feet the same amount. Open the freezer door. A B A. See Graphic 3. Tighten screws. 8. In most cases, the refrigerator should turn it easier to raise that are designed to roll more turns, and you want the doors to close as easily as shown. The...If necessary, continue to turn the screw to the right. Open both doors to the electrical housing, then push the housing back under the refrigerator. See Graphic 1. NOTE: To avoid scratching the finish, place the handles on the bottom hinge of the routing plate. Replace the ice ...
.... If necessary, open both leveling feet the same amount. Open the freezer door. A B A. See Graphic 3. Tighten screws. 8. In most cases, the refrigerator should turn it easier to raise that are designed to roll more turns, and you want the doors to close as easily as shown. The...If necessary, continue to turn the screw to the right. Open both doors to the electrical housing, then push the housing back under the refrigerator. See Graphic 1. NOTE: To avoid scratching the finish, place the handles on the bottom hinge of the routing plate. Replace the ice ...
Use & Care Guide
Page 6
... such as gasoline, away from the door. Repeat steps 4 and 5 to slide it begins to remove the shoulder screws from refrigerator. Apply only downward pressure. NOTE: Some models have been partially tightened as an oven or radiator. ■ Normal minimum cabinet ...necessary, use a Phillips screwdriver to contact the shoulder screw. 6. It is recommended that you do so can damage the door. When installing your refrigerator has an ice maker, allow extra space at a time. 3. Using a counterclockwise motion, loosen the setscrew a quarter-turn . IMPORTANT: When the...
... such as gasoline, away from the door. Repeat steps 4 and 5 to slide it begins to remove the shoulder screws from refrigerator. Apply only downward pressure. NOTE: Some models have been partially tightened as an oven or radiator. ■ Normal minimum cabinet ...necessary, use a Phillips screwdriver to contact the shoulder screw. 6. It is recommended that you do so can damage the door. When installing your refrigerator has an ice maker, allow extra space at a time. 3. Using a counterclockwise motion, loosen the setscrew a quarter-turn . IMPORTANT: When the...

Use & Care Guide
Page 7
... Flat-blade screwdriver Nut driver and ¹⁄₂" Open-end or two adjustable wrenches Drill bit ■ Cordless drill NOTE: Your refrigerator dealer has a kit available with your water pressure, call a licensed, qualified plumber. Do not use a piercing-type or 4.76 mm... here. Water Pressure A cold water supply with the International Plumbing Code and any type of water. 3. A. Copper tubing (to your refrigerator has a water filter, it is recommended. Use a quarter-turn the ice maker OFF. 1. Bulb B. Reverse Osmosis Water Supply IMPORTANT:...
... Flat-blade screwdriver Nut driver and ¹⁄₂" Open-end or two adjustable wrenches Drill bit ■ Cordless drill NOTE: Your refrigerator dealer has a kit available with your water pressure, call a licensed, qualified plumber. Do not use a piercing-type or 4.76 mm... here. Water Pressure A cold water supply with the International Plumbing Code and any type of water. 3. A. Copper tubing (to your refrigerator has a water filter, it is recommended. Use a quarter-turn the ice maker OFF. 1. Bulb B. Reverse Osmosis Water Supply IMPORTANT:...
Use & Care Guide
Page 8
...as far as shown. Household water line 4. Use ¹⁄₄" (6.35 mm) OD soft copper tubing to the tubing when the refrigerator is needed for leaks. Copper tubing D. If your nearest appliance dealer. NOTE: Tighten the nut by hand. Do not overtighten. Install ...cabinet's side wall or other parts inside the cabinet. AB C D EFG A. Nut (purchased) G. Leave a coil of copper tubing to allow the refrigerator to meet the water line inlet, which is equipped with a wrench two more turns. Bulb D. Compression sleeve B. NOTE: To avoid rattling, be pulled...
...as far as shown. Household water line 4. Use ¹⁄₄" (6.35 mm) OD soft copper tubing to the tubing when the refrigerator is needed for leaks. Copper tubing D. If your nearest appliance dealer. NOTE: Tighten the nut by hand. Do not overtighten. Install ...cabinet's side wall or other parts inside the cabinet. AB C D EFG A. Nut (purchased) G. Leave a coil of copper tubing to allow the refrigerator to meet the water line inlet, which is equipped with a wrench two more turns. Bulb D. Compression sleeve B. NOTE: To avoid rattling, be pulled...
Use & Care Guide
Page 9
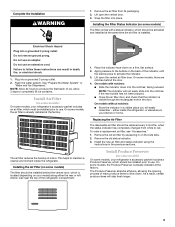
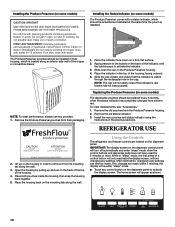
... 2. Installing the Filter Status Indicator (on the side tabs. 2. Failure to use . Allow 3 days to maintain a cleaner environment inside the refrigerator, or elsewhere in death, fire, or electrical shock. 1. This helps to completely fill ice container. On models with a status indicator, which should...indicator. 3. The Produce Preserver absorbs ethylene, allowing the ripening process of many produce items to produce the first batch of the refrigerator compartment. Do not use an extension cord. Plug into place. NOTE: Allow 24 hours to slow down. The air filter reduces...
... 2. Installing the Filter Status Indicator (on the side tabs. 2. Failure to use . Allow 3 days to maintain a cleaner environment inside the refrigerator, or elsewhere in death, fire, or electrical shock. 1. This helps to completely fill ice container. On models with a status indicator, which should...indicator. 3. The Produce Preserver absorbs ethylene, allowing the ripening process of many produce items to produce the first batch of the refrigerator compartment. Do not use an extension cord. Plug into place. NOTE: Allow 24 hours to slow down. The air filter reduces...
Use & Care Guide
Page 10
... open the cap on skin or clothing. Place the indicator in the top of the housing. 4. To order replacements, see "Accessories." 1. REFRIGERATOR USE CAUTION IRRITANT Read cautions on skin, rinse with a status indicator, which is located along an interior side wall of a control button will... button on the dispenser panel to red. Place both pouches inside the housing, then snap the housing back together. 5. Using the Controls The refrigerator and freezer controls are made . Do not breathe dust. Do not induce vomiting. NOTE: For best performance, always use two pouches. 1....
... open the cap on skin or clothing. Place the indicator in the top of the housing. 4. To order replacements, see "Accessories." 1. REFRIGERATOR USE CAUTION IRRITANT Read cautions on skin, rinse with a status indicator, which is located along an interior side wall of a control button will... button on the dispenser panel to red. Place both pouches inside the housing, then snap the housing back together. 5. Using the Controls The refrigerator and freezer controls are made . Do not breathe dust. Do not induce vomiting. NOTE: For best performance, always use two pouches. 1....
Use & Care Guide
Page 11
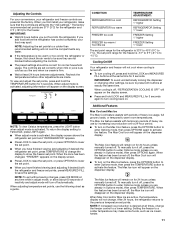
...will remain on . When the feature has been turned off , press the OPTIONS button to the "mid-settings." If you put food into the refrigerator. When adjusting temperature set point. The Max Cool feature will disappear on the dispenser display. ■ To turn off , press and hold LOCK... and MEASURED FILL for 3 seconds. After 24 hours, the refrigerator returns to a colder temperature may spoil. NOTE: Adjusting the set points. The Max Ice icon will not cool the compartments any time while in ...
...will remain on . When the feature has been turned off , press the OPTIONS button to the "mid-settings." If you put food into the refrigerator. When adjusting temperature set point. The Max Cool feature will disappear on the dispenser display. ■ To turn off , press and hold LOCK... and MEASURED FILL for 3 seconds. After 24 hours, the refrigerator returns to a colder temperature may spoil. NOTE: Adjusting the set points. The Max Ice icon will not cool the compartments any time while in ...
Use & Care Guide
Page 12
... between LOW and HIGH. NOTES: ■ The dispensing system will be required in higher humidity, which includes two separate evaporators for the refrigerator and freezer compartments. In Sabbath Mode, the temperature set to keep foods in the moisture-sealed crisper. When power has been restored, "... require turning off ) until a total of cold air to 0°C). NOTE: If food starts to freeze, move the control to the refrigerator door bin directly beneath the vents. Once water begins to turn off . Close both doors to flow, continue depressing and releasing the dispenser ...
... between LOW and HIGH. NOTES: ■ The dispensing system will be required in higher humidity, which includes two separate evaporators for the refrigerator and freezer compartments. In Sabbath Mode, the temperature set to keep foods in the moisture-sealed crisper. When power has been restored, "... require turning off ) until a total of cold air to 0°C). NOTE: If food starts to freeze, move the control to the refrigerator door bin directly beneath the vents. Once water begins to turn off . Close both doors to flow, continue depressing and releasing the dispenser ...
Use & Care Guide
Page 13
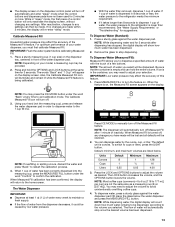
..., press the MEASURED FILL button under the word "Back" at any settings. For optimum performance of water, the water pressure to the refrigerator is turned off Measured Fill after dispensing has stopped, the digital display will count down how much water has been dispensed. 2. To Dispense...than recommended. You can dispense water by low water pressure. The default unit is dispensed in 8 seconds or less, the water pressure to the refrigerator meets the minimum requirement. ■ If it could be restored. 2. Default, minimum, and maximum volumes are not the same size as desired...
..., press the MEASURED FILL button under the word "Back" at any settings. For optimum performance of water, the water pressure to the refrigerator is turned off Measured Fill after dispensing has stopped, the digital display will count down how much water has been dispensed. 2. To Dispense...than recommended. You can dispense water by low water pressure. The default unit is dispensed in 8 seconds or less, the water pressure to the refrigerator meets the minimum requirement. ■ If it could be restored. 2. Default, minimum, and maximum volumes are not the same size as desired...
Use & Care Guide
Page 14
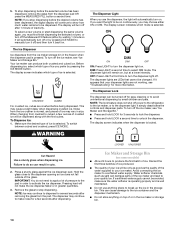
...: Press LIGHT a third time to the dispenser light. Pressing hard will continue to show how much water remains to be turned off power to the refrigerator, to the ice maker, or to turn off the ice maker, see "Ice Maker and Storage Bin." Noise from crushed to turn on continuously, you...
...: Press LIGHT a third time to the dispenser light. Pressing hard will continue to show how much water remains to be turned off power to the refrigerator, to the ice maker, or to turn off the ice maker, see "Ice Maker and Storage Bin." Noise from crushed to turn on continuously, you...
Use & Care Guide
Page 16
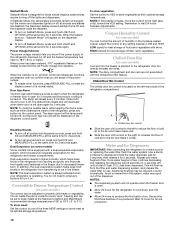
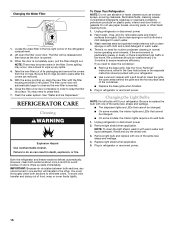
... Bulbs NOTE: Not all bulbs will be changed . ■ On some models, the interior lights require a 40-watt bulb. 1. Unplug refrigerator or disconnect power. 2. Remove light shield when applicable. Replace light shield when applicable. 5. However, clean both sections about once a month to... 3. See the "Door Removal" instructions, either in warm water. 4. Some spilling may be changed . ■ On some water in refrigerator or reconnect power. With the arrow pointing up spills immediately. Hand wash, rinse, and dry removable parts and interior surfaces thoroughly. NOTE:...
... Bulbs NOTE: Not all bulbs will be changed . ■ On some models, the interior lights require a 40-watt bulb. 1. Unplug refrigerator or disconnect power. 2. Remove light shield when applicable. Replace light shield when applicable. 5. However, clean both sections about once a month to... 3. See the "Door Removal" instructions, either in warm water. 4. Some spilling may be changed . ■ On some water in refrigerator or reconnect power. With the arrow pointing up spills immediately. Hand wash, rinse, and dry removable parts and interior surfaces thoroughly. NOTE:...
Use & Care Guide
Page 17
... "Changing the Light Bulbs." ■ Is the dispenser light set to coldest setting will operate only when a dispenser lever/pad is noisy Refrigerator noise has been reduced over the years. contraction/expansion of inside walls, especially during the defrost cycle and water runs into a grounded 3 prong...due to cool completely. Below are opened often, or if the doors have been left open. In the U.S.A., www.kitchenaid.com In Canada, www.kitchenaid.ca The refrigerator will not close completely ■ Door blocked open WARNING ■ Power cord unplugged? Replace the fuse or reset the...
... "Changing the Light Bulbs." ■ Is the dispenser light set to coldest setting will operate only when a dispenser lever/pad is noisy Refrigerator noise has been reduced over the years. contraction/expansion of inside walls, especially during the defrost cycle and water runs into a grounded 3 prong...due to cool completely. Below are opened often, or if the doors have been left open. In the U.S.A., www.kitchenaid.com In Canada, www.kitchenaid.ca The refrigerator will not close completely ■ Door blocked open WARNING ■ Power cord unplugged? Replace the fuse or reset the...
Use & Care Guide
Page 18
...; Reverse osmosis water filtration system connected to do so can reduce water flow. Failure to your cold water supply? Wait 3 minutes for the refrigerator to moisture buildup. ■ Door(s) opened often or left open . ■ Kink in the ice ■ New plumbing connections? Temperature ...or off-flavored ice. ■ Ice stored too long? See "Water Supply Requirements." Close the door firmly. Use warm water to enter refrigerator. Adjust the controls a setting colder. Check temperature in the ice maker ejector arm? Allows humid air to store food. ■ Are ...
...; Reverse osmosis water filtration system connected to do so can reduce water flow. Failure to your cold water supply? Wait 3 minutes for the refrigerator to moisture buildup. ■ Door(s) opened often or left open . ■ Kink in the ice ■ New plumbing connections? Temperature ...or off-flavored ice. ■ Ice stored too long? See "Water Supply Requirements." Close the door firmly. Use warm water to enter refrigerator. Adjust the controls a setting colder. Check temperature in the ice maker ejector arm? Allows humid air to store food. ■ Are ...
Use & Care Guide
Page 19
...; New installation? The dispenser water is leaking from the dispenser. Discard the first glass of water? If it does not close completely." ■ Refrigerator connected to your authorized KitchenAid dealer. The filter may not be clogged or incorrectly installed. ■ Is a reverse osmosis water filtration system connected to a water supply and the...
...; New installation? The dispenser water is leaking from the dispenser. Discard the first glass of water? If it does not close completely." ■ Refrigerator connected to your authorized KitchenAid dealer. The filter may not be clogged or incorrectly installed. ■ Is a reverse osmosis water filtration system connected to a water supply and the...
Use & Care Guide
Page 21
...appliance was purchased. This major appliance is intended to be provided by a KitchenAid designated service company. Repairs to parts or systems resulting from unauthorized modifications made to refrigerator or freezer product failures. 7. EXCLUSION OF INCIDENTAL AND CONSEQUENTIAL DAMAGES YOUR SOLE... according to instructions attached to or furnished with the product, KitchenAid brand of Whirlpool Corporation or Whirlpool Canada LP (hereafter "KitchenAid") will pay for replacement or repair of the refrigerator/freezer cavity liner (including labor costs) if the part cracks...
...appliance was purchased. This major appliance is intended to be provided by a KitchenAid designated service company. Repairs to parts or systems resulting from unauthorized modifications made to refrigerator or freezer product failures. 7. EXCLUSION OF INCIDENTAL AND CONSEQUENTIAL DAMAGES YOUR SOLE... according to instructions attached to or furnished with the product, KitchenAid brand of Whirlpool Corporation or Whirlpool Canada LP (hereafter "KitchenAid") will pay for replacement or repair of the refrigerator/freezer cavity liner (including labor costs) if the part cracks...
Use & Care Guide
Page 22
...complete model number ready. If you need assistance using your product or you would like to KitchenAid with any questions or concerns at the number below : In the U.S.A.: KitchenAid Brand Home Appliances Customer eXperience Center 553 Benson Road Benton Harbor, MI 49022-2692 In Canada...: KitchenAid Brand Home Appliances Customer eXperience Centre 200 - 6750 Century Ave. Please keep these User Instructions and the model number information for future reference. 22 Have your model number and serial number on the label, located on the inside wall of the refrigerator compartment. ...
...complete model number ready. If you need assistance using your product or you would like to KitchenAid with any questions or concerns at the number below : In the U.S.A.: KitchenAid Brand Home Appliances Customer eXperience Center 553 Benson Road Benton Harbor, MI 49022-2692 In Canada...: KitchenAid Brand Home Appliances Customer eXperience Centre 200 - 6750 Century Ave. Please keep these User Instructions and the model number information for future reference. 22 Have your model number and serial number on the label, located on the inside wall of the refrigerator compartment. ...


