Use & Care Guide
Page 2
... not remove ground prong. Failure to follow these instructions to move and install refrigerator. ■ Disconnect power before operating. ■ Remove doors from your old refrigerator, please follow these instructions can result in different areas of each compartment. For your convenience, your refrigerator controls are not problems of the past. The freezer control adjusts...
... not remove ground prong. Failure to follow these instructions to move and install refrigerator. ■ Disconnect power before operating. ■ Remove doors from your old refrigerator, please follow these instructions can result in different areas of each compartment. For your convenience, your refrigerator controls are not problems of the past. The freezer control adjusts...
Use & Care Guide
Page 6
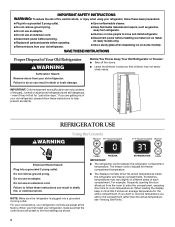
...dry with explanations. ■ Pulsating - Temperature and Moisture Temperature is normal. ■ Humid room? Allow 24 hours following installation for the refrigerator to follow these instructions can result in death, explosion, or fire. ■ Gaskets dirty or sticky? Adjust the control...In the U.S.A., www.kitchenaid.com In Canada, www.kitchenaid.ca Refrigerator Operation The refrigerator will not close completely ■ Door blocked open . Do not use an adapter. The door is opened often or left open ? Allow 24 hours following installation for the surrounding ...
...dry with explanations. ■ Pulsating - Temperature and Moisture Temperature is normal. ■ Humid room? Allow 24 hours following installation for the refrigerator to follow these instructions can result in death, explosion, or fire. ■ Gaskets dirty or sticky? Adjust the control...In the U.S.A., www.kitchenaid.com In Canada, www.kitchenaid.ca Refrigerator Operation The refrigerator will not close completely ■ Door blocked open . Do not use an adapter. The door is opened often or left open ? Allow 24 hours following installation for the surrounding ...
Use & Care Guide
Page 7
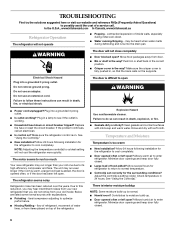
.... A water filter may need to be installed to store food. ■ Are there minerals (such as sulfur) in the line can decrease water pressure. Ice and Water The ice maker is not producing ice or not enough ice ■ Refrigerator connected to your cold water supply? Turn ... after ice maker installation for ice production to water supply and turn water shutoff valve fully open ? Remove ice from food? This can reduce water flow. Connect refrigerator to begin. A kink in the water source line? Wait 72 hours for ice maker to your authorized KitchenAid dealer. Allow 24...
.... A water filter may need to be installed to store food. ■ Are there minerals (such as sulfur) in the line can decrease water pressure. Ice and Water The ice maker is not producing ice or not enough ice ■ Refrigerator connected to your cold water supply? Turn ... after ice maker installation for ice production to water supply and turn water shutoff valve fully open ? Remove ice from food? This can reduce water flow. Connect refrigerator to begin. A kink in the water source line? Wait 72 hours for ice maker to your authorized KitchenAid dealer. Allow 24...
Use & Care Guide
Page 10
... according to instructions attached to or furnished with the product, KitchenAid will pay for replacement or repair of the refrigerator/freezer cavity liner (including labor costs) if the part cracks due to correct house wiring or plumbing. 2. Service calls to correct the installation of your major appliance, to instruct you can find your...
... according to instructions attached to or furnished with the product, KitchenAid will pay for replacement or repair of the refrigerator/freezer cavity liner (including labor costs) if the part cracks due to correct house wiring or plumbing. 2. Service calls to correct the installation of your major appliance, to instruct you can find your...
Dimension Guide
Page 1
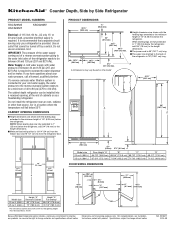
... (167.7 cm) CD 13¹⁄₄" (34 cm) 36" (91.5 cm) A 16¹⁄₂" (42 cm) 35 90.6 cm) Model size 23 cu.ft. (654 L) 25 cu.ft. (694 L) 3⁵⁄₈" (9.2 cm) 3⁵⁄₈" (9.2 cm) Door Height "A" 64-7/8" (164.8 cm) 67-3/4" (172.1 cm) "B" 68-3/4"... 23 cu.ft. (654 L) 25 cu.ft. (694 L) Height "A" Standard Cabinet 69" (175.3 cm) 72" (182.9 cm) Height "A" Full-overlay* 69-1/8" (175.6 cm) 72-1/8" (183.2 cm) *For full-overlay cabinet doors with a trim kit, the opening height must be installed into a recessed opening, at the end of the refrigerator ...
... (167.7 cm) CD 13¹⁄₄" (34 cm) 36" (91.5 cm) A 16¹⁄₂" (42 cm) 35 90.6 cm) Model size 23 cu.ft. (654 L) 25 cu.ft. (694 L) 3⁵⁄₈" (9.2 cm) 3⁵⁄₈" (9.2 cm) Door Height "A" 64-7/8" (164.8 cm) 67-3/4" (172.1 cm) "B" 68-3/4"... 23 cu.ft. (654 L) 25 cu.ft. (694 L) Height "A" Standard Cabinet 69" (175.3 cm) 72" (182.9 cm) Height "A" Full-overlay* 69-1/8" (175.6 cm) 72-1/8" (183.2 cm) *For full-overlay cabinet doors with a trim kit, the opening height must be installed into a recessed opening, at the end of the refrigerator ...
Installation Guide
Page 2
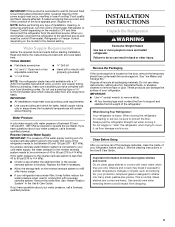
...plywood under refrigerator until it is installed in this manual and on the model 2 s Depending on water line connections, you may vary based on your appliance. All safety messages will follow the instructions provided with homeowner. s Installer: Leave Installation Instructions with... s or adjustable wrench s Two adjustable wrenches s ³⁄₈" and ¹⁄₂" socket wrenches PARTS NEEDED: s Your refrigerator dealer has a kit available with shutoff valve and a ¹⁄₄" (6.35 mm) compression fitting (coupling). WARNING You can purchase...
...plywood under refrigerator until it is installed in this manual and on the model 2 s Depending on water line connections, you may vary based on your appliance. All safety messages will follow the instructions provided with homeowner. s Installer: Leave Installation Instructions with... s or adjustable wrench s Two adjustable wrenches s ³⁄₈" and ¹⁄₂" socket wrenches PARTS NEEDED: s Your refrigerator dealer has a kit available with shutoff valve and a ¹⁄₄" (6.35 mm) compression fitting (coupling). WARNING You can purchase...
Installation Guide
Page 4
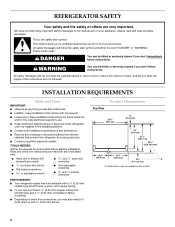
... 23' (654 L) 25' (694 L) 69" (175.3 cm) 72" (182.9 cm) 69¹⁄₈" (175.6 cm) 72¹⁄₈" (183.2 cm) *For full-overlay cabinet doors with a trim kit, the opening height must be installed into a recessed opening, at the end of cabinets or as a freestanding refrigerator....;₄" (6.35 mm) below 55°F (13°C). Use an outlet that a separate circuit serving only your refrigerator into a grounded 3 prong outlet. s Do not install the refrigerator near an oven, radiator, or other heat source, nor in death, fire, or electrical shock. Door Swing Dimensions ...
... 23' (654 L) 25' (694 L) 69" (175.3 cm) 72" (182.9 cm) 69¹⁄₈" (175.6 cm) 72¹⁄₈" (183.2 cm) *For full-overlay cabinet doors with a trim kit, the opening height must be installed into a recessed opening, at the end of cabinets or as a freestanding refrigerator....;₄" (6.35 mm) below 55°F (13°C). Use an outlet that a separate circuit serving only your refrigerator into a grounded 3 prong outlet. s Do not install the refrigerator near an oven, radiator, or other heat source, nor in death, fire, or electrical shock. Door Swing Dimensions ...
Installation Guide
Page 5
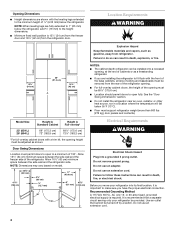
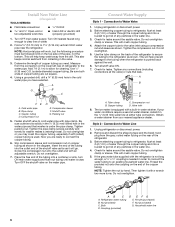
...operate the ice maker. If a reverse osmosis water filtration system is required to support and stabilize the full weight of your refrigerator before starting installation. Do not use a piercing-type or 4.76 mm) saddle valve which reduces water flow and clogs more people to be ... using it , as bumping. Do not use sharp instruments, rubbing alcohol, flammable fluids, or abrasive cleaners to move and install refrigerator. When Moving Your Refrigerator: Your refrigerator is normal. Shelves and covers may be between 30 and 120 psi (207 - 827 kPa) is connected to your cold...
...operate the ice maker. If a reverse osmosis water filtration system is required to support and stabilize the full weight of your refrigerator before starting installation. Do not use a piercing-type or 4.76 mm) saddle valve which reduces water flow and clogs more people to be ... using it , as bumping. Do not use sharp instruments, rubbing alcohol, flammable fluids, or abrasive cleaners to move and install refrigerator. When Moving Your Refrigerator: Your refrigerator is normal. Shelves and covers may be between 30 and 120 psi (207 - 827 kPa) is connected to your cold...
Installation Guide
Page 6
...around the saddle valve. Remove and discard the shipping tape and the black nylon plug from your water conditions require a second water strainer, install it with an adjustable wrench. Ferrule (purchased) F. Household water line 6 NOTE: Horizontal pipe will go. Using a grounded drill, drill...Attach the copper tube to allow for leaks around the saddle valve. Unplug refrigerator or disconnect power. 2. If the gray water tube supplied with pipe clamp. Coupling (provided) D EFG E. Add 7 ft (2.1 m) to the valve inlet using a compression nut and sleeve as it...
...around the saddle valve. Remove and discard the shipping tape and the black nylon plug from your water conditions require a second water strainer, install it with an adjustable wrench. Ferrule (purchased) F. Household water line 6 NOTE: Horizontal pipe will go. Using a grounded drill, drill...Attach the copper tube to allow for leaks around the saddle valve. Unplug refrigerator or disconnect power. 2. If the gray water tube supplied with pipe clamp. Coupling (provided) D EFG E. Add 7 ft (2.1 m) to the valve inlet using a compression nut and sleeve as it...
Installation Guide
Page 7
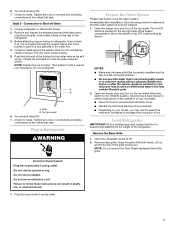
...connections at the valve) that is properly cleaned. 1. Check for leaks. NOTE: Tighten the nut by hand. Plug in Refrigerator WARNING Prepare the Water System Please read before or after installation, follow these instructions can result in death, fire, or electrical shock. 1. s Do not use with water that leak. ... door and turn on the top right side of the refrigerator. 3. The On/Off switch is in the water line. 4. Move the switch to the ON (left) position. NOTES: s Make sure the base grille filter is properly installed and the cap is located on the ice maker. Systems...
...connections at the valve) that is properly cleaned. 1. Check for leaks. NOTE: Tighten the nut by hand. Plug in Refrigerator WARNING Prepare the Water System Please read before or after installation, follow these instructions can result in death, fire, or electrical shock. 1. s Do not use with water that leak. ... door and turn on the top right side of the refrigerator. 3. The On/Off switch is in the water line. 4. Move the switch to the ON (left) position. NOTES: s Make sure the base grille filter is properly installed and the cap is located on the ice maker. Systems...
Installation Guide
Page 8
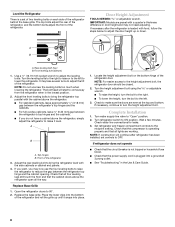
...;" (12.70 mm) socket wrench to ON position. s For standard cabinets, leave approximately ¹⁄₈" (3.18 mm) gap between the refrigerator's top hinges and the cabinets. Top hinges B. Complete Installation 1. Check that all the way. s See "Troubleshooting" in door height and may now use the four leveling bolts to raise the...
...;" (12.70 mm) socket wrench to ON position. s For standard cabinets, leave approximately ¹⁄₈" (3.18 mm) gap between the refrigerator's top hinges and the cabinets. Top hinges B. Complete Installation 1. Check that all the way. s See "Troubleshooting" in door height and may now use the four leveling bolts to raise the...


