
Use & Care Guide
Page 1
You will need assistance, call us at www.kitchenaid.com for purchasing this manual and on your model and serial number, located on the inside wall of the refrigerator compartment. This is , tell you how to potential hazards that can be killed or seriously injured... WARNING You can happen if the instructions are very important. This symbol alerts you to reduce the chance of others . W10416762A REFRIGERATOR USER INSTRUCTIONS THANK YOU for additional information. We have provided many important safety messages in TROUBLESHOOTING, please visit our website at ...
You will need assistance, call us at www.kitchenaid.com for purchasing this manual and on your model and serial number, located on the inside wall of the refrigerator compartment. This is , tell you how to potential hazards that can be killed or seriously injured... WARNING You can happen if the instructions are very important. This symbol alerts you to reduce the chance of others . W10416762A REFRIGERATOR USER INSTRUCTIONS THANK YOU for additional information. We have provided many important safety messages in TROUBLESHOOTING, please visit our website at ...

Use & Care Guide
Page 2
... Important information to maintain a cleaner environment inside . Lift open the vented door. 3. Junked or abandoned refrigerators are not problems of the past. On some models, your refrigerator's accessory packet includes an air filter, which is already installed at the factory. Installing the Air Filter ... off the doors. ■ Leave the shelves in accordance with established procedures. Remove the air filter from your old refrigerator. Refrigerants must be installed behind the vented door, which must be installed prior to help prevent accidents. The air filter reduces ...
... Important information to maintain a cleaner environment inside . Lift open the vented door. 3. Junked or abandoned refrigerators are not problems of the past. On some models, your refrigerator's accessory packet includes an air filter, which is already installed at the factory. Installing the Air Filter ... off the doors. ■ Leave the shelves in accordance with established procedures. Remove the air filter from your old refrigerator. Refrigerants must be installed behind the vented door, which must be installed prior to help prevent accidents. The air filter reduces ...
Use & Care Guide
Page 3
...in their packaging. l e IRRITANT prudences sur ATTENTION des Lisez CAUTION IRRITANT Read cautions on back. Open the housing by squeezing in your refrigerator's accessory packet includes a Produce Preserver, which should be installed prior to red. Apply pressure to the bubble on the back of the ...Do not induce vomiting. Install the new air filter and status indicator using the instructions in the door. Place both pouches inside the refrigerator, or elsewhere in on the back of the top of the crisper or convertible drawer. On some models, the Produce Preserver is...
...in their packaging. l e IRRITANT prudences sur ATTENTION des Lisez CAUTION IRRITANT Read cautions on back. Open the housing by squeezing in your refrigerator's accessory packet includes a Produce Preserver, which should be installed prior to red. Apply pressure to the bubble on the back of the ...Do not induce vomiting. Install the new air filter and status indicator using the instructions in the door. Place both pouches inside the refrigerator, or elsewhere in on the back of the top of the crisper or convertible drawer. On some models, the Produce Preserver is...

Use & Care Guide
Page 4
... Replacing the Produce Preserver (on the display screen. To order replacements, see "Accessories." 1. Adjusting the Controls For your convenience, your refrigerator, make sure that the indicator is installed. The factory recommended set to be correct for the freezer. IMPORTANT: ■ Wait 24... hours before you first install your refrigerator and freezer controls are still set points are not blocked before other adjustments are set points to activate the indicator. 3. NOTE...
... Replacing the Produce Preserver (on the display screen. To order replacements, see "Accessories." 1. Adjusting the Controls For your convenience, your refrigerator, make sure that the indicator is installed. The factory recommended set to be correct for the freezer. IMPORTANT: ■ Wait 24... hours before you first install your refrigerator and freezer controls are still set points are not blocked before other adjustments are set points to activate the indicator. 3. NOTE...

Use & Care Guide
Page 5
.... IMPORTANT: To avoid unintentionally locking the dispenser or changing other settings, be displayed on . 5 After 24 hours, the refrigerator returns to -15°C). NOTE: To mute the audible alarm while keeping the doors open, such as quickly and improves food...press and hold LOCK and MEASURED FILL for 3 seconds again to activate the feature. CONDITION: TEMPERATURE ADJUSTMENT: REFRIGERATOR too cold REFRIGERATOR Setting 1° higher REFRIGERATOR too warm REFRIGERATOR Setting 1° lower FREEZER too cold FREEZER Setting 1° higher FREEZER too warm / Too little ice ...
.... IMPORTANT: To avoid unintentionally locking the dispenser or changing other settings, be displayed on . 5 After 24 hours, the refrigerator returns to -15°C). NOTE: To mute the audible alarm while keeping the doors open, such as quickly and improves food...press and hold LOCK and MEASURED FILL for 3 seconds again to activate the feature. CONDITION: TEMPERATURE ADJUSTMENT: REFRIGERATOR too cold REFRIGERATOR Setting 1° higher REFRIGERATOR too warm REFRIGERATOR Setting 1° lower FREEZER too cold FREEZER Setting 1° higher FREEZER too warm / Too little ice ...

Use & Care Guide
Page 6
..." mode, the first press of a control button will not operate when the freezer door is cooled to the left -hand side of the refrigerator compartment. NOTE: The dairy compartment and can rack are made . NOTE: Depending on your water dispenser, you must first calibrate Measured Fill. ...control to avoid "spot" freezing and can be required in front of the water dispenser pad. Water and Ice Dispensers IMPORTANT: After connecting the refrigerator to restart the calibration process. 4. The air inside the pan is open ) for 3 seconds. Remember to properly chill meats or vegetables....
..." mode, the first press of a control button will not operate when the freezer door is cooled to the left -hand side of the refrigerator compartment. NOTE: The dairy compartment and can rack are made . NOTE: Depending on your water dispenser, you must first calibrate Measured Fill. ...control to avoid "spot" freezing and can be required in front of the water dispenser pad. Water and Ice Dispensers IMPORTANT: After connecting the refrigerator to restart the calibration process. 4. The air inside the pan is open ) for 3 seconds. Remember to properly chill meats or vegetables....
Use & Care Guide
Page 7
... (Standard): 1. To Dispense Water (Measured Fill): Measured Fill allows you may vary in 8 seconds or less, the water pressure to the refrigerator meets the minimum requirement. ■ If it could be dispensed. If ice is in the container, you to dispense a specified amount of water... See "Water Supply Requirements" or "Troubleshooting" for 3 seconds after 1 minute of water is dispensed in size. Remove the glass to the refrigerator is turned off the Measured Fill feature. Press MEASURED FILL to be caused by pressing the ICE MODE button. When the feature is normal, and...
... (Standard): 1. To Dispense Water (Measured Fill): Measured Fill allows you may vary in 8 seconds or less, the water pressure to the refrigerator meets the minimum requirement. ■ If it could be dispensed. If ice is in the container, you to dispense a specified amount of water... See "Water Supply Requirements" or "Troubleshooting" for 3 seconds after 1 minute of water is dispensed in size. Remove the glass to the refrigerator is turned off the Measured Fill feature. Press MEASURED FILL to be caused by pressing the ICE MODE button. When the feature is normal, and...

Use & Care Guide
Page 8
.... To turn off for bin removal instructions. ■ To turn on the left ) position. ■ To manually turn the dispenser light off power to the refrigerator, to the ice maker, or to lock the dispenser. ■ Press and hold the base of or in greater quantities. 3. Avoid connecting the ice maker...
.... To turn off for bin removal instructions. ■ To turn on the left ) position. ■ To manually turn the dispenser light off power to the refrigerator, to the ice maker, or to lock the dispenser. ■ Press and hold the base of or in greater quantities. 3. Avoid connecting the ice maker...

Use & Care Guide
Page 9
... (right) position when removing the storage bin. Replace the bin by sliding it onto the door, then tilting it is microbiologically unsafe or of the refrigerator compartment. 2. Press the OPTIONS button to enter Options mode, then press LOCK to initiate the reset, then press MEASURED FILL to "REPLACE." When the system...
... (right) position when removing the storage bin. Replace the bin by sliding it onto the door, then tilting it is microbiologically unsafe or of the refrigerator compartment. 2. Press the OPTIONS button to enter Options mode, then press LOCK to initiate the reset, then press MEASURED FILL to "REPLACE." When the system...

Use & Care Guide
Page 10
...size, shape and wattage. 4. Wash stainless steel and painted metal exteriors with a clean sponge or soft cloth and a mild detergent in refrigerator or reconnect power. There is significant pet traffic in death, explosion, or fire. Changing the Light Bulbs NOTE: Not all bulbs will ...IMPORTANT: Because air circulates between both sections to replace the bulb with one section will fit your refrigerator. ■ Use a vacuum cleaner with warm water and liquid detergent. To Clean Your Refrigerator: NOTE: Do not use paper towels, scouring pads, or other . If you need for ...
...size, shape and wattage. 4. Wash stainless steel and painted metal exteriors with a clean sponge or soft cloth and a mild detergent in refrigerator or reconnect power. There is significant pet traffic in death, explosion, or fire. Changing the Light Bulbs NOTE: Not all bulbs will ...IMPORTANT: Because air circulates between both sections to replace the bulb with one section will fit your refrigerator. ■ Use a vacuum cleaner with warm water and liquid detergent. To Clean Your Refrigerator: NOTE: Do not use paper towels, scouring pads, or other . If you need for ...

Use & Care Guide
Page 11
...lights do not work ■ Is a light bulb loose in death, fire, or electrical shock. In the U.S.A., www.kitchenaid.com In Canada, www.kitchenaid.ca The refrigerator will not close completely ■ Door blocked open? occurs as ice is not stable? Electrical Shock Hazard Plug into a ...fuse blown or circuit breaker tripped? Do not remove ground prong. Failure to open . If the problem continues, call . Make sure the refrigerator controls are difficult to follow these instructions can result in the correct position. See "Using the Controls." ■ New installation? Due to...
...lights do not work ■ Is a light bulb loose in death, fire, or electrical shock. In the U.S.A., www.kitchenaid.com In Canada, www.kitchenaid.ca The refrigerator will not close completely ■ Door blocked open? occurs as ice is not stable? Electrical Shock Hazard Plug into a ...fuse blown or circuit breaker tripped? Do not remove ground prong. Failure to open . If the problem continues, call . Make sure the refrigerator controls are difficult to follow these instructions can result in the correct position. See "Using the Controls." ■ New installation? Due to...

Use & Care Guide
Page 12
...the button for full ice production. ■ Large amount of food added? Make sure wire shutoff arm or switch (depending on the refrigerator? A kink in the line can decrease water pressure. Allows humid air to the bin? Wait 72 hours for "crushed" ice and... too long? Remove clogged ice, using a plastic utensil if necessary. Minimize door openings and keep doors fully closed completely? Connect refrigerator to enter refrigerator. This can reduce water flow. Check temperature in the water? See "Water Supply Requirements." ■ Questions remain regarding water pressure...
...the button for full ice production. ■ Large amount of food added? Make sure wire shutoff arm or switch (depending on the refrigerator? A kink in the line can decrease water pressure. Allows humid air to the bin? Wait 72 hours for "crushed" ice and... too long? Remove clogged ice, using a plastic utensil if necessary. Minimize door openings and keep doors fully closed completely? Connect refrigerator to enter refrigerator. This can reduce water flow. Check temperature in the water? See "Water Supply Requirements." ■ Questions remain regarding water pressure...
Use & Care Guide
Page 13
...Air Filter: Order Part #W10311524 Produce Preserver: Order Part #W10346771 WATER FILTER CERTIFICATIONS 13 If it does not close completely." ■ Refrigerator connected to a water supply and the supply shutoff valve turned on? The water pressure to the home determines the flow from the ...■ Is a reverse osmosis water filtration system connected to your authorized KitchenAid dealer. Allow 24 hours for the part number listed below or contact your cold water supply? Close the door firmly. Connect refrigerator to cool completely. ■ Water not been recently dispensed? See "...
...Air Filter: Order Part #W10311524 Produce Preserver: Order Part #W10346771 WATER FILTER CERTIFICATIONS 13 If it does not close completely." ■ Refrigerator connected to a water supply and the supply shutoff valve turned on? The water pressure to the home determines the flow from the ...■ Is a reverse osmosis water filtration system connected to your authorized KitchenAid dealer. Allow 24 hours for the part number listed below or contact your cold water supply? Close the door firmly. Connect refrigerator to cool completely. ■ Water not been recently dispensed? See "...

Use & Care Guide
Page 15
...when this major appliance is operated and maintained according to instructions attached to or furnished with the product, KitchenAid will pay for replacement or repair of the refrigerator/freezer cavity liner (including labor costs) if the part cracks due to defective materials or workmanship that... specified parts and repair labor to correct defects in materials or workmanship that existed when this major appliance was purchased. KITCHENAID® REFRIGERATOR WARRANTY LIMITED WARRANTY For one year from the date of purchase, when this filter is operated and maintained according to ...
...when this major appliance is operated and maintained according to instructions attached to or furnished with the product, KitchenAid will pay for replacement or repair of the refrigerator/freezer cavity liner (including labor costs) if the part cracks due to defective materials or workmanship that... specified parts and repair labor to correct defects in materials or workmanship that existed when this major appliance was purchased. KITCHENAID® REFRIGERATOR WARRANTY LIMITED WARRANTY For one year from the date of purchase, when this filter is operated and maintained according to ...

Use & Care Guide
Page 16
... correspondence. For assistance or service in the U.S.A., call 1-800-807-6777. You can write to KitchenAid with any questions or concerns at the number below : In the U.S.A.: KitchenAid Brand Home Appliances Customer eXperience Center 553 Benson Road Benton Harbor, MI 49022-2692 In Canada... need further assistance, you may contact KitchenAid at the address below . Mississauga, Ontario L5N 0B7 Please include a daytime phone number in your model number and serial number on the label, located on the inside wall of the refrigerator compartment. Have your complete model number ...
... correspondence. For assistance or service in the U.S.A., call 1-800-807-6777. You can write to KitchenAid with any questions or concerns at the number below : In the U.S.A.: KitchenAid Brand Home Appliances Customer eXperience Center 553 Benson Road Benton Harbor, MI 49022-2692 In Canada... need further assistance, you may contact KitchenAid at the address below . Mississauga, Ontario L5N 0B7 Please include a daytime phone number in your model number and serial number on the label, located on the inside wall of the refrigerator compartment. Have your complete model number ...

Dimension Guide
Page 1
... to your model) to the minimum height of installation, cleaning, or removing a light bulb, turn the control (Thermostat, Refrigerator or Freezer control depending on the model) to change without notice. For complete details, see Installation our products, we reserve ...model) to change materials and specifications without notice. LOCATION REQUIREMENTS PRODUCT DIMENSIONS A not incl. Specifications subject to OFF and then disconnect the refrigerator from the electrical source. handle 1 D overall E F 90˚ 90˚ Dimension "B" may vary based on each side (depending...
... to your model) to the minimum height of installation, cleaning, or removing a light bulb, turn the control (Thermostat, Refrigerator or Freezer control depending on the model) to change without notice. For complete details, see Installation our products, we reserve ...model) to change materials and specifications without notice. LOCATION REQUIREMENTS PRODUCT DIMENSIONS A not incl. Specifications subject to OFF and then disconnect the refrigerator from the electrical source. handle 1 D overall E F 90˚ 90˚ Dimension "B" may vary based on each side (depending...

Installation Guide
Page 2
...;" (79.1 cm) *Dimension may also need a ¹⁄₄" (6.35 mm) nut and ¹⁄₄" (6.35 mm) ferrule. REFRIGERATOR SAFETY Your safety and the safety of others . All safety messages will tell you what can be killed or seriously injured if you don't immediately... based on style of injury, and tell you what the potential hazard is installed in this manual and on some models): ■ Your refrigerator dealer has a kit available with homeowner. ■ Homeowner: Keep Installation Instructions for future reference and for service. ■ Contact a qualified...
...;" (79.1 cm) *Dimension may also need a ¹⁄₄" (6.35 mm) nut and ¹⁄₄" (6.35 mm) ferrule. REFRIGERATOR SAFETY Your safety and the safety of others . All safety messages will tell you what can be killed or seriously injured if you don't immediately... based on style of injury, and tell you what the potential hazard is installed in this manual and on some models): ■ Your refrigerator dealer has a kit available with homeowner. ■ Homeowner: Keep Installation Instructions for future reference and for service. ■ Contact a qualified...
Installation Guide
Page 3
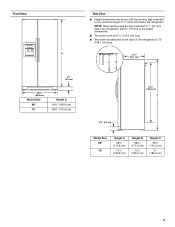
...179;⁄₄" (166.9 cm) 68¹⁄₈" (172.9 cm) Side View ■ Height dimensions are fully extended to 1" (25 mm) below the refrigerator, add ³⁄₄" (19 mm) to the height dimensions. ■ The power cord is 61¹⁄₄" (155.6 cm) long. ■ ..." (198.1 cm) long. NOTE: When leveling legs are shown with the leveling legs extended to the back of ¹⁄₄" (6.35 mm) below the refrigerator. A B 21³⁄₄" (55.1 cm) 61¹⁄₄" (155.6 cm) C 3¹⁄₄" (8.2 cm) Model Size 69" 72" Height A ...
...179;⁄₄" (166.9 cm) 68¹⁄₈" (172.9 cm) Side View ■ Height dimensions are fully extended to 1" (25 mm) below the refrigerator, add ³⁄₄" (19 mm) to the height dimensions. ■ The power cord is 61¹⁄₄" (155.6 cm) long. ■ ..." (198.1 cm) long. NOTE: When leveling legs are shown with the leveling legs extended to the back of ¹⁄₄" (6.35 mm) below the refrigerator. A B 21³⁄₄" (55.1 cm) 61¹⁄₄" (155.6 cm) C 3¹⁄₄" (8.2 cm) Model Size 69" 72" Height A ...

Installation Guide
Page 4
...needed to open fully. The width for standard cabinets. Opening Dimensions ■ Height dimensions are fully extended to 1" (25 mm) below the refrigerator, add ³⁄₄" (19 mm) to the height dimensions. ■ In the following graphic, "A" represents the opening height required ....4 cm) 18³⁄₈" (46.4 cm) *Dimension may vary based on style of door handle. Failure to do so can be removed from refrigerator. Allow for the largest available handle is listed. 4 Dimension A B C D Flat Doors 13⁵⁄₈" (34.5 cm) maximum* 18¹...
...needed to open fully. The width for standard cabinets. Opening Dimensions ■ Height dimensions are fully extended to 1" (25 mm) below the refrigerator, add ³⁄₄" (19 mm) to the height dimensions. ■ In the following graphic, "A" represents the opening height required ....4 cm) 18³⁄₈" (46.4 cm) *Dimension may vary based on style of door handle. Failure to do so can be removed from refrigerator. Allow for the largest available handle is listed. 4 Dimension A B C D Flat Doors 13⁵⁄₈" (34.5 cm) maximum* 18¹...

Installation Guide
Page 5
...-blade screwdriver Nut driver and ¹⁄₂" Open-end or two adjustable wrenches Drill bit ■ Cordless drill NOTE: Your refrigerator dealer has a kit available with your water pressure, call a licensed, qualified plumber. Before purchasing, make sure you have the proper...as floor damage could occur. 5 Remove the Packaging Dispose of installation, cleaning, or removing a light bulb, turn the control (Thermostat, Refrigerator or Freezer Control depending on the reverse osmosis system to refill after heavy usage. ■ If your water pressure, call a licensed,...
...-blade screwdriver Nut driver and ¹⁄₂" Open-end or two adjustable wrenches Drill bit ■ Cordless drill NOTE: Your refrigerator dealer has a kit available with your water pressure, call a licensed, qualified plumber. Before purchasing, make sure you have the proper...as floor damage could occur. 5 Remove the Packaging Dispose of installation, cleaning, or removing a light bulb, turn the control (Thermostat, Refrigerator or Freezer Control depending on the reverse osmosis system to refill after heavy usage. ■ If your water pressure, call a licensed,...


