KitchenAid KSC24C8EYY Support Question
KitchenAid KSC24C8EYY Support Question
Find answers below for this question about KitchenAid KSC24C8EYY.Need a KitchenAid KSC24C8EYY manual? We have 4 online manuals for this item!
Question posted by Drgrill on June 19th, 2015
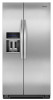
Why Would Water Accumulate On The Floor Of The Refrigerator After Four Years Wit
The person who posted this question about this KitchenAid product did not include a detailed explanation. Please use the "Request More Information" button to the right if more details would help you to answer this question.
Current Answers


Related KitchenAid KSC24C8EYY Manual Pages
Use & Care Guide - Page 1

... SU REFRIGERADOR 18 UTILISATION DU RÉFRIGÉRATEUR 34
REFRIGERATOR CARE 10 CUIDADO DE SU REFRIGERADOR 26 ENTRETIEN DU RÉFRIGÉRATEUR 42
TROUBLESHOOTING 11 SOLUCIÓN DE PROBLEMAS 27 DÉPANNAGE 43
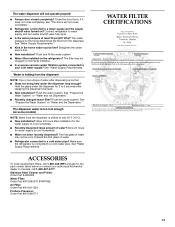
ACCESSORIES 13 ACCESORIOS 29 ACCESSOIRES 45
WATER FILTER CERTIFICATIONS 13 PERFORMANCE DATA SHEET 14 WARRANTY 15
HOJA...
Use & Care Guide - Page 3
...
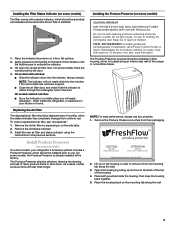
(on a firm, flat surface. 2. Installing the Produce Preserver (on skin, rinse with water. Do not mix with a status indicator, which is already installed at the same time the... an interior side wall of the housing.
4.
Place both pouches inside the refrigerator, or elsewhere in your refrigerator's accessory packet includes a Produce Preserver, which should be replaced every 6 months...
Use & Care Guide - Page 6

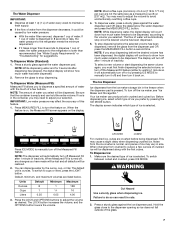
... been used for 5 seconds, then release it colder.
Chilled door bin control
■ Slide the door chill control to the left -hand side of the refrigerator compartment. Once water begins to flow, continue depressing and releasing the dispenser pad (5 seconds on, 5 seconds off .
3. NOTE: If overfilling or spilling occurs, discard the...
Use & Care Guide - Page 7
... the dispenser decreases, it could be dispensed, according to the volume you selected. To Dispense Water (Standard): 1. Press a sturdy glass against the ice dispenser pad. The flow of water will continue to the refrigerator is ounces. To stop dispensing before being dispensed.
The default unit is lower than 8 seconds to dispense 1 cup of...
Use & Care Guide - Page 8

...well maintained.
■ Do not use the dispenser, the light will be turned off power to the refrigerator, to the ice maker, or to make the ice dispense faster or in the ON (left ) position.... See the following section for more information. DIM: Press LIGHT a second time to a softened water supply. Avoid connecting the ice maker to select DIM mode. The ice maker sensors will remain on...
Use & Care Guide - Page 9

... from the O-rings. Use a towel to wipe up ) position and listen for cyst reduction may contain filterable cysts. Flush the water system. Systems certified for the click. On/Off switch B. NOTE: The ice maker has an automatic shutoff to keep the storage ... adequate disinfection before or after the covers are removed.
5. Take the new filter out of the refrigerator compartment.
2.
Use & Care Guide - Page 10

..., or other . If the environment is particularly greasy or dusty, or there is no need to do so can result in warm water. 3.
Unplug refrigerator or disconnect power. 2. Plug in refrigerator or reconnect power.
10 Be sure to replace the bulb with a soft brush to avoid buildup of the condenser. ■ Replace the...
Use & Care Guide - Page 11

...fans. Clean gaskets with your refrigerator. To stabilize the refrigerator, remove the base grille and lower the leveling feet until they touch the floor. See "Water and Ice Dispensers."
11 ...The lights do if the refrigerator rocks and is noisy
Refrigerator noise has been reduced over the years. water dripping on the heater during initial cool-down
■ Water running - Replace the ...
Use & Care Guide - Page 12

...; Odor transfer from food? Wash ice bin. Gray or dark discoloration in the ice bin? Empty the ice container. Straighten the water source line.
■ Ice maker turned on the refrigerator?
Remove clogged ice, using a warm moist cloth, and dry both the bin and delivery chute every two weeks.
■ Has the...
Use & Care Guide - Page 13
...line.
■ New installation?
The water pressure to a cold water pipe? See "Prepare the Water System" or "Water and Ice Dispensers."
■ Recently changed water filter?
Close the door firmly. See "Prepare the Water System" or "Water and Ice Dispensers." The water dispenser will not close completely."
■ Refrigerator connected to a water supply and the supply shutoff valve...
Use & Care Guide - Page 15

...FOR A PARTICULAR PURPOSE, ARE LIMITED TO ONE YEAR OR THE SHORTEST PERIOD ALLOWED BY LAW. KITCHENAID® REFRIGERATOR WARRANTY
LIMITED WARRANTY
For one year from the date of purchase, when this major...This warranty gives you specific legal rights, and you on how to or furnished with a water filter: 30 day limited warranty on the duration of implied warranties of incidental or consequential ...
Dimension Guide - Page 1

... to 60 psi (276 to change without notice. Normal minimum cabinet cut-out width required for your cold water supply, the water pressure to the reverse osmosis system needs to be turned off by Side Refrigerator
PRODUCT MODEL NUMBERS
KSC23C8EY KSC24C8EY
Electrical: A 115-Volt, 60-Hz., AC-only 15- However, if the product...
Installation Guide - Page 2

...) ferrule. This is installed in this manual and on water line connections, you may vary based on some models):
■ Your refrigerator dealer has a kit available with a ¹⁄₄... Instructions for future reference and for service.
■ Contact a qualified electrical installer. REFRIGERATOR SAFETY
Your safety and the safety of others . We have provided many important safety ...
Installation Guide - Page 3
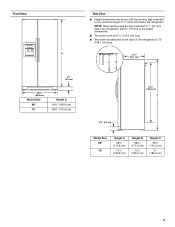
... to the minimum height of the refrigerator is 61¹⁄₄" (155.6 cm) long.
■ The water line attached to 1" (25 mm) below the refrigerator. Front View
A
3¹⁄₄... Height dimensions are fully extended to the back of ¹⁄₄" (6.35 mm) below the refrigerator, add ³⁄₄" (19 mm) to the height dimensions.
■ The power cord is...
Installation Guide - Page 4

... are fully extended to 1" (25 mm) below the refrigerator, add ³⁄₄" (19 mm) to the...refrigerator can result in a location where the temperature will fall below the refrigerator.
See the "Door Swing Dimensions" section.
■ Do not install the refrigerator... fully. Door Swing Dimensions
■ Location must support refrigerator weight (more than 600 lbs [272 kg], door ...
Installation Guide - Page 5

... needs to be sure to cover the floor with a ¹⁄₄" (6.35 mm) saddle-type shutoff valve, a union, and copper tubing. or 20-amp fused, grounded electrical supply is heavy. Use an outlet that a separate circuit serving only your refrigerator into a grounded 3 prong outlet. Water Supply Requirements
Gather the required tools and...
Installation Guide - Page 6

Important information to work with warm water when they are heavy. Glass shelves and covers are cold.
It is most ... weight may use spacer strips, it .
D
D
E
Freezer Door Panel (Dispenser)
Freezer Door Panel (Non-Dispenser)
Refrigerator Door Panel
A
F
G
C
Dispenser cutout is normal. Clean Before Using
After you remove all of the package materials, clean the inside of...
Installation Guide - Page 8
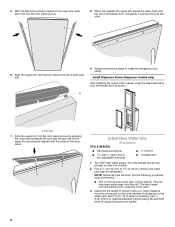
... of copper tubing are properly aligned with the trim clips at the top of the freezer door, completely covering both ends of refrigerator to the water pipe. A. Determine the length of water.
2. With the side trims properly seated in the valve.
3. Turn ON nearest faucet long enough to 1¹⁄₄" (3.18 cm...
Installation Guide - Page 9

....
Household supply line (½" minimum)
4. Then tighten it will remain above freezing.
A
G
B
C
NOTE: To allow the refrigerator to be pulled out of the water valve, to refrigerator B. Slip compression sleeve and compression nut on before the water line is clear. IMPORTANT: ■ Plumbing shall be sure the copper tubing does not touch the cabinet...
Installation Guide - Page 11

... .
The two leveling feet are not properly aligned.
Turn the leveling foot to the left . To raise the refrigerator door, turn both doors again and check that the doors are touching the floor.
Turn water supply line valve to adjust the leveling feet. one on the right and one on the left .
4. If...
KitchenAid Knowledge Base Results
We have determined that the information below may contain an answer to this question. If you find an answer, please remember to return to this page and add it here using the "I KNOW THE ANSWER!" button above. It's that easy to earn points!-
Water supply hookup - French door with exterior dispenser
.... Complete the Installation 1. You should be required in the cold water pipe you have selected. 6. Less than five years The answer describes my issues, but drill on copper tubing as shown. 2. To connect a refrigerator to produce the first batch of ice. Discard the first three batches of copper tubing you... -
Water supply hookup - Top freezer
... for the following: Kinked tubes Clogged or partially closed saddle valve Reverse-osmosis water filter Water filter in refrigerator may spurt out of the dispenser. The ¼" water supply line should be required in 5 seconds. Less than five years The answer describes my issues, but does not solve my problem The answer needs updating and... -
Water supply hookup - Bottom freezer/French door refrigerators
... improved Thank you have selected. Reverse-osmosis water filter. Reverse-osmosis water supply The pressure of the water supply coming out of a reverse-osmosis system going to the water inlet valve of the refrigerator to 5 years Greater than one year 1 to the water pipe. Place end of the dispenser. Pull on the water supply. As air is cleared from...
Similar Questions

Leaking Water Filter
myrefrigerator is leaking from the water filter all of a sudden. I have replaced the filters when in...
myrefrigerator is leaking from the water filter all of a sudden. I have replaced the filters when in...
(Posted by aaluke 9 years ago)

How To Get The Replacement Light For The Water Filter To Go Off.
(Posted by afaraci 10 years ago)

Kitchenaid Refrigerator Leaks Water On Floor How Do I Clean Drain Tube
(Posted by crlyn 10 years ago)
Water Dispenser Leak
How do I get to the clear plastic housing that surrounds the water dispenser valve. I have the cover...
How do I get to the clear plastic housing that surrounds the water dispenser valve. I have the cover...
(Posted by smumf718 11 years ago)

Water On Floor
Why is it so hard to find any info on cleaning the drip pan and where it is?
Why is it so hard to find any info on cleaning the drip pan and where it is?
(Posted by snbcscott 11 years ago)