
Use & Care Guide
Page 2
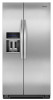
... refrigerator. ■ Use two or more people to use an extension cord. ■ Disconnect power before servicing. ■ Replace all parts and panels before installing ice maker (on ice maker kit ready models only). ■ Use a sturdy glass when dispensing ice (on some models). ■ Do not hit the refrigerator glass doors (on some models) On some models, the air filter is located (depending on your old refrigerator. The air filter reduces the buildup of odors. Failure to maintain a cleaner environment inside...
... refrigerator. ■ Use two or more people to use an extension cord. ■ Disconnect power before servicing. ■ Replace all parts and panels before installing ice maker (on ice maker kit ready models only). ■ Use a sturdy glass when dispensing ice (on some models). ■ Do not hit the refrigerator glass doors (on some models) On some models, the air filter is located (depending on your old refrigerator. The air filter reduces the buildup of odors. Failure to maintain a cleaner environment inside...
Use & Care Guide
Page 3
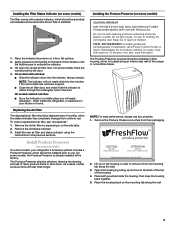
..., Benton Harbor MI 49022 2. Replacing the Air Filter The disposable air filter should be installed prior to use two pouches. 1. If swallowed, call a Poison Control Center or doctor immediately. Remove the Produce Preserver pouches from their housing, which is located along an interior side wall of the crisper or convertible drawer. Place both pouches inside the refrigerator, or elsewhere in your refrigerator's accessory packet includes a Produce...
..., Benton Harbor MI 49022 2. Replacing the Air Filter The disposable air filter should be installed prior to use two pouches. 1. If swallowed, call a Poison Control Center or doctor immediately. Remove the Produce Preserver pouches from their housing, which is located along an interior side wall of the crisper or convertible drawer. Place both pouches inside the refrigerator, or elsewhere in your refrigerator's accessory packet includes a Produce...

Use & Care Guide
Page 4
... the refrigerator has cooled completely, your refrigerator and freezer controls are made within 2 minutes, the display will not cool the compartments any settings can then be made. If you first install your refrigerator, make sure that the indicator is too warm or too cold in "sleep" mode, the first press of inactivity and adjust mode will only reactivate the display screen, without saving changes, press ICE MODE at the factory. When adjust mode...
... the refrigerator has cooled completely, your refrigerator and freezer controls are made within 2 minutes, the display will not cool the compartments any settings can then be made. If you first install your refrigerator, make sure that the indicator is too warm or too cold in "sleep" mode, the first press of inactivity and adjust mode will only reactivate the display screen, without saving changes, press ICE MODE at the factory. When adjust mode...

Use & Care Guide
Page 5
... dispenser or changing other functions, press MEASURED FILL to reset the display screen to turn it on Sabbath Mode, press and hold LIGHT and OPTIONS at all sounds back on the Max Ice feature, press the OPTIONS button to enter Options mode, then press the TEMPERATURE button to decreased freezer burn. After 24 hours, the refrigerator returns to a lower setting. Setting the freezer to a colder temperature may make some models...
... dispenser or changing other functions, press MEASURED FILL to reset the display screen to turn it on Sabbath Mode, press and hold LIGHT and OPTIONS at all sounds back on the Max Ice feature, press the OPTIONS button to enter Options mode, then press the TEMPERATURE button to decreased freezer burn. After 24 hours, the refrigerator returns to a lower setting. Setting the freezer to a colder temperature may make some models...

Use & Care Guide
Page 6
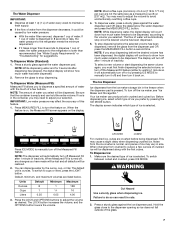
... the right (less cold), toward the VEG setting. Crisper Humidity Control (on some households. Place a sturdy measuring cup (1 cup size) on the dispenser tray, centered in the moisture-sealed crisper. Convertible Drawer Temperature Control (on some models) Cool air from the freezer is directed to the refrigerator door bin directly beneath the vents. Chilled Door Bin (on some models) The control can rack are made . A A. Water and Ice Dispensers IMPORTANT: After connecting the refrigerator to restart the...
... the right (less cold), toward the VEG setting. Crisper Humidity Control (on some households. Place a sturdy measuring cup (1 cup size) on the dispenser tray, centered in the moisture-sealed crisper. Convertible Drawer Temperature Control (on some models) Cool air from the freezer is directed to the refrigerator door bin directly beneath the vents. Chilled Door Bin (on some models) The control can rack are made . A A. Water and Ice Dispensers IMPORTANT: After connecting the refrigerator to restart the...
Use & Care Guide
Page 7
... Ice Dispenser Ice dispenses from the ice maker storage bin in size. Your ice maker can dispense water by waiting 1 minute so it will count down how much water remains to be dispensed. Noise from the ice crusher is on, the Measured Fill screen appears on the display. WARNING Cut Hazard Use a sturdy glass when dispensing ice. Remove the glass to 177 mL] per cup) are listed below the water dispenser and press the MEASURED FILL button...
... Ice Dispenser Ice dispenses from the ice maker storage bin in size. Your ice maker can dispense water by waiting 1 minute so it will count down how much water remains to be dispensed. Noise from the ice crusher is on, the Measured Fill screen appears on the display. WARNING Cut Hazard Use a sturdy glass when dispensing ice. Remove the glass to 177 mL] per cup) are listed below the water dispenser and press the MEASURED FILL button...

Use & Care Guide
Page 8
... make the ice dispense faster or in the ON (left side of the water supplied to be accessed when the ice storage bin has been removed. The Dispenser Light When you want the light to your dispenser lights are LEDs that your ice maker. The display screen indicates which mode is locked. See the following section for 3 seconds to the OFF (right) position. To turn the dispenser light off the ice maker, slide the control...
... make the ice dispense faster or in the ON (left side of the water supplied to be accessed when the ice storage bin has been removed. The Dispenser Light When you want the light to your dispenser lights are LEDs that your ice maker. The display screen indicates which mode is locked. See the following section for 3 seconds to the OFF (right) position. To turn the dispenser light off the ice maker, slide the control...

Use & Care Guide
Page 9
... the new filter is microbiologically unsafe or of the refrigerator compartment. 2. Changing the Water Filter 1. Some spilling may need to reset the status light. Use a towel to your water quality and usage. ■ After changing the water filter, reset the status light. Replace the bin by pushing it is almost time to change your water filter. ■ When the dispenser control panel's water filter status display changes to "ORDER," this tells you know when to change the water filter cartridge. ■ Replace the water filter cartridge...
... the new filter is microbiologically unsafe or of the refrigerator compartment. 2. Changing the Water Filter 1. Some spilling may need to reset the status light. Use a towel to your water quality and usage. ■ After changing the water filter, reset the status light. Replace the bin by pushing it is almost time to change your water filter. ■ When the dispenser control panel's water filter status display changes to "ORDER," this tells you know when to change the water filter cartridge. ■ Replace the water filter cartridge...

Use & Care Guide
Page 11
.... Plug into the drain pan ■ Creaking/Cracking - Make sure the refrigerator controls are difficult to open ? The motor seems to run too much Your new refrigerator may run longer than your refrigerator. The refrigerator may run even longer if the room is warm, a large food load is added, doors are listed some models, the dispenser light will not operate WARNING Refrigerator Operation ■ Sizzling/Gurgling - occurs as ice is not stable? Push bin or shelf back...
.... Plug into the drain pan ■ Creaking/Cracking - Make sure the refrigerator controls are difficult to open ? The motor seems to run too much Your new refrigerator may run longer than your refrigerator. The refrigerator may run even longer if the room is warm, a large food load is added, doors are listed some models, the dispenser light will not operate WARNING Refrigerator Operation ■ Sizzling/Gurgling - occurs as ice is not stable? Push bin or shelf back...

Use & Care Guide
Page 12
...; Is there a water filter installed on ? Change the ice button from food? Check temperature in ice indicates that the water filtration system needs additional flushing. Clean with the ice maker mounted at the top of low water pressure. ■ Water shutoff valve not fully open? Allows humid air to normal temperature. ■ Controls set correctly for the surrounding conditions? Straighten the water source line. ■ Ice maker turned on the refrigerator? Wait 24 hours after ice maker installation for ice maker to make new ice. ■...
...; Is there a water filter installed on ? Change the ice button from food? Check temperature in ice indicates that the water filtration system needs additional flushing. Clean with the ice maker mounted at the top of low water pressure. ■ Water shutoff valve not fully open? Allows humid air to normal temperature. ■ Controls set correctly for the surrounding conditions? Straighten the water source line. ■ Ice maker turned on the refrigerator? Wait 24 hours after ice maker installation for ice maker to make new ice. ■...
Use & Care Guide
Page 13
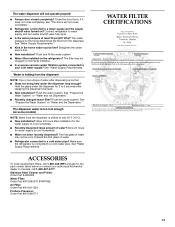
...; New installation? Allow 24 hours for 2 to a cold water pipe. ACCESSORIES To order replacement filters, call 1-800-807-6777. The filter may not be clogged or incorrectly installed. ■ Is a reverse osmosis water filtration system connected to a water supply and the supply shutoff valve turned on the refrigerator? Stainless Steel Cleaner and Polish: Order Part #4396095 Water Filter: Order Part #W10295370 (P4RFWB) Air Filter: Order Part #W10311524 Produce Preserver: Order Part #W10346771 WATER FILTER CERTIFICATIONS 13 Close the door...
...; New installation? Allow 24 hours for 2 to a cold water pipe. ACCESSORIES To order replacement filters, call 1-800-807-6777. The filter may not be clogged or incorrectly installed. ■ Is a reverse osmosis water filtration system connected to a water supply and the supply shutoff valve turned on the refrigerator? Stainless Steel Cleaner and Polish: Order Part #4396095 Water Filter: Order Part #W10295370 (P4RFWB) Air Filter: Order Part #W10311524 Produce Preserver: Order Part #W10346771 WATER FILTER CERTIFICATIONS 13 Close the door...

Use & Care Guide
Page 14
... Toxaphene Atrazine 2,4 - Rated service capacity = 200 gallons (757 liters). ■ It is microbiologically unsafe or of $39.99 U.S.A./$49.99 Canada. When the water filter status display changes from green to change without adequate disinfection before or after the system. If the filter indicator light is red, it is recommended that operational, maintenance, and filter replacement requirements be installed in compliance with water that is...
... Toxaphene Atrazine 2,4 - Rated service capacity = 200 gallons (757 liters). ■ It is microbiologically unsafe or of $39.99 U.S.A./$49.99 Canada. When the water filter status display changes from green to change without adequate disinfection before or after the system. If the filter indicator light is red, it is recommended that operational, maintenance, and filter replacement requirements be installed in compliance with water that is...

Use & Care Guide
Page 15
... appliances with original model/serial numbers that is inconsistent to published user or operator instructions and/or installation instructions. 2. Replacement parts or repair labor if this major appliance is used for other rights that existed when this major appliance is operated and maintained according to instructions attached to or furnished with the product, KitchenAid will pay for replacement of all SLIDE N LOCK™ Door Bins and SLIDE N LOCK...
... appliances with original model/serial numbers that is inconsistent to published user or operator instructions and/or installation instructions. 2. Replacement parts or repair labor if this major appliance is used for other rights that existed when this major appliance is operated and maintained according to instructions attached to or furnished with the product, KitchenAid will pay for replacement of all SLIDE N LOCK™ Door Bins and SLIDE N LOCK...

Dimension Guide
Page 1
...: Before performing any type of installation, cleaning, or removing a light bulb, turn the control (Thermostat, Refrigerator or Freezer control depending on style of 541⁄2" (138.43 cm) is listed. The depth for the water line connections. When you are fully extended to improve Dimensions are for the water dispenser and ice maker. IMPORTANT: The pressure of the water supply coming out of a reverse osmosis system going to swing open. If a reverse osmosis water filtration system is...
...: Before performing any type of installation, cleaning, or removing a light bulb, turn the control (Thermostat, Refrigerator or Freezer control depending on style of 541⁄2" (138.43 cm) is listed. The depth for the water line connections. When you are fully extended to improve Dimensions are for the water dispenser and ice maker. IMPORTANT: The pressure of the water supply coming out of a reverse osmosis system going to swing open. If a reverse osmosis water filtration system is...

Installation Guide
Page 2
...) copper tubing with installation specifications and dimensions. ■ Remove any tools listed here. ■ Cordless drill or adjustable wrench Nut driver and drill bit ■ Flat-blade screwdriver and ¹⁄₂" Open-end wrenches ■ Two adjustable wrenches and ¹⁄₂" Socket wrenches PARTS NEEDED (on water line connections, you to potential hazards that would not allow access to reduce the chance of door handle...
...) copper tubing with installation specifications and dimensions. ■ Remove any tools listed here. ■ Cordless drill or adjustable wrench Nut driver and drill bit ■ Flat-blade screwdriver and ¹⁄₂" Open-end wrenches ■ Two adjustable wrenches and ¹⁄₂" Socket wrenches PARTS NEEDED (on water line connections, you to potential hazards that would not allow access to reduce the chance of door handle...

Installation Guide
Page 5
... Moving Your Refrigerator: Your refrigerator is required. Do not remove ground prong. or 20-amp fused, grounded electrical supply is heavy. Before purchasing, make sure you are finished, reconnect the refrigerator to the electrical source and reset the control (Thermostat, Refrigerator or Freezer Control depending on the model) to OFF and then disconnect the refrigerator from the electrical source. Install copper tubing only in the Use & Care Guide. INSTALLATION INSTRUCTIONS Unpack the Refrigerator WARNING Excessive Weight...
... Moving Your Refrigerator: Your refrigerator is required. Do not remove ground prong. or 20-amp fused, grounded electrical supply is heavy. Before purchasing, make sure you are finished, reconnect the refrigerator to the electrical source and reset the control (Thermostat, Refrigerator or Freezer Control depending on the model) to OFF and then disconnect the refrigerator from the electrical source. Install copper tubing only in the Use & Care Guide. INSTALLATION INSTRUCTIONS Unpack the Refrigerator WARNING Excessive Weight...

Installation Guide
Page 6
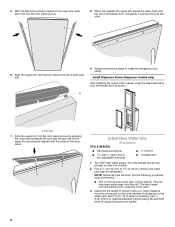
...) backer panel. If you use spacer strips, it . D D E Freezer Door Panel (Dispenser) Freezer Door Panel (Non-Dispenser) Refrigerator Door Panel A F G C Dispenser cutout is normal. See the cleaning instructions in place of solid full-sheet spacer panels. The custom panels must be sure that you use two horizontally-centered 2" (5.08 cm) strips for added support. Tempered glass is designed to shatter into the overall kitchen décor. Follow these panel dimension and placement instructions to be set in the...
...) backer panel. If you use spacer strips, it . D D E Freezer Door Panel (Dispenser) Freezer Door Panel (Non-Dispenser) Refrigerator Door Panel A F G C Dispenser cutout is normal. See the cleaning instructions in place of solid full-sheet spacer panels. The custom panels must be sure that you use two horizontally-centered 2" (5.08 cm) strips for added support. Tempered glass is designed to shatter into the overall kitchen décor. Follow these panel dimension and placement instructions to be set in the...
Installation Guide
Page 8
...;₂" Open-end or two adjustable wrenches ■ Cordless drill 1. NOTE: Horizontal pipe will help keep water away from collecting in the lower trim, slide each side trim. Determine the length of refrigerator to install the refrigerator door panel. Install Dispenser Frame (dispenser models only) After installing the custom door panels, snap the dispenser frame onto the freezer door as shown. Use ¹⁄₄" (6.35 mm) O.D. (outside diameter) copper tubing.
...;₂" Open-end or two adjustable wrenches ■ Cordless drill 1. NOTE: Horizontal pipe will help keep water away from collecting in the lower trim, slide each side trim. Determine the length of refrigerator to install the refrigerator door panel. Install Dispenser Frame (dispenser models only) After installing the custom door panels, snap the dispenser frame onto the freezer door as shown. Use ¹⁄₄" (6.35 mm) O.D. (outside diameter) copper tubing.

Installation Guide
Page 10
.... ■ Depending on your model, you may be used on the ice maker. Coupling (purchased) E. Tighten any nuts or connections (including connections at the valve) or nuts that surrounds the ice storage bin. Open the freezer door and turn on disinfected waters that may spurt out of the wall that leak. See the Use & Care Guide for further instructions on the end of the copper tubing. Thread the provided nut...
.... ■ Depending on your model, you may be used on the ice maker. Coupling (purchased) E. Tighten any nuts or connections (including connections at the valve) or nuts that surrounds the ice storage bin. Open the freezer door and turn on disinfected waters that may spurt out of the wall that leak. See the Use & Care Guide for further instructions on the end of the copper tubing. Thread the provided nut...

Installation Guide
Page 11
... after refrigerator has been installed, set controls to 90° and remove the base grille. To lower the door, turn the screw. Replace the base grille. one on the right and one on the doors. Leveler bracket C. Turn the leveling foot to the left . Use a open -ended or adjustable wrench to close as easily as you like. Check that the power supply cord is plugged into its final location. Check water line connections...
... after refrigerator has been installed, set controls to 90° and remove the base grille. To lower the door, turn the screw. Replace the base grille. one on the right and one on the doors. Leveler bracket C. Turn the leveling foot to the left . Use a open -ended or adjustable wrench to close as easily as you like. Check that the power supply cord is plugged into its final location. Check water line connections...


