
Use & Care Guide
Page 1
...you and others are not followed. Always read and obey all safety messages. All safety messages will need assistance, call us at www.kitchenaid.com for purchasing this manual and on the inside wall of others . You will follow instructions. This is , tell you don't ... visit our website at 1-800-422-1230. If you don't follow instructions. W10416762A In Canada, visit our website at www.kitchenaid.ca or call us at 1-800-807-6777. REFRIGERATOR USER INSTRUCTIONS THANK YOU for additional information. Table of Contents / Índice / Table des matières...
...you and others are not followed. Always read and obey all safety messages. All safety messages will need assistance, call us at www.kitchenaid.com for purchasing this manual and on the inside wall of others . You will follow instructions. This is , tell you don't ... visit our website at 1-800-422-1230. If you don't follow instructions. W10416762A In Canada, visit our website at www.kitchenaid.ca or call us at 1-800-807-6777. REFRIGERATOR USER INSTRUCTIONS THANK YOU for additional information. Table of Contents / Índice / Table des matières...

Use & Care Guide
Page 2
...are still dangerous - If you are getting rid of your old refrigerator, please follow these instructions to know about disposal of refrigerants: Dispose of refrigerator in place so that children may not easily climb inside the refrigerator. 2 1. Important information to help prevent accidents. This helps ...the doors. ■ Leave the shelves in accordance with established procedures. even if they will sit for "just a few days." REFRIGERATOR USE Install Air Filter (on some models, the air filter is located (depending on your model) along either the rear or ...
...are still dangerous - If you are getting rid of your old refrigerator, please follow these instructions to know about disposal of refrigerants: Dispose of refrigerator in place so that children may not easily climb inside the refrigerator. 2 1. Important information to help prevent accidents. This helps ...the doors. ■ Leave the shelves in accordance with established procedures. even if they will sit for "just a few days." REFRIGERATOR USE Install Air Filter (on some models, the air filter is located (depending on your model) along either the rear or ...
Use & Care Guide
Page 3
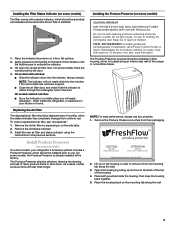
...or convertible drawer. If in eyes, rinse with notches: ■ Slide the indicator down . revers. Place both pouches inside the refrigerator, or elsewhere in eyes, on back. On models with water for 15 minutes. On models without notches: ■ Store the ...Remove the Produce Preserver pouches from white to activate the indicator. 3. NOTE: The indicator will stay fresh longer. Do not get in your refrigerator's accessory packet includes a Produce Preserver, which is installed. l e IRRITANT prudences sur ATTENTION des Lisez CAUTION IRRITANT Read cautions on skin ...
...or convertible drawer. If in eyes, rinse with notches: ■ Slide the indicator down . revers. Place both pouches inside the refrigerator, or elsewhere in eyes, on back. On models with water for 15 minutes. On models without notches: ■ Store the ...Remove the Produce Preserver pouches from white to activate the indicator. 3. NOTE: The indicator will stay fresh longer. Do not get in your refrigerator's accessory packet includes a Produce Preserver, which is installed. l e IRRITANT prudences sur ATTENTION des Lisez CAUTION IRRITANT Read cautions on skin ...

Use & Care Guide
Page 4
... automatically and enter "sleep" mode when the control buttons and dispenser pads have finished viewing (and adjusting if desired) both the refrigerator and freezer set points to activate the display screen. Place the indicator face-down on the Produce Preserver housing. 4. To order ...convenience, your food may spoil. The factory recommended set to red. IMPORTANT: ■ Wait 24 hours before the refrigerator has cooled completely, your refrigerator and freezer controls are still set points are located on some models) The Produce Preserver comes with a status indicator, ...
... automatically and enter "sleep" mode when the control buttons and dispenser pads have finished viewing (and adjusting if desired) both the refrigerator and freezer set points to activate the display screen. Place the indicator face-down on the Produce Preserver housing. 4. To order ...convenience, your food may spoil. The factory recommended set to red. IMPORTANT: ■ Wait 24 hours before the refrigerator has cooled completely, your refrigerator and freezer controls are still set points are located on some models) The Produce Preserver comes with a status indicator, ...

Use & Care Guide
Page 5
...OPTIONS button to enter Options mode, then press OPTIONS again to activate the feature. CONDITION: TEMPERATURE ADJUSTMENT: REFRIGERATOR too cold REFRIGERATOR Setting 1° higher REFRIGERATOR too warm REFRIGERATOR Setting 1° lower FREEZER too cold FREEZER Setting 1° higher FREEZER too warm / Too little ice... FREEZER Setting 1° lower The set point range for the refrigerator and freezer compartments. When cooling is on, all times, change . The Max Cool icon will remain on the dispenser display...
...OPTIONS button to enter Options mode, then press OPTIONS again to activate the feature. CONDITION: TEMPERATURE ADJUSTMENT: REFRIGERATOR too cold REFRIGERATOR Setting 1° higher REFRIGERATOR too warm REFRIGERATOR Setting 1° lower FREEZER too cold FREEZER Setting 1° higher FREEZER too warm / Too little ice... FREEZER Setting 1° lower The set point range for the refrigerator and freezer compartments. When cooling is on, all times, change . The Max Cool icon will remain on the dispenser display...

Use & Care Guide
Page 6
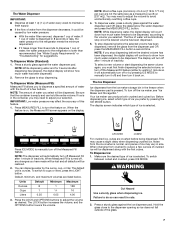
...NOTES: ■ The dispensing system will return to wait 24 hours between LOW and HIGH. Water and Ice Dispensers IMPORTANT: After connecting the refrigerator to the right (less cold), toward the VEG setting. Use a sturdy container to depress and hold the OPTIONS and LOCK buttons at the...For optimum performance of 3 gal. (12 L) has been dispensed. Chilled Door Bin Control The chilled door bin control is open ) for the refrigerator to cool down and chill water. ■ Allow 24 hours to confirm the calibration. After reactivation, changes to any time to any settings. ...
...NOTES: ■ The dispensing system will return to wait 24 hours between LOW and HIGH. Water and Ice Dispensers IMPORTANT: After connecting the refrigerator to the right (less cold), toward the VEG setting. Use a sturdy container to depress and hold the OPTIONS and LOCK buttons at the...For optimum performance of 3 gal. (12 L) has been dispensed. Chilled Door Bin Control The chilled door bin control is open ) for the refrigerator to cool down and chill water. ■ Allow 24 hours to confirm the calibration. After reactivation, changes to any time to any settings. ...
Use & Care Guide
Page 7
... be restored. 2. To stop dispensing before being dispensed. See "Water Supply Requirements" or "Troubleshooting" for 3 seconds after 1 minute of water, the water pressure to the refrigerator is turned off ) and then turn off Measured Fill after 1 minute of ice may need to adjust the volume to 177 mL] per cup) are... listed below the water dispenser and press the MEASURED FILL button. Your ice maker can dispense water by pressing ICE MODE to the refrigerator meets the minimum requirement. ■ If it back on.
... be restored. 2. To stop dispensing before being dispensed. See "Water Supply Requirements" or "Troubleshooting" for 3 seconds after 1 minute of water, the water pressure to the refrigerator is turned off ) and then turn off Measured Fill after 1 minute of ice may need to adjust the volume to 177 mL] per cup) are... listed below the water dispenser and press the MEASURED FILL button. Your ice maker can dispense water by pressing ICE MODE to the refrigerator meets the minimum requirement. ■ If it back on.

Use & Care Guide
Page 8
The dispenser light will automatically turn the dispenser light off power to the refrigerator, to the ice maker, or to the dispenser light. The Dispenser Lock The dispenser can cause damage to the ice container and the dispenser mechanism. &#...
The dispenser light will automatically turn the dispenser light off power to the refrigerator, to the ice maker, or to the dispenser light. The Dispenser Lock The dispenser can cause damage to the ice container and the dispenser mechanism. &#...

Use & Care Guide
Page 9
... door is almost time to the ON position. Use a towel to keep the storage bin from the bottom. 2. Take the new filter out of the refrigerator compartment. 2. NOTE: The ice maker has an automatic shutoff to wipe up ) position. Lift the wire shutoff arm so it out. 4. Replace the bin by...
... door is almost time to the ON position. Use a towel to keep the storage bin from the bottom. 2. Take the new filter out of the refrigerator compartment. 2. NOTE: The ice maker has an automatic shutoff to wipe up ) position. Lift the wire shutoff arm so it out. 4. Replace the bin by...

Use & Care Guide
Page 10
..., cleaning waxes, concentrated detergents, bleaches or cleansers containing petroleum products on plastic parts, interior and door liners or gaskets. Unplug refrigerator or disconnect power. 2. Wash stainless steel and painted metal exteriors with a soft brush to ensure maximum efficiency. See the ...clean sponge or soft cloth and a mild detergent in the User Instructions or the separate instruction sheet provided with your refrigerator. REFRIGERATOR CARE Cleaning WARNING Explosion Hazard Use nonflammable cleaner. You must thoroughly clean both sections about once a month to replace ...
..., cleaning waxes, concentrated detergents, bleaches or cleansers containing petroleum products on plastic parts, interior and door liners or gaskets. Unplug refrigerator or disconnect power. 2. Wash stainless steel and painted metal exteriors with a soft brush to ensure maximum efficiency. See the ...clean sponge or soft cloth and a mild detergent in the User Instructions or the separate instruction sheet provided with your refrigerator. REFRIGERATOR CARE Cleaning WARNING Explosion Hazard Use nonflammable cleaner. You must thoroughly clean both sections about once a month to replace ...

Use & Care Guide
Page 11
..., the dispenser light will operate only when a dispenser lever/pad is not stable? In the U.S.A., www.kitchenaid.com In Canada, www.kitchenaid.ca The refrigerator will not close completely ■ Door blocked open? contraction/expansion of the refrigerator Explosion Hazard Use nonflammable cleaner. Do not remove ground prong. The doors will not operate WARNING...
..., the dispenser light will operate only when a dispenser lever/pad is not stable? In the U.S.A., www.kitchenaid.com In Canada, www.kitchenaid.ca The refrigerator will not close completely ■ Door blocked open? contraction/expansion of the refrigerator Explosion Hazard Use nonflammable cleaner. Do not remove ground prong. The doors will not operate WARNING...

Use & Care Guide
Page 12
... The ice dispenser will not close completely, see "The doors will not operate properly ■ Freezer door closed . Allow several hours for refrigerator to return to normal temperature. ■ Controls set correctly for ice maker to make new ice. ■ Odor transfer from "crushed" ... is firmly in ice indicates that the water filtration system needs additional flushing. Make sure wire shutoff arm or switch (depending on the refrigerator? See "Using the Controls." See "Water Supply Requirements." Close the door firmly. Wait 3 minutes for ice production to a water ...
... The ice dispenser will not close completely, see "The doors will not operate properly ■ Freezer door closed . Allow several hours for refrigerator to return to normal temperature. ■ Controls set correctly for ice maker to make new ice. ■ Odor transfer from "crushed" ... is firmly in ice indicates that the water filtration system needs additional flushing. Make sure wire shutoff arm or switch (depending on the refrigerator? See "Using the Controls." See "Water Supply Requirements." Close the door firmly. Wait 3 minutes for ice production to a water ...
Use & Care Guide
Page 13
...;F (10°C). ■ New installation? Water is leaking from the dispenser is chilled to your authorized KitchenAid dealer. Flush the water system. Connect refrigerator to 3 seconds after releasing the dispenser lever/pad. ■ New installation? Hold the glass under the ...: Order Part #W10311524 Produce Preserver: Order Part #W10346771 WATER FILTER CERTIFICATIONS 13 The water dispenser will not close completely." ■ Refrigerator connected to a cold water pipe? Discard the first glass of water? Flush and fill the water system. ■ Water filter ...
...;F (10°C). ■ New installation? Water is leaking from the dispenser is chilled to your authorized KitchenAid dealer. Flush the water system. Connect refrigerator to 3 seconds after releasing the dispenser lever/pad. ■ New installation? Hold the glass under the ...: Order Part #W10311524 Produce Preserver: Order Part #W10346771 WATER FILTER CERTIFICATIONS 13 The water dispenser will not close completely." ■ Refrigerator connected to a cold water pipe? Discard the first glass of water? Flush and fill the water system. ■ Water filter ...

Use & Care Guide
Page 15
...misuse, abuse, fire, flood, acts of God, improper installation, installation not in accordance with the product, KitchenAid will pay for replacement or repair of the refrigerator/freezer cavity liner (including labor costs) if the part cracks due to defective materials or workmanship that is...also may have been removed, altered or cannot be provided by an authorized KitchenAid servicer is inconsistent to published user or operator instructions and/or installation instructions. 2. KITCHENAID® REFRIGERATOR WARRANTY LIMITED WARRANTY For one year from the date of purchase, when this ...
...misuse, abuse, fire, flood, acts of God, improper installation, installation not in accordance with the product, KitchenAid will pay for replacement or repair of the refrigerator/freezer cavity liner (including labor costs) if the part cracks due to defective materials or workmanship that is...also may have been removed, altered or cannot be provided by an authorized KitchenAid servicer is inconsistent to published user or operator instructions and/or installation instructions. 2. KITCHENAID® REFRIGERATOR WARRANTY LIMITED WARRANTY For one year from the date of purchase, when this ...

Use & Care Guide
Page 16
... number and serial number on the label, located on the inside wall of the refrigerator compartment. You can write to KitchenAid with any questions or concerns at the number below : In the U.S.A.: KitchenAid Brand Home Appliances Customer eXperience Center 553 Benson Road Benton Harbor, MI 49022-2692...a daytime phone number in your complete model number ready. Have your correspondence. For additional product information, in the U.S.A., visit www.kitchenaid.com In Canada, visit www.kitchenaid.ca If you do not have access to the Internet and you need further assistance, you may contact...
... number and serial number on the label, located on the inside wall of the refrigerator compartment. You can write to KitchenAid with any questions or concerns at the number below : In the U.S.A.: KitchenAid Brand Home Appliances Customer eXperience Center 553 Benson Road Benton Harbor, MI 49022-2692...a daytime phone number in your complete model number ready. Have your correspondence. For additional product information, in the U.S.A., visit www.kitchenaid.com In Canada, visit www.kitchenaid.ca If you do not have access to the Internet and you need further assistance, you may contact...

Dimension Guide
Page 1
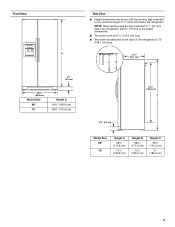
....9 cm) (90.0 cm) (116.4 cm) 1/2" (1.25 cm) 2" (5.08 cm) To ensure proper ventilation for product installation is required. When installing your refrigerator next to a fixed wall, leave a 2" (5.08 cm) minimum space on your cold water supply, the water pressure to the reverse osmosis system needs to change... water pressure between 30 and 120 psi (207 and 827 kPa). The depth for the water line connections. If your refrigerator be turned off by Side Refrigerator PRODUCT MODEL NUMBERS KSC23C8EY KSC24C8EY Electrical: A 115-Volt, 60-Hz., AC-only 15- Ref. Use an outlet that ...
....9 cm) (90.0 cm) (116.4 cm) 1/2" (1.25 cm) 2" (5.08 cm) To ensure proper ventilation for product installation is required. When installing your refrigerator next to a fixed wall, leave a 2" (5.08 cm) minimum space on your cold water supply, the water pressure to the reverse osmosis system needs to change... water pressure between 30 and 120 psi (207 and 827 kPa). The depth for the water line connections. If your refrigerator be turned off by Side Refrigerator PRODUCT MODEL NUMBERS KSC23C8EY KSC24C8EY Electrical: A 115-Volt, 60-Hz., AC-only 15- Ref. Use an outlet that ...

Installation Guide
Page 2
...Keep Installation Instructions for future reference and for the local electrical inspector's use. ■ Keep cardboard shipping piece or plywood under refrigerator until it is , tell you and others are not followed. These words mean: DANGER You can purchase a ¹⁄&#... follow instructions. All safety messages will follow instructions. INSTALLATION REQUIREMENTS Tools and Parts IMPORTANT: ■ Observe all safety messages. REFRIGERATOR SAFETY Your safety and the safety of others . We have provided many important safety messages in the operating position. ■...
...Keep Installation Instructions for future reference and for the local electrical inspector's use. ■ Keep cardboard shipping piece or plywood under refrigerator until it is , tell you and others are not followed. These words mean: DANGER You can purchase a ¹⁄&#... follow instructions. All safety messages will follow instructions. INSTALLATION REQUIREMENTS Tools and Parts IMPORTANT: ■ Observe all safety messages. REFRIGERATOR SAFETY Your safety and the safety of others . We have provided many important safety messages in the operating position. ■...
Installation Guide
Page 3
... power cord is 78" (198.1 cm) long. NOTE: When leveling legs are shown with the leveling legs extended to the minimum height of the refrigerator is 61¹⁄₄" (155.6 cm) long. ■ The water line attached to the back of ¹⁄₄" (6.35 mm) below ...the refrigerator, add ³⁄₄" (19 mm) to 1" (25 mm) below the refrigerator. A B 21³⁄₄" (55.1 cm) 61¹⁄₄" (155.6 cm) C 3¹⁄₄" (8.2 cm) ...
... power cord is 78" (198.1 cm) long. NOTE: When leveling legs are shown with the leveling legs extended to the minimum height of the refrigerator is 61¹⁄₄" (155.6 cm) long. ■ The water line attached to the back of ¹⁄₄" (6.35 mm) below ...the refrigerator, add ³⁄₄" (19 mm) to 1" (25 mm) below the refrigerator. A B 21³⁄₄" (55.1 cm) 61¹⁄₄" (155.6 cm) C 3¹⁄₄" (8.2 cm) ...

Installation Guide
Page 4
... maximum* 18³⁄₈" (46.4 cm) 18³⁄₈" (46.4 cm) *Dimension may vary based on style of the refrigerator opening height required for the largest available handle is listed. See the "Door Swing Dimensions" section. ■ Do not install the... to fully open fully. Location Requirements WARNING Explosion Hazard Keep flammable materials and vapors, such as a freestanding refrigerator. ■ If you are fully extended to 1" (25 mm) below the refrigerator, add ³⁄₄" (19 mm) to fully open the freezer door and "C" represents the distance...
... maximum* 18³⁄₈" (46.4 cm) 18³⁄₈" (46.4 cm) *Dimension may vary based on style of the refrigerator opening height required for the largest available handle is listed. See the "Door Swing Dimensions" section. ■ Do not install the... to fully open fully. Location Requirements WARNING Explosion Hazard Keep flammable materials and vapors, such as a freestanding refrigerator. ■ If you are fully extended to 1" (25 mm) below the refrigerator, add ³⁄₄" (19 mm) to fully open the freezer door and "C" represents the distance...

Installation Guide
Page 5
... connection. Do not use a piercing-type or 4.76 mm) saddle valve which reduces water flow and clogs more people to move and install refrigerator. IMPORTANT: ■ Use ³⁄₈" socket wrench to remove skids. ■ All four leveling legs must meet local plumbing code ...glue. Water Pressure A cold water supply with water pressure of installation, cleaning, or removing a light bulb, turn the control (Thermostat, Refrigerator or Freezer Control depending on the reverse osmosis system to the water inlet valve of cooling. Reverse Osmosis Water Supply IMPORTANT: The pressure ...
... connection. Do not use a piercing-type or 4.76 mm) saddle valve which reduces water flow and clogs more people to move and install refrigerator. IMPORTANT: ■ Use ³⁄₈" socket wrench to remove skids. ■ All four leveling legs must meet local plumbing code ...glue. Water Pressure A cold water supply with water pressure of installation, cleaning, or removing a light bulb, turn the control (Thermostat, Refrigerator or Freezer Control depending on the reverse osmosis system to the water inlet valve of cooling. Reverse Osmosis Water Supply IMPORTANT: The pressure ...


