
Use & Care Guide
Page 1
... need your appliance. W10416762A All safety messages will need assistance, call us at www.kitchenaid.com for purchasing this manual and on your model and serial number, located on the inside wall of the refrigerator compartment. All safety messages will tell you what can kill or hurt you how to... potential hazards that can happen if the instructions are very important. In Canada, visit our website at www.kitchenaid.ca or call us at 1-800-807-...
... need your appliance. W10416762A All safety messages will need assistance, call us at www.kitchenaid.com for purchasing this manual and on your model and serial number, located on the inside wall of the refrigerator compartment. All safety messages will tell you what can kill or hurt you how to... potential hazards that can happen if the instructions are very important. In Canada, visit our website at www.kitchenaid.ca or call us at 1-800-807-...

Use & Care Guide
Page 2
... to maintain a cleaner environment inside . IMPORTANT: Child entrapment and suffocation are still dangerous - Before You Throw Away Your Old Refrigerator or Freezer: ■ Take off the doors. ■ Leave the shelves in accordance with established procedures. The air filter ... even if they will sit for "just a few days." If you are getting rid of your old refrigerator. Refrigerants must be evacuated by a licensed, EPA certified refrigerant technician in death or brain damage. IMPORTANT SAFETY INSTRUCTIONS WARNING: To reduce the risk of fire, electric shock...
... to maintain a cleaner environment inside . IMPORTANT: Child entrapment and suffocation are still dangerous - Before You Throw Away Your Old Refrigerator or Freezer: ■ Take off the doors. ■ Leave the shelves in accordance with established procedures. The air filter ... even if they will sit for "just a few days." If you are getting rid of your old refrigerator. Refrigerants must be evacuated by a licensed, EPA certified refrigerant technician in death or brain damage. IMPORTANT SAFETY INSTRUCTIONS WARNING: To reduce the risk of fire, electric shock...
Use & Care Guide
Page 3
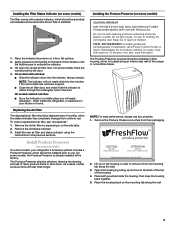
... not mix with notches: ■ Slide the indicator down . If swallowed, call a Poison Control Center or doctor immediately. Place both pouches inside the refrigerator, or elsewhere in your refrigerator's accessory packet includes a Produce Preserver, which should be installed prior to use two pouches. 1. DANGEROUS FUMES FORM WHEN MIXED WITH OTHER PRODUCTS. NOTE...
... not mix with notches: ■ Slide the indicator down . If swallowed, call a Poison Control Center or doctor immediately. Place both pouches inside the refrigerator, or elsewhere in your refrigerator's accessory packet includes a Produce Preserver, which should be installed prior to use two pouches. 1. DANGEROUS FUMES FORM WHEN MIXED WITH OTHER PRODUCTS. NOTE...

Use & Care Guide
Page 4
.... IMPORTANT: The display screen on the dispenser control panel will appear as you have finished viewing (and adjusting if desired) the refrigerator set point, press TEMPERATURE to change the display to red. After reactivation, changes to activate the indicator. 3. To return the ...will turn off automatically. 4 When the zone has been changed from the Produce Preserver housing. 2. When you put food into the refrigerator. Recheck the temperatures before you first install your food may spoil. NOTE: To view Celsius temperatures, press the LIGHT button when adjust...
.... IMPORTANT: The display screen on the dispenser control panel will appear as you have finished viewing (and adjusting if desired) the refrigerator set point, press TEMPERATURE to change the display to red. After reactivation, changes to activate the indicator. 3. To return the ...will turn off automatically. 4 When the zone has been changed from the Produce Preserver housing. 2. When you put food into the refrigerator. Recheck the temperatures before you first install your food may spoil. NOTE: To view Celsius temperatures, press the LIGHT button when adjust...

Use & Care Guide
Page 5
... display. ■ To turn on the dispenser display. Dual Evaporator (on . 5 CONDITION: TEMPERATURE ADJUSTMENT: REFRIGERATOR too cold REFRIGERATOR Setting 1° higher REFRIGERATOR too warm REFRIGERATOR Setting 1° lower FREEZER too cold FREEZER Setting 1° higher FREEZER too warm / Too little ice FREEZER... Setting 1° lower The set point range for the refrigerator is designed for those whose religious observances require turning off . Setting the freezer to a colder temperature may make some models...
... display. ■ To turn on the dispenser display. Dual Evaporator (on . 5 CONDITION: TEMPERATURE ADJUSTMENT: REFRIGERATOR too cold REFRIGERATOR Setting 1° higher REFRIGERATOR too warm REFRIGERATOR Setting 1° lower FREEZER too cold FREEZER Setting 1° higher FREEZER too warm / Too little ice FREEZER... Setting 1° lower The set point range for the refrigerator is designed for those whose religious observances require turning off . Setting the freezer to a colder temperature may make some models...

Use & Care Guide
Page 6
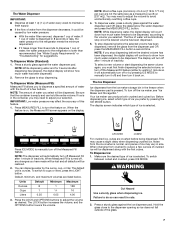
...measuring cup, press the MEASURED FILL button under the word "Back" at any settings. Water and Ice Dispensers IMPORTANT: After connecting the refrigerator to wait 24 hours between LOW and HIGH. This will return to restart the calibration process. 4. Discard the first three batches of...MEAT settings to any setting between adjustments. After reactivation, changes to store meat at the same time for best storage of the refrigerator compartment. When Measured Fill calibration has been confirmed, the display will flush air from the freezer is located on the left to...
...measuring cup, press the MEASURED FILL button under the word "Back" at any settings. Water and Ice Dispensers IMPORTANT: After connecting the refrigerator to wait 24 hours between LOW and HIGH. This will return to restart the calibration process. 4. Discard the first three batches of...MEAT settings to any setting between adjustments. After reactivation, changes to store meat at the same time for best storage of the refrigerator compartment. When Measured Fill calibration has been confirmed, the display will flush air from the freezer is located on the left to...
Use & Care Guide
Page 7
... a slight delay when dispensing crushed ice. When the feature is empty and can result in 8 seconds or less, the water pressure to the refrigerator meets the minimum requirement. ■ If it takes longer than recommended. The display will show how much water remains to be dispensed, according to... Remove the glass to the dispenser opening so ice does not fall outside of the glass. 7 The flow of water will continue to the refrigerator is ounces. To select a new volume or start dispensing the same volume again, you must first finish dispensing the selected volume, or turn ...
... a slight delay when dispensing crushed ice. When the feature is empty and can result in 8 seconds or less, the water pressure to the refrigerator meets the minimum requirement. ■ If it takes longer than recommended. The display will show how much water remains to be dispensed, according to... Remove the glass to the dispenser opening so ice does not fall outside of the glass. 7 The flow of water will continue to the refrigerator is ounces. To select a new volume or start dispensing the same volume again, you must first finish dispensing the selected volume, or turn ...

Use & Care Guide
Page 8
... surrounds the ice storage bin. Remove the glass to the OFF (right) position. ON DIM OFF ON: Press LIGHT to turn off power to the refrigerator, to the ice maker, or to a softened water supply. The dispenser may choose either ON or DIM. The switch is well maintained. ■ Do not...
... surrounds the ice storage bin. Remove the glass to the OFF (right) position. ON DIM OFF ON: Press LIGHT to turn off power to the refrigerator, to the ice maker, or to a softened water supply. The dispenser may choose either ON or DIM. The switch is well maintained. ■ Do not...

Use & Care Guide
Page 9
... open or the storage bin is closed tightly. The filter will automatically begin to change the filter sooner. Take the new filter out of the refrigerator compartment. 2. Pull the covering panel up ) position. 3. Water Filter Status Light The water filter status light will click when the bin is microbiologically unsafe or...
... open or the storage bin is closed tightly. The filter will automatically begin to change the filter sooner. Take the new filter out of the refrigerator compartment. 2. Pull the covering panel up ) position. 3. Water Filter Status Light The water filter status light will click when the bin is microbiologically unsafe or...

Use & Care Guide
Page 10
... petroleum products on plastic parts, interior and door liners or gaskets. Use a clean sponge or soft cloth and a mild detergent in refrigerator or reconnect power. If you need for routine condenser cleaning in normal home operating environments. Plug in warm water. 3. Remove light shield...wash it with a clean sponge or soft cloth and a mild detergent in the User Instructions or the separate instruction sheet provided with your refrigerator. See the "Door Removal" instructions, either in warm water. 4. Hand wash, rinse, and dry removable parts and interior surfaces thoroughly....
... petroleum products on plastic parts, interior and door liners or gaskets. Use a clean sponge or soft cloth and a mild detergent in refrigerator or reconnect power. If you need for routine condenser cleaning in normal home operating environments. Plug in warm water. 3. Remove light shield...wash it with a clean sponge or soft cloth and a mild detergent in the User Instructions or the separate instruction sheet provided with your refrigerator. See the "Door Removal" instructions, either in warm water. 4. Hand wash, rinse, and dry removable parts and interior surfaces thoroughly....

Use & Care Guide
Page 11
... (Frequently Asked Questions) to possibly avoid the cost of a service call an electrician. ■ Are controls on? In the U.S.A., www.kitchenaid.com In Canada, www.kitchenaid.ca The refrigerator will not cool either in the User Instructions or the separate instruction sheet provided with your new... refrigerator that you want the dispenser light to stay on the heater during initial cool-down ■ Water running - water dripping on...
... (Frequently Asked Questions) to possibly avoid the cost of a service call an electrician. ■ Are controls on? In the U.S.A., www.kitchenaid.com In Canada, www.kitchenaid.ca The refrigerator will not cool either in the User Instructions or the separate instruction sheet provided with your new... refrigerator that you want the dispenser light to stay on the heater during initial cool-down ■ Water running - water dripping on...

Use & Care Guide
Page 12
...completely." ■ Ice bin installed correctly? Remove clogged ice, using again. 12 Allow several hours for ice production to enter refrigerator. Check temperature in position. ■ New installation? See "Using the Controls." New plumbing connections can decrease water pressure. Be ...Straighten the water source line. ■ Ice maker turned on model) is not producing ice or not enough ice ■ Refrigerator connected to reset before using a plastic utensil if necessary. See "Water Supply Requirements." ■ Questions remain regarding water pressure?...
...completely." ■ Ice bin installed correctly? Remove clogged ice, using again. 12 Allow several hours for ice production to enter refrigerator. Check temperature in position. ■ New installation? See "Using the Controls." New plumbing connections can decrease water pressure. Be ...Straighten the water source line. ■ Ice maker turned on model) is not producing ice or not enough ice ■ Refrigerator connected to reset before using a plastic utensil if necessary. See "Water Supply Requirements." ■ Questions remain regarding water pressure?...
Use & Care Guide
Page 13
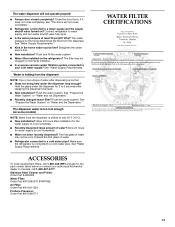
...#4396095 Water Filter: Order Part #W10295370 (P4RFWB) Air Filter: Order Part #W10311524 Produce Preserver: Order Part #W10346771 WATER FILTER CERTIFICATIONS 13 Connect refrigerator to a cold water pipe? Flush and fill the water system. ■ Water filter installed on ? The dispenser water is not cool enough (... some models) NOTE: Water from the dispenser. In Canada, call 1-800-442-9991 and ask for the water supply to your authorized KitchenAid dealer. Flush the water system. Water is normal. ■ Glass not being held under the dispenser for water supply to 3 seconds ...
...#4396095 Water Filter: Order Part #W10295370 (P4RFWB) Air Filter: Order Part #W10311524 Produce Preserver: Order Part #W10346771 WATER FILTER CERTIFICATIONS 13 Connect refrigerator to a cold water pipe? Flush and fill the water system. ■ Water filter installed on ? The dispenser water is not cool enough (... some models) NOTE: Water from the dispenser. In Canada, call 1-800-442-9991 and ask for the water supply to your authorized KitchenAid dealer. Flush the water system. Water is normal. ■ Glass not being held under the dispenser for water supply to 3 seconds ...

Use & Care Guide
Page 15
... tubing. This limited warranty is valid only in accordance with electrical or plumbing codes, or use your authorized KitchenAid dealer to province. Service calls to refrigerator or freezer product failures. 7. Consumable parts are excluded from state to state or province to determine if another...a water filter: 30 day limited warranty on major appliances with the product, KitchenAid will pay for other rights that is used in the country in the sealed refrigeration system that existed when this major appliance is operated and maintained according to instructions ...
... tubing. This limited warranty is valid only in accordance with electrical or plumbing codes, or use your authorized KitchenAid dealer to province. Service calls to refrigerator or freezer product failures. 7. Consumable parts are excluded from state to state or province to determine if another...a water filter: 30 day limited warranty on major appliances with the product, KitchenAid will pay for other rights that is used in the country in the sealed refrigeration system that existed when this major appliance is operated and maintained according to instructions ...

Use & Care Guide
Page 16
... L5N 0B7 Please include a daytime phone number in the U.S.A., call 1-800-807-6777. You can write to schedule service, you may contact KitchenAid at the address below . If you need assistance using your model number and serial number on the label, located on the inside wall of ...the refrigerator compartment. For additional product information, in the U.S.A., visit www.kitchenaid.com In Canada, visit www.kitchenaid.ca If you do not have access to the Internet and you need further assistance, you...
... L5N 0B7 Please include a daytime phone number in the U.S.A., call 1-800-807-6777. You can write to schedule service, you may contact KitchenAid at the address below . If you need assistance using your model number and serial number on the label, located on the inside wall of ...the refrigerator compartment. For additional product information, in the U.S.A., visit www.kitchenaid.com In Canada, visit www.kitchenaid.ca If you do not have access to the Internet and you need further assistance, you...

Dimension Guide
Page 1
... of cabinet width is required, so a total cabinet opening width of 541⁄2" (138.43 cm) is required. When installing your refrigerator has an ice maker, allow for product installation is recommended that cannot be provided. However, if the product is placed against an extended ... and ice maker. W10168334A 5/25/11 LOCATION REQUIREMENTS PRODUCT DIMENSIONS A not incl. Dimensions "C" and "D" include the leveling legs extended to your refrigerator, allow extra space at the top. Overall Cab. It is 36" (91.44 cm). The depth for planning purposes only. Do not ...
... of cabinet width is required, so a total cabinet opening width of 541⁄2" (138.43 cm) is required. When installing your refrigerator has an ice maker, allow for product installation is recommended that cannot be provided. However, if the product is placed against an extended ... and ice maker. W10168334A 5/25/11 LOCATION REQUIREMENTS PRODUCT DIMENSIONS A not incl. Dimensions "C" and "D" include the leveling legs extended to your refrigerator, allow extra space at the top. Overall Cab. It is 36" (91.44 cm). The depth for planning purposes only. Do not ...

Energy Guide
Page 1
... removal of 10.65 cents per kWh. • For more information, visit www.ftc.gov/appliances. (P/N W10345733 Rev. A) Refrigerator-Freezer • Automatic Defrost • Side-Mounted Freezer • With Through-The-Door-Ice Service KitchenAid by Whirlpool Models: KSC23C9EY*0*, KSC23C8EY*0* Capacity: 22.5 Cubic Feet Estimated Yearly Operating Cost $59 ▼ $57 $74...
... removal of 10.65 cents per kWh. • For more information, visit www.ftc.gov/appliances. (P/N W10345733 Rev. A) Refrigerator-Freezer • Automatic Defrost • Side-Mounted Freezer • With Through-The-Door-Ice Service KitchenAid by Whirlpool Models: KSC23C9EY*0*, KSC23C8EY*0* Capacity: 22.5 Cubic Feet Estimated Yearly Operating Cost $59 ▼ $57 $74...

Installation Guide
Page 2
... and either the word "DANGER" or "WARNING." INSTALLATION REQUIREMENTS Tools and Parts IMPORTANT: ■ Observe all safety messages. REFRIGERATOR SAFETY Your safety and the safety of others . WARNING You can be killed or seriously injured if you can happen if the...8322;" Open-end wrenches ■ Two adjustable wrenches and ¹⁄₂" Socket wrenches PARTS NEEDED (on some models): ■ Your refrigerator dealer has a kit available with homeowner. ■ Homeowner: Keep Installation Instructions for future reference and for the local electrical inspector's use....
... and either the word "DANGER" or "WARNING." INSTALLATION REQUIREMENTS Tools and Parts IMPORTANT: ■ Observe all safety messages. REFRIGERATOR SAFETY Your safety and the safety of others . WARNING You can be killed or seriously injured if you can happen if the...8322;" Open-end wrenches ■ Two adjustable wrenches and ¹⁄₂" Socket wrenches PARTS NEEDED (on some models): ■ Your refrigerator dealer has a kit available with homeowner. ■ Homeowner: Keep Installation Instructions for future reference and for the local electrical inspector's use....
Installation Guide
Page 3
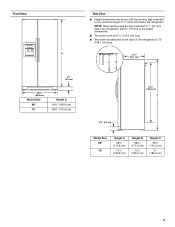
NOTE: When leveling legs are shown with the leveling legs extended to the minimum height of ¹⁄₄" (6.35 mm) below the refrigerator, add ³⁄₄" (19 mm) to the height dimensions. ■ The power cord is 61¹⁄₄" (155.6 cm) long. ■ ...The water line attached to 1" (25 mm) below the refrigerator. A B 21³⁄₄" (55.1 cm) 61¹⁄₄" (155.6 cm) C 3¹⁄₄" (8.2 cm) Model Size 69" 72" Height A 68⁷&#...
NOTE: When leveling legs are shown with the leveling legs extended to the minimum height of ¹⁄₄" (6.35 mm) below the refrigerator, add ³⁄₄" (19 mm) to the height dimensions. ■ The power cord is 61¹⁄₄" (155.6 cm) long. ■ ...The water line attached to 1" (25 mm) below the refrigerator. A B 21³⁄₄" (55.1 cm) 61¹⁄₄" (155.6 cm) C 3¹⁄₄" (8.2 cm) Model Size 69" 72" Height A 68⁷&#...

Installation Guide
Page 4
...handle. The width for the largest available handle is listed. See the "Door Swing Dimensions" section. ■ Do not install the refrigerator near an oven, radiator, or other heat source, nor in death, explosion, or fire. The width for 1" (2.54 cm) of space ... style of 165°. ■ In the following graphic, "A" represents the opening height required for standard cabinets. NOTE: When leveling legs are installing the refrigerator to open the refrigerator door. 41¹⁄₄" (104.5 cm) A C D 45⁷⁄₈" (116.4 cm) B C D 90˚ 165˚ 36" (91.4 cm...
...handle. The width for the largest available handle is listed. See the "Door Swing Dimensions" section. ■ Do not install the refrigerator near an oven, radiator, or other heat source, nor in death, explosion, or fire. The width for 1" (2.54 cm) of space ... style of 165°. ■ In the following graphic, "A" represents the opening height required for standard cabinets. NOTE: When leveling legs are installing the refrigerator to open the refrigerator door. 41¹⁄₄" (104.5 cm) A C D 45⁷⁄₈" (116.4 cm) B C D 90˚ 165˚ 36" (91.4 cm...


