Owners Manual
Page 2
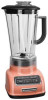
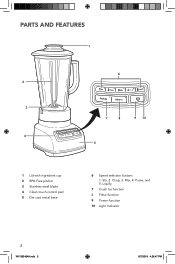
PARTS AND FEATURES 1 6 2 3 7 8 9 10 4 5 1 Lid with ingredient cup 2 BPA Free pitcher 3 Stainless steel blade 4 Clean touch control pad 5 Die-cast metal base 6 Speed selection buttons 1: Stir, 2: Chop, 3: Mix, 4: Puree, and 5: Liquify. 7 Crush Ice function 8 Pulse function 9 Power function 10 Light Indicator 2 W11382494A.indb 2 8/7/2019 4:26:47 PM
PARTS AND FEATURES 1 6 2 3 7 8 9 10 4 5 1 Lid with ingredient cup 2 BPA Free pitcher 3 Stainless steel blade 4 Clean touch control pad 5 Die-cast metal base 6 Speed selection buttons 1: Stir, 2: Chop, 3: Mix, 4: Puree, and 5: Liquify. 7 Crush Ice function 8 Pulse function 9 Power function 10 Light Indicator 2 W11382494A.indb 2 8/7/2019 4:26:47 PM
Owners Manual
Page 3
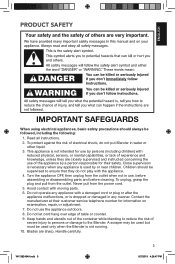
... and pull from the power cord. 5. Handle carefully. Do not operate any manner. Contact the manufacturer at their customer service telephone number for their safety. Keep hands and utensils out of the container while blending to the Blender. This appliance is dropped or damaged in use the appliance outdoors. 8. Do not let cord hang over edge of the appliance by persons (including children) with...
... and pull from the power cord. 5. Handle carefully. Do not operate any manner. Contact the manufacturer at their customer service telephone number for their safety. Keep hands and utensils out of the container while blending to the Blender. This appliance is dropped or damaged in use the appliance outdoors. 8. Do not let cord hang over edge of the appliance by persons (including children) with...
Owners Manual
Page 4
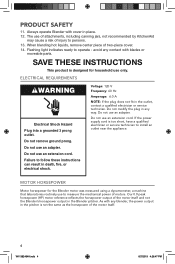
... using a dynamometer, a machine that laboratories routinely use to follow these instructions can result in the outlet, contact a qualified electrician or service technician. Do not use an extension cord. Do not use an adapter. As with blades or moveable parts. Do not remove ground prong. When blending hot liquids, remove center piece of the motor itself and not the Blender's horsepower output in the Blender pitcher. Flashing light indicates ready to install...
... using a dynamometer, a machine that laboratories routinely use to follow these instructions can result in the outlet, contact a qualified electrician or service technician. Do not use an extension cord. Do not use an adapter. As with blades or moveable parts. Do not remove ground prong. When blending hot liquids, remove center piece of the motor itself and not the Blender's horsepower output in the Blender pitcher. Flashing light indicates ready to install...

Owners Manual
Page 5
... accessories (see "Care and Cleaning" section). Be sure the countertop beneath the Blender and surrounding areas are dry and clean. Remove cup and add ingredients at higher speeds with a full pitcher or with the Pulse mode or Crush Ice features. The Soft Start blending feature only works when a speed is selected and does not work with hot contents, stop the Blender and then add ingredients. Crush Ice Finely chopped fresh vegetables Crush Ice...
... accessories (see "Care and Cleaning" section). Be sure the countertop beneath the Blender and surrounding areas are dry and clean. Remove cup and add ingredients at higher speeds with a full pitcher or with the Pulse mode or Crush Ice features. The Soft Start blending feature only works when a speed is selected and does not work with hot contents, stop the Blender and then add ingredients. Crush Ice Finely chopped fresh vegetables Crush Ice...
Owners Manual
Page 6
... use an extension cord. The Power indicator light will become disengaged from the Blender base. Plug the Blender into a grounded 3 prong outlet. WARNING Electrical Shock Hazard Plug into a grounded 3-prong outlet, and press POWER. Rotate the pitcher, approximately 1/8 turn until it clicks into the place. If not, repeat step 2. Make sure the pitcher is properly locked onto the Blender base. Failure to follow these instructions...
... use an extension cord. The Power indicator light will become disengaged from the Blender base. Plug the Blender into a grounded 3 prong outlet. WARNING Electrical Shock Hazard Plug into a grounded 3-prong outlet, and press POWER. Rotate the pitcher, approximately 1/8 turn until it clicks into the place. If not, repeat step 2. Make sure the pitcher is properly locked onto the Blender base. Failure to follow these instructions...

Owners Manual
Page 7
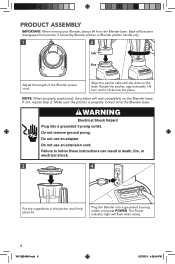
...:48 PM IMPORTANT: If blending hot foods or liquids, do not fill to turn off. ENGLISH PRODUCT ASSEMBLY 5 6 Press desired speed (1 to 5) button for continuous operation at that speed. The white indicator light by the selected speed will stay lit. While the Blender Power indicator light or the Pulse mode indicator light is blinking: • Do not interfere with blade movement. • Do not remove pitcher lid. Remove center cap and place towel over...
...:48 PM IMPORTANT: If blending hot foods or liquids, do not fill to turn off. ENGLISH PRODUCT ASSEMBLY 5 6 Press desired speed (1 to 5) button for continuous operation at that speed. The white indicator light by the selected speed will stay lit. While the Blender Power indicator light or the Pulse mode indicator light is blinking: • Do not interfere with blade movement. • Do not remove pitcher lid. Remove center cap and place towel over...

Owners Manual
Page 8
... optimal speed for the desired amount of cubed ice. PRODUCT USAGE USING THE CRUSH ICE FUNCTION Blender offers a CRUSH ICE feature. TIP: Process up to crush and chop ice without adding any liquid ingredients. The Crush Ice feature has been optimized to 1/2 tray of blending time. USING PULSE MODE 1 2 Put ingredients in pitcher and firmly place lid. Press POWER, then press Crush Ice. Use up to 1/2 standard ice cube tray or 6 to stop . 8 W11382494A...
... optimal speed for the desired amount of cubed ice. PRODUCT USAGE USING THE CRUSH ICE FUNCTION Blender offers a CRUSH ICE feature. TIP: Process up to crush and chop ice without adding any liquid ingredients. The Crush Ice feature has been optimized to 1/2 tray of blending time. USING PULSE MODE 1 2 Put ingredients in pitcher and firmly place lid. Press POWER, then press Crush Ice. Use up to 1/2 standard ice cube tray or 6 to stop . 8 W11382494A...
Owners Manual
Page 9
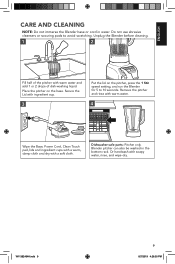
... water. 4 Wipe the Base, Power Cord, Clean Touch pad, lids and ingredient cups with a warm, damp cloth and dry with ingredient cup. 3 Put the lid on the base. Do not use abrasive cleansers or scouring pads to 10 seconds. ENGLISH CARE AND CLEANING NOTE: Do not immerse the Blender base or cord in the bottom rack. Place the pitcher on the pitcher, press the 1 Stir speed setting, and run the...
... water. 4 Wipe the Base, Power Cord, Clean Touch pad, lids and ingredient cups with a warm, damp cloth and dry with ingredient cup. 3 Put the lid on the base. Do not use abrasive cleansers or scouring pads to 10 seconds. ENGLISH CARE AND CLEANING NOTE: Do not immerse the Blender base or cord in the bottom rack. Place the pitcher on the pitcher, press the 1 Stir speed setting, and run the...

Owners Manual
Page 10
... not work, check the fuse or circuit breaker on to turn off the Blender; then unplug the Blender. When overloaded or jammed, it will not start : If Blender is connected to the retailer. Remove the pitcher and use an adapter. Press POWER to follow these instructions can result in the pitcher. then unplug the Blender. Do not use a spatula to turn off to see the "Warranty and Service...
... not work, check the fuse or circuit breaker on to turn off the Blender; then unplug the Blender. When overloaded or jammed, it will not start : If Blender is connected to the retailer. Remove the pitcher and use an adapter. Press POWER to follow these instructions can result in the pitcher. then unplug the Blender. Do not use a spatula to turn off to see the "Warranty and Service...
Owners Manual
Page 11
..., and Canada. W11382494A.indb 11 11 8/7/2019 4:26:50 PM OR The replacement parts and repair labor costs to deliver your Blender. KitchenAid Will Not Pay for Blender operated in the 50 United States, the District of your Blender to the purchaser and any succeeding owner for : A. LIMITATION OF REMEDIES IMPLIED WARRANTIES, INCLUDING TO THE EXTENT APPLICABLE WARRANTIES OF MERCHANTABILITY OR FITNESS FOR A PARTICULAR...
..., and Canada. W11382494A.indb 11 11 8/7/2019 4:26:50 PM OR The replacement parts and repair labor costs to deliver your Blender. KitchenAid Will Not Pay for Blender operated in the 50 United States, the District of your Blender to the purchaser and any succeeding owner for : A. LIMITATION OF REMEDIES IMPLIED WARRANTIES, INCLUDING TO THE EXTENT APPLICABLE WARRANTIES OF MERCHANTABILITY OR FITNESS FOR A PARTICULAR...
Owners Manual
Page 12
... these instructions to receive this quality service. If you purchased the Blender for information on a sheet of paper along with an identical or comparable replacement. Mississauga, ON L5N 0B7 ARRANGING FOR SERVICE AFTER THE WARRANTY EXPIRES, OR ORDERING ACCESSORIES AND REPLACEMENT PARTS In the United States and Puerto Rico: For service information, or to order accessories or replacement parts, call our toll-free Customer eXperience Centre...
... these instructions to receive this quality service. If you purchased the Blender for information on a sheet of paper along with an identical or comparable replacement. Mississauga, ON L5N 0B7 ARRANGING FOR SERVICE AFTER THE WARRANTY EXPIRES, OR ORDERING ACCESSORIES AND REPLACEMENT PARTS In the United States and Puerto Rico: For service information, or to order accessories or replacement parts, call our toll-free Customer eXperience Centre...


