Owners Manual
Page 5
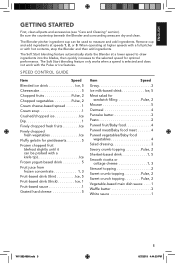
...2019 4:44:53 PM Remove cup and add ingredients at a lower speed to draw ingredients into the blades, then quickly increases to measure and add ingredients. Be sure the countertop beneath the Blender and surrounding areas are dry and clean. The Soft Start blending feature ...automatically starts the Blender at speeds 1, 2, or 3. When operating at higher speeds with a full pitcher or with the Pulse or Ice features. SPEED CONTROL GUIDE Item Speed Blended ice drink Ice, 5 Cheesecake 5 Chopped fruits Pulse, 2 Chopped ...
...2019 4:44:53 PM Remove cup and add ingredients at a lower speed to draw ingredients into the blades, then quickly increases to measure and add ingredients. Be sure the countertop beneath the Blender and surrounding areas are dry and clean. The Soft Start blending feature ...automatically starts the Blender at speeds 1, 2, or 3. When operating at higher speeds with a full pitcher or with the Pulse or Ice features. SPEED CONTROL GUIDE Item Speed Blended ice drink Ice, 5 Cheesecake 5 Chopped fruits Pulse, 2 Chopped ...
Owners Manual
Page 7
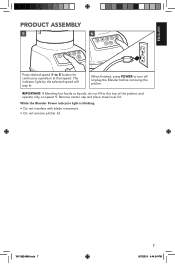
... not fill to turn off. The indicator light by the selected speed will stay lit. Unplug the Blender before removing the pitcher. ENGLISH PRODUCT ASSEMBLY 5 6 Press desired speed (1 to 5) button for continuous operation at that speed. W11382496A.indb 7 7 8/7/2019 4:44:54 PM While the Blender Power indicator light is blinking: • Do not interfere with...
... not fill to turn off. The indicator light by the selected speed will stay lit. Unplug the Blender before removing the pitcher. ENGLISH PRODUCT ASSEMBLY 5 6 Press desired speed (1 to 5) button for continuous operation at that speed. W11382496A.indb 7 7 8/7/2019 4:44:54 PM While the Blender Power indicator light is blinking: • Do not interfere with...
Owners Manual
Page 8
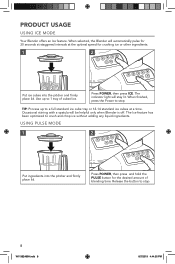
...Put ingredients into the pitcher and firmly place lid. Occasional stirring with a spatula will stay lit. The indicator light will be helpful only when Blender is off. Press POWER, then press and hold the PULSE button for 30 seconds at staggered intervals at a time. PRODUCT USAGE USING ICE MODE... full standard ice cube tray or 12-14 standard ice cubes at the optimal speed for crushing ice or other ingredients. 1 2 Put ice cubes into the pitcher and firmly place lid. When selected, the Blender will automatically pulse for the desired amount of cubed ice. When finished, press ...
...Put ingredients into the pitcher and firmly place lid. Occasional stirring with a spatula will stay lit. The indicator light will be helpful only when Blender is off. Press POWER, then press and hold the PULSE button for 30 seconds at staggered intervals at a time. PRODUCT USAGE USING ICE MODE... full standard ice cube tray or 12-14 standard ice cubes at the optimal speed for crushing ice or other ingredients. 1 2 Put ice cubes into the pitcher and firmly place lid. When selected, the Blender will automatically pulse for the desired amount of cubed ice. When finished, press ...
Owners Manual
Page 9
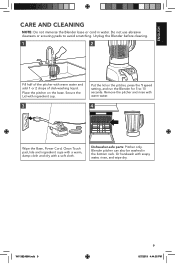
W11382496A.indb 9 9 8/7/2019 4:44:55 PM Place the pitcher on the pitcher, press the 1 speed setting, and run the Blender for 5 to avoid scratching. Remove the pitcher and rinse with warm water. 4 Wipe the Base, Power Cord, Clean Touch pad, lids and ingredient cups with a ...-safe parts: Pitcher only. Secure the Lid with warm water and add 1 or 2 drops of dish-washing liquid. Or handwash with a soft cloth. Unplug the Blender before cleaning. 1 2 Fill half of the pitcher with ingredient cup. 3 Put the lid on the base. Do not use abrasive cleansers or scouring pads to...
W11382496A.indb 9 9 8/7/2019 4:44:55 PM Place the pitcher on the pitcher, press the 1 speed setting, and run the Blender for 5 to avoid scratching. Remove the pitcher and rinse with warm water. 4 Wipe the Base, Power Cord, Clean Touch pad, lids and ingredient cups with a ...-safe parts: Pitcher only. Secure the Lid with warm water and add 1 or 2 drops of dish-washing liquid. Or handwash with a soft cloth. Unplug the Blender before cleaning. 1 2 Fill half of the pitcher with ingredient cup. 3 Put the lid on the base. Do not use abrasive cleansers or scouring pads to...
Owners Manual
Page 10
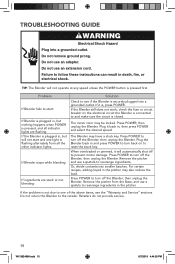
.... then press POWER and select the desired speed. then unplug the Blender. then unplug the Blender. For certain recipes, adding liquid in the pitcher. Press POWER to turn back on the electrical circuit the Blender is connected to turn off the Blender; Remove the pitcher from all indicator lights are..., or electrical shock. Do not use an extension cord. Problem If Blender fails to see the "Warranty and Service" sections. Press POWER; When overloaded or jammed, it will not operate at any speed unless the POWER button is securely plugged into smaller batches. Remove the ...
.... then press POWER and select the desired speed. then unplug the Blender. then unplug the Blender. For certain recipes, adding liquid in the pitcher. Press POWER to turn back on the electrical circuit the Blender is connected to turn off the Blender; Remove the pitcher from all indicator lights are..., or electrical shock. Do not use an extension cord. Problem If Blender fails to see the "Warranty and Service" sections. Press POWER; When overloaded or jammed, it will not operate at any speed unless the POWER button is securely plugged into smaller batches. Remove the ...


