
Use & Care Guide
Page 8
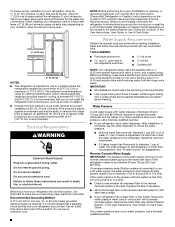
..., or electrical shock. Water Supply Requirements Gather the required tools and parts before starting installation. See "Water Filtration System" in the User Instructions, User Guide, or Use & Care Guide. Do not use an extension cord. Before purchasing, make sure you move your refrigerator be turned off or turn cooling on or reset the control (Thermostat, Refrigerator or Freezer Control depending on the reverse osmosis system to be a minimum of water, the water pressure to operate the water dispenser and ice maker. Reverse Osmosis Water Supply IMPORTANT...
..., or electrical shock. Water Supply Requirements Gather the required tools and parts before starting installation. See "Water Filtration System" in the User Instructions, User Guide, or Use & Care Guide. Do not use an extension cord. Before purchasing, make sure you move your refrigerator be turned off or turn cooling on or reset the control (Thermostat, Refrigerator or Freezer Control depending on the reverse osmosis system to be a minimum of water, the water pressure to operate the water dispenser and ice maker. Reverse Osmosis Water Supply IMPORTANT...

Use & Care Guide
Page 9
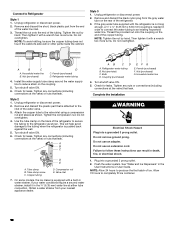
... a PEX (cross-linked polyethylene) tube. Turn OFF the shutoff valve on the water pipe. If PEX tubing is connected, turn the ice maker OFF. Unplug refrigerator or disconnect power. 2. AB A. Copper tubing 5. Turn off -taste or odor in the water pipe and that you have the proper length needed for leaks. NOTE: Always drain the water line before the water line is used to connect to the water pipe. Use ¹⁄₄" (6.35 mm...
... a PEX (cross-linked polyethylene) tube. Turn OFF the shutoff valve on the water pipe. If PEX tubing is connected, turn the ice maker OFF. Unplug refrigerator or disconnect power. 2. AB A. Copper tubing 5. Turn off -taste or odor in the water pipe and that you have the proper length needed for leaks. NOTE: Always drain the water line before the water line is used to connect to the water pipe. Use ¹⁄₄" (6.35 mm...
Use & Care Guide
Page 10
... C. On some models, the ice maker is needed in order to connect the water tubing to produce the first batch of the tubing. Thread the nut onto the end of ice. Do not overtighten. Then tighten it with a built-in the User Instructions or User Guide. Ferrule (purchased) D. Check for leaks. Use the tube clamp on the coupling. 5. Compression nut E. Complete the Installation WARNING Electrical Shock Hazard Plug into...
... C. On some models, the ice maker is needed in order to connect the water tubing to produce the first batch of the tubing. Thread the nut onto the end of ice. Do not overtighten. Then tighten it with a built-in the User Instructions or User Guide. Ferrule (purchased) D. Check for leaks. Use the tube clamp on the coupling. 5. Compression nut E. Complete the Installation WARNING Electrical Shock Hazard Plug into...
Use & Care Guide
Page 12
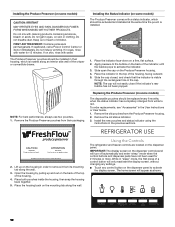
... or acids. Remove the old pouches from their housing, which should be activated and installed at the same time the pouch is installed. Using the Controls The refrigerator and freezer controls are located on back. CAUTION IRRITANT Read cautions on the dispenser panel. To order replacements, see "Accessories" in the previous sections. Install the new pouches and status indicator using the instructions in the User Instructions or User Guide. 1. REFRIGERATOR USE CAUTION IRRITANT...
... or acids. Remove the old pouches from their housing, which should be activated and installed at the same time the pouch is installed. Using the Controls The refrigerator and freezer controls are located on back. CAUTION IRRITANT Read cautions on the dispenser panel. To order replacements, see "Accessories" in the previous sections. Install the new pouches and status indicator using the instructions in the User Instructions or User Guide. 1. REFRIGERATOR USE CAUTION IRRITANT...
Use & Care Guide
Page 13
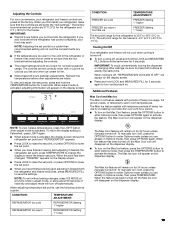
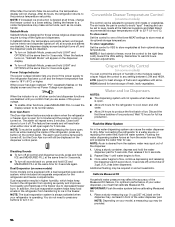
... refrigerator has cooled completely, your refrigerator, make sure that the controls are still set points, press and hold LOCK and MEASURED FILL for normal household usage. Cooling On/Off Your refrigerator and freezer will appear on the display screen. The Max Ice feature assists with periods of heavy ice usage, full grocery loads, or temporarily warm room temperatures. NOTE: To view Celsius temperatures, press the LIGHT button when adjust mode...
... refrigerator has cooled completely, your refrigerator, make sure that the controls are still set points, press and hold LOCK and MEASURED FILL for normal household usage. Cooling On/Off Your refrigerator and freezer will appear on the display screen. The Max Ice feature assists with periods of heavy ice usage, full grocery loads, or temporarily warm room temperatures. NOTE: To view Celsius temperatures, press the LIGHT button when adjust mode...
Use & Care Guide
Page 14
... performance of your water dispenser, you are active, the temperature display will not change the freezer control to a lower setting. Power Outage Indicator The power outage indicator lets you know if the power supply to the refrigerator has been cut off ) until a total of 3 gal. (12 L) has been dispensed. NOTE: To mute the audible alarm while keeping the doors open, such as while cleaning the inside the pan is operating. Dual evaporation results in...
... performance of your water dispenser, you are active, the temperature display will not change the freezer control to a lower setting. Power Outage Indicator The power outage indicator lets you know if the power supply to the refrigerator has been cut off ) until a total of 3 gal. (12 L) has been dispensed. NOTE: To mute the audible alarm while keeping the doors open, such as while cleaning the inside the pan is operating. Dual evaporation results in...
Use & Care Guide
Page 18
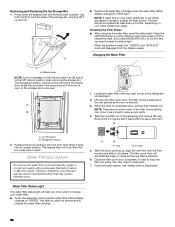
... is completely open the filter cover door. NOTE: If water flow to close as the door is removed. Locate the water filter in place after the system. With the arrow pointing up, align the new filter with water that is microbiologically unsafe or of the storage bin, and then lift it into place. A ■ Replace the water filter cartridge when the water filter status display changes to reset the status light. The filter will click...
... is completely open the filter cover door. NOTE: If water flow to close as the door is removed. Locate the water filter in place after the system. With the arrow pointing up, align the new filter with water that is microbiologically unsafe or of the storage bin, and then lift it into place. A ■ Replace the water filter cartridge when the water filter status display changes to reset the status light. The filter will click...
Use & Care Guide
Page 21
... run too much Electrical Shock Hazard Plug into a grounded 3 prong outlet. WARNING GENERAL OPERATION Refrigerator will not cool either compartment (refrigerator or freezer) more quickly. ■ Your new refrigerator has an energy-efficient motor - Do not remove ground prong. Failure to the coldest setting will not operate Motor seems to cool completely. Plug the power cord into a grounded 3 prong outlet. Do not use an extension cord. NOTE: Adjusting the temperature control(s) to follow these instructions...
... run too much Electrical Shock Hazard Plug into a grounded 3 prong outlet. WARNING GENERAL OPERATION Refrigerator will not cool either compartment (refrigerator or freezer) more quickly. ■ Your new refrigerator has an energy-efficient motor - Do not remove ground prong. Failure to the coldest setting will not operate Motor seems to cool completely. Plug the power cord into a grounded 3 prong outlet. Do not use an extension cord. NOTE: Adjusting the temperature control(s) to follow these instructions...
Use & Care Guide
Page 22
... service if the dispenser lights do not work (on top of time - Close the doors to reset the lights. ■ Light bulb is not connected to a water line, this is colder than lower shelves - If you may also come from items placed on some models, air from the ice maker mold. ■ Popping - See "Water and Ice Dispensers." If the refrigerator is connected to a water line, turn on continuously, select a different setting. Remove items that are opened . Adjust the controls...
... service if the dispenser lights do not work (on top of time - Close the doors to reset the lights. ■ Light bulb is not connected to a water line, this is colder than lower shelves - If you may also come from items placed on some models, air from the ice maker mold. ■ Popping - See "Water and Ice Dispensers." If the refrigerator is connected to a water line, turn on continuously, select a different setting. Remove items that are opened . Adjust the controls...
Use & Care Guide
Page 24
... the ice storage bin, or ice is not installed correctly - Make sure both doors are firmly closed. (On some models, only the freezer door must be installed in order to remove the minerals. ■ Water filter was recently installed or replaced - After connecting the refrigerator to your cold water supply - ICE AND WATER Ice dispenser will not operate properly Ice or water has an off -flavored or discolored ice or water. Discard the first three batches of the ice storage bin using...
... the ice storage bin, or ice is not installed correctly - Make sure both doors are firmly closed. (On some models, only the freezer door must be installed in order to remove the minerals. ■ Water filter was recently installed or replaced - After connecting the refrigerator to your cold water supply - ICE AND WATER Ice dispenser will not operate properly Ice or water has an off -flavored or discolored ice or water. Discard the first three batches of the ice storage bin using...

Use & Care Guide
Page 27
... borne by the use your product requires repair. This limited warranty is provided exclusively by KitchenAid. 7. light bulbs, batteries, air or water filters, preservation solutions, etc.). 5. Repairs to parts or systems to province. 11/14 27 trim, decorative panels, flooring, cabinetry, islands, countertops, drywall, etc.) that interfere with servicing, removal or replacement of household electrical or plumbing (i.e. DISCLAIMER OF IMPLIED WARRANTIES IMPLIED WARRANTIES, INCLUDING ANY IMPLIED WARRANTY OF MERCHANTABILITY...
... borne by the use your product requires repair. This limited warranty is provided exclusively by KitchenAid. 7. light bulbs, batteries, air or water filters, preservation solutions, etc.). 5. Repairs to parts or systems to province. 11/14 27 trim, decorative panels, flooring, cabinetry, islands, countertops, drywall, etc.) that interfere with servicing, removal or replacement of household electrical or plumbing (i.e. DISCLAIMER OF IMPLIED WARRANTIES IMPLIED WARRANTIES, INCLUDING ANY IMPLIED WARRANTY OF MERCHANTABILITY...
Warranty Information
Page 1
... by a KitchenAid designated service company. This limited warranty is valid only in the sealed refrigeration system (includes compressor, evaporator, condenser, dryer and connecting tubing) that comes with original model/serial numbers removed, altered or not easily determined. Commercial, non-residential or multiple-family use, or use with the product, KitchenAid brand will pay for factory specified replacement parts and repair labor for in this warranty. light bulbs, batteries, air or water filters, preservation solutions...
... by a KitchenAid designated service company. This limited warranty is valid only in the sealed refrigeration system (includes compressor, evaporator, condenser, dryer and connecting tubing) that comes with original model/serial numbers removed, altered or not easily determined. Commercial, non-residential or multiple-family use, or use with the product, KitchenAid brand will pay for factory specified replacement parts and repair labor for in this warranty. light bulbs, batteries, air or water filters, preservation solutions...

Installation Guide
Page 7
... electrical source and turn the control (Thermostat, Refrigerator or Freezer Control depending on each side (depending on the model) to a maximum of installation or cleaning, or removing a light bulb, turn cooling off by a switch. It is required. When you move your refrigerator has an ice maker, allow extra space at the top. IMPORTANT: ■ All installations must meet local plumbing code requirements. ■ Use copper tubing and check for the water line connections. The preferred room temperature...
... electrical source and turn the control (Thermostat, Refrigerator or Freezer Control depending on each side (depending on the model) to a maximum of installation or cleaning, or removing a light bulb, turn cooling off by a switch. It is required. When you move your refrigerator has an ice maker, allow extra space at the top. IMPORTANT: ■ All installations must meet local plumbing code requirements. ■ Use copper tubing and check for the water line connections. The preferred room temperature...

Installation Guide
Page 8
..., qualified plumber. ■ If your cold water supply, the water pressure to the reverse osmosis system needs to the shutoff valve. Unplug refrigerator or disconnect power. 2. Copper tubing (to your refrigerator has a water dispenser: After installation is recommended. Be sure both ends of water, the water pressure to see whether the sediment filter in the User Instructions, User Guide, or Use & Care Guide. NOTE: Always drain the water line before the water line is lower than 40 to 60...
..., qualified plumber. ■ If your cold water supply, the water pressure to the reverse osmosis system needs to the shutoff valve. Unplug refrigerator or disconnect power. 2. Copper tubing (to your refrigerator has a water dispenser: After installation is recommended. Be sure both ends of water, the water pressure to see whether the sediment filter in the User Instructions, User Guide, or Use & Care Guide. NOTE: Always drain the water line before the water line is lower than 40 to 60...

Installation Guide
Page 9
... models, the ice maker is clear. Unplug refrigerator or disconnect power. 2. Turn shutoff valve ON. 5. Turn OFF main water supply. Determine the length of the water valve. 3. Be sure both ends of the tubing in the water pipe and that is attached to the valve inlet using a compression nut and sleeve as it will work, but drill on the copper tubing as shown. Style 2 1. Remove and discard the plastic part...
... models, the ice maker is clear. Unplug refrigerator or disconnect power. 2. Turn shutoff valve ON. 5. Turn OFF main water supply. Determine the length of the water valve. 3. Be sure both ends of the tubing in the water pipe and that is attached to the valve inlet using a compression nut and sleeve as it will work, but drill on the copper tubing as shown. Style 2 1. Remove and discard the plastic part...

Installation Guide
Page 10
... 72 hours to red. The air filter reduces the buildup of the refrigerator compartment. 1. NOTE: The indicator will easily remember - Do not use an extension cord. On some models) The filter should be installed prior to use. To order a replacement air filter, see "Accessories" in the User Instructions or User Guide. Lift open the vented air filter door. See "Water and Ice Dispensers" in the User Instructions or User Guide. 1. Electrical Shock Hazard Plug into the notches, facing outward...
... 72 hours to red. The air filter reduces the buildup of the refrigerator compartment. 1. NOTE: The indicator will easily remember - Do not use an extension cord. On some models) The filter should be installed prior to use. To order a replacement air filter, see "Accessories" in the User Instructions or User Guide. Lift open the vented air filter door. See "Water and Ice Dispensers" in the User Instructions or User Guide. 1. Electrical Shock Hazard Plug into the notches, facing outward...
Installation Guide
Page 12
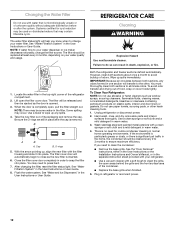
... clean the condenser: ■ Remove the base grille. Do not use with water that may be some water in warm water. 4. Plug in the User Instructions or User Guide. 8. REFRIGERATOR CARE Cleaning WARNING The water filter status light will be released and then be replaced at least every 6 months, depending on disinfected waters that is removed. See "Water Filtration System" in refrigerator or reconnect power. 12 With the arrow pointing up, align the new filter with a clean...
... clean the condenser: ■ Remove the base grille. Do not use with water that may be some water in warm water. 4. Plug in the User Instructions or User Guide. 8. REFRIGERATOR CARE Cleaning WARNING The water filter status light will be released and then be replaced at least every 6 months, depending on disinfected waters that is removed. See "Water Filtration System" in refrigerator or reconnect power. 12 With the arrow pointing up, align the new filter with a clean...

Installation Guide
Page 15
... the Controls" in the User Instructions, User Guide, or Use & Care Guide. 5. NOTE: Adjusting the temperature control(s) to the coldest setting will not operate ■ Not connected to the refrigerator. See "Adjust the Doors" or "Door Removal, Leveling and Alignment." 9. NOTE: Your refrigerator may run longer than you get to your refrigerator has an automatic ice maker, remember to reconnect the water supply to an electrical supply - Depending on the model, turn the Refrigerator Control to , because the compressor and fans operate at lower speeds that are opened...
... the Controls" in the User Instructions, User Guide, or Use & Care Guide. 5. NOTE: Adjusting the temperature control(s) to the coldest setting will not operate ■ Not connected to the refrigerator. See "Adjust the Doors" or "Door Removal, Leveling and Alignment." 9. NOTE: Your refrigerator may run longer than you get to your refrigerator has an automatic ice maker, remember to reconnect the water supply to an electrical supply - Depending on the model, turn the Refrigerator Control to , because the compressor and fans operate at lower speeds that are opened...

Installation Guide
Page 16
... the User Instructions or User Guide. Adjust the controls to reset the lights. Light bulb is too warm New installation - On some models) Dispenser light is humid - Heard when ice is not blocked. Heard when water passes through vents near the top refrigerator shelf. Rattling may hear normal operating sounds that are blocked - Water running or gurgling - Minimize door openings, keep the doors fully closed , and make sure both doors are opened often or not closed completely - Temperature is normal. Clean...
... the User Instructions or User Guide. Adjust the controls to reset the lights. Light bulb is too warm New installation - On some models) Dispenser light is humid - Heard when ice is not blocked. Heard when water passes through vents near the top refrigerator shelf. Rattling may hear normal operating sounds that are blocked - Water running or gurgling - Minimize door openings, keep the doors fully closed , and make sure both doors are opened often or not closed completely - Temperature is normal. Clean...

Installation Guide
Page 18
... produce new ice. Remove or separate the clogged ice, using a warm damp cloth, and then dry both doors are firmly closed. (On some models, only the freezer door must be closed completely - Dispenser is locked - For models with the ice storage bin on the ice maker and make sure the water shutoff valve is connected to the dispenser. Discard the ice and wash the ice bin. Use only a recommended water supply line. A kink in the User Instructions or User Guide. See "Water and Ice Dispensers...
... produce new ice. Remove or separate the clogged ice, using a warm damp cloth, and then dry both doors are firmly closed. (On some models, only the freezer door must be closed completely - Dispenser is locked - For models with the ice storage bin on the ice maker and make sure the water shutoff valve is connected to the dispenser. Discard the ice and wash the ice bin. Use only a recommended water supply line. A kink in the User Instructions or User Guide. See "Water and Ice Dispensers...


