Use and Care Manual
Page 3
... Purchase & Product Registration 4 Electrical Requirements 5 FEATURES AND OPERATION Commercial Blender Features 6 Using the Blender Before First Use 9 Operating the Blender 9 Using the Pulse Feature 11 Using the Ingredient Cap 11 Overload, Jam, & Thermal Safeguards 11 Power-On Safeguard 11 Operating Tips 12 Care & Cleaning General Procedures 13 Washing & Rinsing the Blender Jar 13 Cleaning the Base 13 Sanitizing the Blender 14 Troubleshooting 15 Accessories/Replacement Parts List 17 WARRANTY AND SERVICE Warranty for the 50 United States & District of Columbia...
... Purchase & Product Registration 4 Electrical Requirements 5 FEATURES AND OPERATION Commercial Blender Features 6 Using the Blender Before First Use 9 Operating the Blender 9 Using the Pulse Feature 11 Using the Ingredient Cap 11 Overload, Jam, & Thermal Safeguards 11 Power-On Safeguard 11 Operating Tips 12 Care & Cleaning General Procedures 13 Washing & Rinsing the Blender Jar 13 Cleaning the Base 13 Sanitizing the Blender 14 Troubleshooting 15 Accessories/Replacement Parts List 17 WARRANTY AND SERVICE Warranty for the 50 United States & District of Columbia...
Use and Care Manual
Page 4
BLENDER SAFETY Your safety and the safety of injury, and tell you what the potential hazard is the safety alert symbol. This is , tell you don't follow instructions. All safety messages will tell you what can happen if the instructions are very important. These words mean: DANGER You can ...killed or seriously injured if you and others are not followed. 2 Always read and obey all safety messages. All safety messages will follow instructions. This symbol alerts you to reduce the chance of others . WARNING You can kill or hurt you don't immediately follow the safety ...
BLENDER SAFETY Your safety and the safety of injury, and tell you what the potential hazard is the safety alert symbol. This is , tell you don't follow instructions. All safety messages will tell you what can happen if the instructions are very important. These words mean: DANGER You can ...killed or seriously injured if you and others are not followed. 2 Always read and obey all safety messages. All safety messages will follow instructions. This symbol alerts you to reduce the chance of others . WARNING You can kill or hurt you don't immediately follow the safety ...
Use and Care Manual
Page 5
... moving parts. 6. Do not operate any appliance is used by KitchenAid may be used, but must be followed, including the following: 1. Do not let the cord hang over the edge of the two-piece cover. 13. Keep hands and utensils out of the container while blending to reduce the risk of electrical shock, do not put the Blender in use of injury to persons...
... moving parts. 6. Do not operate any appliance is used by KitchenAid may be used, but must be followed, including the following: 1. Do not let the cord hang over the edge of the two-piece cover. 13. Keep hands and utensils out of the container while blending to reduce the risk of electrical shock, do not put the Blender in use of injury to persons...
Use and Care Manual
Page 6
... Purchased Store Name 4 KCB348 Bar Blender - This card will assure you use your Blender, please fill out and mail your personal records: Model Number: Chef's Blender - PROOF OF PURCHASE AND PRODUCT REGISTRATION Always keep a copy of the sales receipt showing the date of purchase of your warranty. Proof of purchase will enable us to contact you in the unlikely event...
... Purchased Store Name 4 KCB348 Bar Blender - This card will assure you use your Blender, please fill out and mail your personal records: Model Number: Chef's Blender - PROOF OF PURCHASE AND PRODUCT REGISTRATION Always keep a copy of the sales receipt showing the date of purchase of your warranty. Proof of purchase will enable us to contact you in the unlikely event...
Use and Care Manual
Page 7
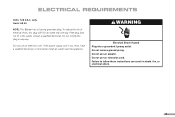
... any way. Failure to follow these instructions can result in the outlet, contact a qualified electrician. Do not remove ground prong. Do not use an adapter. If the plug does not fit in death, fire, or electrical shock. 5 WARNING Electrical Shock Hazard Plug into a grounded 3 prong outlet. If the power supply cord is too short, have a qualified electrician...
... any way. Failure to follow these instructions can result in the outlet, contact a qualified electrician. Do not remove ground prong. Do not use an adapter. If the plug does not fit in death, fire, or electrical shock. 5 WARNING Electrical Shock Hazard Plug into a grounded 3 prong outlet. If the power supply cord is too short, have a qualified electrician...
Use and Care Manual
Page 8
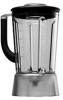
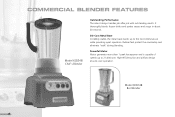
...-Cast Metal Base Incredibly stable, the metal base stands up to the most intensive use while providing quiet operation. Rubber feet protect the countertop and eliminate "walk" during blending. Model KCB148 Bar Blender 6 Powerful Motor Motor generates more than 1 peak horsepower and is capable of speeds up to 21,000 rpm. High-efficiency fan and airflow design ensures cool operation. COMMERCIAL BLENDER FEATURES Model KCB348 Chef's Blender Outstanding Performance...
...-Cast Metal Base Incredibly stable, the metal base stands up to the most intensive use while providing quiet operation. Rubber feet protect the countertop and eliminate "walk" during blending. Model KCB148 Bar Blender 6 Powerful Motor Motor generates more than 1 peak horsepower and is capable of speeds up to 21,000 rpm. High-efficiency fan and airflow design ensures cool operation. COMMERCIAL BLENDER FEATURES Model KCB348 Chef's Blender Outstanding Performance...
Use and Care Manual
Page 9
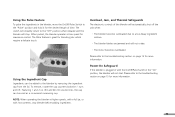
.... Single Speed Operation (Bar Blender only) The Bar Blender's single speed is optimized for extreme performance and long life. Indicator lights show the speed selected. 48 oz. Each features a comfortable handle. Jar Lid with the Chef's Blender, use the High speed setting. Continued... 7 Scalloped Inner Jar Collar and Base The jar can be conveniently placed in the "Pulse" position. When pulsed, the blender operates at the Low speed setting; the Bar Blender will operate at the Medium or High speed settings, turn on the blender...
.... Single Speed Operation (Bar Blender only) The Bar Blender's single speed is optimized for extreme performance and long life. Indicator lights show the speed selected. 48 oz. Each features a comfortable handle. Jar Lid with the Chef's Blender, use the High speed setting. Continued... 7 Scalloped Inner Jar Collar and Base The jar can be conveniently placed in the "Pulse" position. When pulsed, the blender operates at the Low speed setting; the Bar Blender will operate at the Medium or High speed settings, turn on the blender...

Use and Care Manual
Page 10
... unit to be removed from starting if it is jammed, overloaded, or overheated, special electronic controls will prevent the blender from the jar for light or heavy ingredients. Easy-to wipe clean. The jar and lid are easy to -Clean Design The smooth base and round power cord are dishwasher safe. The electronic mixing sensor adjusts power automatically when blending to the selected speed.
... unit to be removed from starting if it is jammed, overloaded, or overheated, special electronic controls will prevent the blender from the jar for light or heavy ingredients. Easy-to wipe clean. The jar and lid are easy to -Clean Design The smooth base and round power cord are dishwasher safe. The electronic mixing sensor adjusts power automatically when blending to the selected speed.

Use and Care Manual
Page 11
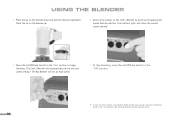
... result in the "Off" position. 3. Continued... 9 Plug the power cord into a grounded 3 prong outlet. Do not remove ground prong. Operating the Blender 1. Do not use an extension cord. USING THE BLENDER Before First Use Wash, rinse, and sanitize the blender before using it for cleaning instructions. See page 13 for the first time. Uncoil the power cord from the storage area on the bottom of the blender base.
... result in the "Off" position. 3. Continued... 9 Plug the power cord into a grounded 3 prong outlet. Do not remove ground prong. Operating the Blender 1. Do not use an extension cord. USING THE BLENDER Before First Use Wash, rinse, and sanitize the blender before using it for cleaning instructions. See page 13 for the first time. Uncoil the power cord from the storage area on the bottom of the blender base.
Use and Care Manual
Page 12
... "Off" position. * To start at the Low speed setting.* The Bar Blender will show the current speed selected. 5. Select other speeds on the blender base and add the desired ingredients. Place the jar on the Chef's Blender by pushing the appropriate Speed Selection Button. To stop blending, move the On/Off/Pulse Switch to begin blending. The indicator lights will run at high speed. 7. USING THE BLENDER 4. Place the lid on the blender jar. 6.
... "Off" position. * To start at the Low speed setting.* The Bar Blender will show the current speed selected. 5. Select other speeds on the blender base and add the desired ingredients. Place the jar on the Chef's Blender by pushing the appropriate Speed Selection Button. To stop blending, move the On/Off/Pulse Switch to begin blending. The indicator lights will run at high speed. 7. USING THE BLENDER 4. Place the lid on the blender jar. 6.
Use and Care Manual
Page 13
... blender blades are jammed and will not rotate. • The motor becomes overheated. Featuring 1 and 2 oz. (30 and 60 ml) volume lines, the cap can be used as a convenient measuring cup. Overload, Jam, and Thermal Safeguards The electronic controls of time. Power-On Safeguard If the blender is great for blending jobs which require a delicate touch. Please refer to the troubleshooting section...
... blender blades are jammed and will not rotate. • The motor becomes overheated. Featuring 1 and 2 oz. (30 and 60 ml) volume lines, the cap can be used as a convenient measuring cup. Overload, Jam, and Thermal Safeguards The electronic controls of time. Power-On Safeguard If the blender is great for blending jobs which require a delicate touch. Please refer to the troubleshooting section...
Use and Care Manual
Page 14
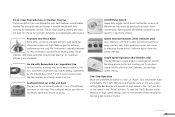
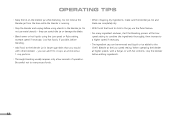
...-process foods. • When chopping dry ingredients, make sure the blender jar, lid, and blade are completely dry. • With foods that tend to stick to the jar, use metal utensils - Do not remove the blender jar from the base while the blender is running. • Stop the blender and unplug before using the Low speed or Pulse setting. When operating the blender at higher speeds, with a full jar, or with other blenders - Do not use the Pulse...
...-process foods. • When chopping dry ingredients, make sure the blender jar, lid, and blade are completely dry. • With foods that tend to stick to the jar, use metal utensils - Do not remove the blender jar from the base while the blender is running. • Stop the blender and unplug before using the Low speed or Pulse setting. When operating the blender at higher speeds, with a full jar, or with other blenders - Do not use the Pulse...
Use and Care Manual
Page 15
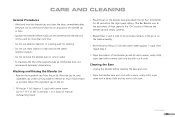
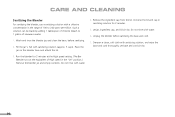
... as possible. Remove the ingredient cap from the jar lid. Place the jar on the blade assembly. 5. Wipe the exterior of the blender jar and lid with warm water (approx. 5 cups), then repeat Step 3. 6. CARE AND CLEANING General Procedures • Wash and rinse the blender jar, and clean the base, immediately after every use abrasive cleansers or scouring pads for 30 seconds at the High speed setting. (The Bar Blender runs at...
... as possible. Remove the ingredient cap from the jar lid. Place the jar on the blade assembly. 5. Wipe the exterior of the blender jar and lid with warm water (approx. 5 cups), then repeat Step 3. 6. CARE AND CLEANING General Procedures • Wash and rinse the blender jar, and clean the base, immediately after every use abrasive cleansers or scouring pads for 30 seconds at the High speed setting. (The Bar Blender runs at...
Use and Care Manual
Page 16
.... 5 cups). Wash and rinse the blender jar, and clean the base, before sanitizing the base and cord. 7. Fill the jar 3⁄4 full with water. 14 Run the blender for 2 minutes. 5. Such a solution can be made by adding 1 tablespoon of chlorine bleach to 1 gallon of 100 to 200 parts-per-million. Immerse the lid and cap in sanitizing solution for 2 minutes at the High speed setting...
.... 5 cups). Wash and rinse the blender jar, and clean the base, before sanitizing the base and cord. 7. Fill the jar 3⁄4 full with water. 14 Run the blender for 2 minutes. 5. Such a solution can be made by adding 1 tablespoon of chlorine bleach to 1 gallon of 100 to 200 parts-per-million. Immerse the lid and cap in sanitizing solution for 2 minutes at the High speed setting...
Use and Care Manual
Page 17
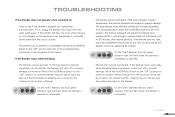
.... Remove the jar from the base and free the blades by breaking-up or removing the contents at the bottom of this section. • If the blender stops while blending: - On the Chef's Blender, the low speed indicator light will shut off to prevent damage to operate safely. TROUBLESHOOTING • If the blender does not operate when switched on the blender. If a foreign object or blender ingredients jam the blades...
.... Remove the jar from the base and free the blades by breaking-up or removing the contents at the bottom of this section. • If the blender stops while blending: - On the Chef's Blender, the low speed indicator light will shut off to prevent damage to operate safely. TROUBLESHOOTING • If the blender does not operate when switched on the blender. If a foreign object or blender ingredients jam the blades...

Use and Care Manual
Page 18
To reset the blender, move the On/Off/Pulse Switch to the retailer. If the problem cannot be fixed with the On/Off/Pulse Switch in this section, see the KitchenAid Warranty and Service on safeguard is plugged in with the steps in the "On" position: - TROUBLESHOOTING • If the blender is engaged. On the Chef's Blender, all three speed indicator lights will flash when the power-on...
To reset the blender, move the On/Off/Pulse Switch to the retailer. If the problem cannot be fixed with the On/Off/Pulse Switch in this section, see the KitchenAid Warranty and Service on safeguard is plugged in with the steps in the "On" position: - TROUBLESHOOTING • If the blender is engaged. On the Chef's Blender, all three speed indicator lights will flash when the power-on...
Use and Care Manual
Page 19
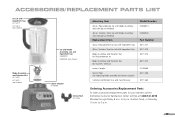
... LIST Jar Lid with Ingredient Cap 8211477 8211478 (not shown) Blade Assembly and Retainer Nut 8211473 8211472 (not shown) Jar with Ingredient Cap Blade Assembly and Retainer Nut for Polycarbonate Jar Blade Assembly and Retainer Nut for Stainless Steel Jar Lower Coupler Service Tool (for replacing blade assembly and lower coupler) Commercial Blender Use and Care Manual Model Number KCB48PCJ KCB48SSJ Part Number 8211477 8211478 8211473 8211472 4176868 8211458 8211464 Ordering Accessories/Replacement Parts To order accessories/replacement parts for your blender, call the KitchenAid Customer...
... LIST Jar Lid with Ingredient Cap 8211477 8211478 (not shown) Blade Assembly and Retainer Nut 8211473 8211472 (not shown) Jar with Ingredient Cap Blade Assembly and Retainer Nut for Polycarbonate Jar Blade Assembly and Retainer Nut for Stainless Steel Jar Lower Coupler Service Tool (for replacing blade assembly and lower coupler) Commercial Blender Use and Care Manual Model Number KCB48PCJ KCB48SSJ Part Number 8211477 8211478 8211473 8211472 4176868 8211458 8211464 Ordering Accessories/Replacement Parts To order accessories/replacement parts for your blender, call the KitchenAid Customer...
Use and Care Manual
Page 20
... damages. Replacement parts or repair labor costs for Blenders operated outside the 50 United States and District of a Service Center near you may not apply to you prepaid and insured. 18 Warranty for Puerto Rico A limited 12 month warranty extends to the purchaser and any succeeding owner for Commercial Blenders, Models KCB348 and KCB148, operated in materials and workmanship. See the KitchenAid® Commercial Blender Warranty for Puerto...
... damages. Replacement parts or repair labor costs for Blenders operated outside the 50 United States and District of a Service Center near you may not apply to you prepaid and insured. 18 Warranty for Puerto Rico A limited 12 month warranty extends to the purchaser and any succeeding owner for Commercial Blenders, Models KCB348 and KCB148, operated in materials and workmanship. See the KitchenAid® Commercial Blender Warranty for Puerto...
Use and Care Manual
Page 21
to page 17 for available replacement parts. Box Numbers, please.) KitchenAid will also be covered by our 12 month full warranty. Ordering Accessories and Replacement Parts Please refer to 5 p.m. To order accessories or replacement parts for your Blender, call toll-free 1-800-541-6390 Monday through Friday, 8 a.m. to 5 p.m., or write to 8 p.m. (Eastern Time), or Saturday, 10 a.m. Arranging for Service Outside the 50 United States and Puerto...
to page 17 for available replacement parts. Box Numbers, please.) KitchenAid will also be covered by our 12 month full warranty. Ordering Accessories and Replacement Parts Please refer to 5 p.m. To order accessories or replacement parts for your Blender, call toll-free 1-800-541-6390 Monday through Friday, 8 a.m. to 5 p.m., or write to 8 p.m. (Eastern Time), or Saturday, 10 a.m. Arranging for Service Outside the 50 United States and Puerto...

Use and Care Manual
Page 24
All rights reserved. dZw39181204 Specifications subject to change without notice. 8211464 ® FOR THE WAY IT'S MADE.™ ® Registered Trademark/™ Trademark of KitchenAid, U.S.A. © 2004.
All rights reserved. dZw39181204 Specifications subject to change without notice. 8211464 ® FOR THE WAY IT'S MADE.™ ® Registered Trademark/™ Trademark of KitchenAid, U.S.A. © 2004.


