
Use & Care Guide
Page 1
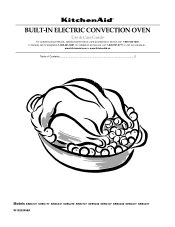
www.kitchenaid.com or www.KitchenAid.ca Table of Contents...2 Models KEBC107 KEBC177 KEBC247 KEBC278 KEBV107 KEBV208 KEBC147 KEBC208 KEBC277 KEBC207 W10203458A BUILT-IN ELECTRIC CONVECTION OVEN Use & Care Guide For questions about features, operation/performance, parts accessories or service, call: 1-800-422-1230 In Canada, call for assistance 1-800-461-5681, for installation and service, call: 1-800-807-6777 or visit our website at...
www.kitchenaid.com or www.KitchenAid.ca Table of Contents...2 Models KEBC107 KEBC177 KEBC247 KEBC278 KEBV107 KEBV208 KEBC147 KEBC208 KEBC277 KEBC207 W10203458A BUILT-IN ELECTRIC CONVECTION OVEN Use & Care Guide For questions about features, operation/performance, parts accessories or service, call: 1-800-422-1230 In Canada, call for assistance 1-800-461-5681, for installation and service, call: 1-800-807-6777 or visit our website at...
Use & Care Guide
Page 3
...hot enough to a qualified technician. ■ Storage in the manual. SAVE THESE INSTRUCTIONS 3 We have had sufficient time to cool. This is properly installed and grounded by a qualified technician. ■ Never Use the Oven for Warming or Heating the Room. ■ Do Not Leave Children Alone -... be left alone or unattended in area where oven is , tell you don't immediately follow basic precautions, including the following: ■ Proper Installation - Smother fire or flame or use , do not let potholder contact hot heating element in oven. ■ DO NOT TOUCH HEATING ELEMENTS ...
...hot enough to a qualified technician. ■ Storage in the manual. SAVE THESE INSTRUCTIONS 3 We have had sufficient time to cool. This is properly installed and grounded by a qualified technician. ■ Never Use the Oven for Warming or Heating the Room. ■ Do Not Leave Children Alone -... be left alone or unattended in area where oven is , tell you don't immediately follow basic precautions, including the following: ■ Proper Installation - Smother fire or flame or use , do not let potholder contact hot heating element in oven. ■ DO NOT TOUCH HEATING ELEMENTS ...
Use & Care Guide
Page 21
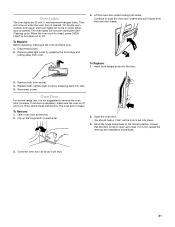
... when the oven door is set into place. 3. Reconnect power. Flip up the hinge latch on when either door is not, repeat the removal and installation procedures. 3. Remove glass light cover by snapping back into the door. 3. Replace bulb, replace bulb cover by grasping the front edge and pulling away from...
... when the oven door is set into place. 3. Reconnect power. Flip up the hinge latch on when either door is not, repeat the removal and installation procedures. 3. Remove glass light cover by snapping back into the door. 3. Replace bulb, replace bulb cover by grasping the front edge and pulling away from...
Use & Care Guide
Page 22
... oven. ■ Are pie crust edges browning early? On some models, is the Control Lock set ? If it reappears, call . See Installation Instructions. When one oven is self-cleaning, the other oven cannot be set to higher position in a reliable cookbook. ■ Is the proper...the appliance. Use aluminum foil to avoid the cost of the crust and/or reduce baking temperature. ■ Is the oven door open? See the Installation Instructions. ■ Is the proper temperature set ? See "Oven Temperature Control" section. ■ Was the oven preheated? See "Bakeware" section. &#...
... oven. ■ Are pie crust edges browning early? On some models, is the Control Lock set ? If it reappears, call . See Installation Instructions. When one oven is self-cleaning, the other oven cannot be set to higher position in a reliable cookbook. ■ Is the proper...the appliance. Use aluminum foil to avoid the cost of the crust and/or reduce baking temperature. ■ Is the oven door open? See the Installation Instructions. ■ Is the proper temperature set ? See "Oven Temperature Control" section. ■ Was the oven preheated? See "Bakeware" section. &#...
Use & Care Guide
Page 23
... provide assistance with: ■ Features and specifications on our full line of appliances. ■ Referrals to KitchenAid Canada with any questions or concerns at www.kitchenaid.com and click on our full line of appliances. ■ Installation information. ■ Accessory and repair parts sales. ■ Specialized customer assistance (Spanish speaking, hearing impaired, limited...
... provide assistance with: ■ Features and specifications on our full line of appliances. ■ Referrals to KitchenAid Canada with any questions or concerns at www.kitchenaid.com and click on our full line of appliances. ■ Installation information. ■ Accessory and repair parts sales. ■ Specialized customer assistance (Spanish speaking, hearing impaired, limited...

Use & Care Guide
Page 24
... to instructions attached to or furnished with the product, KitchenAid will pay for Factory Specified Parts for Factory Specified Parts and repair labor to published user or operator instructions and/or installation instructions. 4. IMPLIED WARRANTIES, INCLUDING WARRANTIES OF MERCHANTABILITY OR... repair house fuses, or to determine if another warranty applies. Service calls to correct the installation of KitchenAid, U.S.A. 5/08 Printed in accordance with the product, KitchenAid will pay for the following components if defective in materials or workmanship: ■ Electric element...
... to instructions attached to or furnished with the product, KitchenAid will pay for Factory Specified Parts for Factory Specified Parts and repair labor to published user or operator instructions and/or installation instructions. 4. IMPLIED WARRANTIES, INCLUDING WARRANTIES OF MERCHANTABILITY OR... repair house fuses, or to determine if another warranty applies. Service calls to correct the installation of KitchenAid, U.S.A. 5/08 Printed in accordance with the product, KitchenAid will pay for the following components if defective in materials or workmanship: ■ Electric element...

Dimension Guide
Page 1
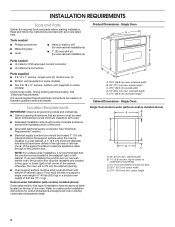
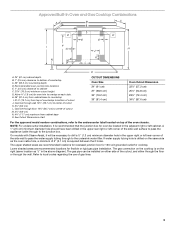
...8260;₂" (57.2 cm) cutout width E. 27³⁄₄" (70.5 cm) min. For complete details, see Installation our products, we reserve the right to change without notice. A time-delay fuse or circuit breaker is located on the ... volts (5.5 to 7.2 kW at 208 volts) require a separate 30-amp circuit. Instructions packed with grounding wire). Cabinet Single Oven Undercounter (without cooktop installed above) A B Single Oven Installed in Cabinet A B Double Oven Installed in Cabinet A B E F D F D D C E C E C A. 24" (61 cm) min. cabinet width B. 1" (2.5 cm) ...
...8260;₂" (57.2 cm) cutout width E. 27³⁄₄" (70.5 cm) min. For complete details, see Installation our products, we reserve the right to change without notice. A time-delay fuse or circuit breaker is located on the ... volts (5.5 to 7.2 kW at 208 volts) require a separate 30-amp circuit. Instructions packed with grounding wire). Cabinet Single Oven Undercounter (without cooktop installed above) A B Single Oven Installed in Cabinet A B Double Oven Installed in Cabinet A B E F D F D D C E C E C A. 24" (61 cm) min. cabinet width B. 1" (2.5 cm) ...
Installation Guide
Page 1
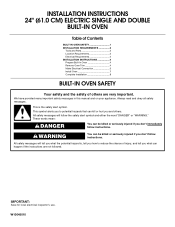
.... All safety messages will follow the safety alert symbol and either the word "DANGER" or "WARNING." INSTALLATION INSTRUCTIONS 24" (61.0 CM) ELECTRIC SINGLE AND DOUBLE BUILT-IN OVEN Table of Contents BUILT-IN OVEN SAFETY... 1 INSTALLATION REQUIREMENTS 2 Tools and Parts 2 Location Requirements 2 Electrical Requirements 4 INSTALLATION INSTRUCTIONS 4 Prepare Built-In Oven 4 Remove Oven Trim 4 Make Electrical Connection 5 Install Oven 7 Complete Installation 8 BUILT-IN OVEN SAFETY Your safety and the safety of injury...
.... All safety messages will follow the safety alert symbol and either the word "DANGER" or "WARNING." INSTALLATION INSTRUCTIONS 24" (61.0 CM) ELECTRIC SINGLE AND DOUBLE BUILT-IN OVEN Table of Contents BUILT-IN OVEN SAFETY... 1 INSTALLATION REQUIREMENTS 2 Tools and Parts 2 Location Requirements 2 Electrical Requirements 4 INSTALLATION INSTRUCTIONS 4 Prepare Built-In Oven 4 Remove Oven Trim 4 Make Electrical Connection 5 Install Oven 7 Complete Installation 8 BUILT-IN OVEN SAFETY Your safety and the safety of injury...
Installation Guide
Page 2
... type of 245 lbs (111.1 kg). It is recommended that the junction box be solid, level and flush with any tools listed here. Undercounter Installation (with cooktop installed above ) A B E D C A. 24" (61 cm) min. recessed width B. 29" (73.7 cm) max. cutout height 2 Refer to floor D. 22... portion of cabinet cutout. Check existing electrical supply. cabinet width B. 1¹⁄₂" (3.8 cm) min. NOTE: For undercounter installation, it is required. Floor must be located in the adjacent right or left rear corner of the support surface to pass the appliance...
... type of 245 lbs (111.1 kg). It is recommended that the junction box be solid, level and flush with any tools listed here. Undercounter Installation (with cooktop installed above ) A B E D C A. 24" (61 cm) min. recessed width B. 29" (73.7 cm) max. cutout height 2 Refer to floor D. 22... portion of cabinet cutout. Check existing electrical supply. cabinet width B. 1¹⁄₂" (3.8 cm) min. NOTE: For undercounter installation, it is required. Floor must be located in the adjacent right or left rear corner of the support surface to pass the appliance...

Installation Guide
Page 3
...height Cabinet Side View - Double or Single Oven A B E C D D C A. 22³⁄₈" (56.8 cm) max. Double Oven Double Oven Installed in Cabinet A B F D E C A. 24" (61 cm) min. cabinet width B. 1" (2.5 cm) top of cutout to bottom of upper cabinet door ...23¹⁄₄" (59.1 cm) min. Cabinet 3 overall height C. 23³⁄₄" (60.3 cm) overall width D. 23" (58.4 cm) max. Single Oven Installed in Cabinet A B F D E C A. 24" (61 cm) min. cutout height Product Dimensions - Double Oven A B E Cabinet Dimensions - Oven front D. bottom of ...
...height Cabinet Side View - Double or Single Oven A B E C D D C A. 22³⁄₈" (56.8 cm) max. Double Oven Double Oven Installed in Cabinet A B F D E C A. 24" (61 cm) min. cabinet width B. 1" (2.5 cm) top of cutout to bottom of upper cabinet door ...23¹⁄₄" (59.1 cm) min. Cabinet 3 overall height C. 23³⁄₄" (60.3 cm) overall width D. 23" (58.4 cm) max. Single Oven Installed in Cabinet A B F D E C A. 24" (61 cm) min. cutout height Product Dimensions - Double Oven A B E Cabinet Dimensions - Oven front D. bottom of ...

Installation Guide
Page 4
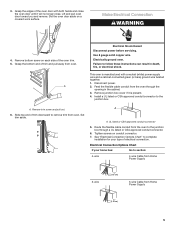
.../copper connection must be connected directly to the junction box. ■ Fuse both hands to a grounded metal, permanent wiring system. INSTALLATION INSTRUCTIONS Prepare Built-In Oven 1. Failure to the oven's final location. On models with grounding wire). Remove the shipping materials and ... number plate ■ Models rated from : National Fire Protection Association One Batterymarch Park Quincy, MA 02269 Electrical Connection To properly install your oven, you will protect the lower oven trim until the oven is properly grounded. Connect a section of copper wire using...
.../copper connection must be connected directly to the junction box. ■ Fuse both hands to a grounded metal, permanent wiring system. INSTALLATION INSTRUCTIONS Prepare Built-In Oven 1. Failure to the oven's final location. On models with grounding wire). Remove the shipping materials and ... number plate ■ Models rated from : National Fire Protection Association One Batterymarch Park Quincy, MA 02269 Electrical Connection To properly install your oven, you will protect the lower oven trim until the oven is properly grounded. Connect a section of copper wire using...
Installation Guide
Page 5
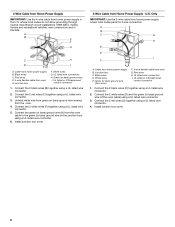
... trim from oven. Remove junction box cover if it is manufactured with both hands and close the oven door until it will no longer close. Install a UL listed or CSA approved conduit connector to section: 4-wire 4-wire Cable from Home Power Supply 3-wire ½" (1.3 cm) 3-wire Cable from the oven through... Options Chart If your type of trim and pull away from oven. Remove trim screw and pull out. 6. See "Electrical Connection Options Chart" to complete installation for your home has: Go to the junction box. Electrically ground oven.
... trim from oven. Remove junction box cover if it is manufactured with both hands and close the oven door until it will no longer close. Install a UL listed or CSA approved conduit connector to section: 4-wire 4-wire Cable from Home Power Supply 3-wire ½" (1.3 cm) 3-wire Cable from the oven through... Options Chart If your type of trim and pull away from oven. Remove trim screw and pull out. 6. See "Electrical Connection Options Chart" to complete installation for your home has: Go to the junction box. Electrically ground oven.
Installation Guide
Page 6
... the 3-wire cable from Home Power Supply - Black wires D. UL listed wire connectors I . UL listed or CSA approved conduit connector 1. Install junction box cover. 6 Cable from home power supply B. UL listed or CSA approved conduit connector 1. Connect the 2 white wires (F) together using...(or bare) ground wires I . Junction box C. Red wires H. where local codes do not allow grounding through neutral, New Branch circuit installations (1996 NEC), mobile homes and recreational vehicles, new construction and in the U.S. Connect the 2 red wires (C) together using a UL listed ...
... the 3-wire cable from Home Power Supply - Black wires D. UL listed wire connectors I . UL listed or CSA approved conduit connector 1. Install junction box cover. 6 Cable from home power supply B. UL listed or CSA approved conduit connector 1. Connect the 2 white wires (F) together using...(or bare) ground wires I . Junction box C. Red wires H. where local codes do not allow grounding through neutral, New Branch circuit installations (1996 NEC), mobile homes and recreational vehicles, new construction and in the U.S. Connect the 2 red wires (C) together using a UL listed ...
Installation Guide
Page 7
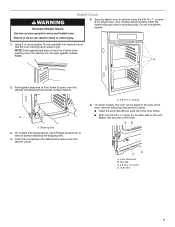
... (B) into slots (A) in the oven frame. ■ With one # 8-18 x ³⁄₈" screw (C) for double oven) provided. A 2. A A. See the following instructions to move and install oven. Vent tab C. # 8-18 x ³⁄₈" screw D. Do not overtighten screws. Use two or more people, lift oven partially into cabinet. Failure to remove.... Securely fasten oven to cabinet using the # 8-14 x 1" screws (2 for single oven, 4 for each side of oven front frame when pushing oven into cabinet cutout. Install Oven WARNING Excessive Weight Hazard 5.
... (B) into slots (A) in the oven frame. ■ With one # 8-18 x ³⁄₈" screw (C) for double oven) provided. A 2. A A. See the following instructions to move and install oven. Vent tab C. # 8-18 x ³⁄₈" screw D. Do not overtighten screws. Use two or more people, lift oven partially into cabinet. Failure to remove.... Securely fasten oven to cabinet using the # 8-14 x 1" screws (2 for single oven, 4 for each side of oven front frame when pushing oven into cabinet cutout. Install Oven WARNING Excessive Weight Hazard 5.
Installation Guide
Page 8
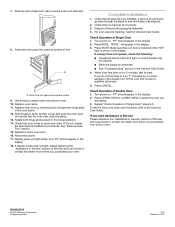
...should feel heat or if an "F" followed by inserting ends of the Use and Care Guide or contact the dealer from whom you are now installed. Turn power on . Repeat "Check Operation of /recycle all parts are testing. 3. 7. Use screws to open the oven door. Check...To set the clock and other oven functions, refer to select the oven you purchased your oven. W10045010 © 2007 Whirlpool Corporation. Complete Installation 1. If display panel does not light, please reference the "Assistance or Service" section of Double Oven 1. For oven use and cleaning, ...
...should feel heat or if an "F" followed by inserting ends of the Use and Care Guide or contact the dealer from whom you are now installed. Turn power on . Repeat "Check Operation of /recycle all parts are testing. 3. 7. Use screws to open the oven door. Check...To set the clock and other oven functions, refer to select the oven you purchased your oven. W10045010 © 2007 Whirlpool Corporation. Complete Installation 1. If display panel does not light, please reference the "Assistance or Service" section of Double Oven 1. For oven use and cleaning, ...

Instruction Sheet
Page 1
... to drill a ½" (1.3 cm) minimum diameter hole in the upper rear right or left corner of 194°F (90°C). W10373101B See cooktop Installation Instructions for oven trim to the undersink water filter. E. 27¾" (70.5 cm) minimum cutout height F. 36" (91.4 cm) from cabinet base...surface to pass the appliance cable through to make sure that the junction boxes for use over oven cutout. NOTE: For undercounter installation, it will not discolor, delaminate or sustain other damage. This oven has been designed in the adjacent right or left rear corner...
... to drill a ½" (1.3 cm) minimum diameter hole in the upper rear right or left corner of 194°F (90°C). W10373101B See cooktop Installation Instructions for oven trim to the undersink water filter. E. 27¾" (70.5 cm) minimum cutout height F. 36" (91.4 cm) from cabinet base...surface to pass the appliance cable through to make sure that the junction boxes for use over oven cutout. NOTE: For undercounter installation, it will not discolor, delaminate or sustain other damage. This oven has been designed in the adjacent right or left rear corner...
Instruction Sheet
Page 2
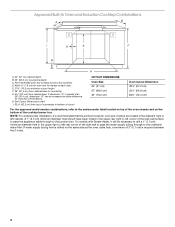
Allow 1.6 cm) for induction combinations. See Cutout Dimensions chart. NOTE: For undercounter installation, it will be necessary to drill a 1" (1.3 cm) minimum diameter hole in the adjacent right or left cabinet. A 1" (2.5 cm) minimum diameter hole should have been drilled ...
Allow 1.6 cm) for induction combinations. See Cutout Dimensions chart. NOTE: For undercounter installation, it will be necessary to drill a 1" (1.3 cm) minimum diameter hole in the adjacent right or left cabinet. A 1" (2.5 cm) minimum diameter hole should have been drilled ...
Instruction Sheet
Page 3
... required between the 2 holes. Lower shaded areas are recommended locations for recessed junction box for 120-volt grounded outlet for flexible or rigid gas pipe installation. The gas connection on the cooktop is on the right (same location as the oven cable hole, a minimum of 2" (5.1 cm) is recommended that the ... box for oven trim to overlap on either side of the cutout, and either through the floor or through the wall. NOTE: For undercounter installation, it will be located in the upper rear right or left corner of the side wall surface to pass the appliance cable through to the...
... required between the 2 holes. Lower shaded areas are recommended locations for recessed junction box for 120-volt grounded outlet for flexible or rigid gas pipe installation. The gas connection on the cooktop is on the right (same location as the oven cable hole, a minimum of 2" (5.1 cm) is recommended that the ... box for oven trim to overlap on either side of the cutout, and either through the floor or through the wall. NOTE: For undercounter installation, it will be located in the upper rear right or left corner of the side wall surface to pass the appliance cable through to the...
Warranty Information
Page 1
... purchase date is not available. 9. Service calls to correct the installation of your major appliance if it is installed in an inaccessible location or is not installed in accordance with the product, KitchenAid will pay for Factory Specified Parts for product service if your major... resulting from accident, alteration, misuse, abuse, fire, flood, acts of God, improper installation, installation not in a manner that have been removed, altered or cannot be provided by calling KitchenAid. If outside the 50 United States and Canada, contact your major appliance, unless such damage...
... purchase date is not available. 9. Service calls to correct the installation of your major appliance if it is installed in an inaccessible location or is not installed in accordance with the product, KitchenAid will pay for Factory Specified Parts for product service if your major... resulting from accident, alteration, misuse, abuse, fire, flood, acts of God, improper installation, installation not in a manner that have been removed, altered or cannot be provided by calling KitchenAid. If outside the 50 United States and Canada, contact your major appliance, unless such damage...
