
Use & Care Guide
Page 3
... technician. ■ Never Use the Oven for a good seal. Do not repair or replace any part of the oven unless specifically recommended in this manual and on Grease Fires - All other servicing should be referred to cool. Let hot air or steam escape before removing or replacing food. ■ ... surfaces are not followed. All safety messages will tell you what can be hot even though they have provided many important safety messages in the manual. Loose-fitting or hanging garments should not be left alone or unattended in area where oven is , tell you how to cause burns -...
... technician. ■ Never Use the Oven for a good seal. Do not repair or replace any part of the oven unless specifically recommended in this manual and on Grease Fires - All other servicing should be referred to cool. Let hot air or steam escape before removing or replacing food. ■ ... surfaces are not followed. All safety messages will tell you what can be hot even though they have provided many important safety messages in the manual. Loose-fitting or hanging garments should not be left alone or unattended in area where oven is , tell you how to cause burns -...
Use & Care Guide
Page 4
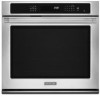
... H. Gasket Parts and Features not shown Third oven rack (roll-out rack) Roasting rack Temperature probe Model and serial number plate 4 PARTS AND FEATURES This manual covers different models. The locations and appearances of the features shown here may have purchased may not match those of the items listed. Convection element...
... H. Gasket Parts and Features not shown Third oven rack (roll-out rack) Roasting rack Temperature probe Model and serial number plate 4 PARTS AND FEATURES This manual covers different models. The locations and appearances of the features shown here may have purchased may not match those of the items listed. Convection element...
Use & Care Guide
Page 5
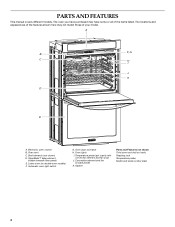
.... To Set: 1. Kitchen timer G. Lower oven cavity symbol C. Before setting, make sure the oven(s), Kitchen Timer and Timed Cooking are off. ELECTRONIC OVEN CONTROL This manual covers different models. Time of day, timer display Single Oven Display A. Oven light J.
.... To Set: 1. Kitchen timer G. Lower oven cavity symbol C. Before setting, make sure the oven(s), Kitchen Timer and Timed Cooking are off. ELECTRONIC OVEN CONTROL This manual covers different models. Time of day, timer display Single Oven Display A. Oven light J.
Use & Care Guide
Page 6
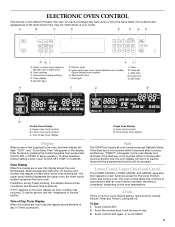
... 8 Demo Mode Kitchen Timer The Kitchen Timer can be set using the TOOLS selection key. To Turn Tones Off/On: Touch TOOLS and then "4" to manually scroll through the various tools, starting at 1 and ending automatically at low, but can be removed. 6 however, the kitchen timer can also touch the Tools...
... 8 Demo Mode Kitchen Timer The Kitchen Timer can be set using the TOOLS selection key. To Turn Tones Off/On: Touch TOOLS and then "4" to manually scroll through the various tools, starting at 1 and ending automatically at low, but can be removed. 6 however, the kitchen timer can also touch the Tools...
Installation Guide
Page 1
.... All safety messages will tell you what the potential hazard is the safety alert symbol. W10351242B We have provided many important safety messages in this manual and on your appliance. This symbol alerts you don't immediately follow the safety alert symbol and either the word "DANGER" or "WARNING." IMPORTANT : À conserver...
.... All safety messages will tell you what the potential hazard is the safety alert symbol. W10351242B We have provided many important safety messages in this manual and on your appliance. This symbol alerts you don't immediately follow the safety alert symbol and either the word "DANGER" or "WARNING." IMPORTANT : À conserver...