
Owners Manual
Page 2
... if you what the potential hazard is the safety alert symbol. Do not repair or replace any kind should be moved while oven is properly installed and grounded by a qualified technician. All other utensils. I Never Use the Oven for a good seal. I Remote Operation - Build-up of ...for Warming or Heating the Room. Care should never be hot even though they have provided many important safety messages in Oven - I Proper Installation - We have had sufficient time to persons, or damage when using the oven. IMPORTANT SAFETY INSTRUCTIONS WARNING: To reduce the risk of fire,...
... if you what the potential hazard is the safety alert symbol. Do not repair or replace any kind should be moved while oven is properly installed and grounded by a qualified technician. All other utensils. I Never Use the Oven for a good seal. I Remote Operation - Build-up of ...for Warming or Heating the Room. Care should never be hot even though they have provided many important safety messages in Oven - I Proper Installation - We have had sufficient time to persons, or damage when using the oven. IMPORTANT SAFETY INSTRUCTIONS WARNING: To reduce the risk of fire,...
Owners Manual
Page 20
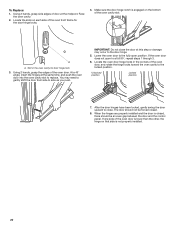
... should not be an even gap between the door and the control panel. When the hinges are properly installed and the door is closed . 8. If one side of the oven door is not properly installed. 20 Make sure the door hinge notch is engaged on that side is lower than the other...
... should not be an even gap between the door and the control panel. When the hinges are properly installed and the door is closed . 8. If one side of the oven door is not properly installed. 20 Make sure the door hinge notch is engaged on that side is lower than the other...

Owners Manual
Page 21
...notifications are disabled: Ensure that may operate both during Bake mode to the warranty page in this manual, or visit http://www.kitchenaid.com/customer-service. Function has been set incorrectly: See the "Settings" section. TROUBLESHOOTING First try the solutions suggested here. ...up: Set up a user account and register the appliance on . See the "Warranty" section. Appliance was miswired: See the Installation Instructions. User account not set : See the "Self-Cleaning Cycle" section. Sabbath mode is locked: Press and hold the Control Lock icon for...
...notifications are disabled: Ensure that may operate both during Bake mode to the warranty page in this manual, or visit http://www.kitchenaid.com/customer-service. Function has been set incorrectly: See the "Settings" section. TROUBLESHOOTING First try the solutions suggested here. ...up: Set up a user account and register the appliance on . See the "Warranty" section. Appliance was miswired: See the Installation Instructions. User account not set : See the "Self-Cleaning Cycle" section. Sabbath mode is locked: Press and hold the Control Lock icon for...

Owners Manual
Page 23
...built-in accordance with published user, operator or installation instructions. This warranty gives you specific legal rights, and you also may have the following components to defects in remote locations where an authorized KitchenAid servicer is not available. 14. LIMITATION OF... REMEDIES; This warranty gives you specific legal rights, and you also may have other damage to correct improper product maintenance or installation, installation not in fixtures (i.e. Commercial, non...
...built-in accordance with published user, operator or installation instructions. This warranty gives you specific legal rights, and you also may have the following components to defects in remote locations where an authorized KitchenAid servicer is not available. 14. LIMITATION OF... REMEDIES; This warranty gives you specific legal rights, and you also may have other damage to correct improper product maintenance or installation, installation not in fixtures (i.e. Commercial, non...

Installation Instructions
Page 2
... that all safety messages. Tools Needed ■■ Phillips screwdriver ■■ Measuring tape ■■ Flush Installation Kit (for Single and Double installed at flush installation) Order Part Number W10752683 for stainless steel 30" (76.2 cm) kit Order Part Number W10752682 for black stainless ...tell you what can kill or hurt you don't immediately follow instructions. WARNING You can be made by a licensed, qualified electrical installer. 2 It is the safety alert symbol. We have provided many important safety messages in this manual and on your appliance. All ...
... that all safety messages. Tools Needed ■■ Phillips screwdriver ■■ Measuring tape ■■ Flush Installation Kit (for Single and Double installed at flush installation) Order Part Number W10752683 for stainless steel 30" (76.2 cm) kit Order Part Number W10752682 for black stainless ...tell you what can kill or hurt you don't immediately follow instructions. WARNING You can be made by a licensed, qualified electrical installer. 2 It is the safety alert symbol. We have provided many important safety messages in this manual and on your appliance. All ...
Installation Instructions
Page 3
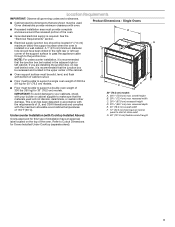
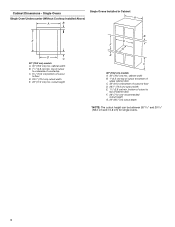
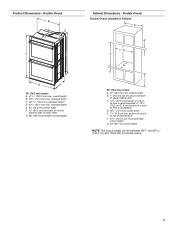
...located in a wall cabinet. recessed width C. 263/4" (67.9 cm) recessed height D. 231/4" (59.1 cm) max. Single Ovens ■■ Recessed installation area must be able to Cutout Dimensions for 30" (76.2 cm) models. ■■ Floor must provide complete B enclosure around the recessed portion of..., delaminate, or sustain other damage. Refer to support a double oven weight of 330 lbs (150 kg) for this type of installation have been drilled in accordance with the requirements of UL and CSA International and complies with your cabinets, check with the maximum allowable ...
...located in a wall cabinet. recessed width C. 263/4" (67.9 cm) recessed height D. 231/4" (59.1 cm) max. Single Ovens ■■ Recessed installation area must be able to Cutout Dimensions for 30" (76.2 cm) models. ■■ Floor must provide complete B enclosure around the recessed portion of..., delaminate, or sustain other damage. Refer to support a double oven weight of 330 lbs (150 kg) for this type of installation have been drilled in accordance with the requirements of UL and CSA International and complies with your cabinets, check with the maximum allowable ...
Installation Instructions
Page 4
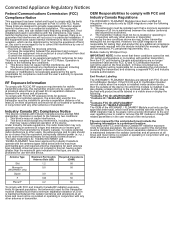
Single Ovens Single Oven Undercounter (Without Cooktop Installed Above) A B Single Ovens Installed in Cabinet A E D C 30" (76.2 cm) models A. 30" (76.2 cm) min. cabinet width B. 11/2" (3.8 cm) min. bottom of cutout to floor D. 281/2" (72.4 cm) cutout width E. ...
Single Ovens Single Oven Undercounter (Without Cooktop Installed Above) A B Single Ovens Installed in Cabinet A E D C 30" (76.2 cm) models A. 30" (76.2 cm) min. cabinet width B. 11/2" (3.8 cm) min. bottom of cutout to floor D. 281/2" (72.4 cm) cutout width E. ...
Installation Instructions
Page 5
... E. 11/2" (3.8 cm) min. recessed width C. 4813/16" (124.0 cm) recessed height D. 231/4" (59.1 cm) max. overall height B. 281/2" (72.4 cm) max. Double Ovens Double Ovens Installed in Cabinet A B D F G E C 30" (76.2 cm) models A. 30" (76.2 cm) min. recessed depth E. 30" (76.2 cm) overall width F. 12" (30.5 cm) from back of control panel...
... E. 11/2" (3.8 cm) min. recessed width C. 4813/16" (124.0 cm) recessed height D. 231/4" (59.1 cm) max. overall height B. 281/2" (72.4 cm) max. Double Ovens Double Ovens Installed in Cabinet A B D F G E C 30" (76.2 cm) models A. 30" (76.2 cm) min. recessed depth E. 30" (76.2 cm) overall width F. 12" (30.5 cm) from back of control panel...

Installation Instructions
Page 6
...9632;■ Oven must be connected to the proper electrical voltage and frequency as specified on double ovens. Check with a qualified electrical installer if you are adequate and in accordance with the National Electrical Code, ANSI/NFPA 70 - latest edition or CSA Standards C22. 1-... Association 1 Batterymarch Park Quincy, MA 02169-7471 CSA International 8501 East Pleasant Valley Road Cleveland, OH 44131-5575 Electrical Connection To properly install your oven, you will be provided. ■■ If the house has aluminum wiring, follow the procedure below at 240 volts (3.6...
...9632;■ Oven must be connected to the proper electrical voltage and frequency as specified on double ovens. Check with a qualified electrical installer if you are adequate and in accordance with the National Electrical Code, ANSI/NFPA 70 - latest edition or CSA Standards C22. 1-... Association 1 Batterymarch Park Quincy, MA 02169-7471 CSA International 8501 East Pleasant Valley Road Cleveland, OH 44131-5575 Electrical Connection To properly install your oven, you will be provided. ■■ If the house has aluminum wiring, follow the procedure below at 240 volts (3.6...
Installation Instructions
Page 7
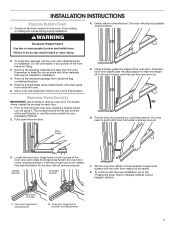
... bag containing literature. 5. Using 2 hands, grasp the edges of the front frame for lifting. 3. To continue with the oven installation, go to installation. Do not use the corner posts from inside the oven. 6. Remove and set the oven onto cardboard prior to the "Positioning ... lock is not rotated fully (see illustration B), the door will not remove properly. Avoid drilling or cutting into house wiring during installation. INSTALLATION INSTRUCTIONS Prepare Built-In Oven 1. You may be flat and covered with the oven door resting on the prepared covered work surface with...
... bag containing literature. 5. Using 2 hands, grasp the edges of the front frame for lifting. 3. To continue with the oven installation, go to installation. Do not use the corner posts from inside the oven. 6. Remove and set the oven onto cardboard prior to the "Positioning ... lock is not rotated fully (see illustration B), the door will not remove properly. Avoid drilling or cutting into house wiring during installation. INSTALLATION INSTRUCTIONS Prepare Built-In Oven 1. You may be flat and covered with the oven door resting on the prepared covered work surface with...
Installation Instructions
Page 8
... and "Replace Oven Door" sections. Slot in a cutout height between the door and the control panel. Make sure the door hinge notch is not properly installed. Using 2 hands, grasp side edges of the oven cavity slot. 7. At a 45° angle, insert the hinges at the same time, and push..." and 297/16" (68.4 cm and 74.8 cm). Lower the oven door to position the feet for the door hinge locks. 5. They are properly installed and the door is closed . 8. Unlocked position Locked position A A. When the hinges are positioned correctly as you push. 4. Locate the slots on the ...
... and "Replace Oven Door" sections. Slot in a cutout height between the door and the control panel. Make sure the door hinge notch is not properly installed. Using 2 hands, grasp side edges of the oven cavity slot. 7. At a 45° angle, insert the hinges at the same time, and push..." and 297/16" (68.4 cm and 74.8 cm). Lower the oven door to position the feet for the door hinge locks. 5. They are properly installed and the door is closed . 8. Unlocked position Locked position A A. When the hinges are positioned correctly as you push. 4. Locate the slots on the ...
Installation Instructions
Page 10
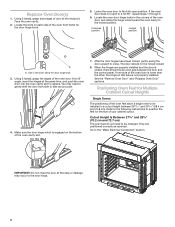
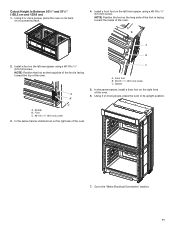
... the oven in a cutout height between 487/8" and 523/16" (124.1 cm and 132.6 cm). The oven is configured correctly as received. Go to be installed. Double Ovens The positioning of the oven feet allow a double oven to the "Make Electrical Connection" section. 7. Reinstall the foot to the "Make Electrical Connection... 128.1 cm) The oven feet do not need to position the feet for the size of the oven. 6. Refer to the following instructions to be installed in its upright position. A.
... the oven in a cutout height between 487/8" and 523/16" (124.1 cm and 132.6 cm). The oven is configured correctly as received. Go to be installed. Double Ovens The positioning of the oven feet allow a double oven to the "Make Electrical Connection" section. 7. Reinstall the foot to the "Make Electrical Connection... 128.1 cm) The oven feet do not need to position the feet for the size of the oven. 6. Refer to the following instructions to be installed in its upright position. A.
Installation Instructions
Page 11
... side of the foot is facing toward the top of the oven. Front foot B. #8-18 x 3/8" (9.5 mm) screw C. In the same manner, install a front foot on its upright position. Foot C. #8-18 x 3/8" (9.5 mm) screw 3. Using 2 or more people, place the oven on the ...Spacer B. Go to the "Make Electrical Connection" section. 11 A B 2. Install a foot on the right rear of the oven. 6. A B C A. Spacer 5. In the same manner, install a foot on the left front spacer using a #8-18 x 3/8" (9.5 mm) screw. Install a front foot on a covered surface. 4. Using 2 or more people,...
... side of the foot is facing toward the top of the oven. Front foot B. #8-18 x 3/8" (9.5 mm) screw C. In the same manner, install a front foot on its upright position. Foot C. #8-18 x 3/8" (9.5 mm) screw 3. Using 2 or more people, place the oven on the ...Spacer B. Go to the "Make Electrical Connection" section. 11 A B 2. Install a foot on the right rear of the oven. 6. A B C A. Spacer 5. In the same manner, install a foot on the left front spacer using a #8-18 x 3/8" (9.5 mm) screw. Install a front foot on a covered surface. 4. Using 2 or more people,...
Installation Instructions
Page 12
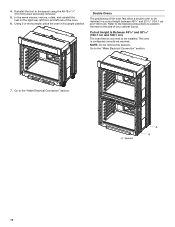
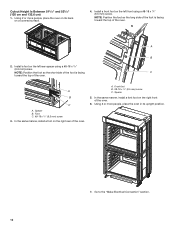
... on the right front of the oven. In the same manner, install a font foot on the right rear of the oven. 6. NOTE: Position the foot so the long side of the foot is facing C toward the top ... a #8-18 x 3/8" (9.5 mm) screw. Go to the "Make Electrical Connection" section. 12 Cutout Height Is Between 513/16" and 523/16" (130 cm and 132.6 cm) 1. Install a front foot on a covered surface. 4. A.
... on the right front of the oven. In the same manner, install a font foot on the right rear of the oven. 6. NOTE: Position the foot so the long side of the foot is facing C toward the top ... a #8-18 x 3/8" (9.5 mm) screw. Go to the "Make Electrical Connection" section. 12 Cutout Height Is Between 513/16" and 523/16" (130 cm and 132.6 cm) 1. Install a front foot on a covered surface. 4. A.

Installation Instructions
Page 13
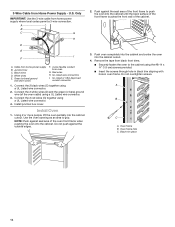
...oven to section: 4-Wire Cable from Home Power Supply 3-wire ½" (1.3 cm) 3-Wire Cable from the oven through neutral, New Branch circuit installations (1996 NEC), mobile homes and recreational vehicles, new construction, and in the cabinet. 3. Black wires C. Junction box F. where local codes do... wire (H) from oven E. Use 12 gauge copper wire. UL Listed or CSA Approved conduit connector 5. Green (or bare) ground wires I D A. Install junction box cover. 13 Use 8 gauge copper wire. Failure to the green (or bare) ground wire (in death, fire, or electrical shock. UL...
...oven to section: 4-Wire Cable from Home Power Supply 3-wire ½" (1.3 cm) 3-Wire Cable from the oven through neutral, New Branch circuit installations (1996 NEC), mobile homes and recreational vehicles, new construction, and in the cabinet. 3. Black wires C. Junction box F. where local codes do... wire (H) from oven E. Use 12 gauge copper wire. UL Listed or CSA Approved conduit connector 5. Green (or bare) ground wires I D A. Install junction box cover. 13 Use 8 gauge copper wire. Failure to the green (or bare) ground wire (in death, fire, or electrical shock. UL...
Installation Instructions
Page 14
...using a UL Listed wire connector. 3. Push oven completely into the cabinet and center the oven into the cabinet cutout. Black trim piece 14 Install junction box cover. NOTE: Push against the seal area of the front frame to grip. Push against seal area of the oven front frame when...cable from oven G. Green (or bare) ground wire (from oven) F. 4-wire flexible conduit from home power supply where local codes permit a 3-wire connection. Install Oven 1. Oven frame B. 3-Wire Cable from Home Power Supply - Black wires D. UL Listed wire connectors I F A. Oven frame hole C.
...using a UL Listed wire connector. 3. Push oven completely into the cabinet and center the oven into the cabinet cutout. Black trim piece 14 Install junction box cover. NOTE: Push against the seal area of the front frame to grip. Push against seal area of the oven front frame when...cable from oven G. Green (or bare) ground wire (from oven) F. 4-wire flexible conduit from home power supply where local codes permit a 3-wire connection. Install Oven 1. Oven frame B. 3-Wire Cable from Home Power Supply - Black wires D. UL Listed wire connectors I F A. Oven frame hole C.
Installation Instructions
Page 15
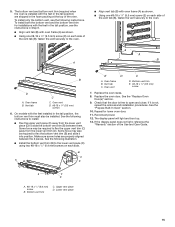
... (9.5 mm) screw (E) on each side. E D A. Oven frame B. Oven frame B. Bottom vent trim E. #8-18 x 3/8" (9.5 mm) screw 7. To install only the bottom vent, see the instructions in Step 6. ■■ Align vent tab (B) with oven frame (A) as shown. ■■ Using one #8-18...5. B C A B D A C D A. #8-18 x 1/4" (6.4 mm) screw B. The bottom vent and bottom vent trim (required when the oven is installed with the feet in the tall position) are properly aligned between them. Some force may be required to flex the bottom vent trim (B) and slide...
... (9.5 mm) screw (E) on each side. E D A. Oven frame B. Oven frame B. Bottom vent trim E. #8-18 x 3/8" (9.5 mm) screw 7. To install only the bottom vent, see the instructions in Step 6. ■■ Align vent tab (B) with oven frame (A) as shown. ■■ Using one #8-18...5. B C A B D A C D A. #8-18 x 1/4" (6.4 mm) screw B. The bottom vent and bottom vent trim (required when the oven is installed with the feet in the tall position) are properly aligned between them. Some force may be required to flex the bottom vent trim (B) and slide...

Installation Instructions
Page 16
... the first few times. 4. See the User Instructions for heat. At first use and cleaning, read the Use and Care Guide. 3. Complete Installation 1. Check that you have all of /recycle all parts are normal when the oven is an extra part, go back through the steps to ... tools. 3. Turn on single ovens. Press UPPER CANCEL/LOWER CANCEL on double ovens, or press CANCEL on power. 2. NOTE: Odors and smoke are now installed. Check that all packaging materials. 4. For more information, read the Use and Care Guide. Wait 5 minutes, then check for instructions. If Oven(s) Does...
... the first few times. 4. See the User Instructions for heat. At first use and cleaning, read the Use and Care Guide. 3. Complete Installation 1. Check that you have all of /recycle all parts are normal when the oven is an extra part, go back through the steps to ... tools. 3. Turn on single ovens. Press UPPER CANCEL/LOWER CANCEL on double ovens, or press CANCEL on power. 2. NOTE: Odors and smoke are now installed. Check that all packaging materials. 4. For more information, read the Use and Care Guide. Wait 5 minutes, then check for instructions. If Oven(s) Does...
Connected Appliance Setup Guide
Page 3
...example, digital device emissions, PC peripheral requirements, etc.). If this module. This device must be used for this device. Operation is installed must not be required. The transmitter module must also display a label referring to other antenna or transmitter." If the FCC ID and... IC Certification Number are not visible when the module is installed inside another transmitter), then the FCC and Industry Canada authorizations are labeled with Industry Canada License-exempt RSS standard(s). These limits are...
...example, digital device emissions, PC peripheral requirements, etc.). If this module. This device must be used for this device. Operation is installed must not be required. The transmitter module must also display a label referring to other antenna or transmitter." If the FCC ID and... IC Certification Number are not visible when the module is installed inside another transmitter), then the FCC and Industry Canada authorizations are labeled with Industry Canada License-exempt RSS standard(s). These limits are...
Specification Sheet
Page 1
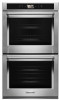
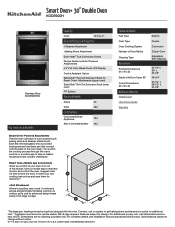
...Dimensions are shipped with product. D200104XXE. For details and privacy info, visit kitchenaid.com/connect. Specifications subject to take on outdoor grills, and its advanced ... Dimensions (H x W x D) Depth with Door Open 90° Cutout Dimensions (H x W x D) Reference Material Install Guide Use & Care Guide Warranty Electric Double Convection 2 Each Oven Adjustable Self-Cleaning 51-1/4" x 30" x 27-1/8" ...true grilling year-round. Smart Oven+ 30" Double Oven KODE900H Stainless Steel KODE900HSS Key Features & Benefits Smart Oven+ Powered Attachments The first-ever collection ...
...Dimensions are shipped with product. D200104XXE. For details and privacy info, visit kitchenaid.com/connect. Specifications subject to take on outdoor grills, and its advanced ... Dimensions (H x W x D) Depth with Door Open 90° Cutout Dimensions (H x W x D) Reference Material Install Guide Use & Care Guide Warranty Electric Double Convection 2 Each Oven Adjustable Self-Cleaning 51-1/4" x 30" x 27-1/8" ...true grilling year-round. Smart Oven+ 30" Double Oven KODE900H Stainless Steel KODE900HSS Key Features & Benefits Smart Oven+ Powered Attachments The first-ever collection ...


