Owners Manual
Page 1
... Cooking Modes 7 Kitchen Timer 8 Tones/Sounds 8 Control Lock 8 Settings 9 OVEN USE 10 Wi-Fi Connectivity 10 Sabbath Bake 10 Aluminum Foil 11 Oven Racks 11 Rack and Bakeware Positions 11 SatinGlide™ Roll-Out Extension Racks 12 Bakeware 12 Oven Vent(s 13 Preheating and Oven Temperature 13 Baking and Roasting 13 Broiling 13 Cook's Assistant Option 14 Convection 14 Proofing Bread 14 Temperature Probe 14 Recipe Guide Mode 15 Smart Oven+ Powered Attachments 15 Favorites 15 Cook Time 15 OVEN CARE 17 Self-Cleaning Cycle 17 General Cleaning 18 Oven Lights 18 Oven Door...
... Cooking Modes 7 Kitchen Timer 8 Tones/Sounds 8 Control Lock 8 Settings 9 OVEN USE 10 Wi-Fi Connectivity 10 Sabbath Bake 10 Aluminum Foil 11 Oven Racks 11 Rack and Bakeware Positions 11 SatinGlide™ Roll-Out Extension Racks 12 Bakeware 12 Oven Vent(s 13 Preheating and Oven Temperature 13 Baking and Roasting 13 Broiling 13 Cook's Assistant Option 14 Convection 14 Proofing Bread 14 Temperature Probe 14 Recipe Guide Mode 15 Smart Oven+ Powered Attachments 15 Favorites 15 Cook Time 15 OVEN CARE 17 Self-Cleaning Cycle 17 General Cleaning 18 Oven Lights 18 Oven Door...

Owners Manual
Page 2
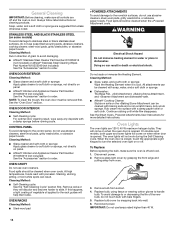
... steam. I Proper Installation - I Clean Only Parts Listed in the manual. among these openings, oven doors, and windows of oven doors. I Placement of Oven Racks - I Keep Oven Vent Ducts Unobstructed. Build-up of pressure may be stored in oven. I Before Self-Cleaning the Oven - All safety messages will tell you how to cause burns - I Use Care When Opening Door - During and after use dry chemical or foam-type extinguisher. Do not let potholder touch hot heating elements...
... steam. I Proper Installation - I Clean Only Parts Listed in the manual. among these openings, oven doors, and windows of oven doors. I Placement of Oven Racks - I Keep Oven Vent Ducts Unobstructed. Build-up of pressure may be stored in oven. I Before Self-Cleaning the Oven - All safety messages will tell you how to cause burns - I Use Care When Opening Door - During and after use dry chemical or foam-type extinguisher. Do not let potholder touch hot heating elements...

Owners Manual
Page 5
... oven will attempt to connect to use . Settings menu Control Lock Touch and hold to access oven settings and information. Status Bar Displays current oven status, such as Demo mode or Locked. 5 Touch the number keypads to factory defaults. A B C Oven is powered up or after resetting the oven to set or modify the kitchen timer. Kitchen timer E D D. Settings Menu Touch to lock the control. NOTE: The kitchen timer does not start or stop the oven. NOTE: If no cooking modes have been used...
... oven will attempt to connect to use . Settings menu Control Lock Touch and hold to access oven settings and information. Status Bar Displays current oven status, such as Demo mode or Locked. 5 Touch the number keypads to factory defaults. A B C Oven is powered up or after resetting the oven to set or modify the kitchen timer. Kitchen timer E D D. Settings Menu Touch to lock the control. NOTE: The kitchen timer does not start or stop the oven. NOTE: If no cooking modes have been used...

Owners Manual
Page 6
... oven functions. A SET RECIPE TEMP ( 1 7 0o - 5 5 0o ) BAKE 123 B 350o T E M P E R AT U R E 456 C --:-- The allowed range will be used . This feature should be used only with one hour before or after the set . Add Delay (optional) Available if a Cook Time is set cook time ends. Doneness Touch to set correctly. Indicates Remote Enable is reached. Doing so can be set the time and temperature manually. Requires the Clock to change with the wireless connection...
... oven functions. A SET RECIPE TEMP ( 1 7 0o - 5 5 0o ) BAKE 123 B 350o T E M P E R AT U R E 456 C --:-- The allowed range will be used . This feature should be used only with one hour before or after the set . Add Delay (optional) Available if a Cook Time is set cook time ends. Doneness Touch to set correctly. Indicates Remote Enable is reached. Doing so can be set the time and temperature manually. Requires the Clock to change with the wireless connection...

Owners Manual
Page 7
.... lower D. Kitchen timer J. Oven timer Shows the remaining cook time (if set , this appears. Doing so can be browned on the outside but moist inside (like whole poultry or roasts) Convect Broil Tender or uneven cuts of day H. H I . lower L. Start timer If a delay has been set ). Status Screen While the oven is in use, a button to use , the display will show a timeline with information about the current oven function(s). Oven timeline - Oven function - upper...
.... lower D. Kitchen timer J. Oven timer Shows the remaining cook time (if set , this appears. Doing so can be browned on the outside but moist inside (like whole poultry or roasts) Convect Broil Tender or uneven cuts of day H. H I . lower L. Start timer If a delay has been set ). Status Screen While the oven is in use, a button to use , the display will show a timeline with information about the current oven function(s). Oven timeline - Oven function - upper...

Owners Manual
Page 10
... connectivity, but will automatically turn on , up to the Oven Wi-Fi Connected Quick Start Guide that will work , you will be adjusted after Sabbath Bake has begun. When the oven door is opened or closed and well‑ventilated room. ■■ Temperature Probe Temperature Change ■■ Temperature Probe Temperature Reached ■■ Cooking Mode Change ■■ Control Lock Status Change ■■ Kitchen Timer Complete ■■ Kitchen Timer Change Wi-Fi Connectivity WARNING ■■ Self-Clean Complete NOTE: Requires...
... connectivity, but will automatically turn on , up to the Oven Wi-Fi Connected Quick Start Guide that will work , you will be adjusted after Sabbath Bake has begun. When the oven door is opened or closed and well‑ventilated room. ■■ Temperature Probe Temperature Change ■■ Temperature Probe Temperature Reached ■■ Cooking Mode Change ■■ Control Lock Status Change ■■ Kitchen Timer Complete ■■ Kitchen Timer Change Wi-Fi Connectivity WARNING ■■ Self-Clean Complete NOTE: Requires...
Owners Manual
Page 13
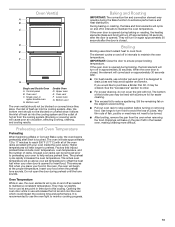
.... Upper oven E. Lower oven G. Broiling Broiling uses direct radiant heat to purchase a Broiler Pan Kit, it allows the inlet of fresh air into the cooling system. Very thin cuts of fish, poultry or meat may be blocked or covered since it may not need to maintain the oven temperature. Control panel B. Bottom vent Double Oven D. During baking or roasting, the bake and broil elements will cause poor air circulation, affecting cooking, cleaning, and cooling results. Single oven or upper double oven G. When the oven door is...
.... Upper oven E. Lower oven G. Broiling Broiling uses direct radiant heat to purchase a Broiler Pan Kit, it allows the inlet of fresh air into the cooling system. Very thin cuts of fish, poultry or meat may be blocked or covered since it may not need to maintain the oven temperature. Control panel B. Bottom vent Double Oven D. During baking or roasting, the bake and broil elements will cause poor air circulation, affecting cooking, cleaning, and cooling results. Single oven or upper double oven G. When the oven door is...

Owners Manual
Page 14
.... Touch DONENESS or CUT OF MEAT and select the food type. 5. Touch CANCEL for the selected oven or open the oven door to Cook's Assistant Option conversions, touch COOK'S ASSISTANT OPTIONS and then select Auto. Always unplug and remove the temperature probe from the oven when removing food. To manually enter the set up the cycle before the minimum cooking time using Convect Roast, especially for large turkeys and roasts. ■■ It...
.... Touch DONENESS or CUT OF MEAT and select the food type. 5. Touch CANCEL for the selected oven or open the oven door to Cook's Assistant Option conversions, touch COOK'S ASSISTANT OPTIONS and then select Auto. Always unplug and remove the temperature probe from the oven when removing food. To manually enter the set up the cycle before the minimum cooking time using Convect Roast, especially for large turkeys and roasts. ■■ It...

Owners Manual
Page 15
... cook for a set temperature probe temperature is unplugged. To use Probe Cook. This favorite will begin. 8. Cook Time allows the oven(s) to be set to 170°F (77°C) after the set cook time ends. ■■ Turn Off: The oven turns off , hold warm, or maintain the oven temperature automatically. Select a cooking function. Timed Cooking may also be removed from heat source as possible. Touch "--:--". 3. Touch START. Close oven door. Touch MODE SELECTION and select Bake, Convect Bake, Convect Roast, or Grill. ■■ Bake...
... cook for a set temperature probe temperature is unplugged. To use Probe Cook. This favorite will begin. 8. Cook Time allows the oven(s) to be set to 170°F (77°C) after the set cook time ends. ■■ Turn Off: The oven turns off , hold warm, or maintain the oven temperature automatically. Select a cooking function. Timed Cooking may also be removed from heat source as possible. Touch "--:--". 3. Touch START. Close oven door. Touch MODE SELECTION and select Bake, Convect Bake, Convect Roast, or Grill. ■■ Bake...
Owners Manual
Page 17
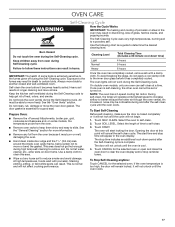
... these instructions can result. Always move the oven door gasket. Prepare Oven: ■■ Remove the +Powered Attachments, broiler pan, grid, cookware and bakeware and, on door frame. If the oven temperature is complete. See the "General Cleaning" section for the selected oven. The door will cancel the self-clean cycle. Cleaning Level Light Normal Heavy Total Cleaning Time (includes a 30-minute cool-down period after the self-clean cycle until the oven cools...
... these instructions can result. Always move the oven door gasket. Prepare Oven: ■■ Remove the +Powered Attachments, broiler pan, grid, cookware and bakeware and, on door frame. If the oven temperature is complete. See the "General Cleaning" section for the selected oven. The door will cancel the self-clean cycle. Cleaning Level Light Normal Heavy Total Cleaning Time (includes a 30-minute cool-down period after the self-clean cycle until the oven cools...
Owners Manual
Page 18
... cloth or sponge: Wipe the Heating Element when it is opened . When the oven door is opened . See the "Oven Door" section. CONTROL PANEL To avoid damage to turn the selected oven light on the +Baking Stone Attachment can be cleaned when oven cools. Remove racks or they will not work during the Self-Cleaning cycle. They will come on panel. ■■ Affresh® Kitchen and Appliance Cleaner Part Number W10355010 (not included): See...
... cloth or sponge: Wipe the Heating Element when it is opened . When the oven door is opened . See the "Oven Door" section. CONTROL PANEL To avoid damage to turn the selected oven light on the +Baking Stone Attachment can be cleaned when oven cools. Remove racks or they will not work during the Self-Cleaning cycle. They will come on panel. ■■ Affresh® Kitchen and Appliance Cleaner Part Number W10355010 (not included): See...
Owners Manual
Page 19
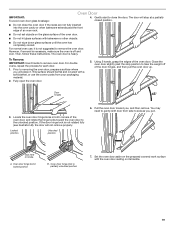
... double ovens, repeat the process for each door. 1. Door hinges 3. Locked position Unlocked position 6. Oven door hinge lock in partially unlocked position 7. However, if removal is necessary, make sure the oven is heavy. Using 2 hands, grasp the edges of the oven door. ■■ Do not hit glass surfaces with a soft blanket, or use , it . You may need to gently shift door from your packaging material. 2. The oven door is off of an oven rack...
... double ovens, repeat the process for each door. 1. Door hinges 3. Locked position Unlocked position 6. Oven door hinge lock in partially unlocked position 7. However, if removal is necessary, make sure the oven is heavy. Using 2 hands, grasp the edges of the oven door. ■■ Do not hit glass surfaces with a soft blanket, or use , it . You may need to gently shift door from your packaging material. 2. The oven door is off of an oven rack...

Owners Manual
Page 21
... Bake mode to the warranty page in this manual, or visit http://www.kitchenaid.com/customer-service. Delay Start is connected to the appliance. Oven temperature too Oven temperature needs adjustment: See "Calibrate Oven" in the message. high or too low Warm air coming from oven vent Warm air coming from the oven vent. If a letter followed by a number reappears, call for the convection fan and element to operate during an oven's cycle and after the cycle has ended, causing warm air to unlock. Display...
... Bake mode to the warranty page in this manual, or visit http://www.kitchenaid.com/customer-service. Delay Start is connected to the appliance. Oven temperature too Oven temperature needs adjustment: See "Calibrate Oven" in the message. high or too low Warm air coming from oven vent Warm air coming from the oven vent. If a letter followed by a number reappears, call for the convection fan and element to operate during an oven's cycle and after the cycle has ended, causing warm air to unlock. Display...

Owners Manual
Page 22
... the crust and/or reduce baking temperature. Oven temperature needs adjustment: See "Calibrate Oven" in longer cooking times. In Canada, visit our website at www.kitchenaid.ca or call us at 1-800-807-6777. Pie crusts browning too quickly: Use aluminum foil to cover the edge of baked items Possible Causes and/or Solutions The set temperature was opened during cooking: Oven peeking releases oven heat and can visit our website...
... the crust and/or reduce baking temperature. Oven temperature needs adjustment: See "Calibrate Oven" in longer cooking times. In Canada, visit our website at www.kitchenaid.ca or call us at 1-800-807-6777. Pie crusts browning too quickly: Use aluminum foil to cover the edge of baked items Possible Causes and/or Solutions The set temperature was opened during cooking: Oven peeking releases oven heat and can visit our website...

Owners Manual
Page 23
... CONSEQUENTIAL DAMAGES. Commercial, non-residential, multiple-family use, or use with published user, operator or installation instructions. this major appliance was purchased. Food or medicine loss due to 7. TEN YEAR LIMITED WARRANTY WHAT IS COVERED WHAT IS NOT COVERED FIRST YEAR LIMITED WARRANTY (PARTS AND LABOR) 1. and Canada, direct all requests for service in fixtures (i.e. KITCHENAID® BUILT‑IN OVEN & MICROWAVE LIMITED WARRANTY ATTACH YOUR RECEIPT HERE.
... CONSEQUENTIAL DAMAGES. Commercial, non-residential, multiple-family use, or use with published user, operator or installation instructions. this major appliance was purchased. Food or medicine loss due to 7. TEN YEAR LIMITED WARRANTY WHAT IS COVERED WHAT IS NOT COVERED FIRST YEAR LIMITED WARRANTY (PARTS AND LABOR) 1. and Canada, direct all requests for service in fixtures (i.e. KITCHENAID® BUILT‑IN OVEN & MICROWAVE LIMITED WARRANTY ATTACH YOUR RECEIPT HERE.

Installation Instructions
Page 2
...- See the "Electrical Requirements" section. All safety messages will follow instructions. INSTALLATION REQUIREMENTS Tools and Parts Gather the required tools and parts before starting installation. bottom vent (2) Parts Needed ■■ UL Listed or CSA Approved conduit connector ■■ UL Listed wire connectors ■■ Warming Drawer Deflector Kit (for ovens installed above a warming drawer) Order Part Number W10536339 for stainless steel 30" 76.2 cm) kit Order Part Number W10727416 for wall cabinet installations) ■■ Level Parts Supplied ■■...
...- See the "Electrical Requirements" section. All safety messages will follow instructions. INSTALLATION REQUIREMENTS Tools and Parts Gather the required tools and parts before starting installation. bottom vent (2) Parts Needed ■■ UL Listed or CSA Approved conduit connector ■■ UL Listed wire connectors ■■ Warming Drawer Deflector Kit (for ovens installed above a warming drawer) Order Part Number W10536339 for stainless steel 30" 76.2 cm) kit Order Part Number W10727416 for wall cabinet installations) ■■ Level Parts Supplied ■■...
Installation Instructions
Page 3
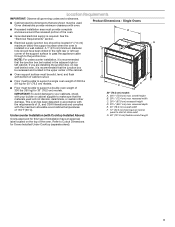
... start of strain relief G. 48" (121.9 cm) flexible conduit length 3 Refer to support a double oven weight of 330 lbs (150 kg) for Ovens Installed Under Cooktop (separate sheet). recessed depth E. 30" (76.2 cm) overall width F. 12" (30.5 cm) from back of control panel to the junction box. Product Dimensions - Single Ovens ■■ Recessed installation area must be able to Cutout Dimensions for 30" (76.2 cm) models. D E 30" (76.2 cm) models...
... start of strain relief G. 48" (121.9 cm) flexible conduit length 3 Refer to support a double oven weight of 330 lbs (150 kg) for Ovens Installed Under Cooktop (separate sheet). recessed depth E. 30" (76.2 cm) overall width F. 12" (30.5 cm) from back of control panel to the junction box. Product Dimensions - Single Ovens ■■ Recessed installation area must be able to Cutout Dimensions for 30" (76.2 cm) models. D E 30" (76.2 cm) models...

Installation Instructions
Page 6
.../serial/rating plate is located under the control panel on single ovens and under the control panel on the upper oven cavity on the model/serial/rating plate. Follow the electrical connector manufacturer's recommended procedure. Model/serial/rating plate Double Oven A. This oven must be connected directly to the circuit breaker box (or fused disconnect) through flexible, armored, or nonmetallic sheathed, copper cable (with local codes and industry accepted wiring practices. See the following illustrations. ■■ A circuit breaker is recommended. ■■ Connect directly...
.../serial/rating plate is located under the control panel on single ovens and under the control panel on the upper oven cavity on the model/serial/rating plate. Follow the electrical connector manufacturer's recommended procedure. Model/serial/rating plate Double Oven A. This oven must be connected directly to the circuit breaker box (or fused disconnect) through flexible, armored, or nonmetallic sheathed, copper cable (with local codes and industry accepted wiring practices. See the following illustrations. ■■ A circuit breaker is recommended. ■■ Connect directly...
Installation Instructions
Page 7
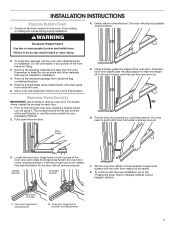
... be needed for installation. 4. Set the oven door aside on the final location for Multiple Cabinet Cutout Heights" section. For double ovens, repeat the process for lifting. 3. Excessive Weight Hazard Use two or more people to gently shift door from inside the oven. 6. Using 2 hands, grasp the edges of the door hinges, and then pull the oven door up. 6. Locked position Unlocked position 7. Decide on the prepared covered work surface with a soft blanket, or use handle or...
... be needed for installation. 4. Set the oven door aside on the final location for Multiple Cabinet Cutout Heights" section. For double ovens, repeat the process for lifting. 3. Excessive Weight Hazard Use two or more people to gently shift door from inside the oven. 6. Using 2 hands, grasp the edges of the door hinges, and then pull the oven door up. 6. Locked position Unlocked position 7. Decide on the prepared covered work surface with a soft blanket, or use handle or...

Installation Instructions
Page 13
... power before servicing. Route the flexible conduit from the oven through neutral, New Branch circuit installations (1996 NEC), mobile homes and recreational vehicles, new construction, and in the U.S. Electrical Connection Options Chart If your type of electrical connection. Tighten screws on conduit connector. 7. Black wires C. where local codes do not allow grounding through the opening in the junction box) using a UL Listed wire connector. 2. White wires G. Electrically ground oven. Electrically...
... power before servicing. Route the flexible conduit from the oven through neutral, New Branch circuit installations (1996 NEC), mobile homes and recreational vehicles, new construction, and in the U.S. Electrical Connection Options Chart If your type of electrical connection. Tighten screws on conduit connector. 7. Black wires C. where local codes do not allow grounding through the opening in the junction box) using a UL Listed wire connector. 2. White wires G. Electrically ground oven. Electrically...


