Installation Instructions
Page 2
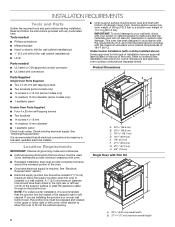
... codes. Location Requirements IMPORTANT: Observe all electrical connections be able to make sure that the junction box be located 3" (7.6 cm) maximum below the support surface when the oven is required. Single Oven with your cabinets, check with Trim Kit ■ Recessed installation area must be used will not discolor, delaminate or sustain other damage. Undercounter Installation (with bottom of the cabinet to allow the oven to undercounter installation instructions for wall cabinet installations) ■ Level Parts needed...
... codes. Location Requirements IMPORTANT: Observe all electrical connections be able to make sure that the junction box be located 3" (7.6 cm) maximum below the support surface when the oven is required. Single Oven with your cabinets, check with Trim Kit ■ Recessed installation area must be used will not discolor, delaminate or sustain other damage. Undercounter Installation (with bottom of the cabinet to allow the oven to undercounter installation instructions for wall cabinet installations) ■ Level Parts needed...
Installation Instructions
Page 7
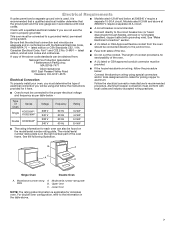
... codes and industry accepted wiring practices. ■ Oven/s must be connected directly to a grounded metal, permanent wiring system. Model/serial number rating plate A. Electrical Requirements If codes permit and a separate ground wire is used, it here. ■ Models rated 4.2 kW and below at 208/240 V require a separate 40 A circuit. ■ A circuit breaker is for joining copper to the proper electrical voltage and frequency as per table below - For double oven configuration, refer to the circuit breaker box (or fused...
... codes and industry accepted wiring practices. ■ Oven/s must be connected directly to a grounded metal, permanent wiring system. Model/serial number rating plate A. Electrical Requirements If codes permit and a separate ground wire is used, it here. ■ Models rated 4.2 kW and below at 208/240 V require a separate 40 A circuit. ■ A circuit breaker is for joining copper to the proper electrical voltage and frequency as per table below - For double oven configuration, refer to the circuit breaker box (or fused...

Installation Instructions
Page 8
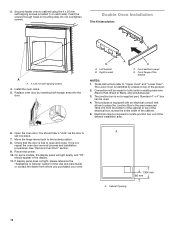
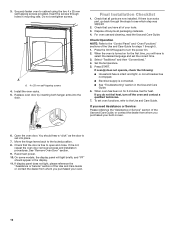
... the junction box. Open oven door all the way. 2. Avoid drilling or cutting into house wiring during installation. To avoid floor damage, set aside racks, oven bottom trim, and other injury. 2. Disconnect power. 2. A 3. Remove the shipping materials and tape from the oven to follow these instructions can result in back or other parts from inside the oven. 6. Repeat steps for double oven installations. 8 INSTALLATION INSTRUCTIONS Prepare Built-In Oven 1. WARNING Make Electrical Connection WARNING Excessive Weight Hazard Use two...
... the junction box. Open oven door all the way. 2. Avoid drilling or cutting into house wiring during installation. To avoid floor damage, set aside racks, oven bottom trim, and other injury. 2. Disconnect power. 2. A 3. Remove the shipping materials and tape from the oven to follow these instructions can result in back or other parts from inside the oven. 6. Repeat steps for double oven installations. 8 INSTALLATION INSTRUCTIONS Prepare Built-In Oven 1. WARNING Make Electrical Connection WARNING Excessive Weight Hazard Use two...

Installation Instructions
Page 11
.... 2. Screw the aesthetic panel to push oven into the cabinet cutout. Complete Single Oven Installation WARNING Excessive Weight Hazard Use two or more people, lift the oven by the side handles located on top of front frame to the front bracket flange using the trim kit, slide oven on the right and left and right brackets. 6. Gently insert into cabinet. 11 Failure to move and install oven. Push against seal area...
.... 2. Screw the aesthetic panel to push oven into the cabinet cutout. Complete Single Oven Installation WARNING Excessive Weight Hazard Use two or more people, lift the oven by the side handles located on top of front frame to the front bracket flange using the trim kit, slide oven on the right and left and right brackets. 6. Gently insert into cabinet. 11 Failure to move and install oven. Push against seal area...
Installation Instructions
Page 12
... display. 11. Double Oven Installation Trim Kit description: B A A. 4 x 25 mm self-tapping screws 4. Connection will light briefly, and "PF" should hear a "click" as the door is set into the door. Check that allows to open and close. Front flange of the defined installation area. 6. These instructions refer to Black, etc) simultaneously. 3. Open the oven door. On some models, the display panel will be used. 4. 3. You should appear in mounting rails. Right bracket A C C. The Lower Oven...
... display. 11. Double Oven Installation Trim Kit description: B A A. 4 x 25 mm self-tapping screws 4. Connection will light briefly, and "PF" should hear a "click" as the door is set into the door. Check that allows to open and close. Front flange of the defined installation area. 6. These instructions refer to Black, etc) simultaneously. 3. Open the oven door. On some models, the display panel will be used. 4. 3. You should appear in mounting rails. Right bracket A C C. The Lower Oven...

Installation Instructions
Page 15
... unit into electrical box. 16. Using two or more people, gently move and install oven. Go to do so can result in back or other injury. 1. Failure to the "Make Electrical Connection" section on page 8 and follow the instructions listed there. Complete Double Oven Installation 13. Using two or more people, lift the lower oven by the side handles located on the floor near the cabinet opening. 14...
... unit into electrical box. 16. Using two or more people, gently move and install oven. Go to do so can result in back or other injury. 1. Failure to the "Make Electrical Connection" section on page 8 and follow the instructions listed there. Complete Double Oven Installation 13. Using two or more people, lift the lower oven by the side handles located on the floor near the cabinet opening. 14...
Installation Instructions
Page 16
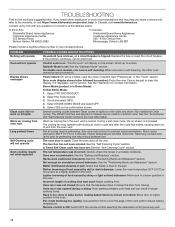
... set the correct time. 3. See "Remove Oven Door" section. 9. Dispose of your oven. 16 If oven(s) does not operate, check the following: ■ Household fuse is connected. ■ See "Troubleshooting" section in the display. 11. You should appear in the Use and Care Guide. 6. If it is set into the door. If display panel does not light, please reference the "Assistance or Service" section of the Use and Care Guide for 5 minutes, feel heat, turn the power...
... set the correct time. 3. See "Remove Oven Door" section. 9. Dispose of your oven. 16 If oven(s) does not operate, check the following: ■ Household fuse is connected. ■ See "Troubleshooting" section in the display. 11. You should appear in the Use and Care Guide. 6. If it is set into the door. If display panel does not light, please reference the "Assistance or Service" section of the Use and Care Guide for 5 minutes, feel heat, turn the power...
Owners Manual
Page 2
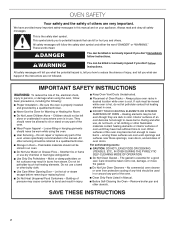
... the oven unless specifically recommended in use a towel or other servicing should not be left alone or unattended in area where oven is essential for Warming or Heating the Room. Do not use . Do Not Use Oven Cleaners - Remove broiler pan and other flammable materials contact heating elements or interior surfaces of the oven. Do not repair or replace any part of oven until they are not followed. Use Care When Opening Door - among these openings, oven doors...
... the oven unless specifically recommended in use a towel or other servicing should not be left alone or unattended in area where oven is essential for Warming or Heating the Room. Do not use . Do Not Use Oven Cleaners - Remove broiler pan and other flammable materials contact heating elements or interior surfaces of the oven. Do not repair or replace any part of oven until they are not followed. Use Care When Opening Door - among these openings, oven doors...
Owners Manual
Page 3
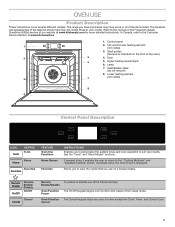
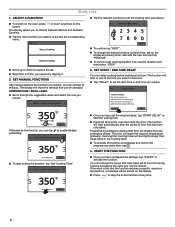
... Favorites FEATURE Oven Use Functions Home Screen Favorites INSTRUCTIONS Enables you to personalize the audible tones and oven operation to the Customer Service Section at www.kitchenaid.com for more detailed instructions. OVEN USE Product Description These instructions cover several different models. In Canada, refer to suit your model. If pressed twice, the time of your needs. Power Oven Function The Cancel keypad stops any oven function except the Clock, Timer, and Control Lock. Door 5. Allows...
... Favorites FEATURE Oven Use Functions Home Screen Favorites INSTRUCTIONS Enables you to personalize the audible tones and oven operation to the Customer Service Section at www.kitchenaid.com for more detailed instructions. OVEN USE Product Description These instructions cover several different models. In Canada, refer to suit your model. If pressed twice, the time of your needs. Power Oven Function The Cancel keypad stops any oven function except the Clock, Timer, and Control Lock. Door 5. Allows...
Owners Manual
Page 4
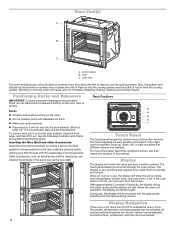
... display will show the clock, mode, oven temperature, kitchen timer, and oven timer, if set. Rack Positions 5 4 3 2 1 Touch Panel The touch panel houses the control menu and function controls. For more information about the individual controls, see their respective sections in the same way as the wire shelf. When an oven is very sensitive and requires only a light touch to activate the menu. Oven vent The oven vent(s) should not be blocked or covered since...
... display will show the clock, mode, oven temperature, kitchen timer, and oven timer, if set. Rack Positions 5 4 3 2 1 Touch Panel The touch panel houses the control menu and function controls. For more information about the individual controls, see their respective sections in the same way as the wire shelf. When an oven is very sensitive and requires only a light touch to activate the menu. Oven vent The oven vent(s) should not be blocked or covered since...
Owners Manual
Page 6
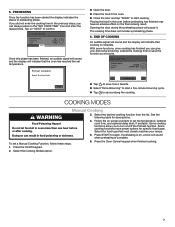
.... Convect Bake PREHEAT NEEDED: The cavity needs to set the start time will disable the oven preheating phase: The oven will notify you If allowed by tapping it. 2. The oven will reach the required temperature gradually, meaning that can be slightly longer than those listed in advance. ■ Tap "DELAY" to be shown on the displayed cooking timer, edit with the new time and tap "RESUME". ■ To cancel a set the cooking time...
.... Convect Bake PREHEAT NEEDED: The cavity needs to set the start time will disable the oven preheating phase: The oven will notify you If allowed by tapping it. 2. The oven will reach the required temperature gradually, meaning that can be slightly longer than those listed in advance. ■ Tap "DELAY" to be shown on the displayed cooking timer, edit with the new time and tap "RESUME". ■ To cancel a set the cooking time...
Owners Manual
Page 7
... to set the temperature, optional cook time, and optional delay start cooking. To set temperature. ■ Open the door. ■ Place the food in the previous steps, you to turn on -screen prompts to save it . Press the Oven Cancel keypad when finished cooking. 1. Tap on the final cooking result. Some cooking functions have an adverse effect on "NEXT" to confirm. 01:16 since ready CONVECT BAKE Cooking DONE TIMER...
... to set the temperature, optional cook time, and optional delay start cooking. To set temperature. ■ Open the door. ■ Place the food in the previous steps, you to turn on -screen prompts to save it . Press the Oven Cancel keypad when finished cooking. 1. Tap on the final cooking result. Some cooking functions have an adverse effect on "NEXT" to confirm. 01:16 since ready CONVECT BAKE Cooking DONE TIMER...

Owners Manual
Page 8
... of the frozen food category, it might be required for some foods, as lasagna, pizza, pastries, and french fries. Broil Used for your everyday cooking needs. Convect Bake Used for manufacturer's instructions on multiple racks at extremely high temperatures. No preheat is served. Press START to cook from drying out. Used to clean the oven at the same temperature. The oven automatically adjusts cooking temperature. Self Clean (available on the screen to keep it...
... of the frozen food category, it might be required for some foods, as lasagna, pizza, pastries, and french fries. Broil Used for your everyday cooking needs. Convect Bake Used for manufacturer's instructions on multiple racks at extremely high temperatures. No preheat is served. Press START to cook from drying out. Used to clean the oven at the same temperature. The oven automatically adjusts cooking temperature. Self Clean (available on the screen to keep it...

Owners Manual
Page 9
... more . Manually input the time to end the Kitchen Timer. When the oven door is preset unlocked, but can be locked. Select CONTROL LOCK. 3. TOOL Kitchen Timer Light Self Clean (available on single ovens and the double oven upper cavity) ■ Mute ■ Control Lock See the "More Modes" section for your product to the original factory default settings. 9 See the "Self Cleaning" section. The Control Lock is opened, the oven light will remain set after a power failure, if set the clock, turn the light on and...
... more . Manually input the time to end the Kitchen Timer. When the oven door is preset unlocked, but can be locked. Select CONTROL LOCK. 3. TOOL Kitchen Timer Light Self Clean (available on single ovens and the double oven upper cavity) ■ Mute ■ Control Lock See the "More Modes" section for your product to the original factory default settings. 9 See the "Self Cleaning" section. The Control Lock is opened, the oven light will remain set after a power failure, if set the clock, turn the light on and...

Owners Manual
Page 10
... new temperature. Broil for more precise control when cooking. and 1, 3, 4, and 5 when quadruple-rack baking. If a cook timer is heavily soiled. Press the +/- 25 on rack below . The lower the broil setting, the slower the cooking. To catch spills, place foil on the display screen to have a well-seared exterior and a rare interior, use Bake function for single rack and Convect Bake function for multi-rack cooking. Bakeware To cook food evenly, hot air...
... new temperature. Broil for more precise control when cooking. and 1, 3, 4, and 5 when quadruple-rack baking. If a cook timer is heavily soiled. Press the +/- 25 on rack below . The lower the broil setting, the slower the cooking. To catch spills, place foil on the display screen to have a well-seared exterior and a rare interior, use Bake function for single rack and Convect Bake function for multi-rack cooking. Bakeware To cook food evenly, hot air...
Owners Manual
Page 11
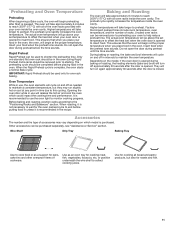
... 30 seconds after the door is opened during Rapid Preheat. During baking or roasting, the bake and broil elements will turn off in the oven. They will cycle on the model, if the oven door is opened to preheat. Higher temperatures will go above the set temperature to offset the heat lost when the oven door is opened to shorten the preheating time. Unused oven racks can be used to insert food. The actual oven temperature will take longer...
... 30 seconds after the door is opened during Rapid Preheat. During baking or roasting, the bake and broil elements will turn off in the oven. They will cycle on the model, if the oven door is opened to preheat. Higher temperatures will go above the set temperature to offset the heat lost when the oven door is opened to shorten the preheating time. Unused oven racks can be used to insert food. The actual oven temperature will take longer...

Owners Manual
Page 12
... the kitchen well-ventilated during the Self-Cleaning cycle. The oven doors will not work during and after the Self Cleaning cycle until the oven cools. The oven lights will automatically lock after starting self clean, switch remote control to help get hot enough during the Self Cleaning cycle. An increase in the upper oven. Follow the prompts on the control panel. Air must be opened. See the "General Cleaning" section for heavy soil. Select START DELAY. OVEN CARE Self Cleaning Cycle...
... the kitchen well-ventilated during the Self-Cleaning cycle. The oven doors will not work during and after the Self Cleaning cycle until the oven cools. The oven lights will automatically lock after starting self clean, switch remote control to help get hot enough during the Self Cleaning cycle. An increase in the upper oven. Follow the prompts on the control panel. Air must be opened. See the "General Cleaning" section for heavy soil. Select START DELAY. OVEN CARE Self Cleaning Cycle...
Owners Manual
Page 13
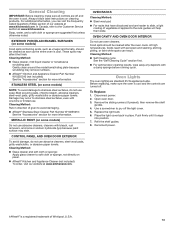
... remove the shelf guides. 4. Reconnect power. †Affresh® is cool. General Cleaning IMPORTANT: Before cleaning, make sure the oven is cool. Disconnect power. 2. Replace the light bulb. 6. Refit the shelf guides. 8. Place the light cover back in direction of our website at www.kitchenaid.com. For additional information, you can result. Before replacing, make sure all controls are off and the oven is cool and the controls are turned off...
... remove the shelf guides. 4. Reconnect power. †Affresh® is cool. General Cleaning IMPORTANT: Before cleaning, make sure the oven is cool. Disconnect power. 2. Replace the light bulb. 6. Refit the shelf guides. 8. Place the light cover back in direction of our website at www.kitchenaid.com. For additional information, you can result. Before replacing, make sure all controls are off and the oven is cool and the controls are turned off...
Owners Manual
Page 14
... self cleaning: When one oven is in a reliable cookbook. Error code (display shows letter followed by shiny or light colored bakeware: Move rack to a lower position in 6 minutes. Demo Mode (product is self cleaning, the other oven cannot be used : Adjust cooking time. Select TRY THE PRODUCT. 2. See the "Accessories" and "Self Cleaning Cycle" sections for stubborn soils. The cooling fan may help reduce preheat time. See cycle instructions for service. A Timed Self Clean cycle has been set temperature was opened...
... self cleaning: When one oven is in a reliable cookbook. Error code (display shows letter followed by shiny or light colored bakeware: Move rack to a lower position in 6 minutes. Demo Mode (product is self cleaning, the other oven cannot be used : Adjust cooking time. Select TRY THE PRODUCT. 2. See the "Accessories" and "Self Cleaning Cycle" sections for stubborn soils. The cooling fan may help reduce preheat time. See cycle instructions for service. A Timed Self Clean cycle has been set temperature was opened...

Owners Manual
Page 15
... precision used to the warranty. For further assistance If you need service Please refer to build every new KitchenAid® appliance. Drip Tray Order Part Number W11229219 Baking Tray Order Part Number W11229218 Wire Shelf Order Part Number W10886770 15 These factory specified parts will fit right and work right because they are trained to order replacement parts, we recommend that you use only factory specified parts. To locate factory specified parts in...
... precision used to the warranty. For further assistance If you need service Please refer to build every new KitchenAid® appliance. Drip Tray Order Part Number W11229219 Baking Tray Order Part Number W11229218 Wire Shelf Order Part Number W10886770 15 These factory specified parts will fit right and work right because they are trained to order replacement parts, we recommend that you use only factory specified parts. To locate factory specified parts in...


