Owners Manual
Page 2
To help ensure the longevity and performance of delicious meals for your product. Remember to use and care for family and friends. WELCOME TO THE WORLD OF KITCHENAID. USA: 1.800.541.6390 2 Canada: 1.800.807.6777 KitchenAid.com KitchenAid.ca Join us in the kitchen at www.kitchenaid.com or by mail using the enclosed Product Registration Card. Your satisfaction is our #1 goal. We're committed to helping you with the best way to register your Toaster, keep this guide handy. It will empower you create a lifetime of your product online at www.kitchenaid.com.
To help ensure the longevity and performance of delicious meals for your product. Remember to use and care for family and friends. WELCOME TO THE WORLD OF KITCHENAID. USA: 1.800.541.6390 2 Canada: 1.800.807.6777 KitchenAid.com KitchenAid.ca Join us in the kitchen at www.kitchenaid.com or by mail using the enclosed Product Registration Card. Your satisfaction is our #1 goal. We're committed to helping you with the best way to register your Toaster, keep this guide handy. It will empower you create a lifetime of your product online at www.kitchenaid.com.
Owners Manual
Page 3
... use ...7 Toasting...8 SPECIAL TOASTING FUNCTIONS Toasting Bagels...9 Defrosting...10 Keep Warm...11 Lift & See...12 CARE AND CLEANING 12 TROUBLESHOOTING 13 WARRANTY AND SERVICE 14 PROOF OF PURCHASE & PRODUCT REGISTRATION Always keep a copy of the itemized sales receipt showing the date of purchase of your Toaster. Please complete the following for your warranty. This card does not verify your personal records: Model Number...
... use ...7 Toasting...8 SPECIAL TOASTING FUNCTIONS Toasting Bagels...9 Defrosting...10 Keep Warm...11 Lift & See...12 CARE AND CLEANING 12 TROUBLESHOOTING 13 WARRANTY AND SERVICE 14 PROOF OF PURCHASE & PRODUCT REGISTRATION Always keep a copy of the itemized sales receipt showing the date of purchase of your Toaster. Please complete the following for your warranty. This card does not verify your personal records: Model Number...
Owners Manual
Page 4
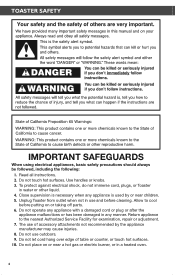
... or taking off parts. 6. Return appliance to cool before cleaning. Do not let cord hang over edge of accessory attachments not recommended by or near a hot gas or electric burner, or in use outdoors. 9. TOASTER SAFETY IMPORTANT SAFEGUARDS When using electrical appliances, basic safety precautions should always be followed, including the following: 1. Use handles or knobs. 3. Close supervision is...
... or taking off parts. 6. Return appliance to cool before cleaning. Do not let cord hang over edge of accessory attachments not recommended by or near a hot gas or electric burner, or in use outdoors. 9. TOASTER SAFETY IMPORTANT SAFEGUARDS When using electrical appliances, basic safety precautions should always be followed, including the following: 1. Use handles or knobs. 3. Close supervision is...
Owners Manual
Page 5
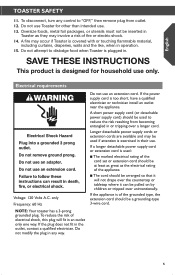
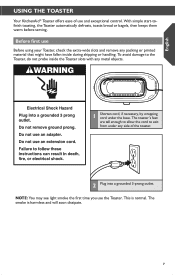
...extension cords are available and may be a grounding-type 3-wire cord. 5 If a longer detachable power supply cord or extension cord is used: n The marked electrical rating of the grounded type, the extension cord should be pulled on by ...use Toaster for household use . 13. n The cord should be inserted in their use an extension cord. SAVE THESE INSTRUCTIONS This product is covered with or touching flammable material, including curtains, draperies, walls and the like, when in any control to dislodge food when Toaster is too short, have a qualified electrician or technician install...
...extension cords are available and may be a grounding-type 3-wire cord. 5 If a longer detachable power supply cord or extension cord is used: n The marked electrical rating of the grounded type, the extension cord should be pulled on by ...use Toaster for household use . 13. n The cord should be inserted in their use an extension cord. SAVE THESE INSTRUCTIONS This product is covered with or touching flammable material, including curtains, draperies, walls and the like, when in any control to dislodge food when Toaster is too short, have a qualified electrician or technician install...
Owners Manual
Page 6
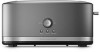
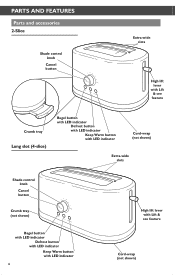
PARTS AND FEATURES Parts and accessories 2-Slice Shade control knob Cancel button Extra-wide slots High lift lever with Lift & see feature Crumb tray Long slot (4-slice) Bagel button with LED indicator Defrost button with LED indicator Keep Warm button with LED indicator Cord-wrap (not shown) Extra-wide slots Shade control knob Cancel button Crumb tray (not shown) Bagel button with LED indicator Defrost button with LED indicator Keep Warm button with LED indicator 6 High lift lever with Lift & see feature Cord-wrap (not shown)
PARTS AND FEATURES Parts and accessories 2-Slice Shade control knob Cancel button Extra-wide slots High lift lever with Lift & see feature Crumb tray Long slot (4-slice) Bagel button with LED indicator Defrost button with LED indicator Keep Warm button with LED indicator Cord-wrap (not shown) Extra-wide slots Shade control knob Cancel button Crumb tray (not shown) Bagel button with LED indicator Defrost button with LED indicator Keep Warm button with LED indicator 6 High lift lever with Lift & see feature Cord-wrap (not shown)
Owners Manual
Page 7
...normal. With simple start-tofinish toasting, the Toaster automatically defrosts, toasts bread or bagels, then keeps them warm before serving. The toaster's feet are tall enough to allow the cord to the Toaster, do not probe inside the Toaster slots with any metal objects. 1 Shorten cord, if...inside during shipping or handling. To avoid damage to exit from under the base. Before first use and exceptional control. English USING THE TOASTER Your KitchenAid® Toaster offers ease of use Before using your Toaster, check the extra-wide slots and remove any side of the toaster. 2 Plug into ...
...normal. With simple start-tofinish toasting, the Toaster automatically defrosts, toasts bread or bagels, then keeps them warm before serving. The toaster's feet are tall enough to allow the cord to the Toaster, do not probe inside the Toaster slots with any metal objects. 1 Shorten cord, if...inside during shipping or handling. To avoid damage to exit from under the base. Before first use and exceptional control. English USING THE TOASTER Your KitchenAid® Toaster offers ease of use Before using your Toaster, check the extra-wide slots and remove any side of the toaster. 2 Plug into ...
Owners Manual
Page 8
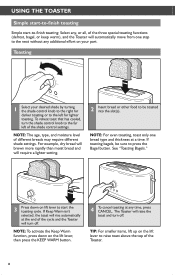
... function, press down on the lift lever, then press the KEEP WARM button. 4 To cancel toasting at the end of the shade control settings. Toasting 1 Select your part. NOTE: The age, type, and moisture level of the Toaster. 8 For example, dry bread will brown more rapidly than moist bread and will turn the shade control knob to the far left for darker...
... function, press down on the lift lever, then press the KEEP WARM button. 4 To cancel toasting at the end of the shade control settings. Toasting 1 Select your part. NOTE: The age, type, and moisture level of the Toaster. 8 For example, dry bread will brown more rapidly than moist bread and will turn the shade control knob to the far left for darker...
Owners Manual
Page 9
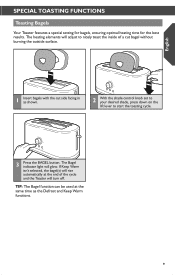
... time as shown. 2 With the shade control knob set to your desired shade, press down on the lift lever to nicely toast the inside of a cut bagel without burning the outside surface. 1 Insert bagels with the cut side facing in as the Defrost... and Keep Warm functions. 9 TIP: The Bagel function can be used at the end of the cycle and the Toaster will adjust to start the toasting cycle. 3 Press the BAGEL button. The heating elements will turn...
... time as shown. 2 With the shade control knob set to your desired shade, press down on the lift lever to nicely toast the inside of a cut bagel without burning the outside surface. 1 Insert bagels with the cut side facing in as the Defrost... and Keep Warm functions. 9 TIP: The Bagel function can be used at the end of the cycle and the Toaster will adjust to start the toasting cycle. 3 Press the BAGEL button. The heating elements will turn...
Owners Manual
Page 10
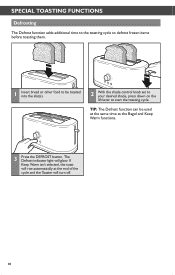
... slot(s). 2 With the shade control knob set to your desired shade, press down on the lift lever to start the toasting cycle. SPECIAL TOASTING FUNCTIONS Defrosting The Defrost function adds additional time to the toasting cycle to defrost frozen items before toasting them. 1 Insert bread or other food to be used at the end of the cycle and the Toaster will turn...
... slot(s). 2 With the shade control knob set to your desired shade, press down on the lift lever to start the toasting cycle. SPECIAL TOASTING FUNCTIONS Defrosting The Defrost function adds additional time to the toasting cycle to defrost frozen items before toasting them. 1 Insert bread or other food to be used at the end of the cycle and the Toaster will turn...
Owners Manual
Page 11
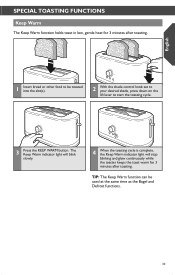
...toasting. 1 Insert bread or other food to be used at the same time as the Bagel and Defrost functions. 11 The Keep Warm indicator light will blink slowly. 4 When the toasting cycle is complete, the Keep Warm indicator light will stop blinking and glow continuously while the toaster keeps the toast... warm for 3 minutes after toasting. TIP: The Keep Warm function can be toasted into the slot(s). 2 With the shade control knob set to your desired shade, press down on the lift lever to start the toasting cycle. 3 Press the KEEP WARM button.
...toasting. 1 Insert bread or other food to be used at the same time as the Bagel and Defrost functions. 11 The Keep Warm indicator light will blink slowly. 4 When the toasting cycle is complete, the Keep Warm indicator light will stop blinking and glow continuously while the toaster keeps the toast... warm for 3 minutes after toasting. TIP: The Keep Warm function can be toasted into the slot(s). 2 With the shade control knob set to your desired shade, press down on the lift lever to start the toasting cycle. 3 Press the KEEP WARM button.
Owners Manual
Page 12
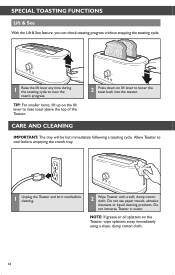
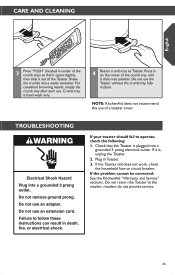
... the toast back into the toaster. Do not use paper towels, abrasive cleansers or liquid cleaning products. SPECIAL TOASTING FUNCTIONS Lift & See With the Lift & See feature, you can check toasting progress without stopping the toasting cycle. 1 Raise the lift lever any time during the toasting cycle to cool before emptying the crumb tray. 1 Unplug the Toaster and let it cool before cleaning. 2 Wipe Toaster with...
... the toast back into the toaster. Do not use paper towels, abrasive cleansers or liquid cleaning products. SPECIAL TOASTING FUNCTIONS Lift & See With the Lift & See feature, you can check toasting progress without stopping the toasting cycle. 1 Raise the lift lever any time during the toasting cycle to cool before emptying the crumb tray. 1 Unplug the Toaster and let it cool before cleaning. 2 Wipe Toaster with...
Owners Manual
Page 13
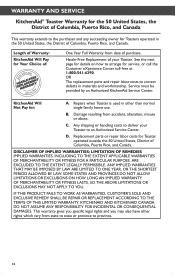
... it out of the Toaster. If the problem cannot be corrected: See the KitchenAid "Warranty and Service" sections. Crumb tray is plugged into a grounded 3 prong electrical outlet. TROUBLESHOOTING If your toaster should fail to the retailer; Shake the crumbs into position. NOTE: KitchenAid does not recommend the use the Toaster without the crumb tray fully in place. If the Toaster still does not work, check the household...
... it out of the Toaster. If the problem cannot be corrected: See the KitchenAid "Warranty and Service" sections. Crumb tray is plugged into a grounded 3 prong electrical outlet. TROUBLESHOOTING If your toaster should fail to the retailer; Shake the crumbs into position. NOTE: KitchenAid does not recommend the use the Toaster without the crumb tray fully in place. If the Toaster still does not work, check the household...
Owners Manual
Page 14
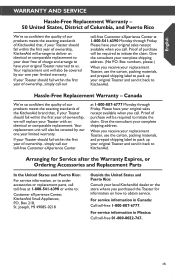
...warranty gives you specific legal rights and you may also have other than normal single family home use. Any shipping or handling costs to deliver your Toaster. IF THIS PRODUCT FAILS TO WORK AS WARRANTED, CUSTOMER'S SOLE AND EXCLUSIVE REMEDY SHALL BE REPAIR OR REPLACEMENT... Rico, and Canada. C. Replacement parts or repair labor costs for service, or call the Customer eXperience Center toll-free at 1-800-541-6390. DISCLAIMER OF IMPLIED WARRANTIES; Length of Warranty: KitchenAid Will Pay for : A. B. WARRANTY AND SERVICE KitchenAid® Toaster Warranty for the 50 United States,...
...warranty gives you specific legal rights and you may also have other than normal single family home use. Any shipping or handling costs to deliver your Toaster. IF THIS PRODUCT FAILS TO WORK AS WARRANTED, CUSTOMER'S SOLE AND EXCLUSIVE REMEDY SHALL BE REPAIR OR REPLACEMENT... Rico, and Canada. C. Replacement parts or repair labor costs for service, or call the Customer eXperience Center toll-free at 1-800-541-6390. DISCLAIMER OF IMPLIED WARRANTIES; Length of Warranty: KitchenAid Will Pay for : A. B. WARRANTY AND SERVICE KitchenAid® Toaster Warranty for the 50 United States,...
Owners Manual
Page 15
... your local KitchenAid dealer or the store where you receive your replacement Toaster, use the carton, packing materials, and prepaid shipping label to pack up your original Toaster and send it back to obtain service. Your replacement unit will also be covered by our one year limited warranty. Box numbers, please.) When you purchased the Toaster for Service after the Warranty Expires...
... your local KitchenAid dealer or the store where you receive your replacement Toaster, use the carton, packing materials, and prepaid shipping label to pack up your original Toaster and send it back to obtain service. Your replacement unit will also be covered by our one year limited warranty. Box numbers, please.) When you purchased the Toaster for Service after the Warranty Expires...


