Use and Care Guide
Page 1
MICROWAVE HOOD COMBINATION Use & Care Guide For questions about features, operation/performance, parts, accessories or service, call: 1-800-422-1230, or visit our website at... www.kitchenaid.com Table of Contents...2 Models KHMS2050S KHMS2056S W10131854
MICROWAVE HOOD COMBINATION Use & Care Guide For questions about features, operation/performance, parts, accessories or service, call: 1-800-422-1230, or visit our website at... www.kitchenaid.com Table of Contents...2 Models KHMS2050S KHMS2056S W10131854
Use and Care Guide
Page 2
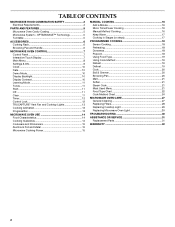
... 22 Cook Method Chart 24 MICROWAVE OVEN CARE 27 General Cleaning 27 Replacing Filters 28 Replacing Cooktop Light 29 Replacing Microwave Oven Light 29 TROUBLESHOOTING 30 ASSISTANCE OR SERVICE 31 Replacement Parts 31 WARRANTY 32 2 TABLE OF CONTENTS MICROWAVE HOOD COMBINATION SAFETY 3 Electrical Requirements...
... 22 Cook Method Chart 24 MICROWAVE OVEN CARE 27 General Cleaning 27 Replacing Filters 28 Replacing Cooktop Light 29 Replacing Microwave Oven Light 29 TROUBLESHOOTING 30 ASSISTANCE OR SERVICE 31 Replacement Parts 31 WARRANTY 32 2 TABLE OF CONTENTS MICROWAVE HOOD COMBINATION SAFETY 3 Electrical Requirements...
Use and Care Guide
Page 3
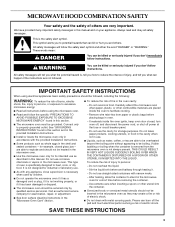
... LIQUID. Do not use the cavity for example, closed , turn oven off, and disconnect the power cord, or shut off the pad and touch electrical parts involving a risk of injury to properly grounded outlet. Always read and obey all instructions before removing the container. - Do not overcook food. Carefully attend the...
... LIQUID. Do not use the cavity for example, closed , turn oven off, and disconnect the power cord, or shut off the pad and touch electrical parts involving a risk of injury to properly grounded outlet. Always read and obey all instructions before removing the container. - Do not overcook food. Carefully attend the...
Use and Care Guide
Page 4
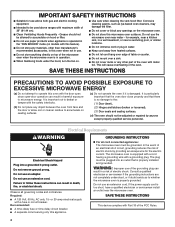
... Door (bent), (2) Hinges and latches (broken or loosened), (3) Door seals and sealing surfaces. (d) The oven should not be allowed to operate this oven with Part 18 of the microwave oven when the microwave oven is operated in the "PAN BROWN" mode (on models with the safety interlocks. (b) Do not place...completely understood, or if doubt exists as lye-based oven cleaners, may damage the filter. ■ Do not cover or block any materials, other part of the grounding plug can result in operation. ■ When flambeing foods under the hood, turn the fan on the microwave oven. ■ ...
... Door (bent), (2) Hinges and latches (broken or loosened), (3) Door seals and sealing surfaces. (d) The oven should not be allowed to operate this oven with Part 18 of the microwave oven when the microwave oven is operated in the "PAN BROWN" mode (on models with the safety interlocks. (b) Do not place...completely understood, or if doubt exists as lye-based oven cleaners, may damage the filter. ■ Do not cover or block any materials, other part of the grounding plug can result in operation. ■ When flambeing foods under the hood, turn the fan on the microwave oven. ■ ...
Use and Care Guide
Page 5
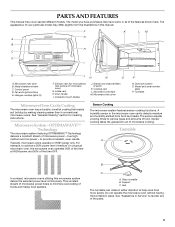
..., nonstick coating that resists soil buildup by making cleaning easier than in place. Microwave System - Sensor cooking takes the guesswork out of the parts. 5 Support C. See "Assistance or Service" to achieve a 50% power level ("medium") in either direction to provide consistent, even results.... PARTS AND FEATURES This manual may cover several different models. Microwave oven door B. Exhaust vent (for cleaning instructions. Model and serial number plate P. ...
..., nonstick coating that resists soil buildup by making cleaning easier than in place. Microwave System - Sensor cooking takes the guesswork out of the parts. 5 Support C. See "Assistance or Service" to achieve a 50% power level ("medium") in either direction to provide consistent, even results.... PARTS AND FEATURES This manual may cover several different models. Microwave oven door B. Exhaust vent (for cleaning instructions. Model and serial number plate P. ...

Use and Care Guide
Page 6
... not attempt to soil buildup, clean rack supports often (see "General Cleaning" section). Use the handle to order replacement parts. To Install: 1. Place the support on the rack. Any of the parts may be turned off indicator will appear on the edge of the microwave oven. ■ For best cooking results, do... supports on . Damage to the microwave oven could result if someone unintentionally turns on the microwave oven. ■ Rack will automatically default to order replacement parts. See "Assistance or Service" to the "ON" mode.
... not attempt to soil buildup, clean rack supports often (see "General Cleaning" section). Use the handle to order replacement parts. To Install: 1. Place the support on the rack. Any of the parts may be turned off indicator will appear on the edge of the microwave oven. ■ For best cooking results, do... supports on . Damage to the microwave oven could result if someone unintentionally turns on the microwave oven. ■ Rack will automatically default to order replacement parts. See "Assistance or Service" to the "ON" mode.
Use and Care Guide
Page 13
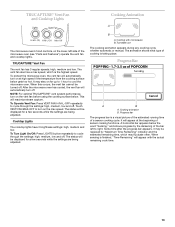
... cycle through the settings: high, medium, low and off . Touch VENT FAN MAX-OFF to turn on at the beginning of the microwave oven (see "Parts and Features") operate the vent fan and cooktop lights. To Turn Light On/Off: Press LIGHTS button repeatedly to cycle through the settings: high, medium...
... cycle through the settings: high, medium, low and off . Touch VENT FAN MAX-OFF to turn on at the beginning of the microwave oven (see "Parts and Features") operate the vent fan and cooktop lights. To Turn Light On/Off: Press LIGHTS button repeatedly to cycle through the settings: high, medium...

Use and Care Guide
Page 14
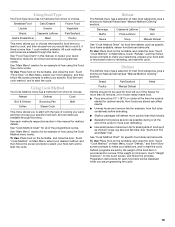
... a ring pattern, leaving the center of a light, porous food, such as cake. 14 Arranging If heating irregularly shaped or different sized foods, arrange the thinner parts and smaller sized items toward the center. Heavy, dense foods, such as meat and potatoes, require a longer cook time than larger pieces, and uniformly shaped...
... a ring pattern, leaving the center of a light, porous food, such as cake. 14 Arranging If heating irregularly shaped or different sized foods, arrange the thinner parts and smaller sized items toward the center. Heavy, dense foods, such as meat and potatoes, require a longer cook time than larger pieces, and uniformly shaped...
Use and Care Guide
Page 19
... the prompts. Defrost programs are set by the weight of the freezer for more even defrosting. ■ Use small pieces of aluminum foil to shield parts of the programmed cycles. To Use: Place food on the touch screen, and follow screen prompts to make your food and/ or microwave oven for...
... the prompts. Defrost programs are set by the weight of the freezer for more even defrosting. ■ Use small pieces of aluminum foil to shield parts of the programmed cycles. To Use: Place food on the touch screen, and follow screen prompts to make your food and/ or microwave oven for...

Use and Care Guide
Page 27
... or Service" to avoid touch screen activation during cleaning. Steam will not affect the performance of grain. ■ KitchenAid® Stainless Steel Cleaner and Polish (not included) KitchenAid® Stainless Steel Wipes (not included): See "Assistance or Service" section to dry. ■ Dishwasher: Wash ... otherwise noted. This is a durable, nonstick coating that makes soils easier to the microwave oven, the microwave inlet cover (see "Parts and Features") should be trapped in microwave oven. Microwave Inlet Cover To avoid arcing and damage to remove. See "Control Lock" ...
... or Service" to avoid touch screen activation during cleaning. Steam will not affect the performance of grain. ■ KitchenAid® Stainless Steel Cleaner and Polish (not included) KitchenAid® Stainless Steel Wipes (not included): See "Assistance or Service" section to dry. ■ Dishwasher: Wash ... otherwise noted. This is a durable, nonstick coating that makes soils easier to the microwave oven, the microwave inlet cover (see "Parts and Features") should be trapped in microwave oven. Microwave Inlet Cover To avoid arcing and damage to remove. See "Control Lock" ...

Use and Care Guide
Page 28
... rack, do not use abrasive cleansers or scrubbers. ■ Mild cleanser, water and washcloth ■ Dishwasher COOKING RACK Dishwasher cleaning is not recommended. See "Replacement Parts" section in place. Charcoal filter A. Do not use abrasive cleansers or scrubbers. ■ Mild cleanser, water and washcloth To avoid soil buildup which may lead...
... rack, do not use abrasive cleansers or scrubbers. ■ Mild cleanser, water and washcloth ■ Dishwasher COOKING RACK Dishwasher cleaning is not recommended. See "Replacement Parts" section in place. Charcoal filter A. Do not use abrasive cleansers or scrubbers. ■ Mild cleanser, water and washcloth To avoid soil buildup which may lead...
Use and Care Guide
Page 31
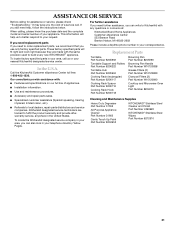
...or your telephone directory Yellow Pages. If you use only factory specified parts. Call the KitchenAid Customer eXperience Center toll free: 1-800-422-1230. ASSISTANCE OR SERVICE...parts in your nearest KitchenAid designated service center. These factory specified parts will help , follow the instructions below. Replacement Parts Turntable Part Number 8205992 Turntable Support and Rollers Part Number 8206222 Turntable Hub Part Number 8205994 Cooking Rack (rectangular) Part Number 8206117 Cooking Rack Spacer Part Number 8206116 Cooking Rack Hook Part Number 8206118 Browning Pan Part...
...or your telephone directory Yellow Pages. If you use only factory specified parts. Call the KitchenAid Customer eXperience Center toll free: 1-800-422-1230. ASSISTANCE OR SERVICE...parts in your nearest KitchenAid designated service center. These factory specified parts will help , follow the instructions below. Replacement Parts Turntable Part Number 8205992 Turntable Support and Rollers Part Number 8206222 Turntable Hub Part Number 8205994 Cooking Rack (rectangular) Part Number 8206117 Cooking Rack Spacer Part Number 8206116 Cooking Rack Hook Part Number 8206118 Browning Pan Part...

Use and Care Guide
Page 32
...in the second through due to defects in accordance with the product, KitchenAid will pay for factory specified parts for factory specified parts and repair labor to correct defects in remote locations. 9. ITEMS KITCHENAID WILL NOT PAY FOR 1. Damage resulting from accident, alteration, misuse...proof of purchase or installation date for future reference. Service calls to correct the installation of KitchenAid, U.S.A. 461965266853 4/07 Printed in the home. 7. Those consumable parts are excluded from unauthorized modifications made to repair or replace appliance light bulbs, air filters ...
...in the second through due to defects in accordance with the product, KitchenAid will pay for factory specified parts for factory specified parts and repair labor to correct defects in remote locations. 9. ITEMS KITCHENAID WILL NOT PAY FOR 1. Damage resulting from accident, alteration, misuse...proof of purchase or installation date for future reference. Service calls to correct the installation of KitchenAid, U.S.A. 461965266853 4/07 Printed in the home. 7. Those consumable parts are excluded from unauthorized modifications made to repair or replace appliance light bulbs, air filters ...
Installation Instructions
Page 1
... Plate to Wall 8 Prepare Upper Cabinet 8 Install the Oven 9 Complete Installation 10 VENTING DESIGN SPECIFICATIONS 11 ASSISTANCE 12 Replacement Parts 12 MICROWAVE HOOD COMBINATION SAFETY Your safety and the safety of the installer. ■ Product failure due to reduce the chance...symbol and either the word "DANGER" or "WARNING." All safety messages will follow instructions. This symbol alerts you to and including 30" (76.2 cm) wide. MICROWAVE HOOD COMBINATION INSTALLATION INSTRUCTIONS This product is suitable for use . 8206329 IMPORTANT: Read Installation Instructions...
... Plate to Wall 8 Prepare Upper Cabinet 8 Install the Oven 9 Complete Installation 10 VENTING DESIGN SPECIFICATIONS 11 ASSISTANCE 12 Replacement Parts 12 MICROWAVE HOOD COMBINATION SAFETY Your safety and the safety of the installer. ■ Product failure due to reduce the chance...symbol and either the word "DANGER" or "WARNING." All safety messages will follow instructions. This symbol alerts you to and including 30" (76.2 cm) wide. MICROWAVE HOOD COMBINATION INSTALLATION INSTRUCTIONS This product is suitable for use . 8206329 IMPORTANT: Read Installation Instructions...
Installation Instructions
Page 2
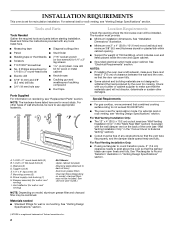
...properly, and the damper blade opens freely and fully. For Wall Venting Installation Only: ■ The 12" x 4" (30.5 x 10.2 cm) cutout area (see "Replacement Parts" section. hole drill ■ No. 3 Phillips screwdriver for bit for wood or metal 1/4-20 x 3" round-head ... and 3/8" (9.5 mm) drill bits ■ 3/4" (19 mm) hole saw ■ Caulking gun and weatherproof caulking compound ■ Duct tape Parts Supplied For information on model, aluminum grease filter and charcoal filter may not be combined. See "Venting Design Specifications" section. See "Installation Dimensions" ...
...properly, and the damper blade opens freely and fully. For Wall Venting Installation Only: ■ The 12" x 4" (30.5 x 10.2 cm) cutout area (see "Replacement Parts" section. hole drill ■ No. 3 Phillips screwdriver for bit for wood or metal 1/4-20 x 3" round-head ... and 3/8" (9.5 mm) drill bits ■ 3/4" (19 mm) hole saw ■ Caulking gun and weatherproof caulking compound ■ Duct tape Parts Supplied For information on model, aluminum grease filter and charcoal filter may not be combined. See "Venting Design Specifications" section. See "Installation Dimensions" ...

Installation Instructions
Page 12
... plate, which is located behind the microwave oven door on the Web. All rights reserved. 4619-656-18631 3/06 Printed in "Parts Supplied" section) Part Number 8205979 Vent Deflector Part Number 8205980 A B 6 ft (1.8 m) 2 ft (0.6 m) C D A. Recommended Vent Length A 3¹⁄₄" x 10" (8.3 x 25.4 cm) rectangular or 6" (15.2 cm) round vent should be installed to keep the...
... plate, which is located behind the microwave oven door on the Web. All rights reserved. 4619-656-18631 3/06 Printed in "Parts Supplied" section) Part Number 8205979 Vent Deflector Part Number 8205980 A B 6 ft (1.8 m) 2 ft (0.6 m) C D A. Recommended Vent Length A 3¹⁄₄" x 10" (8.3 x 25.4 cm) rectangular or 6" (15.2 cm) round vent should be installed to keep the...

