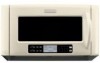
Use and Care Guide
Page 3
... materials are able to excessive microwave energy: ■ Read all safety messages. This is not always present. All safety messages will follow instructions. Do not use . ■ As with narrow necks. - We have provided many important safety messages in the "Microwave Oven Care"... follow the specific "PRECAUTIONS TO AVOID POSSIBLE EXPOSURE TO EXCESSIVE MICROWAVE ENERGY" found in this manual. Always read and obey all instructions before removing the container. - This symbol alerts you and others are not followed. Carefully attend the microwave oven when paper,...
... materials are able to excessive microwave energy: ■ Read all safety messages. This is not always present. All safety messages will follow instructions. Do not use . ■ As with narrow necks. - We have provided many important safety messages in the "Microwave Oven Care"... follow the specific "PRECAUTIONS TO AVOID POSSIBLE EXPOSURE TO EXCESSIVE MICROWAVE ENERGY" found in this manual. Always read and obey all instructions before removing the container. - This symbol alerts you and others are not followed. Carefully attend the microwave oven when paper,...
Use and Care Guide
Page 4
...; Do not store this oven with the door open since open-door operation can result in a risk of electric shock. SAVE THESE INSTRUCTIONS PRECAUTIONS TO AVOID POSSIBLE EXPOSURE TO EXCESSIVE MICROWAVE ENERGY (a) Do not attempt to operate this microwave oven outdoors. Do not remove ground prong...is properly installed and grounded. Do not use an extension cord. Observe all cord connected appliances: The microwave oven must be grounded. GROUNDING INSTRUCTIONS ■ For all governing codes and ordinances. Do not use an adapter. Do not use the microwave oven near a swimming pool, ...
...; Do not store this oven with the door open since open-door operation can result in a risk of electric shock. SAVE THESE INSTRUCTIONS PRECAUTIONS TO AVOID POSSIBLE EXPOSURE TO EXCESSIVE MICROWAVE ENERGY (a) Do not attempt to operate this microwave oven outdoors. Do not remove ground prong...is properly installed and grounded. Do not use an extension cord. Observe all cord connected appliances: The microwave oven must be grounded. GROUNDING INSTRUCTIONS ■ For all governing codes and ordinances. Do not use an adapter. Do not use the microwave oven near a swimming pool, ...
Use and Care Guide
Page 5
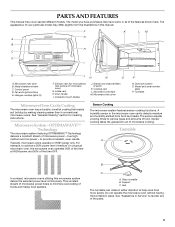
F K L M G A B H C D I . Metal-shielded window C. Exhaust vent (for cleaning instructions. Microwave oven light M. See "General Cleaning" section for recirculation) (top surface of microwave power - OPTIMAWAVE™ Technology The microwave system featuring OPTIMAWAVE™ Technology delivers a ...
F K L M G A B H C D I . Metal-shielded window C. Exhaust vent (for cleaning instructions. Microwave oven light M. See "General Cleaning" section for recirculation) (top surface of microwave power - OPTIMAWAVE™ Technology The microwave system featuring OPTIMAWAVE™ Technology delivers a ...

Use and Care Guide
Page 6
... when cooking on 2 levels. ■ To avoid damage to the microwave oven, do not use a microwave-safe container. ■ The rack is ideal for cleaning instructions. 6 Fit the raised, curved lines in the microwave oven. When the manual cycle is over, the turntable will become hot. It provides extra cavity space...
... when cooking on 2 levels. ■ To avoid damage to the microwave oven, do not use a microwave-safe container. ■ The rack is ideal for cleaning instructions. 6 Fit the raised, curved lines in the microwave oven. When the manual cycle is over, the turntable will become hot. It provides extra cavity space...
Use and Care Guide
Page 7
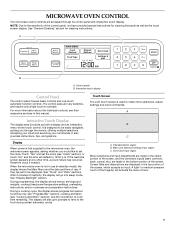
... input and executing your commands. The control pads are displayed in the top portion of the screen, which accepts no input. It also provides instructions, tips, and graphics. Touch "Yes" and set the clock (see their respective sections in the bottom portion of the control panel, we ...have provided special instructions for cleaning instructions. When the microwave oven is designed to be easily navigable, guiding you would like to set to medium-pressure touch of day, if ...
... input and executing your commands. The control pads are displayed in the top portion of the screen, which accepts no input. It also provides instructions, tips, and graphics. Touch "Yes" and set the clock (see their respective sections in the bottom portion of the control panel, we ...have provided special instructions for cleaning instructions. When the microwave oven is designed to be easily navigable, guiding you would like to set to medium-pressure touch of day, if ...
Use and Care Guide
Page 8
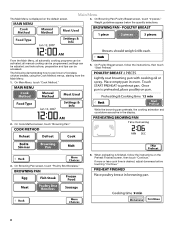
...then touch "Continue." Main Menu 4. From the Main Menu, all manual cooking can be programmed; On Poultry Breast screen, follow the instructions on the default screen. On Browning Pan screen, touch "Poultry Brst Boneless." 6. The following demonstrates how to pan brown 2 boneless... are active in the display. 3. all automatic cooking programs can be activated; Weight guidelines appear below the quantity selections. and instructions, preparation and tips can be accessed. If more or less cook time is desired, adjust doneness before touching "Continue." 8 On...
...then touch "Continue." Main Menu 4. From the Main Menu, all manual cooking can be programmed; On Poultry Breast screen, follow the instructions on the default screen. On Browning Pan screen, touch "Poultry Brst Boneless." 6. The following demonstrates how to pan brown 2 boneless... are active in the display. 3. all automatic cooking programs can be activated; Weight guidelines appear below the quantity selections. and instructions, preparation and tips can be accessed. If more or less cook time is desired, adjust doneness before touching "Continue." 8 On...
Use and Care Guide
Page 9
... number and website. ■ Set date: month, day and year. ■ Hide date. If you would like to either add more categories), then follow the instructions on the screen to turn off . This takes you to practice navigating through the cycle, the microwave oven will stop, and the display will direct...
... number and website. ■ Set date: month, day and year. ■ Hide date. If you would like to either add more categories), then follow the instructions on the screen to turn off . This takes you to practice navigating through the cycle, the microwave oven will stop, and the display will direct...
Use and Care Guide
Page 10
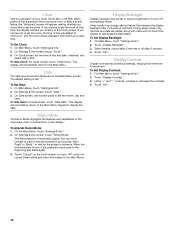
... "Back," or wait for the screen to the Main Menu. To Set Clock: 1. During sleep mode, only the time and date are visible, along with instruction to touch the display to maximum. The default setting is a standard 12-hour clock (12:00 AM-11:59 PM). To Set Display Backlight: 1. On...
... "Back," or wait for the screen to the Main Menu. To Set Clock: 1. During sleep mode, only the time and date are visible, along with instruction to touch the display to maximum. The default setting is a standard 12-hour clock (12:00 AM-11:59 PM). To Set Display Backlight: 1. On...
Use and Care Guide
Page 16
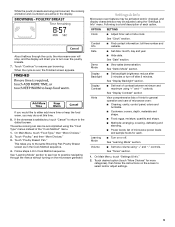
... choose. Some of the methods have set power levels that cannot be added in minutes and seconds. Use the following the prompts. Follow instructions on the turntable, and close the door. 2. During the countdown, cook time and some cooking powers and/or temperatures may be changed...TEMP SETTINGS Reheat Microwave-safe 10-100%; 100% default Defrost Microwave-safe 20% only Cook Microwave-safe 10-100%; 100% default Melt Microwave-safe 30% only Boil & Simmer Microwave-safe Enter desired time. Keep Warm Microwave-safe 10% only To Use: 1. Touch "Manual Method" on the ...
... choose. Some of the methods have set power levels that cannot be added in minutes and seconds. Use the following the prompts. Follow instructions on the turntable, and close the door. 2. During the countdown, cook time and some cooking powers and/or temperatures may be changed...TEMP SETTINGS Reheat Microwave-safe 10-100%; 100% default Defrost Microwave-safe 20% only Cook Microwave-safe 10-100%; 100% default Melt Microwave-safe 30% only Boil & Simmer Microwave-safe Enter desired time. Keep Warm Microwave-safe 10% only To Use: 1. Touch "Manual Method" on the ...

Use and Care Guide
Page 18
... popcorn at all times. Place popcorn bag on the touch screen, and adjust the doneness with plastic wrap, be attended at a time. ■ Follow manufacturer's instructions when using a microwave popcorn popper. ■ Do not try to or subtracted from the food as with loose-fitting lids are recommended. When the cycle...
... popcorn at all times. Place popcorn bag on the touch screen, and adjust the doneness with plastic wrap, be attended at a time. ■ Follow manufacturer's instructions when using a microwave popcorn popper. ■ Do not try to or subtracted from the food as with loose-fitting lids are recommended. When the cycle...
Use and Care Guide
Page 19
... The Food Type menu has 12 methods from which to choose. See "Main Menu" section for all of the food items and programmed cycles. Preparation instructions for reheating, and start the cycle. Touch "Cook Method" on Main Menu, touch "Defrost," and then follow screen prompts to make your Quick Reference Guide...
... The Food Type menu has 12 methods from which to choose. See "Main Menu" section for all of the food items and programmed cycles. Preparation instructions for reheating, and start the cycle. Touch "Cook Method" on Main Menu, touch "Defrost," and then follow screen prompts to make your Quick Reference Guide...

Use and Care Guide
Page 27
Always follow label instructions on panel. ■ Mild soap, water and soft washcloth MICROWAVE OVEN DOOR AND EXTERIOR The area where the microwave oven door and frame touch when ... dry with soft, lint-free cloth. Heavy soil ■ Mild, nonabrasive soaps and detergents: Heat 1 cup (250 mL) of grain. ■ KitchenAid® Stainless Steel Cleaner and Polish (not included) KitchenAid® Stainless Steel Wipes (not included): See "Assistance or Service" section to remove. Rinse with clean water and dry with wet...
Always follow label instructions on panel. ■ Mild soap, water and soft washcloth MICROWAVE OVEN DOOR AND EXTERIOR The area where the microwave oven door and frame touch when ... dry with soft, lint-free cloth. Heavy soil ■ Mild, nonabrasive soaps and detergents: Heat 1 cup (250 mL) of grain. ■ KitchenAid® Stainless Steel Cleaner and Polish (not included) KitchenAid® Stainless Steel Wipes (not included): See "Assistance or Service" section to remove. Rinse with clean water and dry with wet...

Use and Care Guide
Page 28
... outside of the filter frame inward, and pull down until it fits into place. Microwave oven bottom 28 Small tab C. See "General Cleaning" for cleaning instructions. The charcoal filters cannot be washed and should be replaced every 6 to 12 months. AB C D To Remove/Replace: 1. Filter frame B. Do not operate the microwave...
... outside of the filter frame inward, and pull down until it fits into place. Microwave oven bottom 28 Small tab C. See "General Cleaning" for cleaning instructions. The charcoal filters cannot be washed and should be replaced every 6 to 12 months. AB C D To Remove/Replace: 1. Filter frame B. Do not operate the microwave...
Use and Care Guide
Page 30
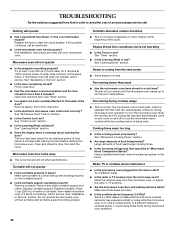
...screen ■ Some steam is not operating ■ Is the Timer in use ? Make sure these items during microwave oven operation. 30 TROUBLESHOOTING Try the solutions suggested here first in order to avoid the cost of an unnecessary service call for service. Remove spacer, then firmly... 2.4 GHz-based cordless phones and home wireless networks may also automatically come on and cycle on turntable, then restart microwave oven. See Installation Instructions provided with your microwave oven. If water does not heat, try the steps below is not working, call an electrician. ■ Is ...
...screen ■ Some steam is not operating ■ Is the Timer in use ? Make sure these items during microwave oven operation. 30 TROUBLESHOOTING Try the solutions suggested here first in order to avoid the cost of an unnecessary service call for service. Remove spacer, then firmly... 2.4 GHz-based cordless phones and home wireless networks may also automatically come on and cycle on turntable, then restart microwave oven. See Installation Instructions provided with your microwave oven. If water does not heat, try the steps below is not working, call an electrician. ■ Is ...
Use and Care Guide
Page 31
...KitchenAid Customer eXperience Center toll free: 1-800-422-1230. Our consultants provide assistance with any questions or concerns at: KitchenAid...etc.). ■ Referrals to build every new KITCHENAID® appliance. Replacement Parts Turntable Part Number 8205992...KITCHENAID® Stainless Steel Cleaner and Polish Part Number 4396920 KITCHENAID® Stainless Steel Wipes Part Number 8212510 31 KitchenAid...work right because they are trained to KitchenAid with : ■ Features and ... your nearest KitchenAid designated service center. To locate the KitchenAid designated service...
...KitchenAid Customer eXperience Center toll free: 1-800-422-1230. Our consultants provide assistance with any questions or concerns at: KitchenAid...etc.). ■ Referrals to build every new KITCHENAID® appliance. Replacement Parts Turntable Part Number 8205992...KITCHENAID® Stainless Steel Cleaner and Polish Part Number 4396920 KITCHENAID® Stainless Steel Wipes Part Number 8212510 31 KitchenAid...work right because they are trained to KitchenAid with : ■ Features and ... your nearest KitchenAid designated service center. To locate the KitchenAid designated service...

Use and Care Guide
Page 32
... inaccessible location or is operated and maintained according to instructions attached to correct defects in materials or workmanship. Pickup and delivery. This major appliance is used for factory specified parts and repair labor to or furnished with the product, KitchenAid or KitchenAid Canada (hereafter "KitchenAid") will pay for factory specified parts for future reference...
... inaccessible location or is operated and maintained according to instructions attached to correct defects in materials or workmanship. Pickup and delivery. This major appliance is used for factory specified parts and repair labor to or furnished with the product, KitchenAid or KitchenAid Canada (hereafter "KitchenAid") will pay for factory specified parts for future reference...
Installation Instructions
Page 1
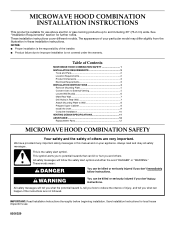
...read and obey all safety messages. This is , tell you how to and including 30" (76.2 cm) wide. The appearance of injury, and tell you don't follow instructions. See "Installation Requirements" section for local house inspector's use above electric or gas...injured if you what the potential hazard is the safety alert symbol. All safety messages will follow instructions. Save Installation Instructions for further notes. These installation instructions cover different models. NOTES: ■ Proper installation is the responsibility of Contents MICROWAVE HOOD COMBINATION ...
...read and obey all safety messages. This is , tell you how to and including 30" (76.2 cm) wide. The appearance of injury, and tell you don't follow instructions. See "Installation Requirements" section for local house inspector's use above electric or gas...injured if you what the potential hazard is the safety alert symbol. All safety messages will follow instructions. Save Installation Instructions for further notes. These installation instructions cover different models. NOTES: ■ Proper installation is the responsibility of Contents MICROWAVE HOOD COMBINATION ...
Installation Instructions
Page 2
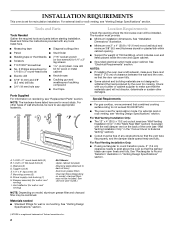
... needs to use appropriate fasteners. For external (wall or roof) venting, see "Venting Design Specifications" section. Read and follow the instructions provided with any obstructions so that the materials used will be installed. For other damages. Toggle nuts (4) E. 1/4" x 2" lag...) venting, see "Venting Design Specifications" section. Power supply cord bushing (1) H. For Wall Venting Installation Only: ■ The 12" x 4" (30.5 x 10.2 cm) cutout area (see "Wall Venting Installation Only" in the "Convert Oven to back of Textron Innovations Inc. 2 Vent deflector ...
... needs to use appropriate fasteners. For external (wall or roof) venting, see "Venting Design Specifications" section. Read and follow the instructions provided with any obstructions so that the materials used will be installed. For other damages. Toggle nuts (4) E. 1/4" x 2" lag...) venting, see "Venting Design Specifications" section. Power supply cord bushing (1) H. For Wall Venting Installation Only: ■ The 12" x 4" (30.5 x 10.2 cm) cutout area (see "Wall Venting Installation Only" in the "Convert Oven to back of Textron Innovations Inc. 2 Vent deflector ...

Installation Instructions
Page 3
...30.5 cm) min. 13" (33.0 cm) max. Grounded 3 prong outlet *33" (83.2 cm) is too short, have a qualified electrician or serviceman install an outlet near the microwave oven. Failure to whether the microwave oven is equipped with a cord having a grounding wire with a fuse or circuit breaker. SAVE THESE INSTRUCTIONS...not use of the grounding plug can result in a risk of electric shock. or 20-amp electrical supply with a grounding plug. GROUNDING INSTRUCTIONS ■ For all governing codes and ordinances. A. 2" x 4" wall stud B. The plug must be inside the upper cabinet. Observe...
...30.5 cm) min. 13" (33.0 cm) max. Grounded 3 prong outlet *33" (83.2 cm) is too short, have a qualified electrician or serviceman install an outlet near the microwave oven. Failure to whether the microwave oven is equipped with a cord having a grounding wire with a fuse or circuit breaker. SAVE THESE INSTRUCTIONS...not use of the grounding plug can result in a risk of electric shock. or 20-amp electrical supply with a grounding plug. GROUNDING INSTRUCTIONS ■ For all governing codes and ordinances. A. 2" x 4" wall stud B. The plug must be inside the upper cabinet. Observe...

Installation Instructions
Page 4
... the oven is being handled. Tape the oven door closed so that attach it back and under the back edge of the vent opening. INSTALLATION INSTRUCTIONS Remove Mounting Plate NOTE: To avoid possible damage to the back of the oven, and set for wall or roof venting, the vent deflector (Lshaped...
... the oven is being handled. Tape the oven door closed so that attach it back and under the back edge of the vent opening. INSTALLATION INSTRUCTIONS Remove Mounting Plate NOTE: To avoid possible damage to the back of the oven, and set for wall or roof venting, the vent deflector (Lshaped...
