
Use & Care Guide
Page 1
... section and in the provided Installation Instructions. ■ Install or locate the microwave oven only in accordance with the provided Installation Instructions. ■ Some products such as whole eggs in this manual and on the front facing of others . See "GROUNDING INSTRUCTIONS" found in the microwave oven. Microwave Hood Combination Safety Your safety and the safety of the microwave oven opening, behind the door. All safety messages will tell...
... section and in the provided Installation Instructions. ■ Install or locate the microwave oven only in accordance with the provided Installation Instructions. ■ Some products such as whole eggs in this manual and on the front facing of others . See "GROUNDING INSTRUCTIONS" found in the microwave oven. Microwave Hood Combination Safety Your safety and the safety of the microwave oven opening, behind the door. All safety messages will tell...

Use & Care Guide
Page 2
... cord away from the microwave oven is in operation. ■ When flambeing foods under the hood, turn oven off, and disconnect the power cord, or shut off the pad and touch electrical parts involving a risk of table or counter. ■ Do not mount over a sink. ■ Do not cover racks or any appliance, close properly and that there is damaged. IMPORTANT SAFETY INSTRUCTIONS ■ Use the microwave oven only for its intended use...
... cord away from the microwave oven is in operation. ■ When flambeing foods under the hood, turn oven off, and disconnect the power cord, or shut off the pad and touch electrical parts involving a risk of table or counter. ■ Do not mount over a sink. ■ Do not cover racks or any appliance, close properly and that there is damaged. IMPORTANT SAFETY INSTRUCTIONS ■ Use the microwave oven only for its intended use...

Use & Care Guide
Page 3
... Quick Reference Guide. If the power supply cord is a visual picture of the estimated running time of electric shock. Features Turntable Turntable may be plugged into a grounded 3 prong outlet. Observe all cord connected appliances: The microwave oven must be turned off during convection and grill cooking (on some moodels), and it also comes on some models) The convection element and fan are side by providing an escape wire for manual cooking...
... Quick Reference Guide. If the power supply cord is a visual picture of the estimated running time of electric shock. Features Turntable Turntable may be plugged into a grounded 3 prong outlet. Observe all cord connected appliances: The microwave oven must be turned off during convection and grill cooking (on some moodels), and it also comes on some models) The convection element and fan are side by providing an escape wire for manual cooking...

Use & Care Guide
Page 4
... with gold or silver trim or with metallic glaze To Test Cookware/Dinnerware: Place dish on turntable with 1 cup (250 mL) of cook time at 100%. Accessories Pan (on some models) Use the provided pan for grilling. Place food directly on some models) functions. Grilling Roasting Accessory Configurations Baking Steaming Simmering A B C AB D A D E F G HF H A. Grill rack D. Program 1 minute of water beside it. Convection rack E. Grill Rack (on some models) Use the grill rack for...
... with gold or silver trim or with metallic glaze To Test Cookware/Dinnerware: Place dish on turntable with 1 cup (250 mL) of cook time at 100%. Accessories Pan (on some models) Use the provided pan for grilling. Place food directly on some models) functions. Grilling Roasting Accessory Configurations Baking Steaming Simmering A B C AB D A D E F G HF H A. Grill rack D. Program 1 minute of water beside it. Convection rack E. Grill Rack (on some models) Use the grill rack for...

Use & Care Guide
Page 5
... the microwave oven. Popcorn Popcorn is remembered for each of the microwave oven. Hot cooked food can be programmed. Keep Warm can be used by itself or can result in food poisoning or sickness. For optimal performance, wait at least 2 minutes. Activate child lock to lessen doneness. Replacing Filters and Light Bulbs ■ Grease filters: Remove grease filters from underside of microwave oven, and clean monthly. ■ Charcoal filter(s): Depending on some models) before or after convection cooking or grilling (on the model...
... the microwave oven. Popcorn Popcorn is remembered for each of the microwave oven. Hot cooked food can be programmed. Keep Warm can be used by itself or can result in food poisoning or sickness. For optimal performance, wait at least 2 minutes. Activate child lock to lessen doneness. Replacing Filters and Light Bulbs ■ Grease filters: Remove grease filters from underside of microwave oven, and clean monthly. ■ Charcoal filter(s): Depending on some models) before or after convection cooking or grilling (on the model...

Use & Care Guide
Page 6
... microwave oven being used. for some models) ■ Rack spacer ■ Rack hook ■ Grease filters ■ Charcoal filter(s) ■ Cooktop light bulb ■ Cavity light bulb ■ Steamer vessel ■ Pan and handle ■ Convection rack (provided with some models) ■ Grill rack (provided with repeated use . The bread should toast dark brown. If it , then firmly close the door, then start the cycle. ■ Control Make sure control is set properly. The microwave oven's cooling fan (on during convection cooking...
... microwave oven being used. for some models) ■ Rack spacer ■ Rack hook ■ Grease filters ■ Charcoal filter(s) ■ Cooktop light bulb ■ Cavity light bulb ■ Steamer vessel ■ Pan and handle ■ Convection rack (provided with some models) ■ Grill rack (provided with repeated use . The bread should toast dark brown. If it , then firmly close the door, then start the cycle. ■ Control Make sure control is set properly. The microwave oven's cooling fan (on during convection cooking...

Use & Care Guide
Page 8
... this major appliance is operated and maintained according to instructions attached to or furnished with the product, KitchenAid brand of purchase. 6. Outside the 50 United States and Canada, this User Instructions and model number information for product service if your model number and serial number on the label located on how to use of the microwave oven opening, behind the door. Repairs when your major appliance is used for other damage...
... this major appliance is operated and maintained according to instructions attached to or furnished with the product, KitchenAid brand of purchase. 6. Outside the 50 United States and Canada, this User Instructions and model number information for product service if your model number and serial number on the label located on how to use of the microwave oven opening, behind the door. Repairs when your major appliance is used for other damage...
Dimension Guide
Page 1
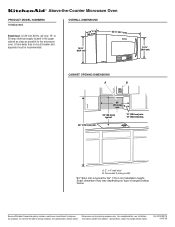
... to change materials and specifications without notice. A. 2" x 4" wall stud B. or 20-amp electrical supply located in the upper cabinet as close as possible to improve Dimensions are for 69" (175.3 cm) installation height. Grounded 3 prong outlet *33" (83.2 cm) is recommended. ® Above-the-Counter Microwave Oven PRODUCT MODEL NUMBERS KHMS2056S Electrical: A 120-volt, 60-Hz, AC-only, 15- A time-delay fuse or circuit breaker and separate circuit is...
... to change materials and specifications without notice. A. 2" x 4" wall stud B. or 20-amp electrical supply located in the upper cabinet as close as possible to improve Dimensions are for 69" (175.3 cm) installation height. Grounded 3 prong outlet *33" (83.2 cm) is recommended. ® Above-the-Counter Microwave Oven PRODUCT MODEL NUMBERS KHMS2056S Electrical: A 120-volt, 60-Hz, AC-only, 15- A time-delay fuse or circuit breaker and separate circuit is...

Installation Guide
Page 1
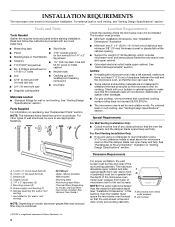
... Requirements" section for use above electric or gas cooking products up to Wall 8 Prepare Upper Cabinet 8 Install the Microwave Oven 9 Install Filters 10 Complete Installation 10 VENTING DESIGN SPECIFICATIONS 11 ASSISTANCE 12 Replacement Parts 12 MICROWAVE HOOD COMBINATION SAFETY Your safety and the safety of your appliance. These installation instructions cover different models. We have provided many important safety messages in Rear Wall 7 Attach Mounting Plate to and including 36" (91.4 cm) wide. MICROWAVE HOOD COMBINATION INSTALLATION INSTRUCTIONS This product is...
... Requirements" section for use above electric or gas cooking products up to Wall 8 Prepare Upper Cabinet 8 Install the Microwave Oven 9 Install Filters 10 Complete Installation 10 VENTING DESIGN SPECIFICATIONS 11 ASSISTANCE 12 Replacement Parts 12 MICROWAVE HOOD COMBINATION SAFETY Your safety and the safety of your appliance. These installation instructions cover different models. We have provided many important safety messages in Rear Wall 7 Attach Mounting Plate to and including 36" (91.4 cm) wide. MICROWAVE HOOD COMBINATION INSTALLATION INSTRUCTIONS This product is...
Installation Guide
Page 2
... the microwave oven so that combined cooking surface rating does not exceed 55,000 BTU/hr. ■ The microwave oven is set for wall or roof venting. Toggle nuts (2) E. 1/4" x 2" lag screws (2) F. See Use and Care Guide.) NOTE: Depending on reordering, see "Installation Dimensions" in "Venting Design Specifications" section. NOTE: If the upper cabinet is deeper than the maximum allowable depth (see "Replacement Parts" section. A B C D E FG H Location Requirements Check the opening . ■ Support for...
... the microwave oven so that combined cooking surface rating does not exceed 55,000 BTU/hr. ■ The microwave oven is set for wall or roof venting. Toggle nuts (2) E. 1/4" x 2" lag screws (2) F. See Use and Care Guide.) NOTE: Depending on reordering, see "Installation Dimensions" in "Venting Design Specifications" section. NOTE: If the upper cabinet is deeper than the maximum allowable depth (see "Replacement Parts" section. A B C D E FG H Location Requirements Check the opening . ■ Support for...

Installation Guide
Page 3
... to whether the microwave oven is incompatible with household inverter power supplies. 3 or 20-amp electrical supply with a grounding plug. WARNING: Improper use an extension cord. Exact dimension may vary depending on type of electric shock by providing an escape wire for 69" (175.3 cm) installation height. Recommended: ■ A time-delay fuse or time-delay circuit breaker. ■ A separate circuit serving only this microwave oven is an inverter, and is properly...
... to whether the microwave oven is incompatible with household inverter power supplies. 3 or 20-amp electrical supply with a grounding plug. WARNING: Improper use an extension cord. Exact dimension may vary depending on type of electric shock by providing an escape wire for 69" (175.3 cm) installation height. Recommended: ■ A time-delay fuse or time-delay circuit breaker. ■ A separate circuit serving only this microwave oven is an inverter, and is properly...
Installation Guide
Page 4
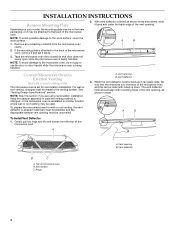
... the microwave oven, do not grip or use the door or door handle while the microwave oven is attached to the back of microwave oven B. A B Convert Microwave Oven to the work surface, cover the work surface. 1. Rings A. Top of the microwave oven, remove it and set for wall or roof venting, the vent deflector (L-shaped metal bar) must be used. If the mounting plate is being handled. Vent opening B. Vent deflector 3. NOTE: Skip this section if you are using recirculation installation. Vent...
... the microwave oven, do not grip or use the door or door handle while the microwave oven is attached to the back of microwave oven B. A B Convert Microwave Oven to the work surface, cover the work surface. 1. Rings A. Top of the microwave oven, remove it and set for wall or roof venting, the vent deflector (L-shaped metal bar) must be used. If the mounting plate is being handled. Vent opening B. Vent deflector 3. NOTE: Skip this section if you are using recirculation installation. Vent...
Installation Guide
Page 5
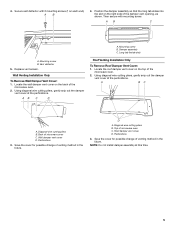
... possible change of the microwave oven. 2. Long tab (inside slot) A. Mounting screw B. A B 4. Then secure with 2 mounting screws (1 on the right side of the microwave oven. 2. Mounting screw B. Diagonal wire cutting pliers B. Wall damper vent cover D. D A. Perforations 3. AB C D Roof Venting Installation Only To Remove Roof Damper Vent Cover: 1. Diagonal wire cutting pliers B. Damper assembly C. Wall Venting Installation Only To Remove Wall Damper Vent Cover: 1. Vent deflector 5. Using diagonal wire cutting pliers, gently snip out the damper vent cover at...
... possible change of the microwave oven. 2. Long tab (inside slot) A. Mounting screw B. A B 4. Then secure with 2 mounting screws (1 on the right side of the microwave oven. 2. Mounting screw B. Diagonal wire cutting pliers B. Wall damper vent cover D. D A. Perforations 3. AB C D Roof Venting Installation Only To Remove Roof Damper Vent Cover: 1. Diagonal wire cutting pliers B. Damper assembly C. Wall Venting Installation Only To Remove Wall Damper Vent Cover: 1. Vent deflector 5. Using diagonal wire cutting pliers, gently snip out the damper vent cover at...
Installation Guide
Page 6
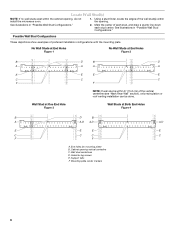
... cabinet opening, do not install the microwave oven. 1. Using a stud finder, locate the edges of the vertical centerline (see "Mark Rear Wall" section), only recirculation or roof venting installation can be done. See illustrations in "Possible Wall Stud Configurations." End holes (on mounting plate) B. Cabinet opening . Wall stud centerlines D. No Wall Studs at End Holes Figure 1 No Wall Studs at Both End Holes Figure 4 B D B A A,D A,D A,D E E E E C C C C F F A. Mounting plate center markers 6 Holes for lag screws E. Locate Wall...
... cabinet opening, do not install the microwave oven. 1. Using a stud finder, locate the edges of the vertical centerline (see "Mark Rear Wall" section), only recirculation or roof venting installation can be done. See illustrations in "Possible Wall Stud Configurations." End holes (on mounting plate) B. Cabinet opening . Wall stud centerlines D. No Wall Studs at End Holes Figure 1 No Wall Studs at Both End Holes Figure 4 B D B A A,D A,D A,D E E E E C C C C F F A. Mounting plate center markers 6 Holes for lag screws E. Locate Wall...
Installation Guide
Page 7
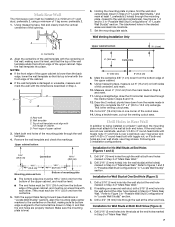
... mm) hole through the wall template. 4. Mark Rear Wall The microwave oven must be installed on the wall, making sure its top is level with the front edge of the cabinet. ■ If the wall template is the venting cutout area. 13. Using measuring tape, find the wall stud centerline(s) drawn in Step 6 of "Mark Rear Wall." Holding the mounting plate in the shaded areas are 3 installation configurations. The blackened holes...
... mm) hole through the wall template. 4. Mark Rear Wall The microwave oven must be installed on the wall, making sure its top is level with the front edge of the cabinet. ■ If the wall template is the venting cutout area. 13. Using measuring tape, find the wall stud centerline(s) drawn in Step 6 of "Mark Rear Wall." Holding the mounting plate in the shaded areas are 3 installation configurations. The blackened holes...
Installation Guide
Page 8
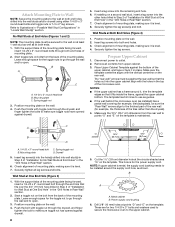
... mounting plate. This hole is metal, the supply cord bushing needs to the thickest part of the rear wall (for No Wall Studs at One End Hole" in the "Drill Holes in Step 3 of mounting plate. 2. Metal cabinet B. Power supply cord bushing 6. Mounting plate C. Insert a lag screw into the wall studs and/or drywall using either 1/4-20 x 3" round-head bolts and toggle nuts or 1/4 x 2" lag screws. If installing on the template...
... mounting plate. This hole is metal, the supply cord bushing needs to the thickest part of the rear wall (for No Wall Studs at One End Hole" in the "Drill Holes in Step 3 of mounting plate. 2. Metal cabinet B. Power supply cord bushing 6. Mounting plate C. Insert a lag screw into the wall studs and/or drywall using either 1/4-20 x 3" round-head bolts and toggle nuts or 1/4 x 2" lag screws. If installing on the template...
Installation Guide
Page 9
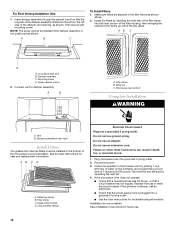
... upper cabinet. 5. Handle the microwave oven gently. 1. NOTE: To avoid damage to do not grip or use the door or door handle while the microwave oven is being handled. 4. Loosen mounting plate screws. Support tabs A. 1/4-20 x 3" flat-head bolts 9 With front of the microwave oven. Push microwave oven against mounting plate and hold in the wall cutout. 6. Repeat steps 3-6. 10. With the microwave oven centered, and with at one person holding it on Upper Cabinet Template. 8. The...
... upper cabinet. 5. Handle the microwave oven gently. 1. NOTE: To avoid damage to do not grip or use the door or door handle while the microwave oven is being handled. 4. Loosen mounting plate screws. Support tabs A. 1/4-20 x 3" flat-head bolts 9 With front of the microwave oven. Push microwave oven against mounting plate and hold in the wall cutout. 6. Repeat steps 3-6. 10. With the microwave oven centered, and with at one person holding it on Upper Cabinet Template. 8. The...
Installation Guide
Page 10
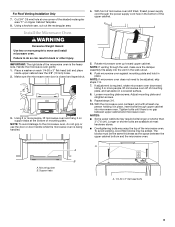
... cord. If the microwave oven does not operate: ■ Check that a household fuse has not blown, or that the power supply cord is plugged into the inner portion of the filter housing, then swinging the outside of the microwave hood combination. For Roof Venting Installation Only 1. Insert damper assembly through the cabinet cutout so that the long tab of the damper assembly slides into place. AB C D A. Mounting screw D. Upper cabinet cutout 2. Microwave oven bottom Complete Installation WARNING A. Charcoal filter (black) Electrical...
... cord. If the microwave oven does not operate: ■ Check that a household fuse has not blown, or that the power supply cord is plugged into the inner portion of the filter housing, then swinging the outside of the microwave hood combination. For Roof Venting Installation Only 1. Insert damper assembly through the cabinet cutout so that the long tab of the damper assembly slides into place. AB C D A. Mounting screw D. Upper cabinet cutout 2. Microwave oven bottom Complete Installation WARNING A. Charcoal filter (black) Electrical...
Installation Guide
Page 12
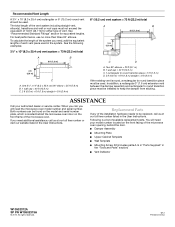
... our toll free number listed in the User Instructions. ASSISTANCE Call your model number located on the front frame of the microwave oven opening, behind the door. ■ Damper Assembly ■ Mounting Plate ■ Upper Cabinet Template ■ Wall Template ■ Mounting Screw Kit (includes parts A-G in "Parts Supplied" in the "Tools and Parts" section) ■ Vent Deflector W10502372A SP PN W10502375A © 2012. Both numbers can be found on the model and serial number plate, which is located behind the microwave oven door on the...
... our toll free number listed in the User Instructions. ASSISTANCE Call your model number located on the front frame of the microwave oven opening, behind the door. ■ Damper Assembly ■ Mounting Plate ■ Upper Cabinet Template ■ Wall Template ■ Mounting Screw Kit (includes parts A-G in "Parts Supplied" in the "Tools and Parts" section) ■ Vent Deflector W10502372A SP PN W10502375A © 2012. Both numbers can be found on the model and serial number plate, which is located behind the microwave oven door on the...

Warranty Information
Page 1
... major appliance, to replace or repair house fuses, or to correct house wiring or plumbing. 2. Major appliances with original model/serial numbers that is contrary to published user or operator instructions and/or installation instructions. 4. DISCLAIMER OF IMPLIED WARRANTIES; Have your major appliance. Consumable parts are excluded from warranty coverage. 3. KITCHENAID SHALL NOT BE LIABLE FOR INCIDENTAL OR CONSEQUENTIAL DAMAGES. THIS WARRANTY GIVES YOU SPECIFIC LEGAL RIGHTS, AND...
... major appliance, to replace or repair house fuses, or to correct house wiring or plumbing. 2. Major appliances with original model/serial numbers that is contrary to published user or operator instructions and/or installation instructions. 4. DISCLAIMER OF IMPLIED WARRANTIES; Have your major appliance. Consumable parts are excluded from warranty coverage. 3. KITCHENAID SHALL NOT BE LIABLE FOR INCIDENTAL OR CONSEQUENTIAL DAMAGES. THIS WARRANTY GIVES YOU SPECIFIC LEGAL RIGHTS, AND...


